Background
MCP (Model Context Protocol) originated from an article published by Anthropic in 2024: Introducing the Model Context Protocol. It is a standardized protocol for interacting with LLM models, allowing models to extend their capabilities. After the recent surge in popularity of Manus, attention on MCP has grown even further—it was only after that I learned about this protocol. In my view, this protocol is a milestone, unifying the communication standard between models and applications. It will have even broader application scenarios in the future, and many application vendors have already integrated the MCP protocol, such as Baidu Maps in China.
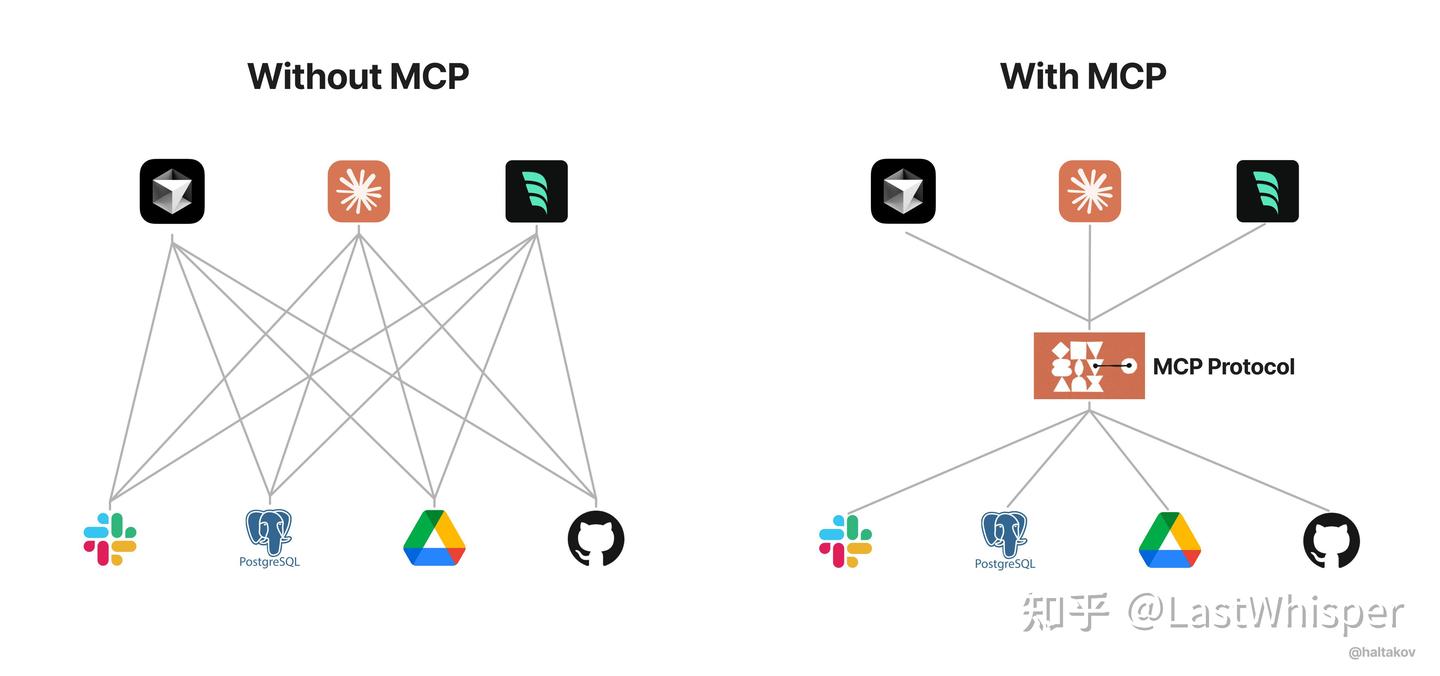
Borrowing the image from the article below, this diagram clearly illustrates what MCP does. For readers who are interested in MCP but not yet familiar with it, I recommend reading the article below.
https://zhuanlan.zhihu.com/p/29001189476
This article is both a learning record of my journey building an MCP server and a simple walkthrough of the process. Due to my limited technical expertise, this article does not cover mature development paradigms—it’s more of a record and summary of the overall workflow. I hope it can be helpful to readers who want to start developing MCP servers. This article uses Python as the programming language for the hands-on portion.
The server I built: a server that helps LLMs access wiki websites. Feel free to give it a Star!
https://github.com/shiquda/mediawiki-mcp-server
This project was inspired by a game I’ve been playing recently, Noita. As a beginner, I frequently need to look up the game’s wiki. So I went overboard for a small convenience decided to use MCP technology to let the LLM read and summarize wiki pages for me. And that’s how this article came to be 😄
Prerequisites
Before reading and practicing, I assume the reader has the following abilities:
- Familiarity with the Python programming language
- Access to a stable LLM provider that supports Tool Calls, as well as a client that supports the MCP protocol
- Familiarity with the basics of Git and GitHub
- A reliable network connection
For point 2, if you don’t have a suitable option yet, here are my recommendations:
- Volcano Engine - New Growth Engine for the Cloud: A platform by ByteDance offering good stability and competitive pricing. You can use the DeepSeek model, which supports tool-calling.
- Cherry Studio Official Website - All-in-one AI Assistant: An open-source, free desktop LLM chat application that supports multiple LLM providers and now supports the MCP protocol. (I’ve contributed to this project, so consider this a small plug :)
I trust that registering and configuring these two won’t be an issue for readers—please look up the setup guides on your own.
Main Content
Environment Setup
For developing MCP servers in Python, the mainstream tool is currently uv, an efficient package manager written in Rust that supports virtual environment management, running and installing Python applications, project management, project building, and more. To learn more, you can read the official documentation.
Please install and configure uv on your own. You can refer to this article:
Python Package Management Made Easy: A Quick Guide to uv - wang_yb - cnblogs
We’ll also need the node environment for testing the server.
Initialization
Use uv to initialize the project.
1 | uv init <project_name> |
Create a virtual environment:
1 | uv venv |
And activate it using the method appropriate for your platform.
Use uv to add dependencies:
1 | uv add "mcp[cli]" httpx |
For other MCP projects you’ve cloned, you can use the following command to install dependencies:
1 | uv sync |
Project Structure
Below is a minimal project structure (some files omitted) for your reference.
1 | mediawiki-mcp-server |
pyproject.toml is the configuration file for the entire project, and we need to make the appropriate modifications to it.
In addition to the existing project name, version, etc., we also need to add the following lines for running and building the project:
1 | [build-system] |
Now it’s time to start writing a simple MCP server! For more detailed information, you can refer to the following sources:
For Server Developers - Model Context Protocol
We’ll create a main.py file in /src/<name> to hold the main logic of the MCP server.
For the simplest server, you can follow the example below:
1 | from mcp.server.fastmcp import FastMCP |
In short, you just need to focus on implementing a Tool interface. For tools exposed to the model, decorate them with @mcp.tool(). The call parameters are the function’s input parameters, and the usage instructions go in the function’s docstring.
Now let’s think from the user’s perspective. When users use your server, they can configure three main parts:

- Command. The main options are
uvx/uv,npx, anddocker. Since we’re using Python, this is typically filled in withuvx/uv. - Arguments. This part is passed to the server as command-line arguments, so we need to handle these arguments before
mcp.runstarts. - Environment variables. We also need to check for required environment variables before startup.
Therefore, we need to use arguments or environment variables to customize the server and read data. For example, for services that require authentication, we can have users configure their credentials in the environment variables section; custom parameters can be passed via command-line arguments.
Testing
After writing the logic, it’s time to test.
Step 1: First, test using the official MCP testing tool. It’s very simple to use:
1 | npx @modelcontextprotocol/inspector uv run <name> |
After running it, open the address shown in your browser to start debugging.
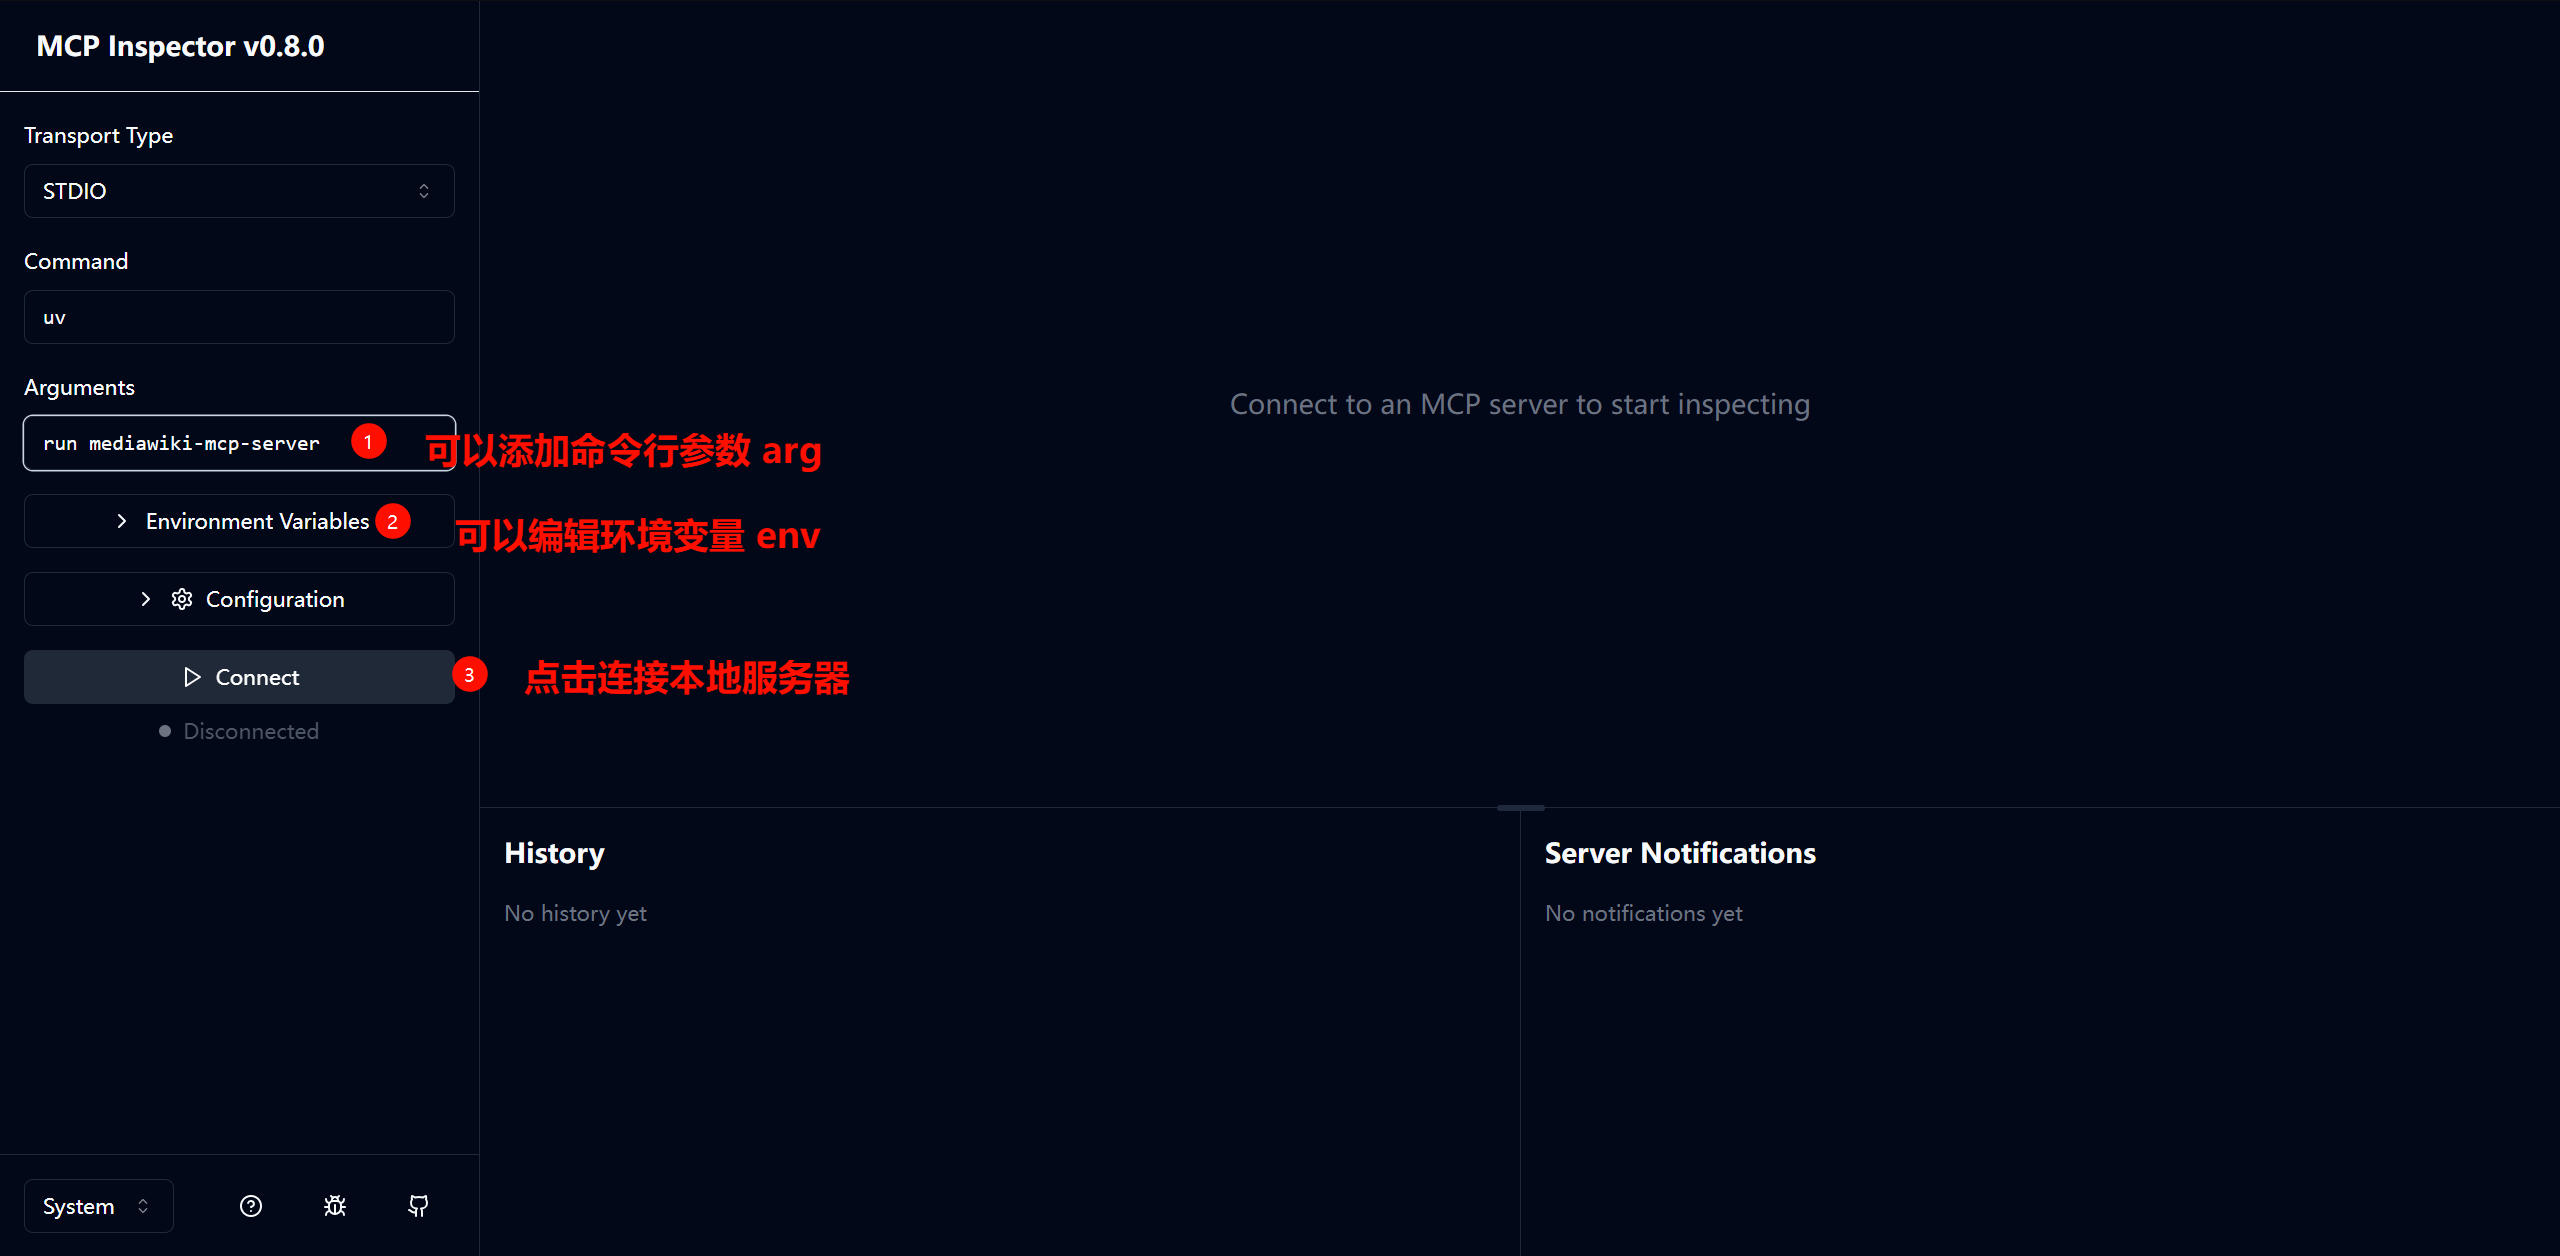
For our simple project, the main thing to test is the Tool functionality.
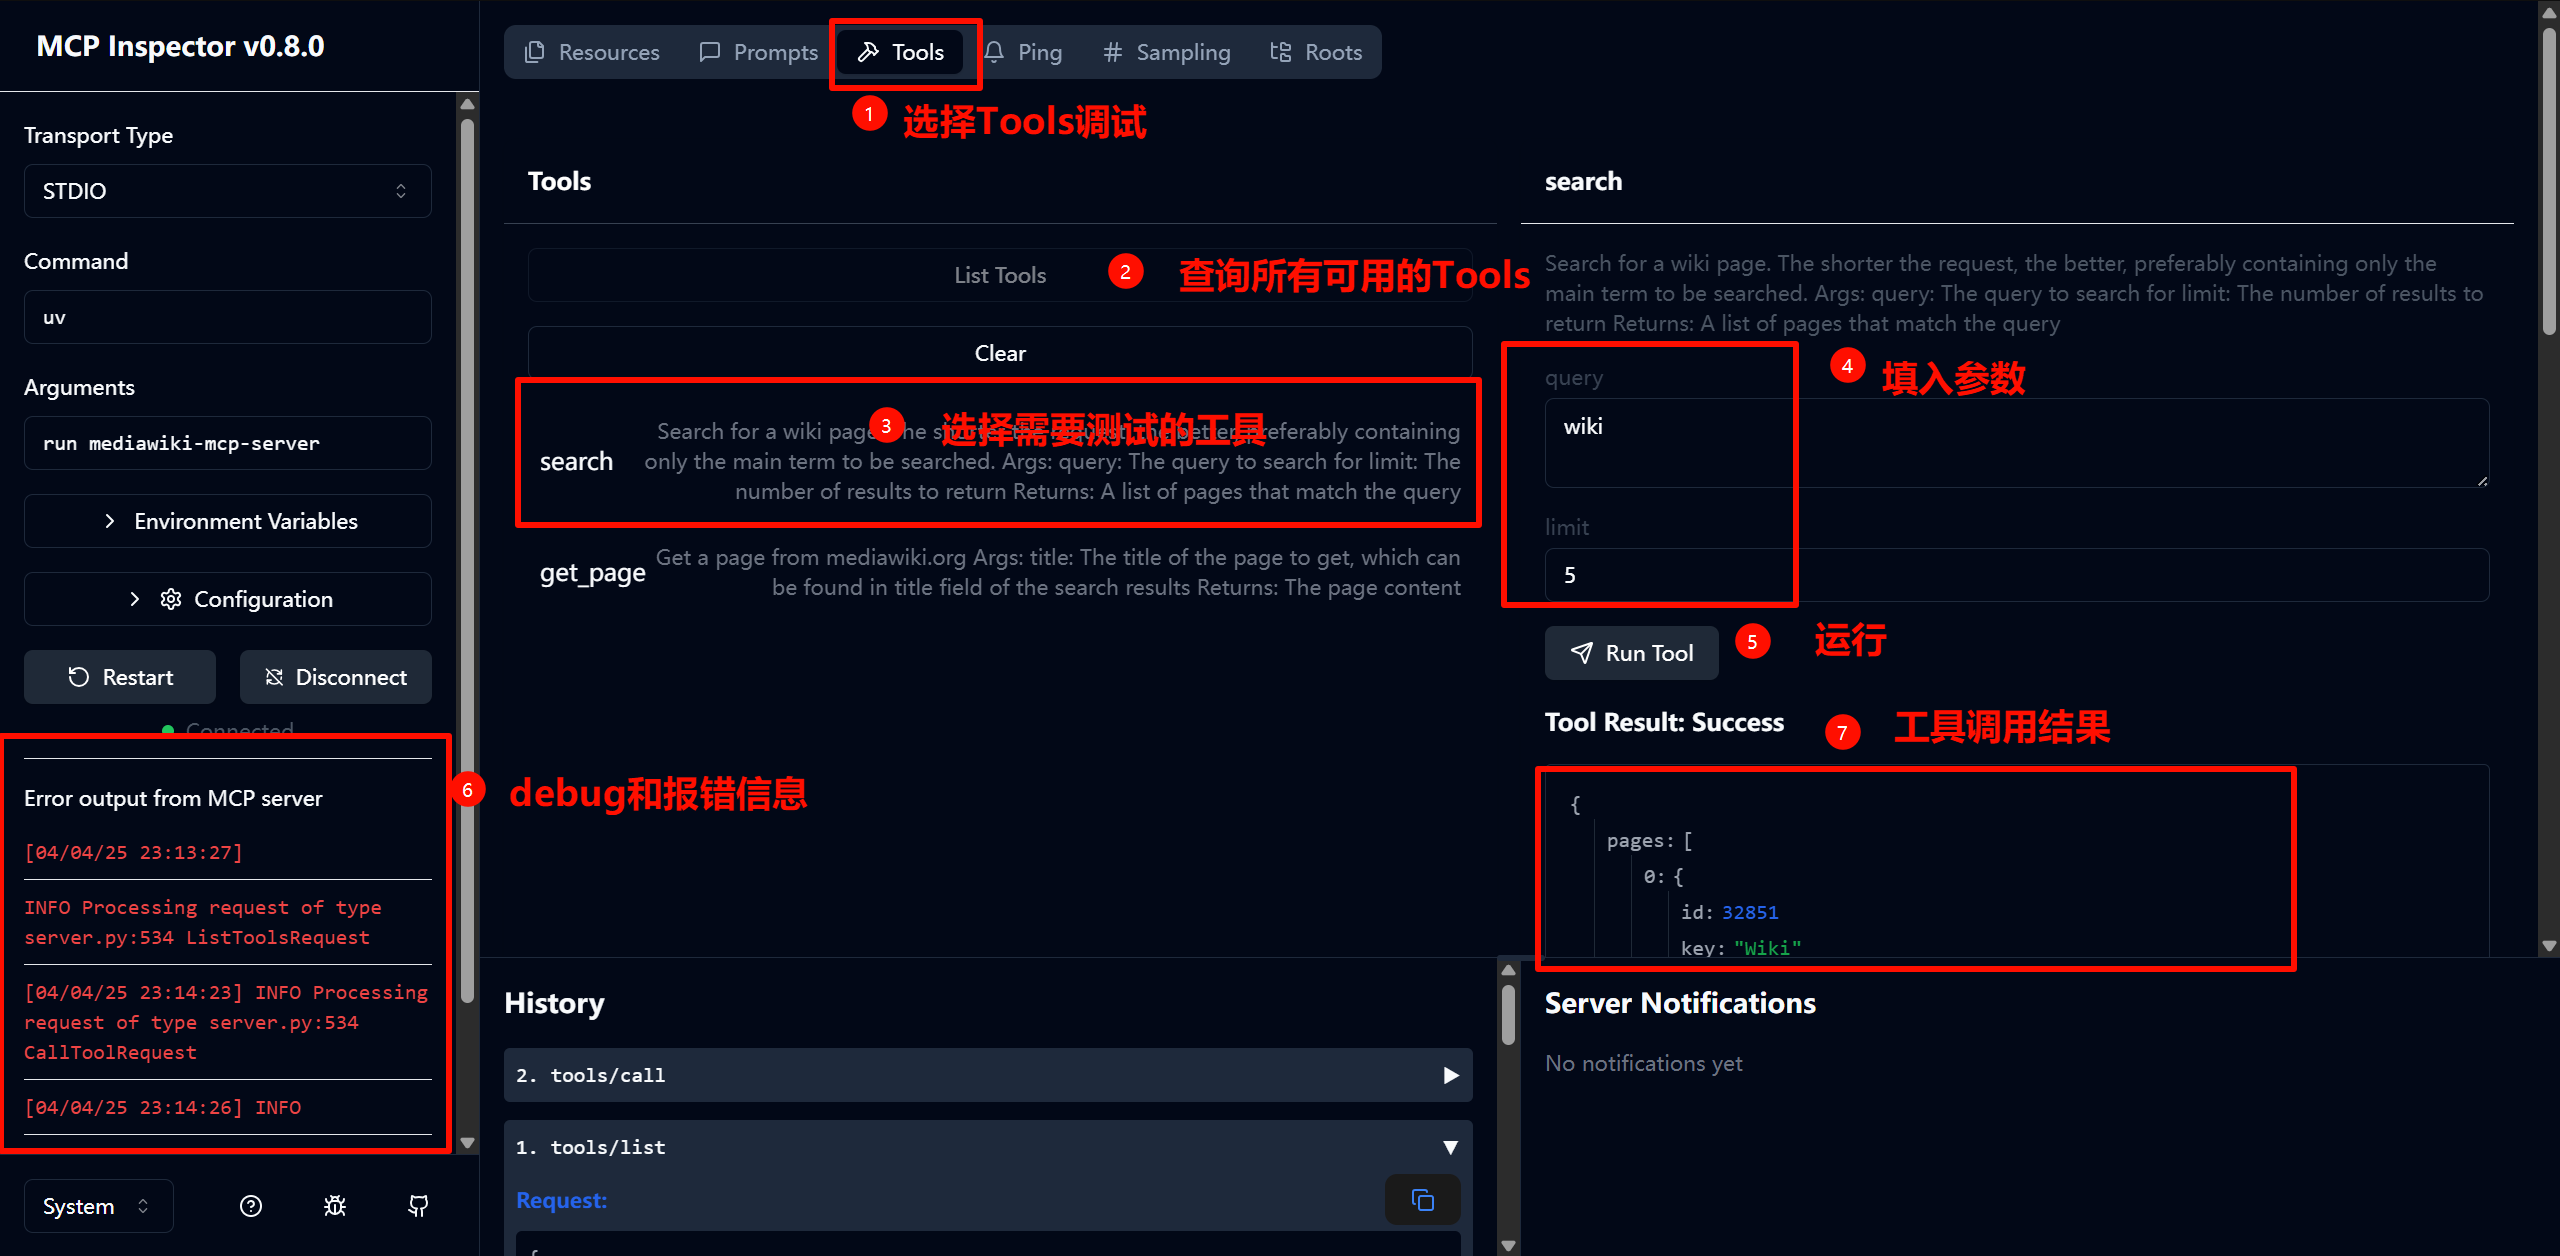
Step 2: After testing is complete, we can connect to a client for further testing. This step mainly checks whether the functionality meets expectations, whether the LLM can invoke tools as intended, and whether any unforeseen issues arise.
For local development and debugging, one thing to note: since we haven’t packaged the final product to PyPI yet, we need to add command-line arguments for local debugging. You can refer to the example below:
Command: uv
Arguments:
1 | "args": [ |
Building
After testing, we can consider publishing to PyPI so other users can easily download and use it.
In this article, we use uv with GitHub Actions for automated builds. But before the official build, we need to test locally:
1 | uv build |
If everything goes well, you should see the build artifacts in the project’s /dist directory.
Once everything is working, go to https://pypi.org/ to set things up. If you don’t have an account, you can register one first.
PyPI now supports automated builds via “trusted” publishers. We’ll configure this using the GitHub platform.
Go to Trusted Publisher Management · PyPI and find Add a new pending publisher.
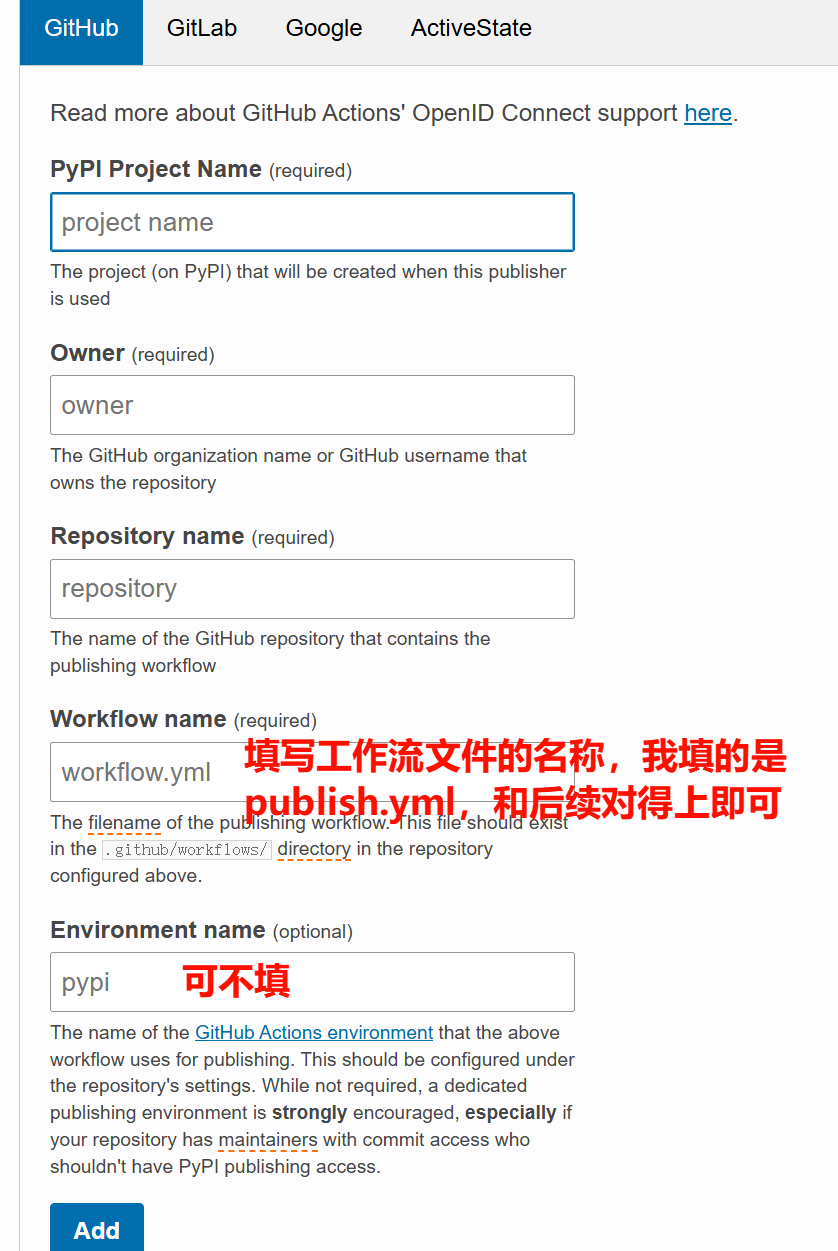
After adding it, we create .github/workflows/publish.yml in the project. Note that the YAML filename needs to match what you specified in the previous step.
For the workflow file, you can refer to the example below:
1 | name: Publish Python Package to PyPI when a Release is Created |
This is configured to trigger the build when a Release is created on GitHub, so when building, you’ll need to manually create a Release in the project. The workflow can also be changed to trigger on tag pushes—feel free to modify it as you see fit.
Once successfully published to PyPI, you can invoke it in your client using the following:
1 | "command": "uvx", |
Sharing
Want to recommend your MCP server to others? Here are a few common MCP discovery platforms where you can submit your server to help more users find and try it out.
- https://glama.ai/mcp/servers, related to punkpeye/awesome-mcp-servers: A collection of MCP servers.
- https://mcp.so/
References
Introduction - Model Context Protocol
PyPI · The Python Package Index
Publishing a Python Package from GitHub to PyPI in 2024
https://pypi.org/manage/account/publishing/
https://github.com/punkpeye/awesome-mcp-servers