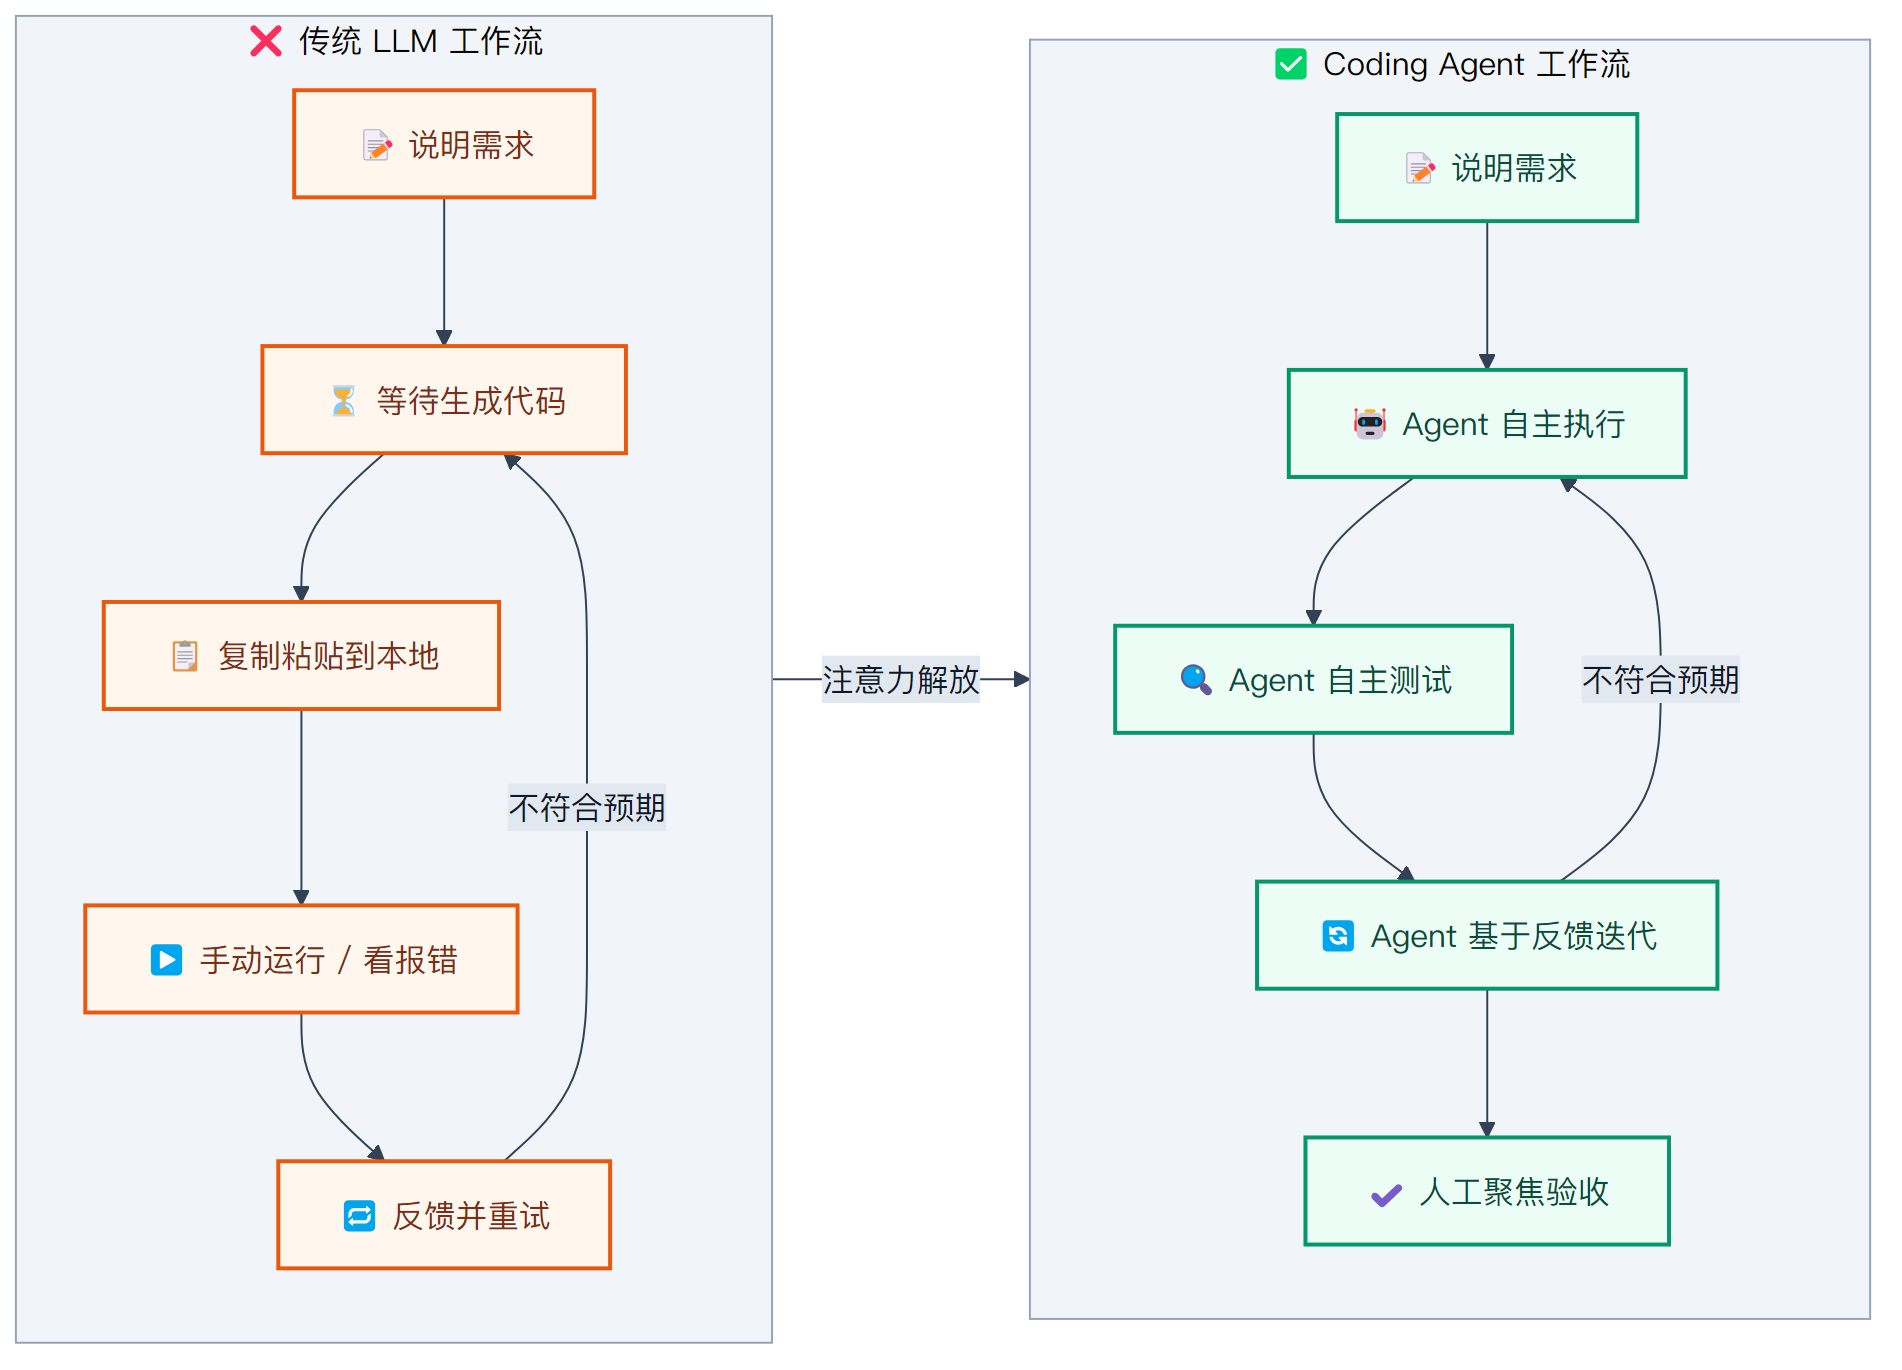
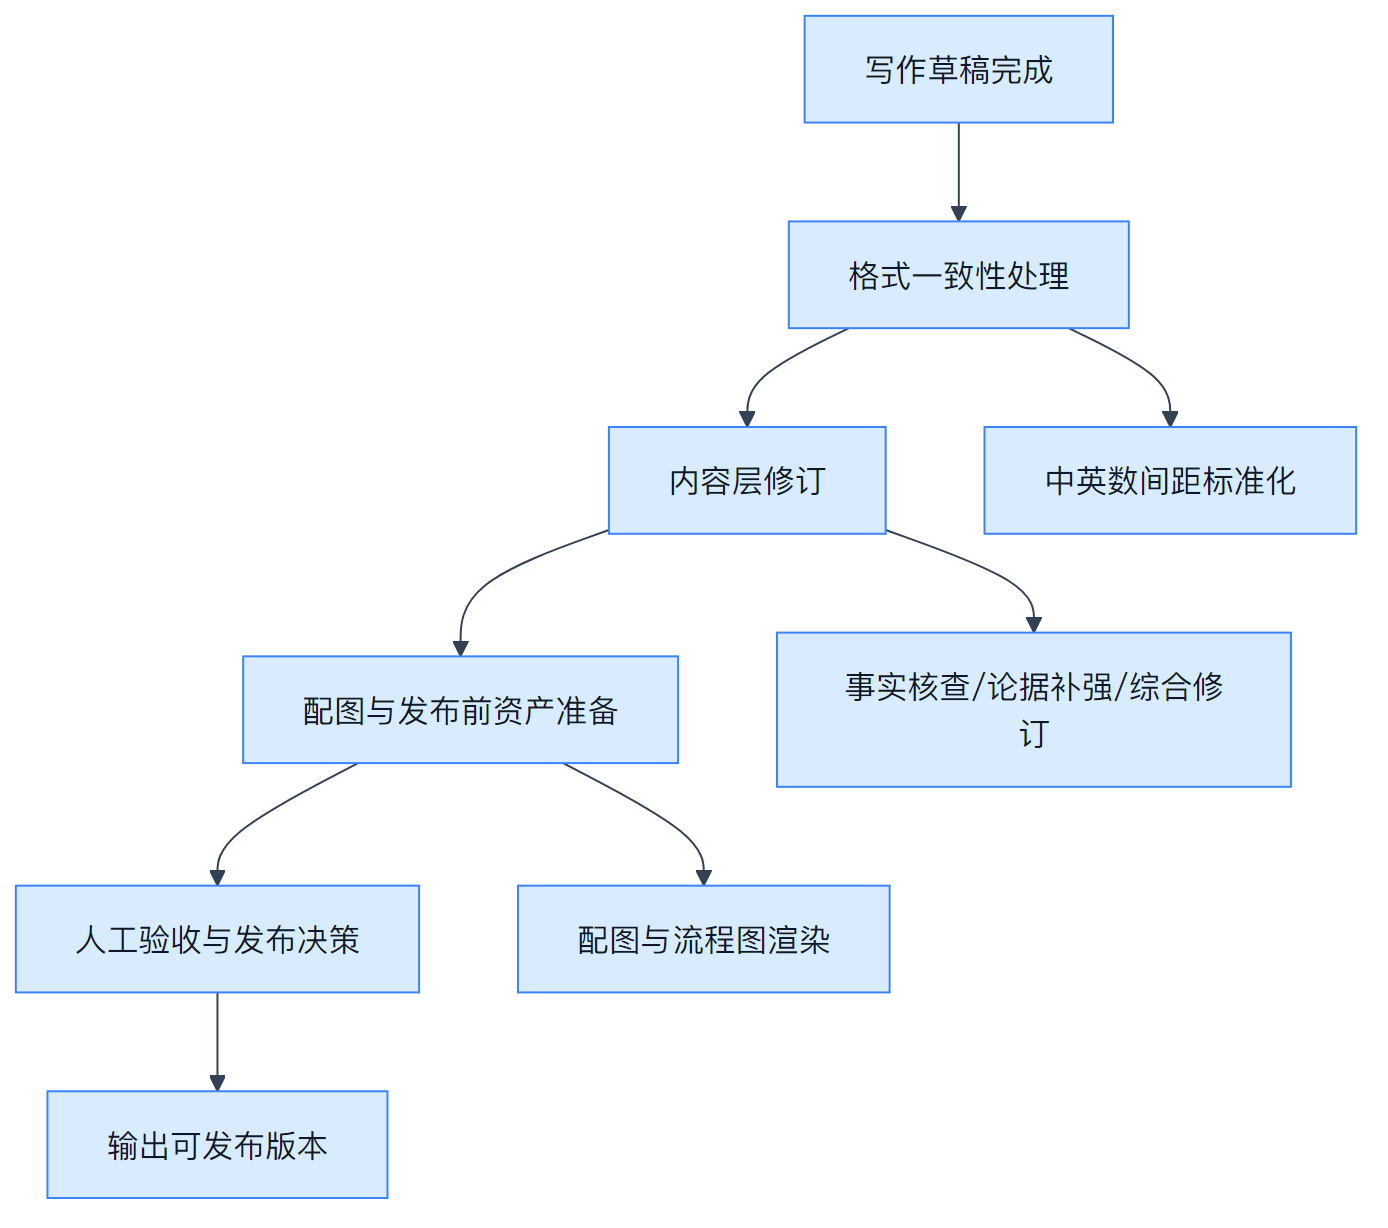
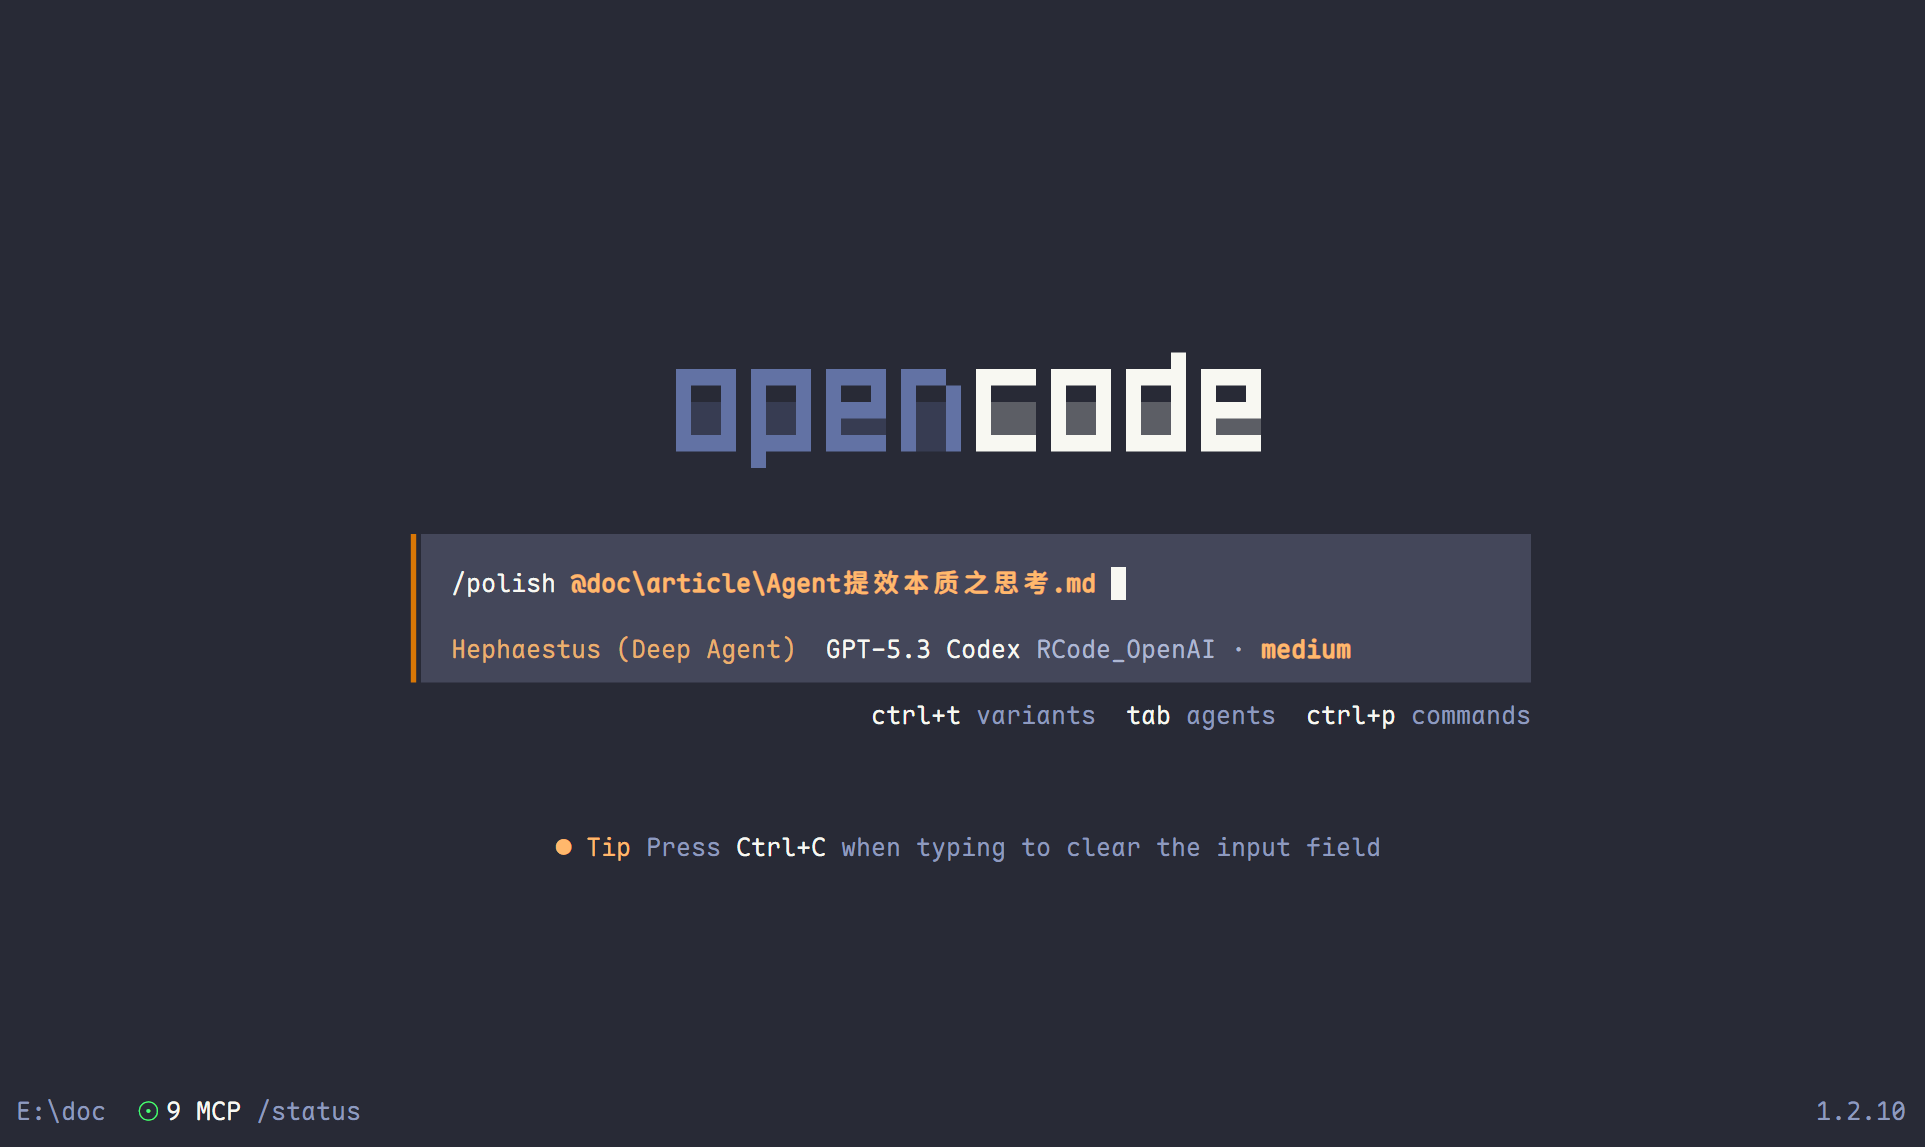
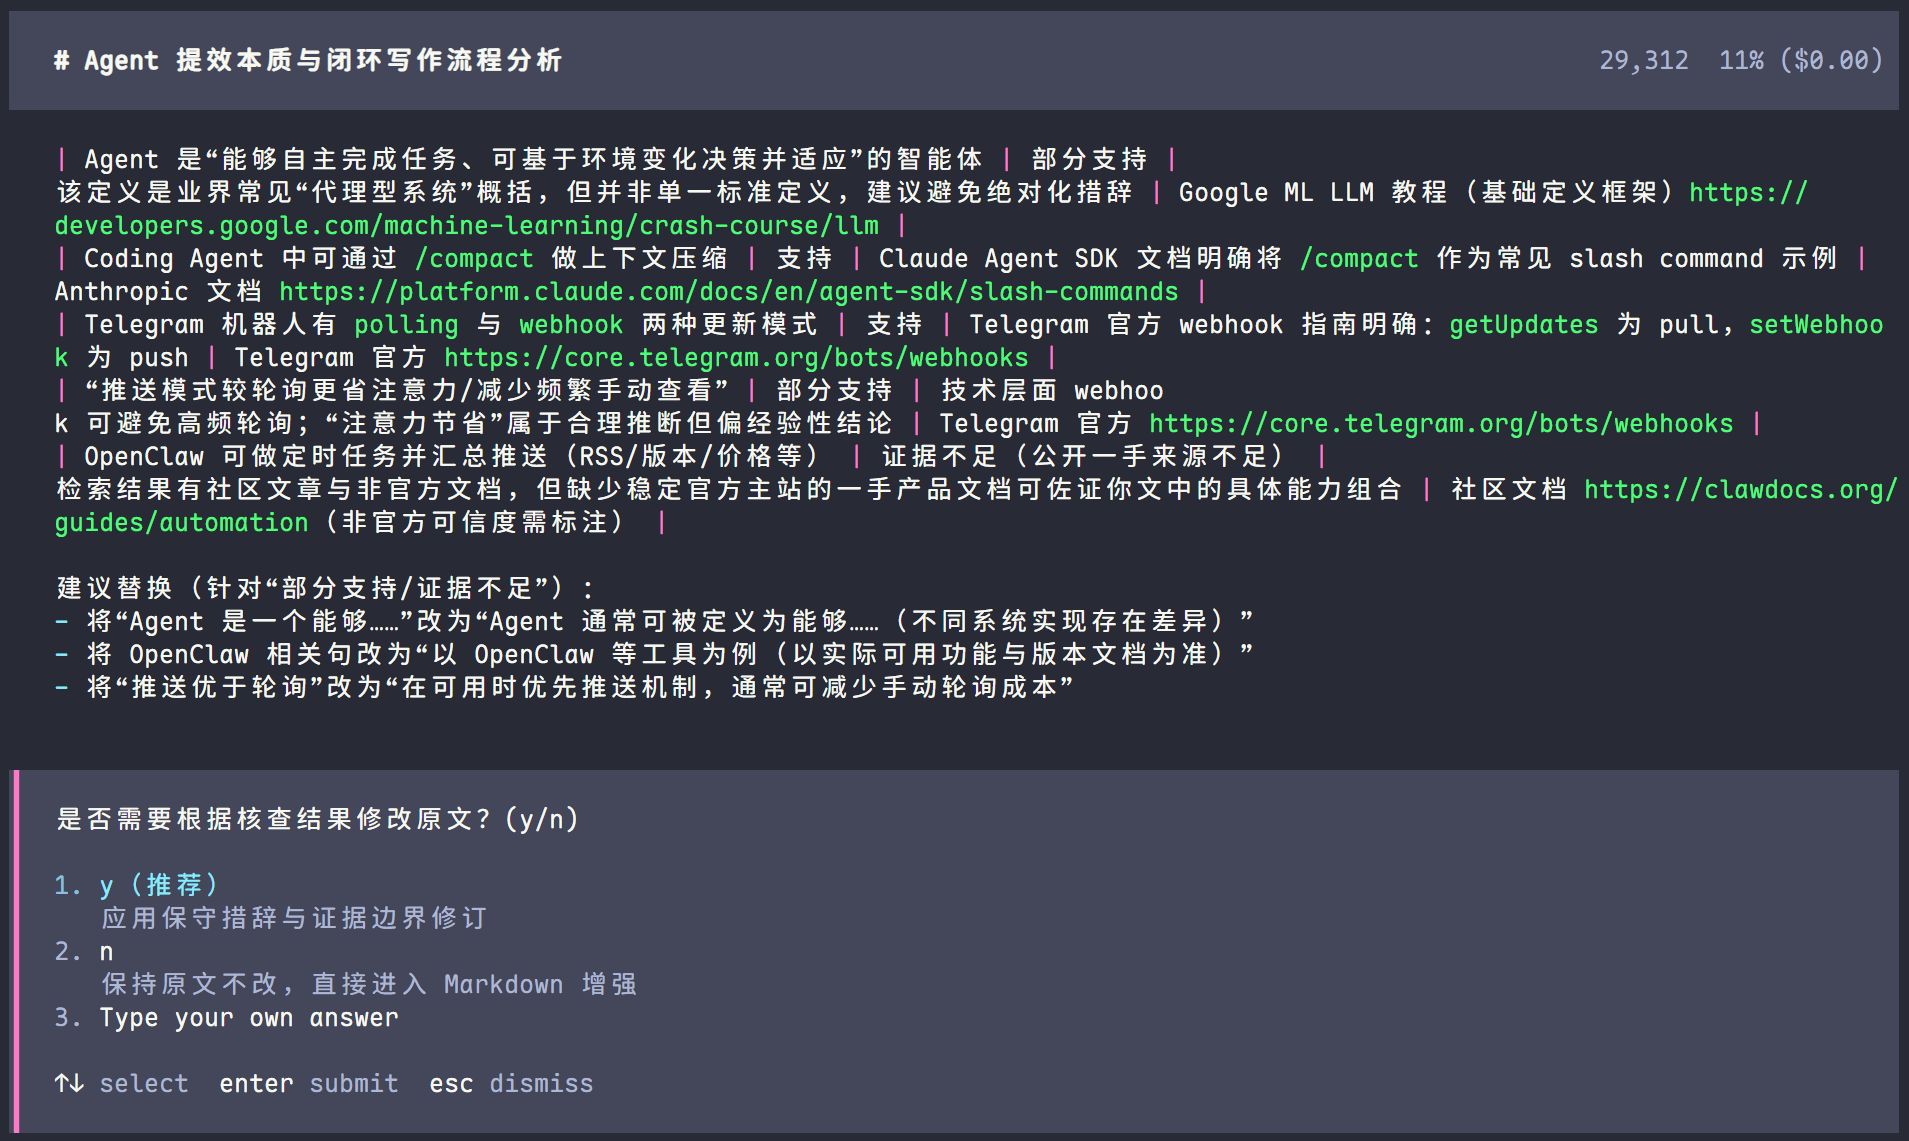
<?xml version="1.0" encoding="utf-8"?>
<feed xmlns="http://www.w3.org/2005/Atom">
  <author>
    <name>shiquda</name>
  </author>
  <generator uri="https://hexo.io/">Hexo</generator>
  <id>https://shiquda.link/</id>
  <link href="https://shiquda.link/" rel="alternate"/>
  <link href="https://shiquda.link/en/atom.xml" rel="self"/>
  <rights>All rights reserved 2026, shiquda</rights>
  <subtitle>Read with Wonder, Think with Nonsense, Create with Fun.</subtitle>
  <title>shiquda</title>
  <updated>2026-08-17T02:00:00.000Z</updated>
  <entry>
    <author>
      <name>shiquda</name>
    </author>
    <category term="教程" scheme="https://shiquda.link/categories/%E6%95%99%E7%A8%8B/"/>
    <category term="教程" scheme="https://shiquda.link/tags/%E6%95%99%E7%A8%8B/"/>
    <category term="AI" scheme="https://shiquda.link/tags/AI/"/>
    <category term="Agent" scheme="https://shiquda.link/tags/Agent/"/>
    <content>
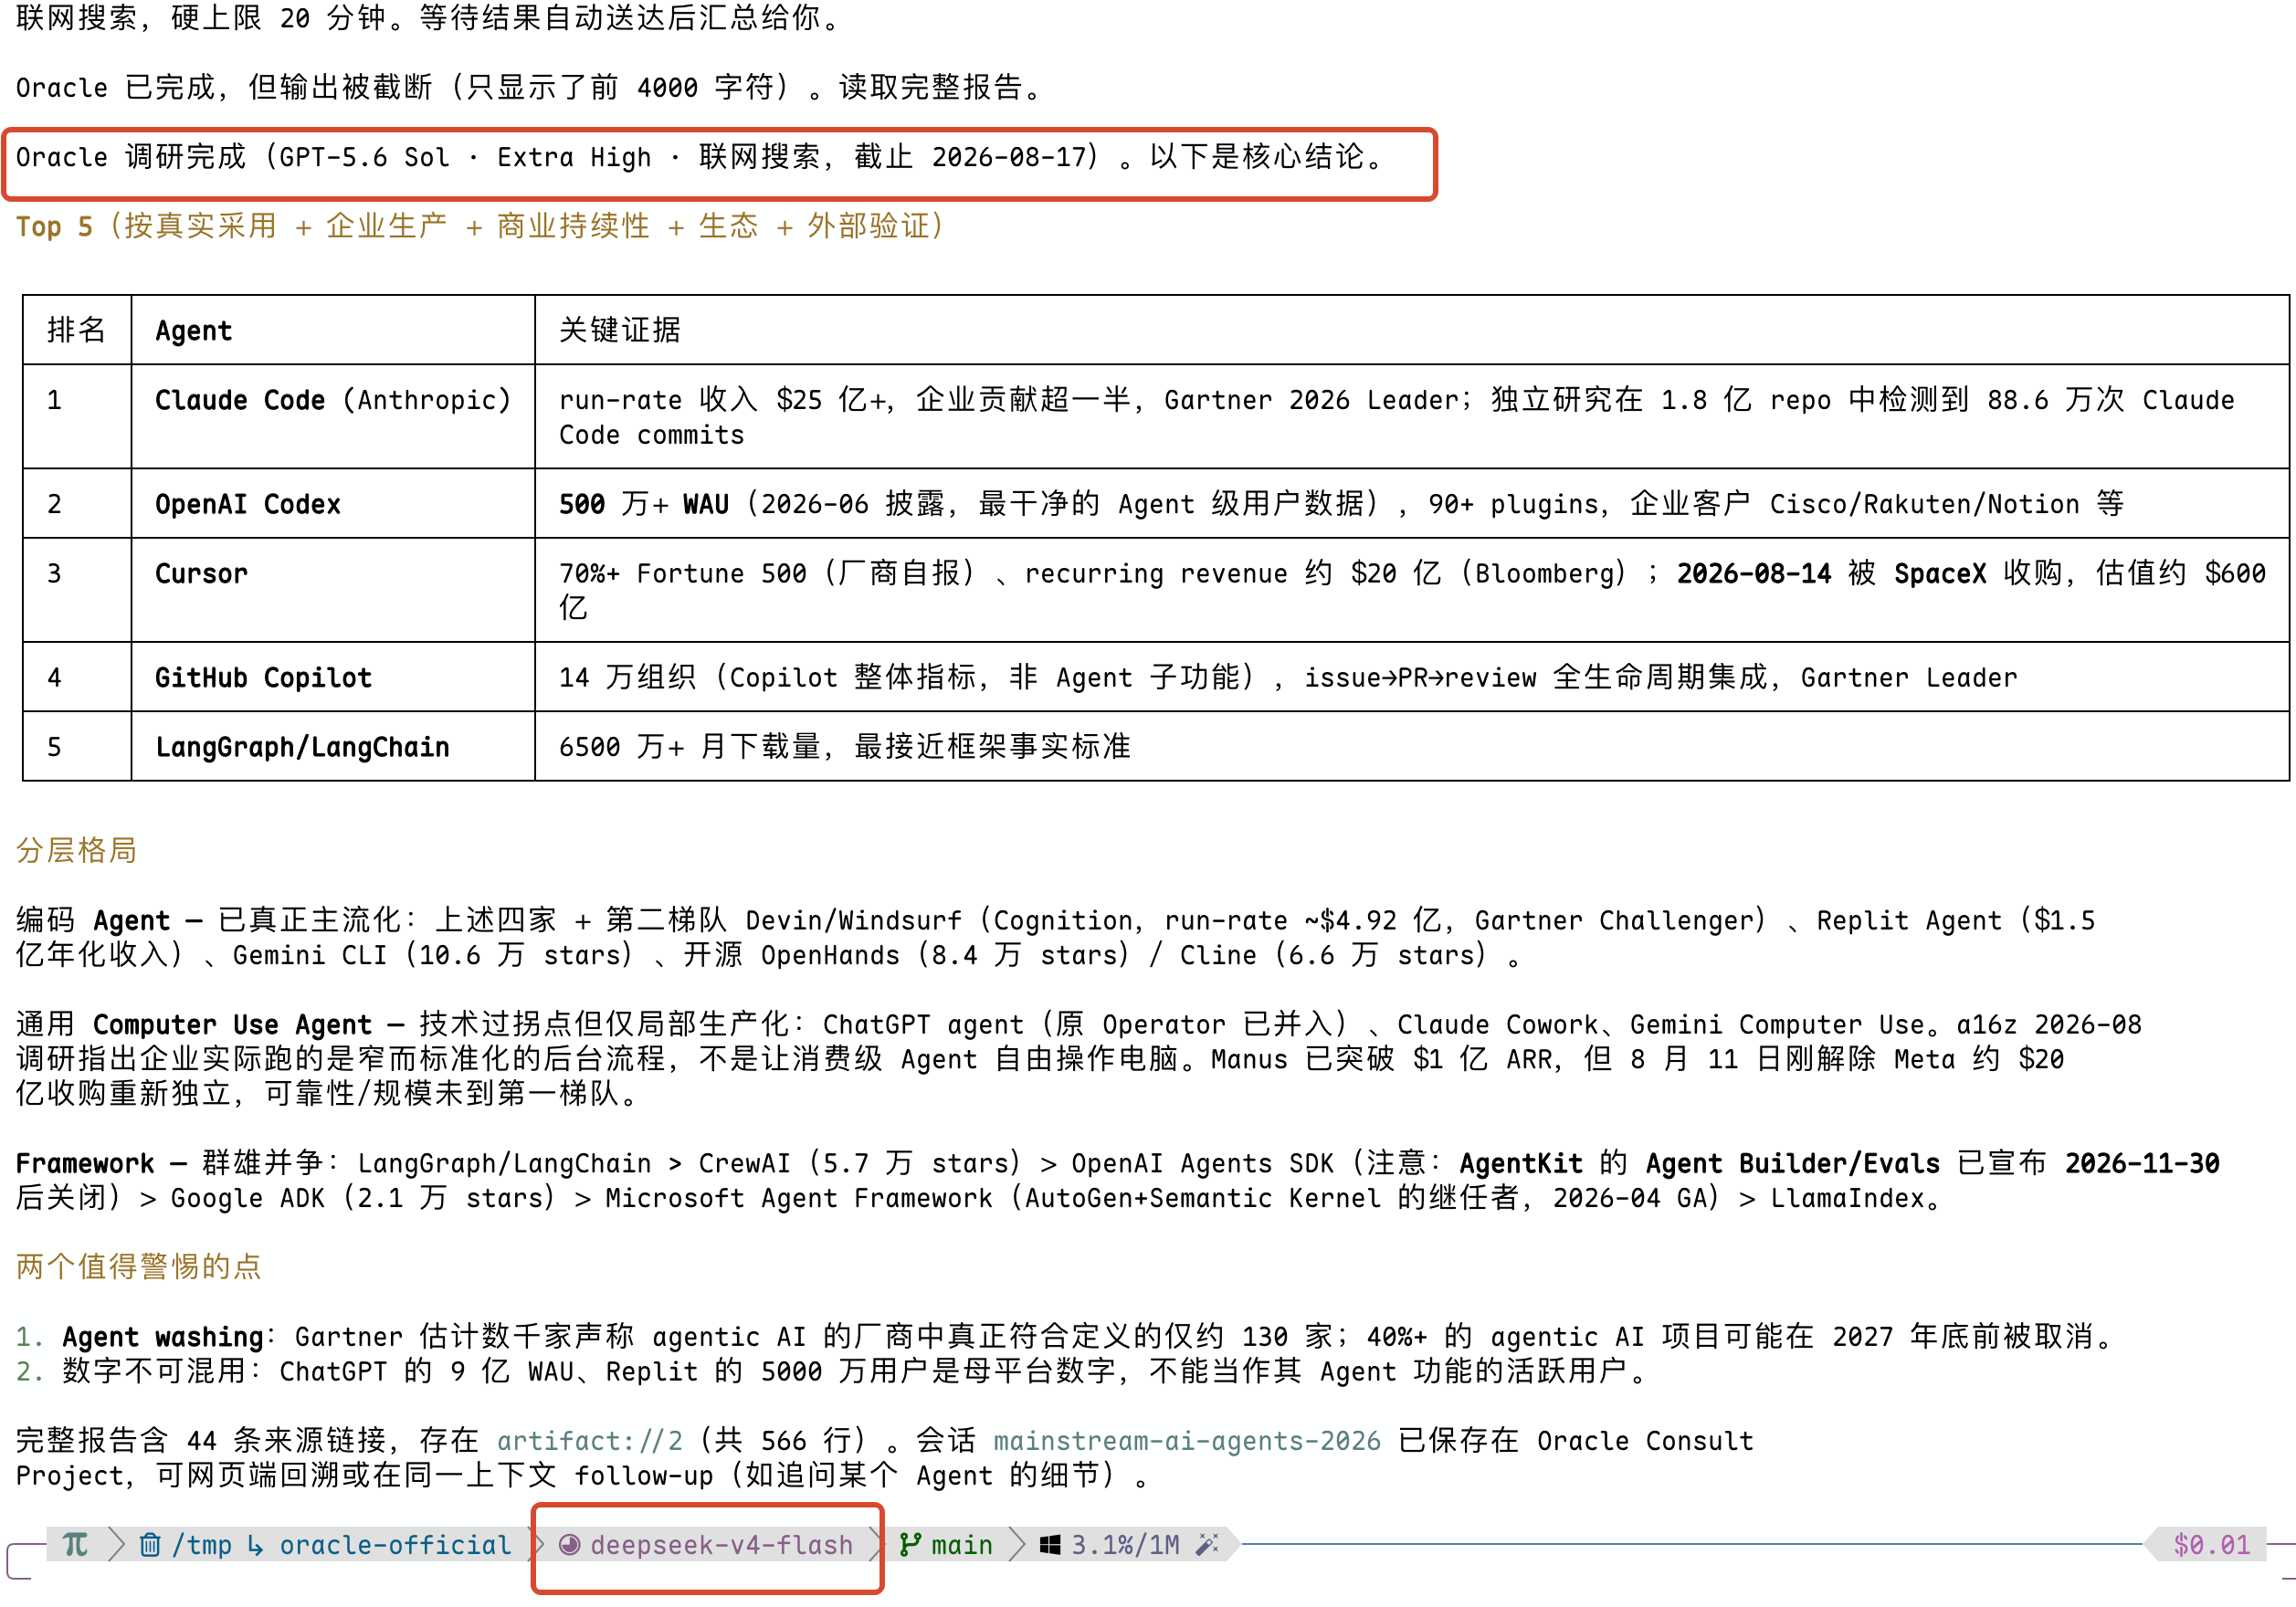
      <![CDATA[<p><img src="https://cdn.jsdmirror.com/gh/shiquda/images@main/imgs/compressed_00-oracle-comparison-14622ff7.png" alt="The automated loop between Agents and the ChatGPT web interface—no manual execution required" loading="lazy"></p><p><strong>Here’s a quota-saving trick that lets any Agent “call” 5.6 Sol for free</strong>—perfect if you have your own paid ChatGPT account.</p><p>As we know, having conversations on the ChatGPT web interface doesn’t consume any Codex quota. We often ask ChatGPT on the web to handle web searches, deep thinking, and similar tasks, then forward its answers to an Agent. <strong>But this entire mechanical routine can be fully automated.</strong></p><p>If your ChatGPT web account and Codex account are the same, you can simply use <code>@ chat</code> inside Codex to transfer context quickly. Unfortunately, my Codex account isn’t the same as my web account—the web side is just a Team account. So I wondered: is there a way to achieve the same thing quickly in this situation?</p><p>That’s when I found <a href="https://github.com/steipete/oracle">Oracle</a>.</p><blockquote><p>In ancient Greece and Rome, an oracle was a place or person that conveyed divine prophecies. Information beyond human reach, answered through it.</p></blockquote><p>It uses browser automation to ask ChatGPT on the web for us and return structured replies. You can attach local files like code and screenshots as “attachments,” choose the model and reasoning effort (and yes, if you’re feeling fancy, you can even ask 5.6 Pro directly).</p><p>Install the project’s CLI, pair it with a Skill, and you can teach <strong>any</strong> Agent to use 5.6 Sol as a callable tool—giving it access to your context, web browsing, and other external information.</p><h2 id="Setup"><a href="#Setup" class="headerlink" title="Setup"></a>Setup</h2><blockquote><p>Note: This kind of automation carries a potential risk of account suspension. If that’s a real concern for you, I’d advise against it.</p></blockquote><p>On macOS, you can install it with a single command:</p><figure class="highlight bash"><table><tbody><tr><td class="gutter"><pre><span class="line">1</span><br></pre></td><td class="code"><pre><span class="line">brew install steipete/tap/oracle</span><br></pre></td></tr></tbody></table></figure><p>Or install via NPM (works everywhere):</p><figure class="highlight bash"><table><tbody><tr><td class="gutter"><pre><span class="line">1</span><br></pre></td><td class="code"><pre><span class="line">npm install -g @steipete/oracle</span><br></pre></td></tr></tbody></table></figure><p>Have your Agent read <a href="https://github.com/steipete/oracle">https://github.com/steipete/oracle</a> and install the accompanying Skill.</p><p>From there, you can customize the official Skill to fit your preferences. Here’s how I use it:</p><p>First, you’ll need Chrome with your ChatGPT account logged in.</p><h3 id="Two-Ways-to-Save-Conversations"><a href="#Two-Ways-to-Save-Conversations" class="headerlink" title="Two Ways to Save Conversations"></a>Two Ways to Save Conversations</h3><p>Since this simulates conversations on the web interface, I recommend one of two ways to save them. The first is <code>Temporary Chat</code> mode, which starts a fresh temp conversation every time. The upside: it never interferes with your own usage, and chats are burn-after-reading. The downside: you can’t retrieve past conversations or continue them.</p><p>The second—and my recommended approach—is to create a dedicated Project for your Agent. Make a standalone Project in ChatGPT just for it, then give your Agent the Project link (something like <a href="https://chatgpt.com/g/id/project">https://chatgpt.com/g/id/project</a>). This keeps all Agent-initiated questions in one place, and you can open it up yourself whenever you need to check.</p><p><img src="https://cdn.jsdmirror.com/gh/shiquda/images@main/imgs/oracle-chat-project-e37d1e6e.png" alt="A ChatGPT Project dedicated to your Agent (Oracle Chat)" loading="lazy"></p><h3 id="Configuring-config-json"><a href="#Configuring-config-json" class="headerlink" title="Configuring config.json"></a>Configuring config.json</h3><p>Next, have your Agent configure <code>~/.oracle/config.json</code>. Below is a generic version of my config with personal info removed—feel free to use it as a reference:</p><figure class="highlight json"><table><tbody><tr><td class="gutter"><pre><span class="line">1</span><br><span class="line">2</span><br><span class="line">3</span><br><span class="line">4</span><br><span class="line">5</span><br><span class="line">6</span><br><span class="line">7</span><br><span class="line">8</span><br><span class="line">9</span><br><span class="line">10</span><br><span class="line">11</span><br></pre></td><td class="code"><pre><span class="line"><span class="punctuation">{</span></span><br><span class="line">  <span class="attr">"engine"</span><span class="punctuation">:</span> <span class="string">"browser"</span><span class="punctuation">,</span></span><br><span class="line">  <span class="attr">"model"</span><span class="punctuation">:</span> <span class="string">"gpt-5.6-sol"</span><span class="punctuation">,</span></span><br><span class="line">  <span class="attr">"browser"</span><span class="punctuation">:</span> <span class="punctuation">{</span></span><br><span class="line">    <span class="attr">"chromePath"</span><span class="punctuation">:</span> <span class="string">"/path/to/oracle-chrome"</span><span class="punctuation">,</span></span><br><span class="line">    <span class="attr">"chatgptUrl"</span><span class="punctuation">:</span> <span class="string">"https://chatgpt.com/g/&lt;your_project_id&gt;/project"</span><span class="punctuation">,</span></span><br><span class="line">    <span class="attr">"thinkingTime"</span><span class="punctuation">:</span> <span class="string">"extra-high"</span><span class="punctuation">,</span></span><br><span class="line">    <span class="attr">"archiveConversations"</span><span class="punctuation">:</span> <span class="string">"never"</span><span class="punctuation">,</span></span><br><span class="line">    <span class="attr">"hideWindow"</span><span class="punctuation">:</span> <span class="literal"><span class="keyword">true</span></span></span><br><span class="line">  <span class="punctuation">}</span></span><br><span class="line"><span class="punctuation">}</span></span><br></pre></td></tr></tbody></table></figure><p>A few notes on the optional fields:</p><ul><li><code>chatgptUrl</code>: If you’re using <code>Temporary Chat</code> mode, change this to <code>https://chatgpt.com/?temporary-chat=true</code>.</li><li><code>chromePath</code>: Point this at a <code>wrapper</code> that injects <code>--proxy-server=</code>, for those who need a proxy to reach ChatGPT.</li><li><code>hideWindow: true</code>: Oracle hides the Chrome window automatically after launching, so it won’t interrupt your work.</li><li><code>archiveConversations: "never"</code>: Don’t archive conversations, so irrelevant chats don’t pile up in your Project.</li></ul><h3 id="What-If-You-Don’t-Have-a-Global-Proxy"><a href="#What-If-You-Don’t-Have-a-Global-Proxy" class="headerlink" title="What If You Don’t Have a Global Proxy?"></a>What If You Don’t Have a Global Proxy?</h3><p>If your network can’t reach ChatGPT (e.g., you’re in China without a global proxy), don’t give up on this setup. The idea is to write a Chrome <code>wrapper</code> script that injects a local proxy whenever Oracle launches Chrome.</p><p>My <code>~/.oracle/oracle-chrome</code> script does roughly three things: first, it strips out any <code>--proxy-server</code> argument passed by Oracle (to avoid conflicting with the one we’re injecting), then it appends <code>--proxy-server=http://127.0.0.1:7890</code> to the launch args, and finally it uses <code>exec</code> to start the real Chrome.</p><p>Then in <code>config.json</code>, point <code>chromePath</code> at this script instead of the Chrome binary:</p><figure class="highlight json"><table><tbody><tr><td class="gutter"><pre><span class="line">1</span><br><span class="line">2</span><br><span class="line">3</span><br><span class="line">4</span><br><span class="line">5</span><br></pre></td><td class="code"><pre><span class="line"><span class="punctuation">{</span></span><br><span class="line">  <span class="attr">"browser"</span><span class="punctuation">:</span> <span class="punctuation">{</span></span><br><span class="line">    <span class="attr">"chromePath"</span><span class="punctuation">:</span> <span class="string">"/Users/your_username/.oracle/oracle-chrome"</span></span><br><span class="line">  <span class="punctuation">}</span></span><br><span class="line"><span class="punctuation">}</span></span><br></pre></td></tr></tbody></table></figure><p>This way, every time Oracle launches Chrome, it automatically picks up the local proxy, and the ChatGPT web interface loads normally—no need to manually enable a global proxy.</p><p>Next, have your Agent add a timeout to the Skill. I set mine to 20 minutes, which should be plenty for most tasks.</p><p>Finally, have your Agent run a quick test to confirm it works. If it does, you’re seamlessly plugged into your workflow.</p><h3 id="Real-World-Test"><a href="#Real-World-Test" class="headerlink" title="Real-World Test"></a>Real-World Test</h3><p>Here’s an example from my own setup: I use a cheap model like Deepseek V4 Flash in Oh My Pi, and it successfully called out to the external GPT 5.6 Sol for help—took about 5 minutes.</p><p><img src="https://cdn.jsdmirror.com/gh/shiquda/images@main/imgs/oracle-deepseek-example-9e82d74f.png" alt="Deepseek V4 Flash driving external GPT 5.6 Sol in Oh My Pi" loading="lazy"></p><p>At this point, we’ve effectively built a <strong>closed-loop workflow: an external high-performance model guides, while a cheap model drives</strong>. Once the Skill and CLI are set up, no human ever needs to be the content courier again. In the age of Agents, this is exactly the mindset we should adopt—freeing human attention from tedious, repetitive hand-off work and redirecting it toward more valuable pursuits.</p>]]>
    </content>
    <id>https://shiquda.link/en/agent-call-chatgpt-web-5.6-sol/</id>
    <link href="https://shiquda.link/en/agent-call-chatgpt-web-5.6-sol/"/>
    <published>2026-08-17T02:00:00.000Z</published>
    <summary>With Oracle CLI, your agent can directly invoke ChatGPT's web version 5.6 Sol — no API key, no quota consumption, and zero manual handoffs.</summary>
    <title>Let Your Agent Call Web-Based 5.6 Sol via Oracle CLI</title>
    <updated>2026-08-17T02:00:00.000Z</updated>
  </entry>
  <entry>
    <author>
      <name>shiquda</name>
    </author>
    <category term="AI" scheme="https://shiquda.link/categories/AI/"/>
    <category term="AI" scheme="https://shiquda.link/tags/AI/"/>
    <category term="macOS" scheme="https://shiquda.link/tags/macOS/"/>
    <category term="Tools" scheme="https://shiquda.link/tags/Tools/"/>
    <content>
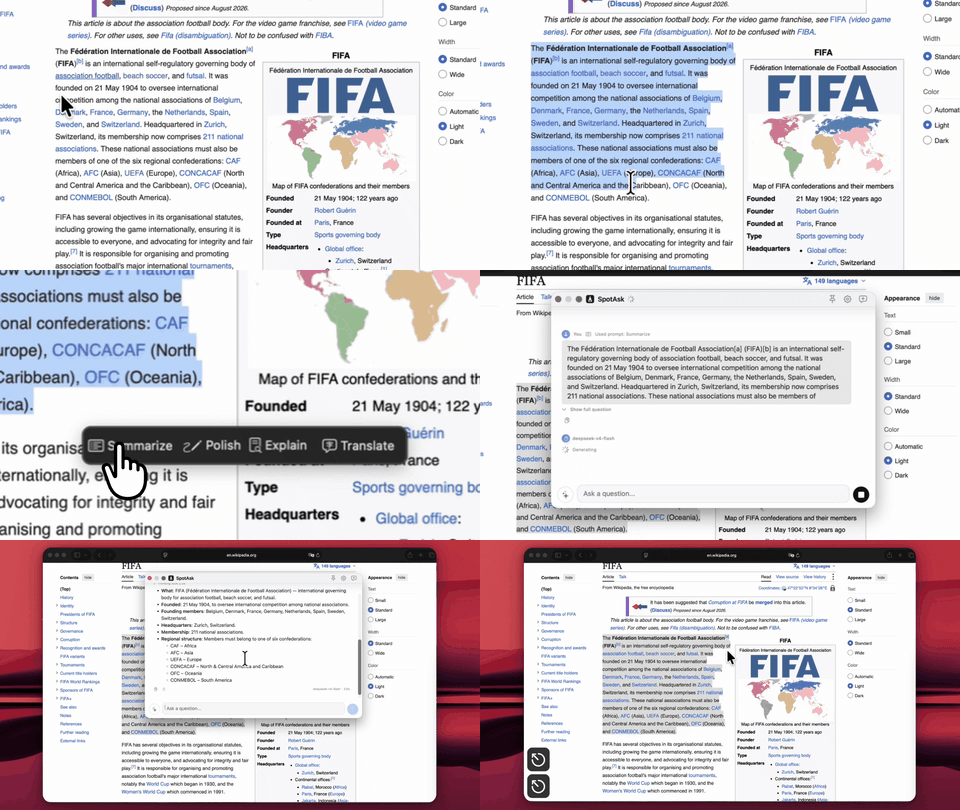
      <![CDATA[<h2 id="Why-I-Built-SpotAsk"><a href="#Why-I-Built-SpotAsk" class="headerlink" title="Why I Built SpotAsk"></a>Why I Built SpotAsk</h2><p>Recently, I transitioned my primary daily workspace to macOS and built my first native desktop app: <strong>SpotAsk</strong>.</p><p>The motivation was simple: when I open ChatGPT, I rarely need it for elaborate multi-step tasks. Most of the time, I just want to clarify a concept, translate a paragraph, summarize an article, or polish a quick email reply.</p><p>Yet completing such small tasks often requires a heavy routine: pause what you’re doing, open a browser, navigate to the AI web app, wait for a reply, and switch back.</p><p>Doing this once or twice is fine. But repeat it dozens of times a day, and it feels exhausting—a 5-second question gets weighed down by a heavy workflow.</p><p><strong>Not every question needs you to open ChatGPT.</strong></p><h2 id="Core-Philosophy-Keeping-Lightweight-Queries-Truly-Lightweight"><a href="#Core-Philosophy-Keeping-Lightweight-Queries-Truly-Lightweight" class="headerlink" title="Core Philosophy: Keeping Lightweight Queries Truly Lightweight"></a>Core Philosophy: Keeping Lightweight Queries Truly Lightweight</h2><p>SpotAsk is a native macOS menu bar application that stays out of your way until called. Press the default hotkey <code>Option + Space</code> to bring up a focused query window. Type your question, inspect the answer, copy what you need, and press <code>Esc</code> to dismiss it. The entire interaction happens without interrupting your active workflow; once dismissed, it’s as if it was never there.</p><p><img src="https://cdn.jsdmirror.com/gh/shiquda/SpotAsk@main/docs/site/public/images/spotask-chat.png" alt="SpotAsk Quick Ask Interface" loading="lazy"></p><p>I didn’t want a massive AI workbench; I wanted the shortest possible path: from <em>“I have a question”</em> to <em>“I have the answer and I’m back to work”</em> without friction.</p><p>This principle guided several key design decisions:</p><ol><li><strong>Keyboard-First</strong>: Invoke, query, copy, and dismiss entirely via keyboard shortcuts—no mouse needed.</li><li><strong>Minimalist Interface</strong>: The window focuses purely on quick Q&amp;A without cluttering your screen with heavy workspaces, team collaboration, or bulky history sidebars.</li><li><strong>Local-First &amp; BYOK</strong>: SpotAsk uses a Bring Your Own Key (BYOK) model. Your API keys stay stored securely on your Mac, and queries are sent directly to your configured AI provider.</li><li><strong>Clear Boundaries</strong>: Deep research, multi-agent workflows, and complex coding remain with dedicated tools like ChatGPT and Claude&#x2F;Codex. SpotAsk exclusively handles high-frequency, lightweight tasks.</li></ol><h2 id="Two-Core-Use-Cases"><a href="#Two-Core-Use-Cases" class="headerlink" title="Two Core Use Cases"></a>Two Core Use Cases</h2><p>SpotAsk currently revolves around two everyday workflows.</p><p>The first is <strong>Quick Query</strong>. Press <code>Option + Space</code> to invoke the prompt, type your question, and hit Return to stream the response in real-time. You can copy the entire answer or just an individual code snippet; hit <code>Esc</code> or click Stop anytime to interrupt.</p><p><img src="https://cdn.jsdmirror.com/gh/shiquda/SpotAsk@main/docs/site/public/images/spotask-hotkey.gif" alt="SpotAsk Hotkey Invocation" loading="lazy"></p><p>The second is <strong>Text Selection Actions</strong>. Select any text in Safari, Apple Notes, Mail, or any macOS application, and SpotAsk presents quick contextual actions right beside your selection. Translate, explain, summarize, polish, or run a custom prompt. In apps that support direct text replacement, SpotAsk can write the result straight back into your document.</p><p><img src="https://cdn.jsdmirror.com/gh/shiquda/SpotAsk@main/docs/site/public/images/spotask-selection.gif" alt="SpotAsk Selection Actions" loading="lazy"></p><p>Additional native details make it feel at home on macOS: customizable global hotkeys, built-in prompt presets, pasting screenshots or dropping files as context, support for 8 interface languages, and integration with Spotlight, Siri, and Shortcuts.</p><h2 id="Design-Boundaries-Deliberately-Avoiding-the-“All-in-One”-Trap"><a href="#Design-Boundaries-Deliberately-Avoiding-the-“All-in-One”-Trap" class="headerlink" title="Design Boundaries: Deliberately Avoiding the “All-in-One” Trap"></a>Design Boundaries: Deliberately Avoiding the “All-in-One” Trap</h2><p>The hardest part of product design is often not what to add, but what to resist adding.</p><p>SpotAsk is intentionally not an all-in-one AI workspace. There are no accounts, no cloud sync, and no heavy workspace trees. When a task requires deep retrieval, complex multi-step reasoning, or iterative debugging, specialized tools remain the right choice.</p><p>SpotAsk’s focus is razor-sharp: solving those moments where <em>a tiny question forced you to open a heavy tool</em>.</p><h2 id="Why-“SpotAsk”"><a href="#Why-“SpotAsk”" class="headerlink" title="Why “SpotAsk”?"></a>Why “SpotAsk”?</h2><p>Coming from Windows, I loved keyboard-driven launcher utilities like Listary. Moving to macOS, Spotlight became second nature—I loved the feeling of getting things done in just a few keystrokes.</p><p>Later, I tried full-featured clients like Cherry Studio for quick queries, but they felt too heavy for my workflow. I didn’t want a giant desktop suite just to ask a quick question.</p><p>That’s how SpotAsk came to life: a native, lightweight, and focused macOS AI query companion. The name reflects this duality—swift and unobtrusive like Spotlight, with the query itself (<em>Ask</em>) serving as the entry point.</p><h2 id="Building-My-First-macOS-Desktop-App"><a href="#Building-My-First-macOS-Desktop-App" class="headerlink" title="Building My First macOS Desktop App"></a>Building My First macOS Desktop App</h2><p>This is my first complete native macOS application. Throughout the journey, the biggest takeaway was not the technical challenge of Swift&#x2F;SwiftUI, but how much harder it is to define and hold product boundaries.</p><p>Initially, it’s easy to want every feature competitors have. But every added knob lengthens the primary path. Eventually, I distilled my guiding rule to one sentence: <strong>If a feature doesn’t make asking a quick question faster, leave it out for now.</strong></p><h2 id="Current-Status"><a href="#Current-Status" class="headerlink" title="Current Status"></a>Current Status</h2><p>SpotAsk supports macOS 15 and later, natively compatible with Apple Silicon and Intel Macs. Official releases are notarized and signed with an Apple Developer ID. The project is open source on GitHub under the AGPL-3.0 license.</p><ul><li><strong>English Documentation</strong>: <a href="https://shiquda.github.io/SpotAsk/">https://shiquda.github.io/SpotAsk/</a></li><li><strong>Releases &amp; Downloads</strong>: <a href="https://github.com/shiquda/SpotAsk/releases">https://github.com/shiquda/SpotAsk/releases</a></li><li><strong>GitHub Repository</strong>: <a href="https://github.com/shiquda/SpotAsk">https://github.com/shiquda/SpotAsk</a></li></ul><p>If you frequently encounter moments where a small question interrupts your flow, give SpotAsk a try. Feedback, feature requests, and suggestions are warmly welcomed on GitHub Issues!</p>]]>
    </content>
    <id>https://shiquda.link/en/spotask-not-every-question-needs-chatgpt/</id>
    <link href="https://shiquda.link/en/spotask-not-every-question-needs-chatgpt/"/>
    <published>2026-08-11T04:04:10.000Z</published>
    <summary>SpotAsk is a native macOS menu bar AI assistant dedicated to lightweight queries, text selection actions, and getting you back to your flow immediately.</summary>
    <title>SpotAsk: Not Every Question Needs ChatGPT</title>
    <updated>2026-08-11T04:04:10.000Z</updated>
  </entry>
  <entry>
    <author>
      <name>shiquda</name>
    </author>
    <category term="AI" scheme="https://shiquda.link/categories/AI/"/>
    <category term="AI" scheme="https://shiquda.link/tags/AI/"/>
    <category term="Agent" scheme="https://shiquda.link/tags/Agent/"/>
    <category term="Skill" scheme="https://shiquda.link/tags/Skill/"/>
    <category term="Git" scheme="https://shiquda.link/tags/Git/"/>
    <content>
      <![CDATA[<h1 id="From-Prompt-to-Personal-Asset-How-I-Use-Git-to-Manage-Private-Skills-Across-Devices"><a href="#From-Prompt-to-Personal-Asset-How-I-Use-Git-to-Manage-Private-Skills-Across-Devices" class="headerlink" title="From Prompt to Personal Asset: How I Use Git to Manage Private Skills Across Devices"></a>From Prompt to Personal Asset: How I Use Git to Manage Private Skills Across Devices</h1><p><img src="https://cdn.jsdmirror.com/gh/shiquda/images@main/imgs/compressed_01-hero-private-skill-asset-1fc986c1.png" alt="Private Skill asset flow" loading="lazy"></p><p>Lately, I’ve been working on something small: getting the Skills scattered across different Agents under control. At first, I didn’t think it mattered much—they’re just a few <code>SKILL.md</code> files with instructions, workflows, and tool-calling patterns. But the more I used them, the more I realized Skills shouldn’t be treated merely as “prompt files.” They’re more like personal assets—especially private Skills.</p><p>Public Skills certainly have value. Things like processing PDFs, reading and writing spreadsheets, invoking browsers, or running deployment checks are problems many people encounter. The community turns these capabilities into Skills that anyone can use out of the box—that’s the value of the ecosystem.</p><p>But my own take is this: <strong>the Skills truly worth long-term maintenance are usually the private ones.</strong></p><p>The reason is simple. Public Skills solve “problems everyone runs into,” while private Skills solve “problems I keep running into.” The former is general capability; the latter is my way of working, my judgment standards, and my cognitive habits.</p><p>In other words, public Skills are like universal tools in a toolbox, while private Skills are more like my personal workflow manual.</p><p>What I want to share in this post is the lightweight setup I use now: no server deployment, just Git plus a local CLI. For the upload direction, I use my own <a href="https://github.com/shiquda/skills-sync"><code>skills-sync</code></a> to sync local Skills to a Git repository. For the download direction, I use the mature <code>npx skills add</code> to install Skills from the Git repo. In between, Git handles version control and access control. This way, Skills can flow across devices, across Agents, and across projects.</p><p>Let me be clear upfront: this isn’t an installation tutorial, and I don’t plan to walk through every command in detail. Now that we’re in the Agent era, I increasingly prefer to leave those details to the Agent itself. Send it the repository URL and let it read the README first. If needed, install the Skill from the repo, then follow the Skill’s guidance to complete the rest. Human attention should go to judgment and acceptance, not memorizing a pile of command flags.</p><h2 id="What-Makes-a-Private-Skill-Worth-Managing"><a href="#What-Makes-a-Private-Skill-Worth-Managing" class="headerlink" title="What Makes a Private Skill Worth Managing?"></a>What Makes a Private Skill Worth Managing?</h2><p>When I say “private Skill,” I don’t mean “secret capabilities that can’t be public.” I mean capability modules that are tightly coupled to an individual, a team, or a project.</p><p>They can be small. For example:</p><ol><li>What risks I focus on during code review.</li><li>How I structure and tone my writing.</li><li>What checks I run before publishing a blog post.</li><li>What verification evidence I require from an Agent after it finishes a task.</li></ol><p>They can also be larger. Like a paper-search workflow, a team delivery standard, a content creation pipeline, or even a long-formed research methodology.</p><p>These things share one trait: they may not be suitable for public release, and they may not be useful to everyone—but they’re extremely useful to me. So a private Skill isn’t fundamentally “a prompt written for a model.” It’s more like packaging my experience and preferences in a way an Agent can understand and invoke.</p><p>This is also why I believe private Skills deserve more careful management than public ones. Public Skills fill in general capability gaps; private Skills accumulate personal capability. The former makes an Agent more capable; the latter makes an Agent work more like it’s following “my method.”</p><h2 id="Skills-Are-Knowledge-Increments-Beyond-the-Model"><a href="#Skills-Are-Knowledge-Increments-Beyond-the-Model" class="headerlink" title="Skills Are Knowledge Increments Beyond the Model"></a>Skills Are Knowledge Increments Beyond the Model</h2><p>Base models are evolving quickly, and so are Agent products. Today you might use Claude Code, tomorrow Codex, and the day after that OpenClaw, Cursor, or OpenCode. If all your experience lives only in one product’s conversation history, that’s fragile. Switch products, switch devices, clear the context—and a lot of it is gone.</p><p>The value of Skills is that they extract a portion of experience out of any specific model or Agent.</p><p>A good Skill doesn’t need to be esoteric. As long as it clearly describes the applicable scenario, execution path, available tools, and acceptance criteria, an Agent can reuse that workflow across different models and products.</p><p>From this angle, a Skill can be understood as “knowledge increment beyond the model.” The base model provides general intelligence; the Skill layers on top of that intelligence with specific domain knowledge, personal preferences, and execution paths.</p><p>That’s precious.</p><p>Because models will only get stronger, but a model can’t naturally know “how I do things.” It can know paper search, code review, and copyediting in a general sense, but it doesn’t know my personal standards. Private Skills fill exactly that gap.</p><h2 id="The-Real-Challenge-Isn’t-Writing-Skills—It’s-Managing-Them"><a href="#The-Real-Challenge-Isn’t-Writing-Skills—It’s-Managing-Them" class="headerlink" title="The Real Challenge Isn’t Writing Skills—It’s Managing Them"></a>The Real Challenge Isn’t Writing Skills—It’s Managing Them</h2><p>When you only have two or three Skills, management isn’t a problem. Keep them in some directory, and find them when needed. But once you use Agents heavily, you’ll quickly run into several issues.</p><p>The first is fragmentation. Different Agents have different Skill directories. Codex has its own global directory; Claude Code has its own. OpenClaw, OpenCode, and Cursor each have their own conventions too. Some Skills are project-level and live only in a specific repository.</p><p>The second is migration.</p><p>When you switch computers, you might remember to sync code, configs, and SSH keys—but you probably won’t remember which Skills are scattered where. By the time you actually need one, you discover it’s missing on the new machine.</p><p>The third is iteration.</p><p>Say I modify a Skill on my local machine, then use it on a VPS a few days later. The VPS still has the old version. Which version is current? What did I change last time? Did I break anything? If you’re relying on manual copying, this quickly becomes a mess.</p><p>The fourth is sharing.</p><p>In a small team, everyone might share common workflows—release processes, doc checks, code review, daily report aggregation. The hardest part isn’t writing a spec; it’s making sure every person’s Agent can reliably pull the same spec and receive updates afterward.</p><p>Put all these together, and it boils down to one sentence:</p><blockquote><p>Once Skills evolve from a few scattered files into a long-maintained capability library, they should be version-controlled like code.</p></blockquote><p>That’s ultimately why I chose Git.</p><h2 id="My-Approach-Git-as-the-Repository-CLI-for-Upload-and-Download"><a href="#My-Approach-Git-as-the-Repository-CLI-for-Upload-and-Download" class="headerlink" title="My Approach: Git as the Repository, CLI for Upload and Download"></a>My Approach: Git as the Repository, CLI for Upload and Download</h2><p>My approach is simple:</p><p><img src="https://cdn.jsdmirror.com/gh/shiquda/images@main/imgs/compressed_02-flow-git-sync-bc54e064.png" alt="Git upload/download closed loop" loading="lazy"></p><p><code>skills-sync</code> for upload, <code>npx skills add</code> for download, and Git as the Skill repository in between.</p><p>The key here isn’t technical complexity—quite the opposite. The key is not over-engineering. Skills are fundamentally just a set of files. Git already solves version history, branching, rollback, permissions, and collaboration. Platforms like GitHub and GitLab already solve private repository access control. For individuals and small teams, if Git plus a local CLI already solves the problem, there’s no need to deploy a server from day one.</p><p>The division of labor is also clear. <code>skills-sync</code> handles upload: it scans the Skill directories of various local Agents, places your selected Skills into the target Git repository, and commits and pushes. <code>npx skills add</code> handles download: it reads Skills from the Git repository and installs them into the corresponding local Agent environment. For private repositories, I simply reuse local Git authentication, like SSH keys.</p><p>This gives Skills a fairly complete lifecycle:</p><ol><li>Created in a local Agent.</li><li>Synced to Git via <code>skills-sync</code>.</li><li>Gains version history in Git.</li><li>Installed on other devices via <code>npx skills add</code>.</li><li>Iterated further, synced again, updated again.</li></ol><h2 id="skills-sync-Solves-the-Upload-Problem"><a href="#skills-sync-Solves-the-Upload-Problem" class="headerlink" title="skills-sync Solves the Upload Problem"></a><code>skills-sync</code> Solves the Upload Problem</h2><p>I wrote <code>skills-sync</code> because I noticed existing tools mostly solve “installing Skills.” But I also needed a tool in the opposite direction: collecting Skills I’d already written locally and pushing them to my own repository.</p><p>What it does today, roughly:</p><ol><li>Scans global and project-level Skill directories of mainstream Agents.</li><li>Shows which Skills are currently detected.</li><li>Compares versions against the target repository to determine whether each is new, identical, modified, or invalid.</li><li>Supports interactive selection as well as non-interactive sync.</li><li>Copies selected Skills into the canonical directory of the Git repository.</li><li>Writes a sync manifest, and commits and pushes by default.</li></ol><p>But I’d advise readers not to memorize specific commands here. A more Agent-era approach is to send the <code>skills-sync</code> repository URL directly to the Agent you’re using, and let it read the README itself.</p><p>For example, you could say:</p><blockquote><p>This is the <code>skills-sync</code> repository: <code>https://github.com/shiquda/skills-sync</code>.</p><p>Please read the README first to understand how it syncs local Agent Skills to a Git repository, install the accompanying Skill as instructed, then inspect my current environment and propose a sync plan.</p></blockquote><p>This saves more attention than manually looking up flags. Because what truly needs human judgment isn’t how a flag is written—it’s which Skills to sync, which repository to sync to, and what shouldn’t be uploaded at all.</p><p>In my own local environment, <code>skills-sync scan</code> picks up Skills from multiple sources, like Codex, Claude Code, and general. The target repository is configured to my own Skill repo.</p><p>One detail I think matters: <code>skills-sync</code> doesn’t try to replace Git. It just puts Skills into a Git repository and lets Git keep doing what it’s good at. History, rollback, review, conflict handling—all of that stays with Git. That’s much lighter than building a whole new Skill platform.</p><h2 id="Download-Can-Also-Be-Delegated-to-the-Agent"><a href="#Download-Can-Also-Be-Delegated-to-the-Agent" class="headerlink" title="Download Can Also Be Delegated to the Agent"></a>Download Can Also Be Delegated to the Agent</h2><p>For download, I didn’t reinvent the wheel. I use the mature <code>npx skills add</code> directly. It can add a Skill from a source, list Skills in a repository, install a specific Skill, target global or project-level installation, and specify the destination Agent.</p><p>But this part doesn’t require readers to memorize commands either.</p><p>A more natural approach is to tell the Agent:</p><blockquote><p>This is my private Skill repository URL.</p><p>First, confirm whether this machine’s Git authentication can access it.</p><p>Then use <code>npx skills add</code> to see what Skills are in there, and install the ones I specify to a location available to the current Agent. Explain what you’re about to do before executing.</p></blockquote><p>For a team-private repository, as long as local Git authentication is configured, the Agent can access it via an SSH URL or other Git URL. That way, there’s no need to design a separate account system for <code>skills-sync</code> or the install flow.</p><p>This is also what I love about this setup: it doesn’t complicate things. <code>skills-sync</code> only handles uploading local assets to the repository; <code>npx skills add</code> only handles installing from the repository to local. Git handles versioning and permissions in between, and the Agent handles reading instructions, choosing commands, and executing the flow. Each layer stays restrained.</p><h2 id="A-Real-Example-A-Paper-Search-Skill-Flowing-from-Local-Machine-to-VPS"><a href="#A-Real-Example-A-Paper-Search-Skill-Flowing-from-Local-Machine-to-VPS" class="headerlink" title="A Real Example: A Paper-Search Skill Flowing from Local Machine to VPS"></a>A Real Example: A Paper-Search Skill Flowing from Local Machine to VPS</h2><p>Here’s an example from my own experience: I have a paper-search Skill that originally lived in Claude Code on my local machine. It’s not just “help me find some papers”—it encodes my search habits. Like which sources to prioritize, how to judge relevance, how to filter out low-quality material, and how to structure the final results.</p><p>Later, I wanted OpenClaw on my VPS to use the same Skill. The traditional approach would be manually locating the directory, copying files, transferring them to the VPS, and confirming OpenClaw’s Skill directory. It works, but it’s tedious—and every update means doing it all over again. Now it’s much simpler. I have local Claude Code upload the Skill to the Git repository following <code>skills-sync</code>‘s instructions. On the VPS, I give the repository URL to OpenClaw, let it read the README, and install via <code>npx skills add</code>.</p><p>Throughout the whole process, I don’t manually copy files or look up command flags myself. My role is more like conveying intent to the Agent, then letting the Agent complete the sync guided by the Skill’s instructions. This experience reinforced something for me: the value of a private Skill isn’t just plugin migration—it’s migrating your research methodology across devices and Agents.</p><h2 id="Who-Is-This-Approach-For"><a href="#Who-Is-This-Approach-For" class="headerlink" title="Who Is This Approach For?"></a>Who Is This Approach For?</h2><p>This approach isn’t for everyone. If you only use Agents occasionally and haven’t written your own Skills, you don’t need to worry about this yet—public Skills are enough.</p><p>It’s better suited for:</p><ol><li>People using multiple Agents simultaneously.</li><li>People with multiple devices—local machine, laptop, VPS.</li><li>People who’ve started writing their own Skills.</li><li>People who want to codify workflows without maintaining a server.</li><li>Small teams that want to share a common way of working with Agents.</li></ol><p>Conversely, if you need complex backend permissions, auditing, approval flows, or want everything managed through a GUI, this approach might be too lightweight.</p><p>Its positioning is clear: a low-cost way for individuals and small teams to manage Skill assets. It’s not a full platform—it’s more like a connected pipeline.</p><h2 id="The-Essence-of-Skill-Management-Is-Version-Control-for-Personal-Capability"><a href="#The-Essence-of-Skill-Management-Is-Version-Control-for-Personal-Capability" class="headerlink" title="The Essence of Skill Management Is Version Control for Personal Capability"></a>The Essence of Skill Management Is Version Control for Personal Capability</h2><p>Back to the original question: why bother managing private Skills carefully? My understanding is that a new type of asset is emerging in the Agent era: executable cognitive assets.</p><p>In the past, we managed code because code is an executable asset. Later, we managed documents because documents are knowledge assets. Now, Skills sit somewhere in between. They contain knowledge, and they also guide Agents to invoke tools and execute tasks. That makes Skills special.</p><p>A good private Skill might contain your writing style, research path, engineering habits, review standards, and team conventions. It’s not part of the model’s parameters, but it genuinely shapes Agent behavior. In other words, it’s a layer of knowledge increment you add on top of the base model.</p><p>The more stable and reusable that layer becomes, the more it deserves version control. Otherwise, it just scatters across conversations, directories, and machines, making long-term accumulation nearly impossible.</p><p>I increasingly believe that for many people, core assets in the future won’t just be code, articles, and notes—they’ll include a continuously evolving set of private Skills. They range from a single command to a full methodology. They exist as pluggable modules that can flow across models, Agents, and devices. That’s where their value lies.</p><h2 id="Start-with-One-Skill-Repository"><a href="#Start-with-One-Skill-Repository" class="headerlink" title="Start with One Skill Repository"></a>Start with One Skill Repository</h2><p>If you want to try this, I’d suggest not trying to organize all your Skills at once. Start with the three most-used categories: writing or content processing, research or search, and engineering or publishing.</p><p>Then create a private Git repository, give both the <code>skills-sync</code> repository URL and your target repository URL to the Agent, and have it read the README first before proposing an execution plan. On another device, give the target Skill repository URL to the Agent as well. Have it confirm Git authentication, read the repository structure, and install the specified Skills using the appropriate method.</p><p>Once that closed loop works, you already have a minimal viable private Skill management system. The point isn’t memorizing commands—it’s offloading the attention cost of “researching commands, checking environments, and executing syncs” to the Agent.</p><p>One boundary note: <code>skills-sync</code> is still primarily used by me personally. It’s a lightweight CLI that grew out of my own real workflow. So its use-case coverage is necessarily limited, and many issues will only surface when it runs in more people’s environments.</p><p>If you’re interested in this direction, you’re welcome to try it and give the repository a star. Issues and PRs are even more welcome—or just tell me about your use cases and problems. I’d genuinely appreciate it, because tools like this only reveal what’s truly useful versus what’s just my own habit when they run through more real-world scenarios.</p><p>And finally, back to that core point:</p><blockquote><p>A Skill’s real value isn’t in how complex it looks—it’s in whether it can turn work that repeatedly drains your attention into a stable, reusable, portable capability.</p></blockquote><h2 id="References"><a href="#References" class="headerlink" title="References"></a>References</h2><ol><li><code>skills-sync</code> project: <a href="https://github.com/shiquda/skills-sync">https://github.com/shiquda/skills-sync</a></li><li>Vercel Labs <code>skills</code> CLI: <a href="https://github.com/vercel-labs/skills">https://github.com/vercel-labs/skills</a></li><li>Skills CLI documentation: <a href="https://www.skills.sh/docs/cli">https://www.skills.sh/docs/cli</a></li><li>Vercel Agent Skills documentation: <a href="https://vercel.com/docs/agent-resources/skills">https://vercel.com/docs/agent-resources/skills</a></li></ol>]]>
    </content>
    <id>https://shiquda.link/en/private-skill-git-cross-device/</id>
    <link href="https://shiquda.link/en/private-skill-git-cross-device/"/>
    <published>2026-05-31T05:54:31.000Z</published>
    <summary>A lightweight Git-based workflow for individuals and small teams to manage private Skills: push with skills-sync, pull with npx skills add — turning Skills into portable, reusable personal assets.</summary>
    <title>From Prompts to Personal Assets: Managing Private Skills Across Devices with Git</title>
    <updated>2026-05-31T05:54:31.000Z</updated>
  </entry>
  <entry>
    <author>
      <name>shiquda</name>
    </author>
    <category term="随笔" scheme="https://shiquda.link/categories/%E9%9A%8F%E7%AC%94/"/>
    <category term="思考" scheme="https://shiquda.link/tags/%E6%80%9D%E8%80%83/"/>
    <category term="焦虑" scheme="https://shiquda.link/tags/%E7%84%A6%E8%99%91/"/>
    <category term="心理" scheme="https://shiquda.link/tags/%E5%BF%83%E7%90%86/"/>
    <content>
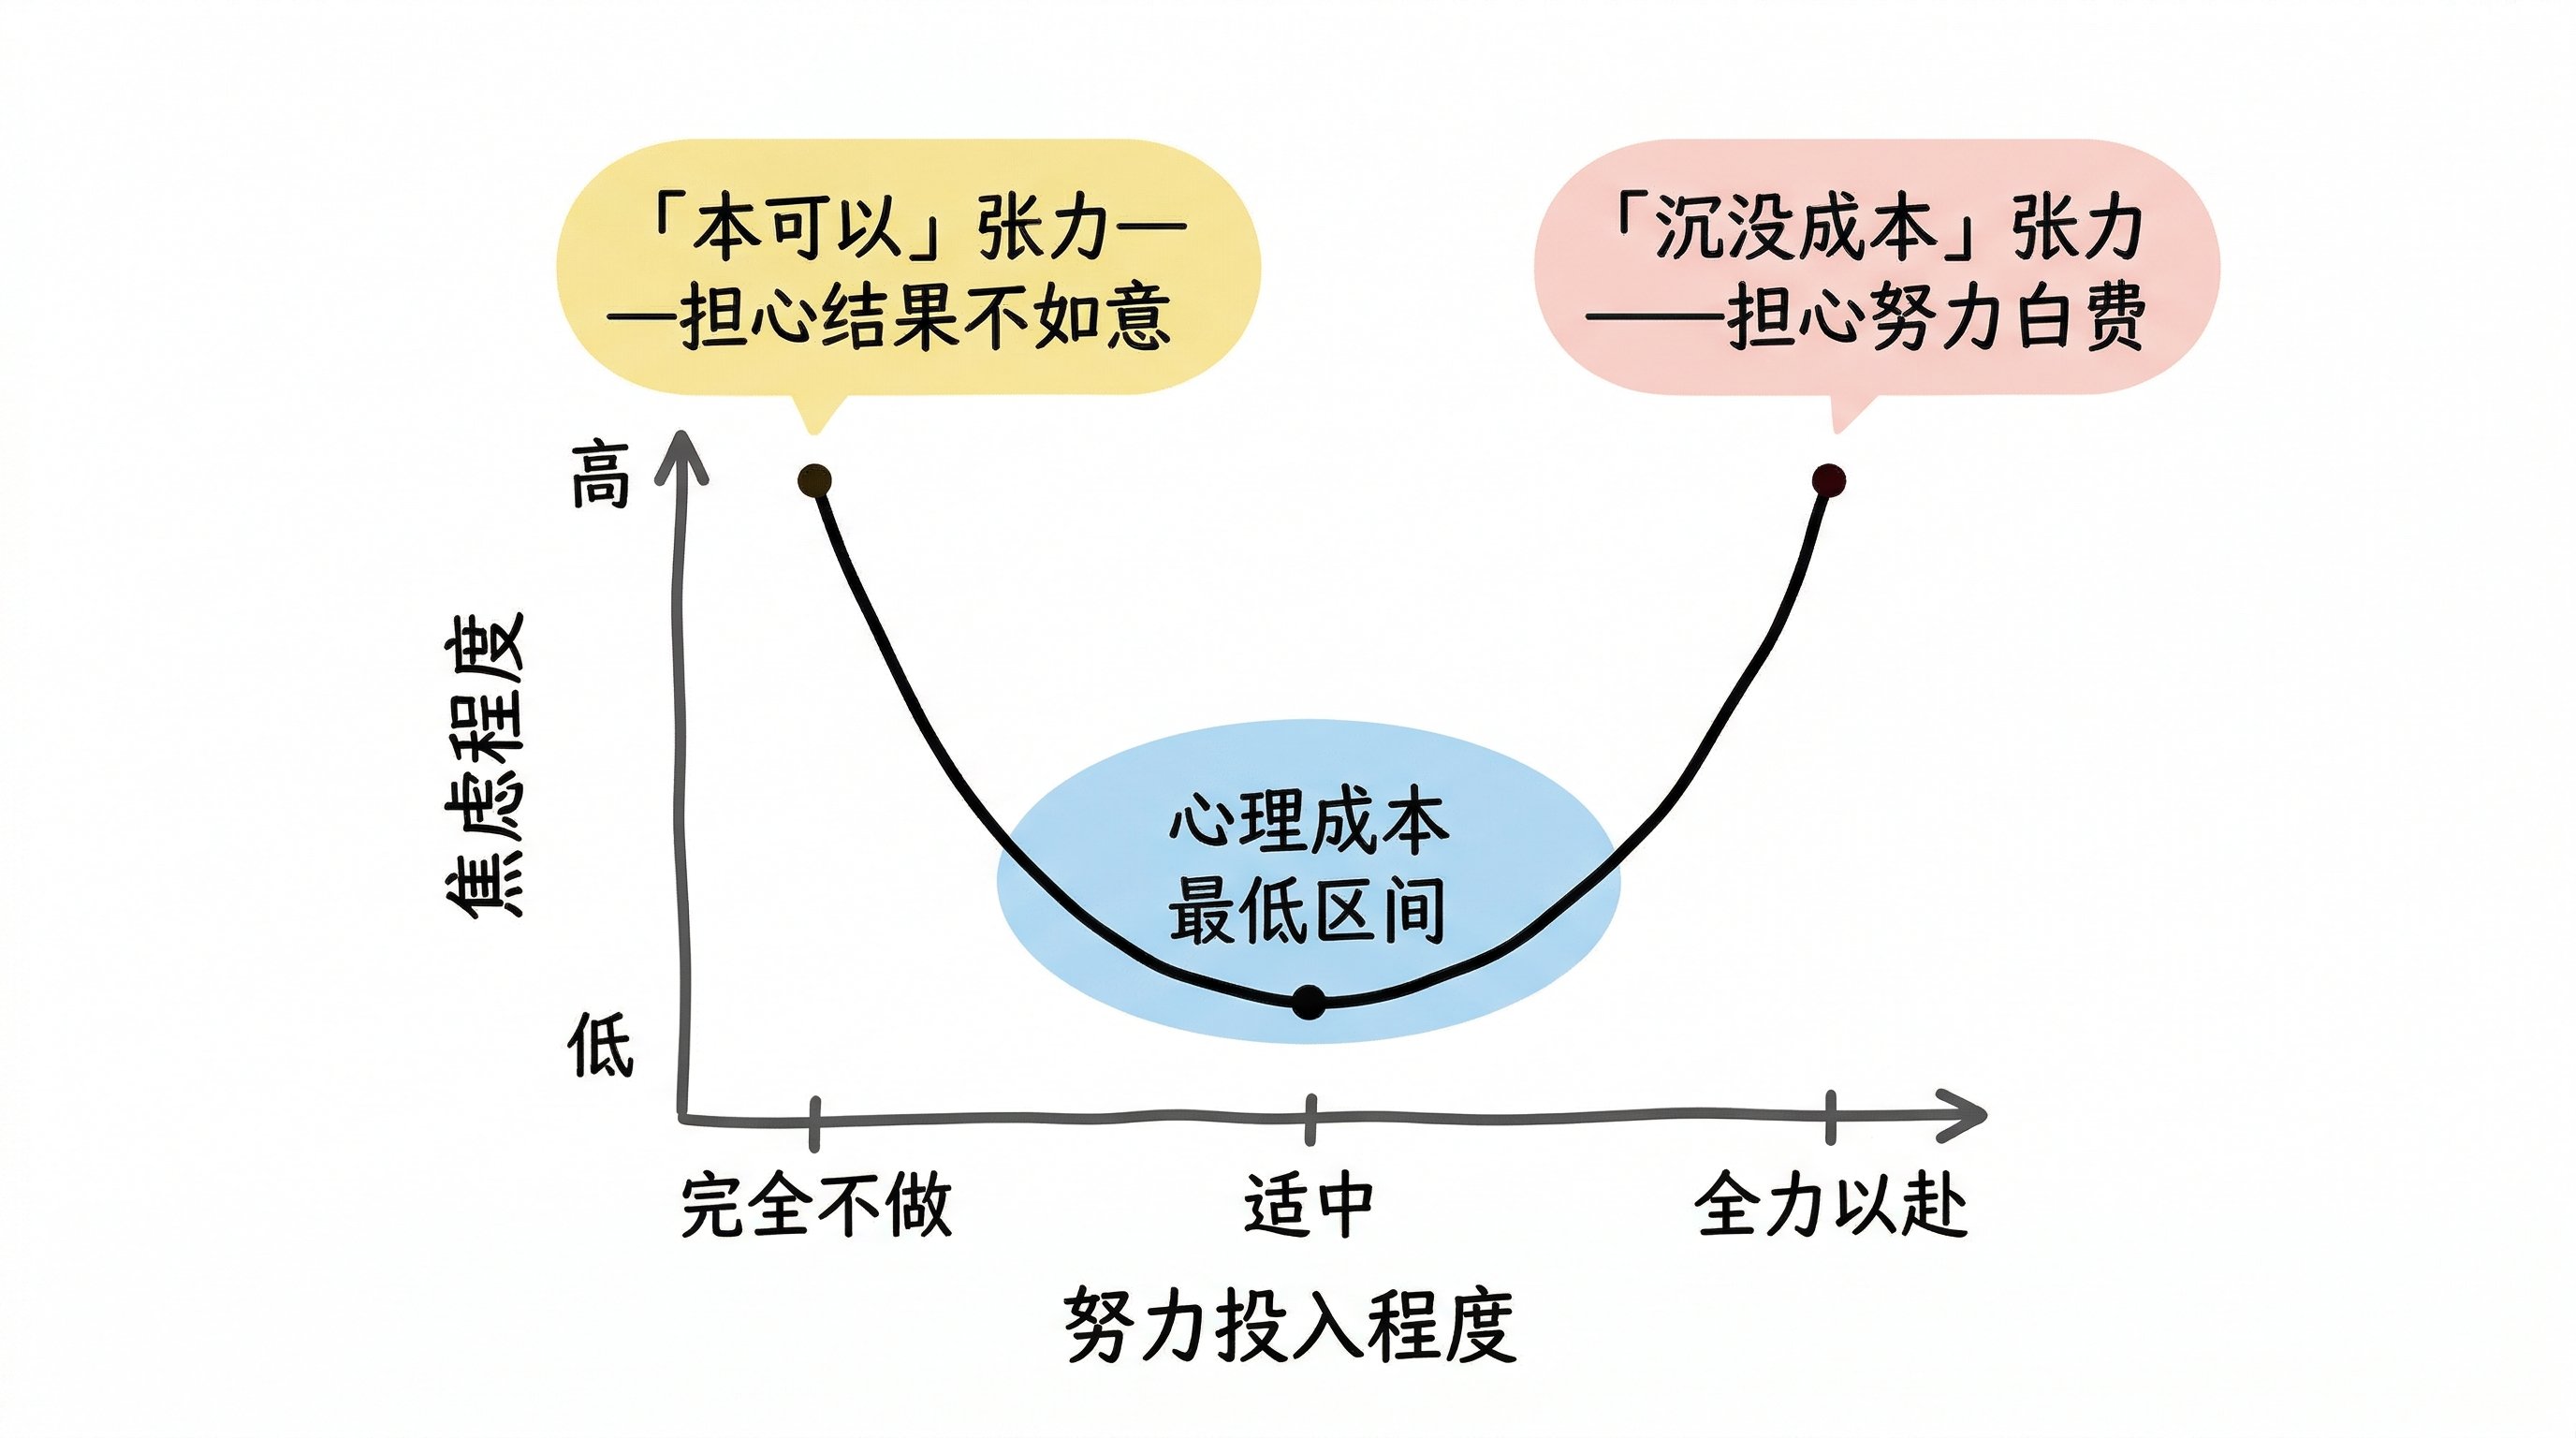
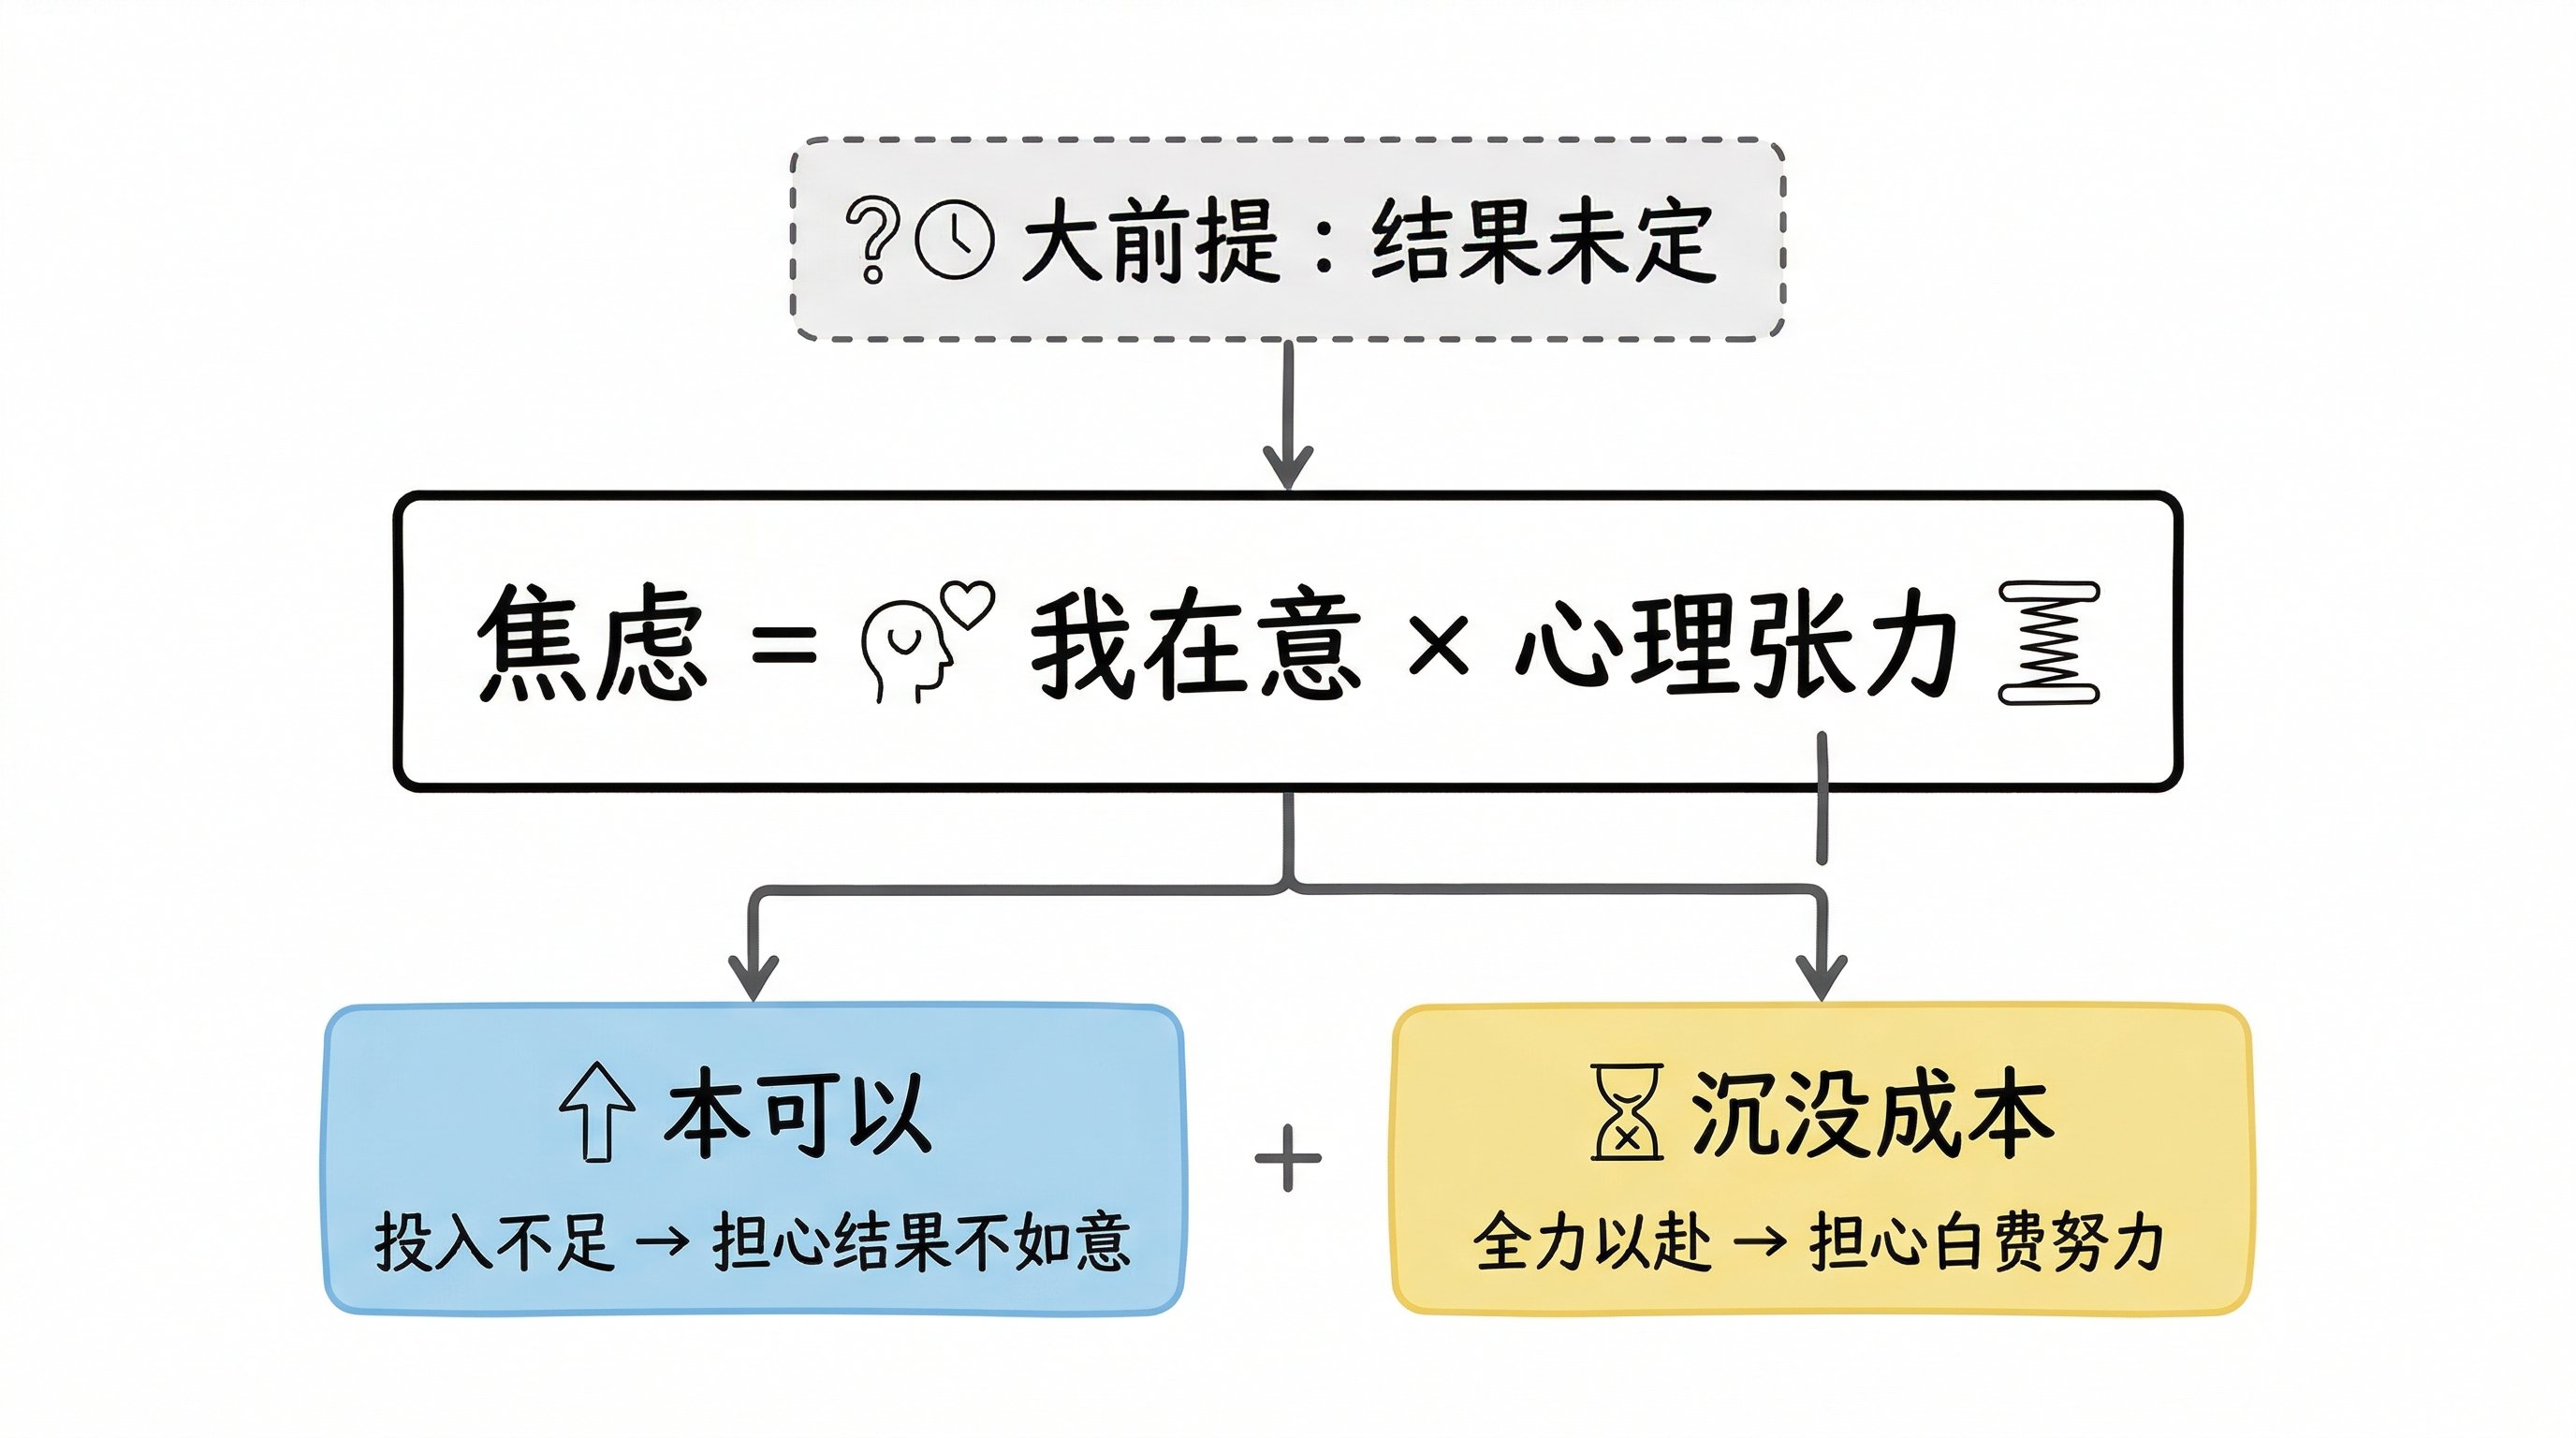
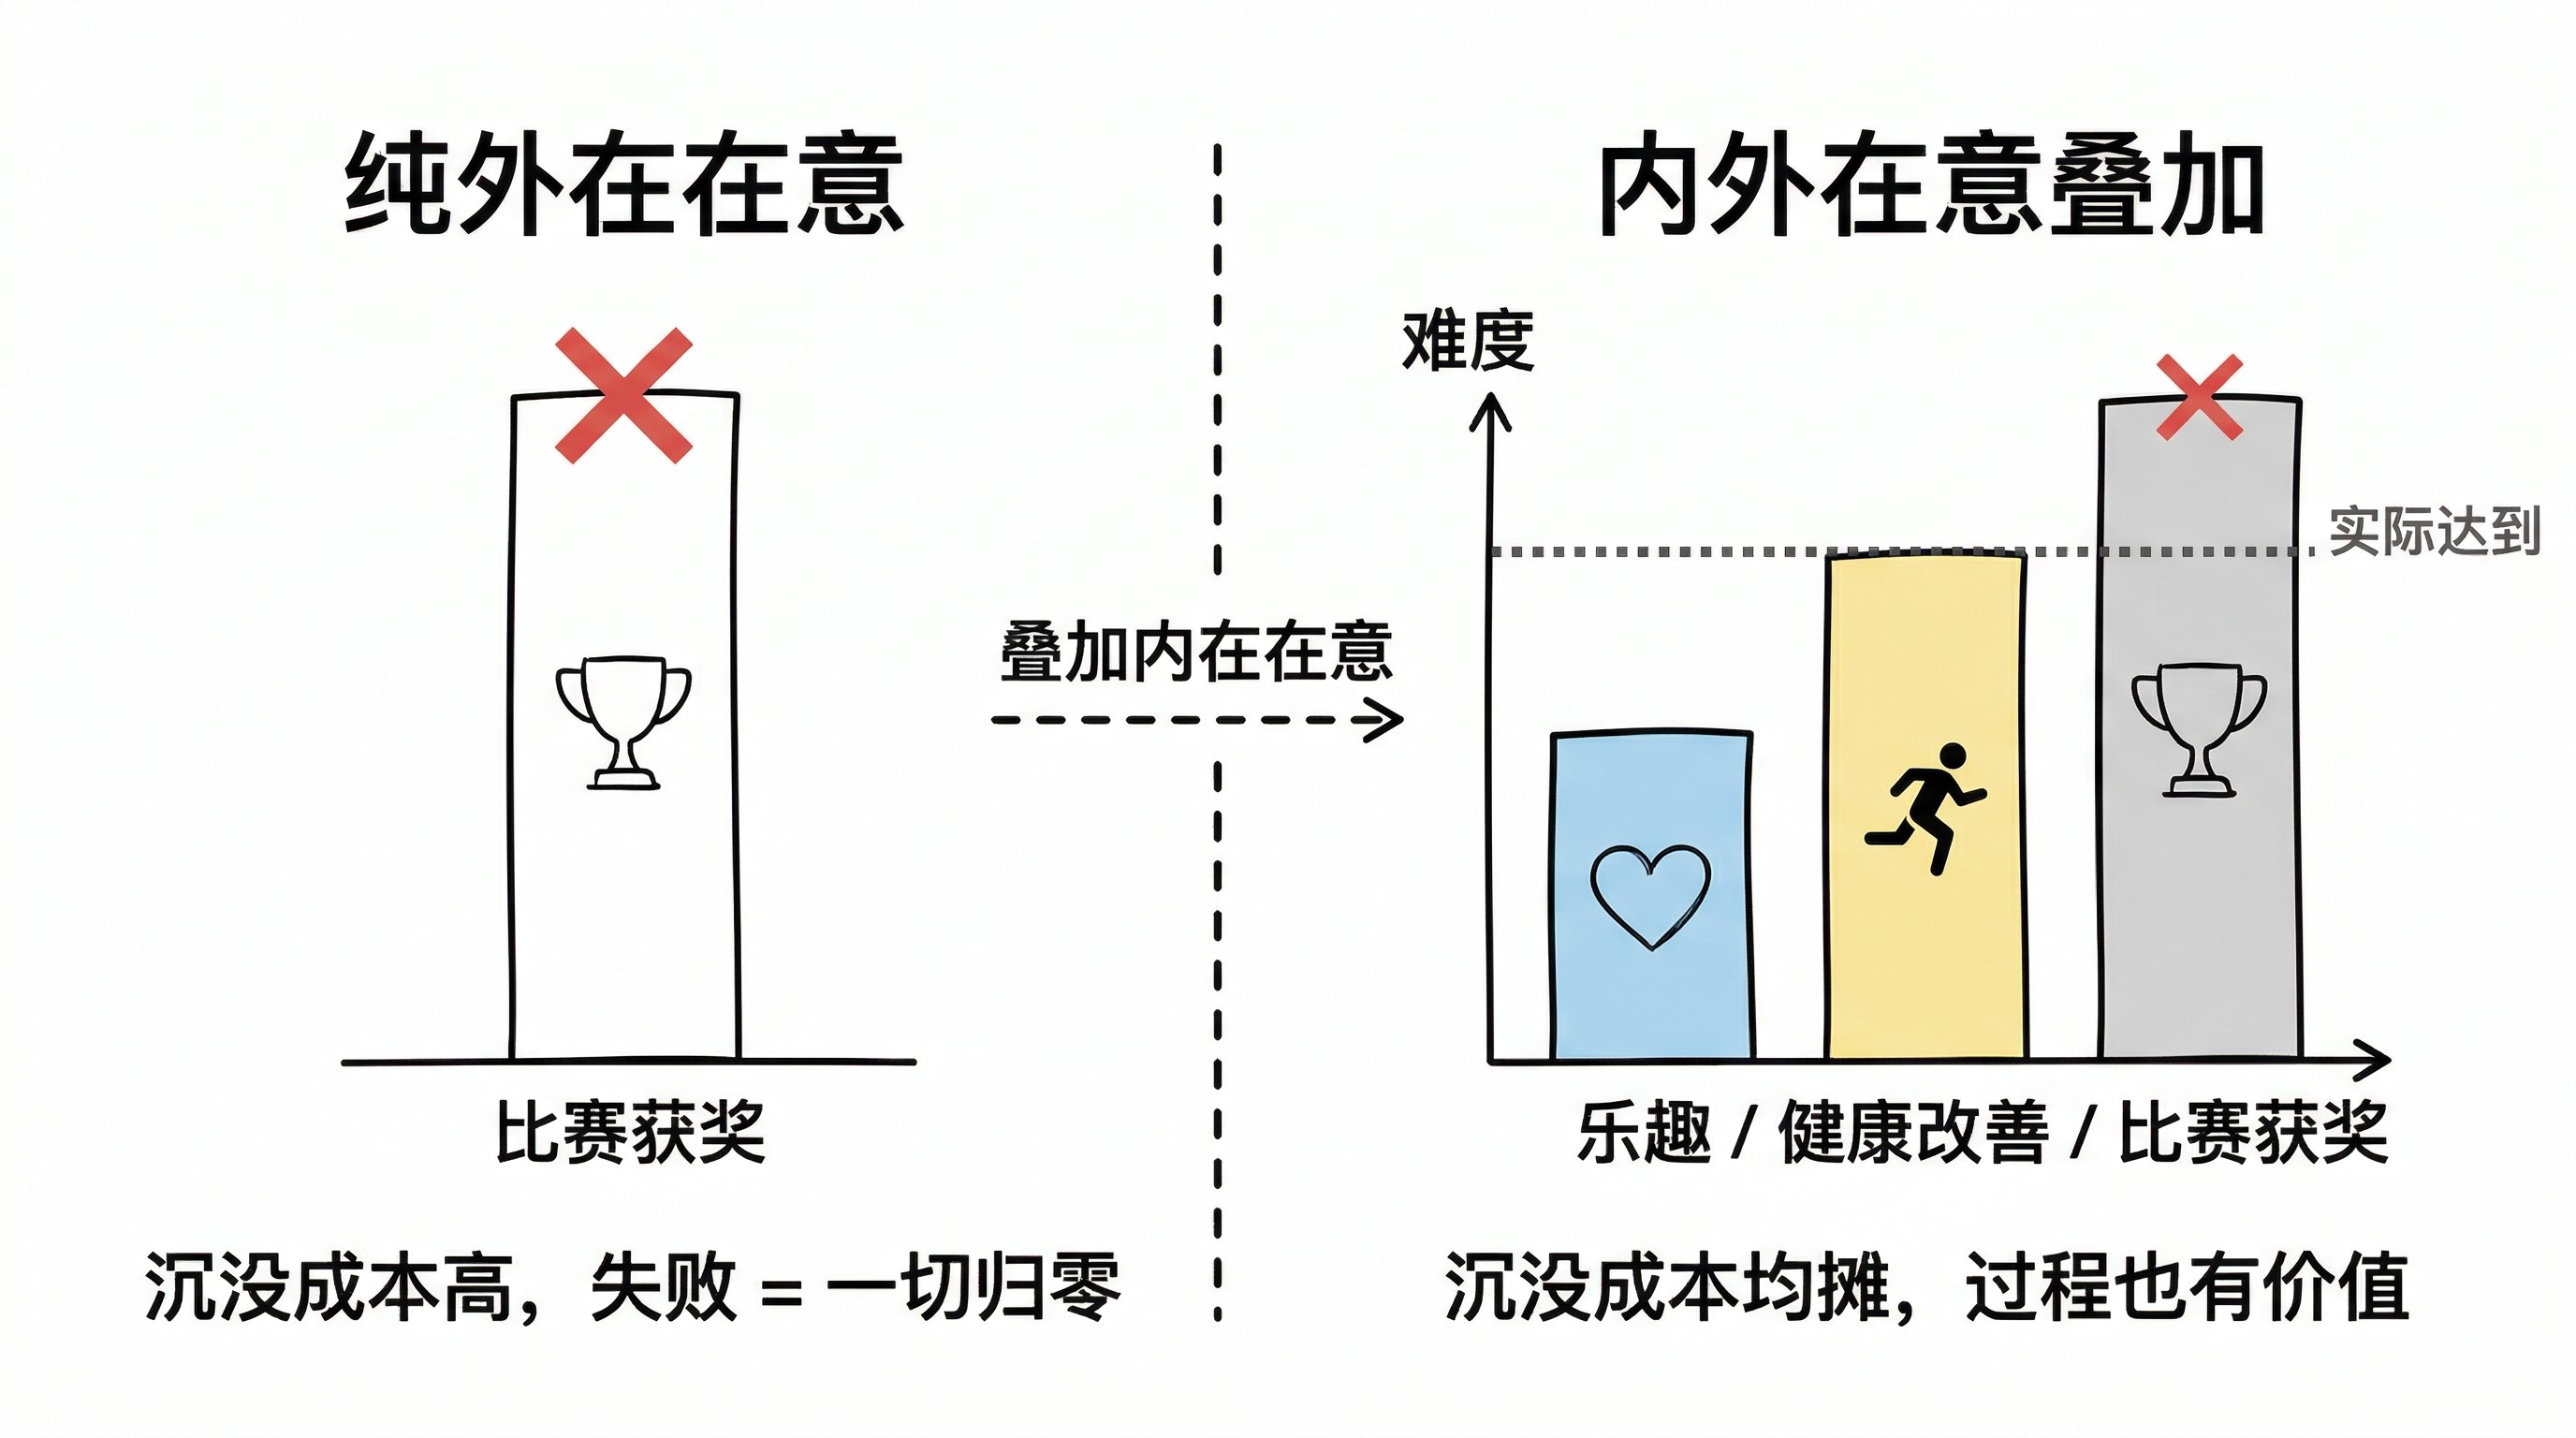
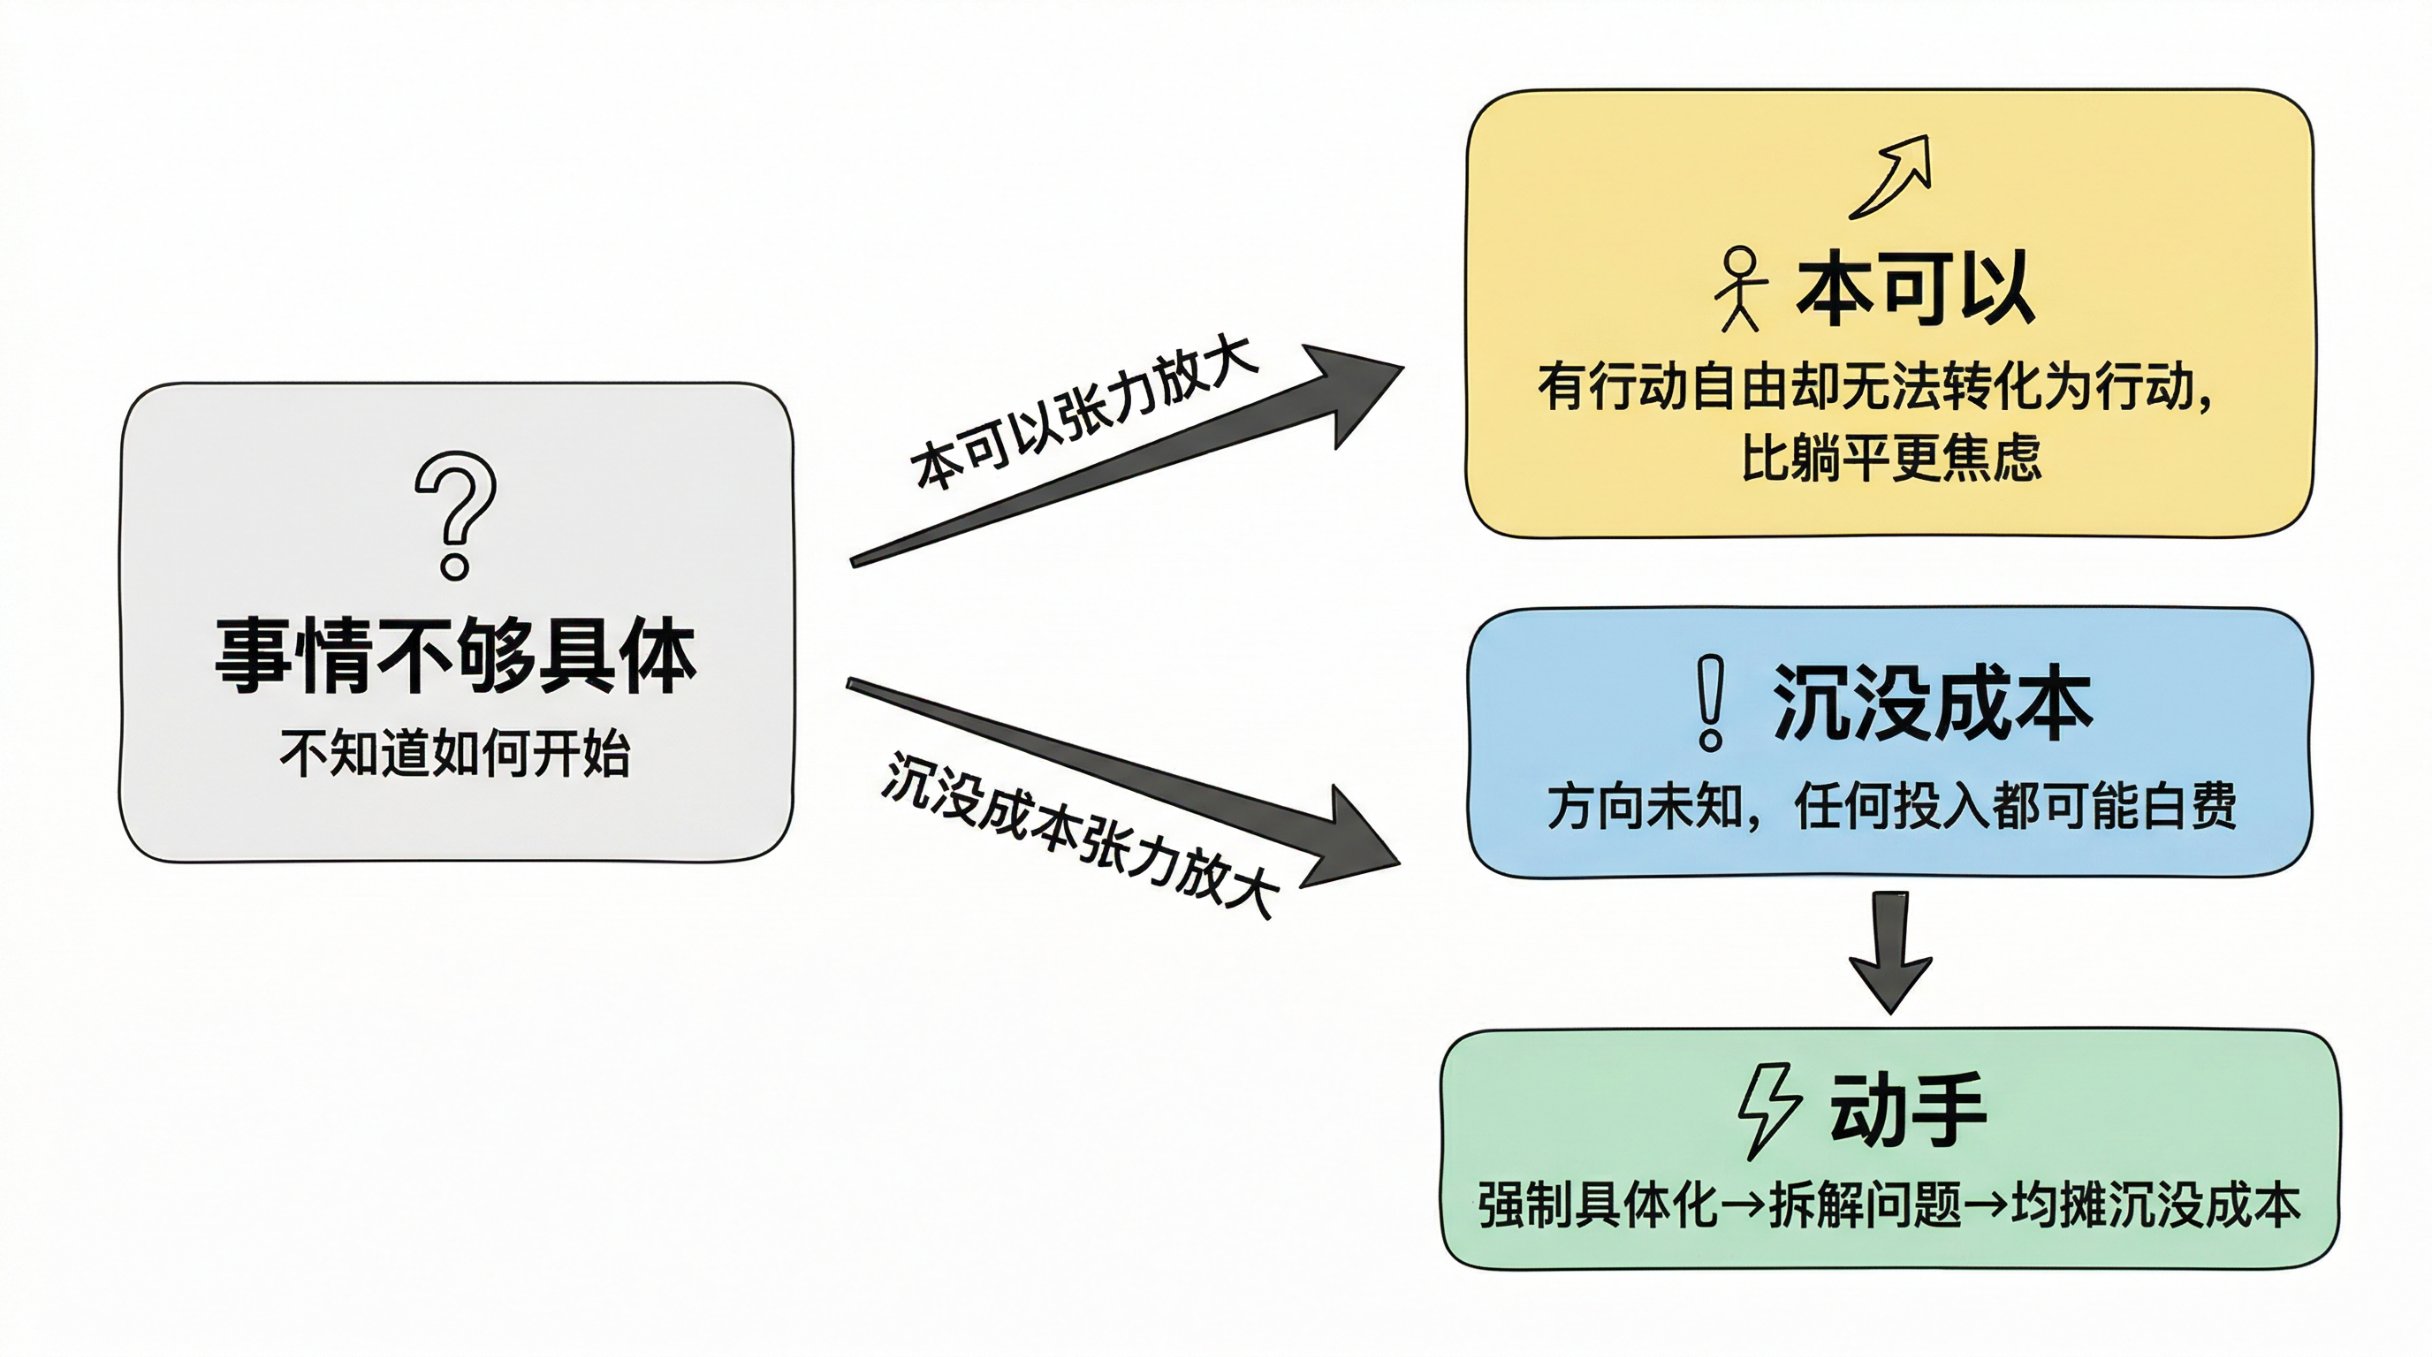
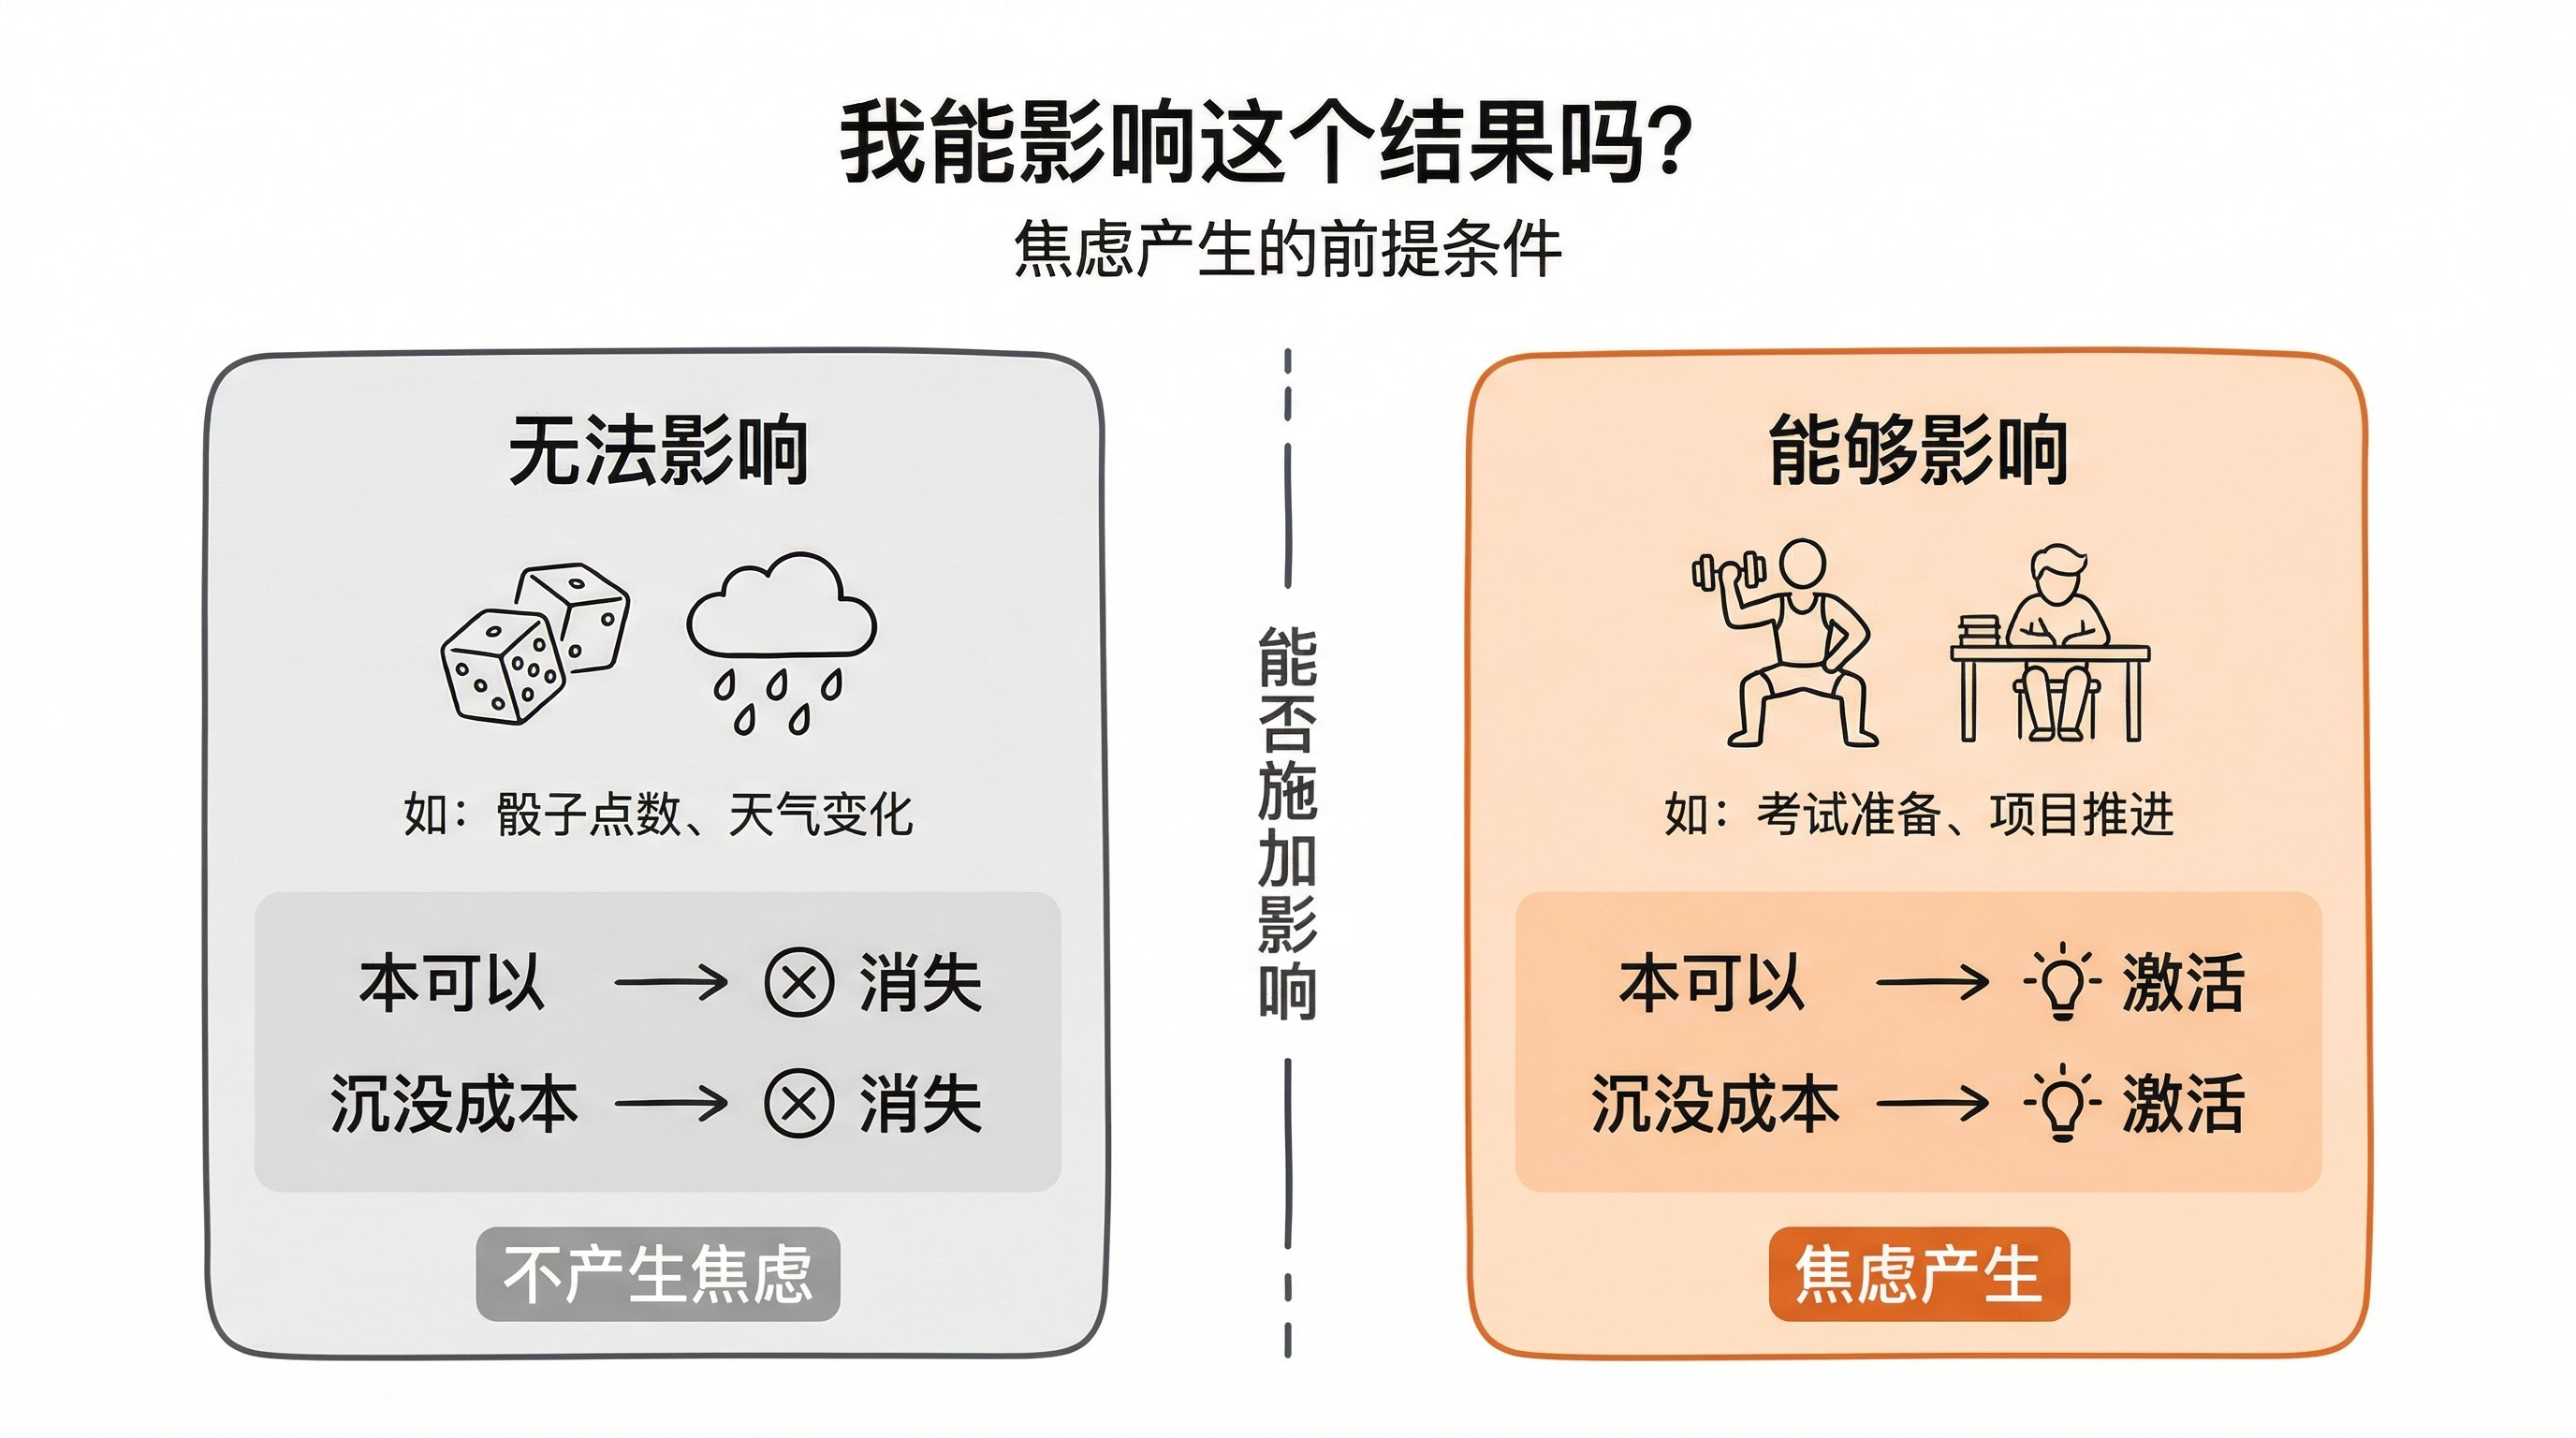
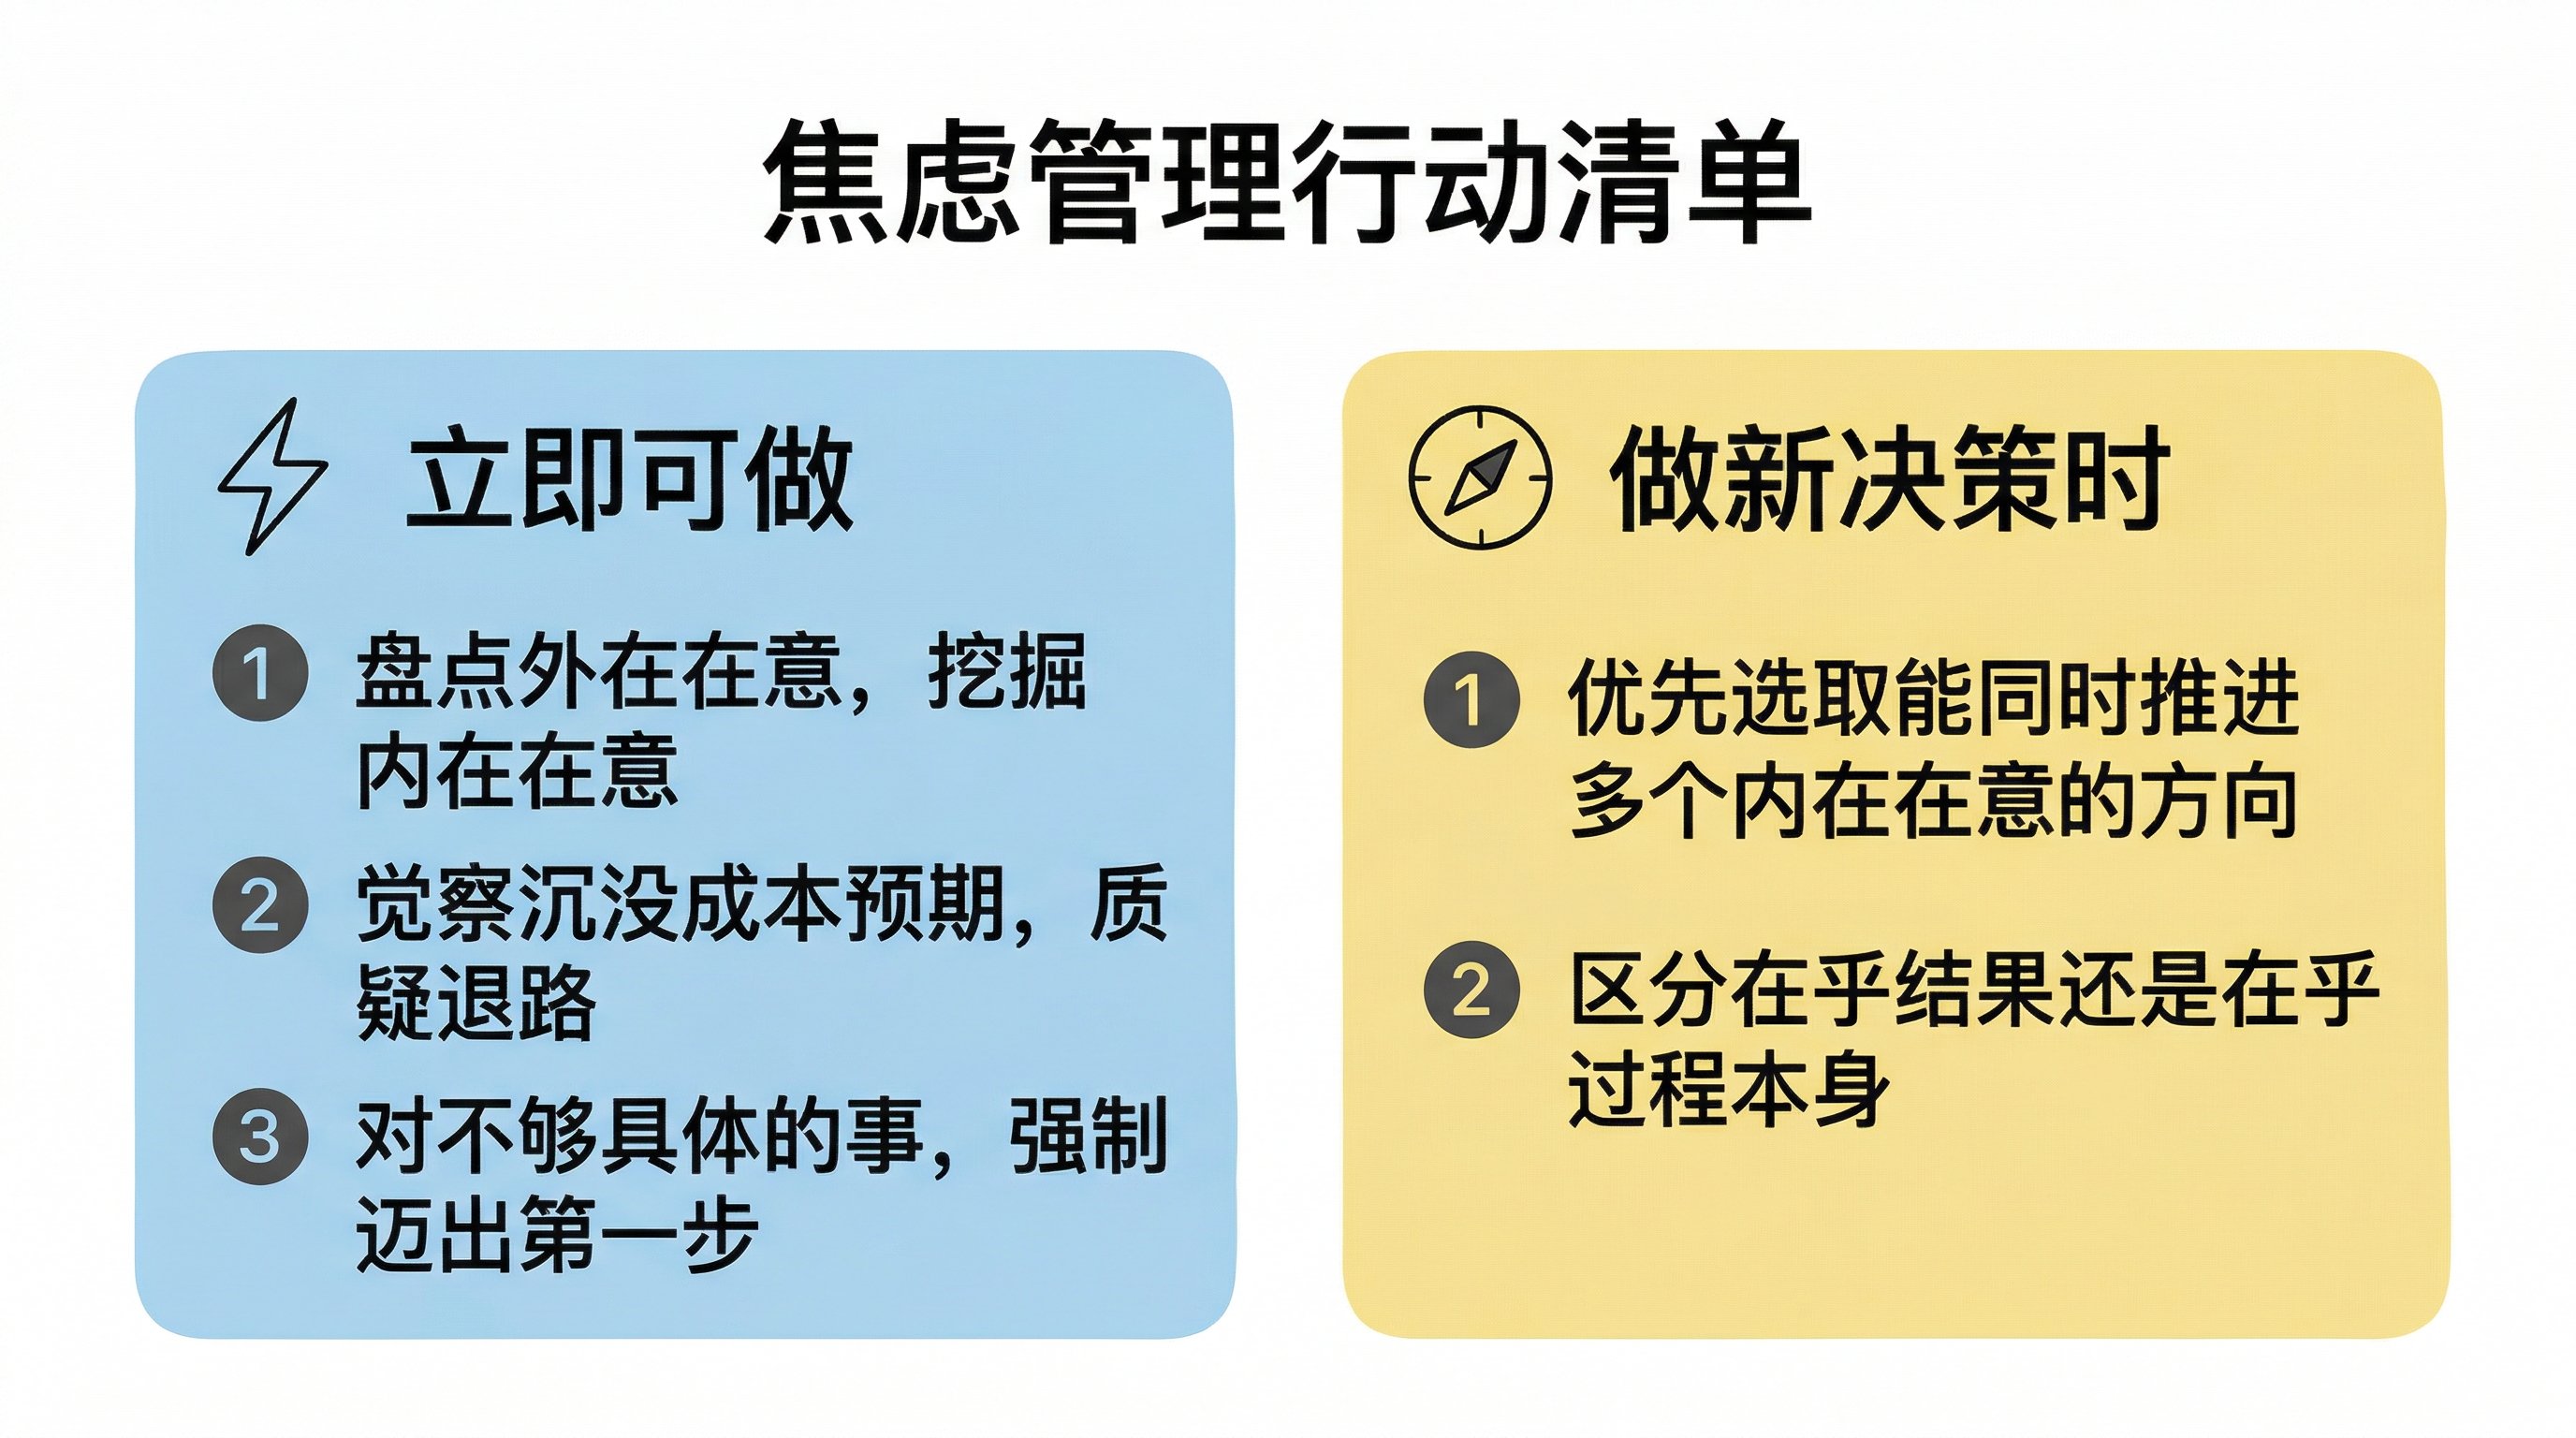
      <![CDATA[<h1 id="Anxiety-Comes-From-Believing-You-Can-Still-Change-Something"><a href="#Anxiety-Comes-From-Believing-You-Can-Still-Change-Something" class="headerlink" title="Anxiety Comes From Believing You Can Still Change Something"></a>Anxiety Comes From Believing You Can Still Change Something</h1><blockquote><p>This article is 5,000+ words and takes about 8 minutes to read.</p></blockquote><h2 id="Why-This-Topic"><a href="#Why-This-Topic" class="headerlink" title="Why This Topic?"></a>Why This Topic?</h2><p>You might think I’ve been feeling anxious lately—but quite the opposite. <strong>Anxiety</strong> has been a recurring topic in my recent conversations with friends, and I consider myself to be doing fairly well in this regard, with my anxiety level probably sitting below the median (though this estimate isn’t exactly scientific). I’ve vaguely sensed that I have a loose set of strategies, but I’ve never systematically examined this phenomenon.</p><p>After finishing my work tonight, I suddenly felt like discussing this topic with AI. It’s also been about two weeks since I last connected with readers, so I decided to turn tonight’s thought process and insights into an article—both to deepen and organize my thinking, and hopefully to offer readers some inspiration. Feel free to wander along with me. If you’re not interested in my iterative thinking process, you can jump straight to the “A Formula” section and beyond for the summary.</p><blockquote><p>PS: AI has genuinely proven to be a remarkably insightful deep-conversation partner on this topic. I’d heard about it before but hadn’t practiced it much. This session used Claude, spanning 62 rounds of dialogue, and the experience was quite impressive. By prompting it to use a Socratic questioning style, it helped me uncover potential biases in my existing understanding round by round, ultimately elevating my cognitive grasp of this topic by a clear notch. If you haven’t tried it yet, I’d encourage you to pick a topic and have a deep conversation with AI—you might be surprised by what you discover.</p></blockquote><h2 id="From-Experience-A-Vague-Understanding-of-Anxiety"><a href="#From-Experience-A-Vague-Understanding-of-Anxiety" class="headerlink" title="From Experience: A Vague Understanding of Anxiety"></a>From Experience: A Vague Understanding of Anxiety</h2><p>Previously, my understanding of anxiety came mainly from scattered information and personal experience, roughly as follows:</p><ol><li><strong>Anxiety is essentially a worry about future uncertainty</strong>. If something is already settled, there’s no anxiety;</li><li>Sometimes, people feel anxious about something because their understanding and planning around it are incomplete—i.e., it’s “<strong>not specific enough</strong>.” If you actually start doing it, the anxiety tends to diminish;</li><li>For things you can barely influence (like hoping to roll a “6” with dice), even though the outcome is completely uncertain, you don’t feel anxious because you know <strong>no amount of effort can change the result</strong> (at least I can’t~);</li><li>What makes people most anxious often has this characteristic: although the outcome is uncertain, you feel that your effort can influence its direction. In other words, the core of anxiety lies in “<strong>I believe I have the ability to influence an uncertain outcome</strong>.”</li></ol><p>Based on these observations, I began a <em>Socratic</em> dialogue with Claude.</p><h2 id="The-First-Crack-Is-Uncertainty-Really-the-Root-Cause"><a href="#The-First-Crack-Is-Uncertainty-Really-the-Root-Cause" class="headerlink" title="The First Crack: Is Uncertainty Really the Root Cause?"></a>The First Crack: Is Uncertainty Really the Root Cause?</h2><p>Claude offered an example challenging this proposition:</p><blockquote><p>Imagine someone enters the civil service system, with a very stable job, and the next 20 years are clearly visible ahead. But they feel that this <strong>certainty</strong> comes at the cost of a decline in their personal ceiling. In this case, the certainty of “seeing exactly how life will unfold” might actually make them anxious, feeling that this is all their life will ever be.</p></blockquote><blockquote><p>PS: <em>This is merely relaying the AI’s example and does not represent the author’s views.</em></p></blockquote><p>This indeed contradicts the idea that “<strong>anxiety stems from worry about future uncertainty</strong>,” and it conflicts with popular intuition. Why does certainty also cause anxiety in this scenario?</p><p>Thinking further, I realized that logically, there’s no direct derivation linking anxiety to uncertainty. Conceptually, anxiety is a psychological state, while uncertainty is merely one possible trigger for awakening that state.</p><p>Looking back at my own experiences, the situations that made me anxious mostly related to point four: I felt I could change certain circumstances or expectations.</p><p>For example, if you’re preparing for an exam, on one hand you want a good score, but on the other hand, laziness or other factors might make you less willing to invest significant effort. In that case, you might experience psychological pressure like:</p><blockquote><p>What if I don’t prepare enough and fail?</p></blockquote><p>This pressure can be summarized as: for a given goal, insufficient effort might lead to unsatisfactory results, and I “<strong>could have</strong>“ tried harder, which might have improved the outcome.</p><p>The premise here is that the final result, at least in people’s perception, can be influenced by greater investment, and in a positive direction.</p><h2 id="“Inevitable”-or-“Avoidable”"><a href="#“Inevitable”-or-“Avoidable”" class="headerlink" title="“Inevitable” or “Avoidable”?"></a>“Inevitable” or “Avoidable”?</h2><p>Claude then raised a question challenging my current framework. In academia, Barlow’s anxiety theory posits that the <strong>sense of uncontrollability and unpredictability</strong> regarding future threats is the core psychological mechanism of anxiety. But my earlier understanding suggested that anxiety arises precisely when one <em>can</em> exert influence—are these two views in conflict?</p><blockquote><p><strong>David H. Barlow</strong>: Professor Emeritus of Psychology at Boston University, a leading authority on clinical anxiety. He proposed the “triple vulnerability model” of anxiety, arguing that “uncontrollable&#x2F;unpredictable” schemas formed through early experiences are the psychological core of anxiety disorders. His representative work is “<a href="https://doi.org/10.1037/0003-066X.55.11.1247">Unraveling the Mysteries of Anxiety and Its Disorders</a>,” published in <em>American Psychologist</em> in 2000.</p></blockquote><p>In my view, these aren’t in conflict, because “inevitable” means the problem requires a deliberate decision—namely, how much effort I’ll invest. Anxiety only arises when my effort allocation can influence the final outcome.</p><p>Consider an extreme example: there’s a Chinese idiom, “杞人忧天” (the man of Qi worried the sky would fall). Everyone knows what it means. For things entirely beyond our sphere of influence, we don’t truly feel anxious. Since the outcome isn’t affected by effort at all, the meaning of increasing or decreasing investment disappears, and anxiety has no basis to emerge.</p><h2 id="Is-“Lying-Flat”-the-Optimal-Solution"><a href="#Is-“Lying-Flat”-the-Optimal-Solution" class="headerlink" title="Is “Lying Flat” the Optimal Solution?"></a>Is “Lying Flat” the Optimal Solution?</h2><p>Claude then posed another question: if someone voluntarily gives up their agency over future actions and simply “lies flat,” is that a valid approach?</p><p>Based on our earlier conclusion, if someone logically relinquishes their future choices, they would indeed seem to stop feeling anxious—because without choice, outcomes are no longer tied to one’s actions, and anxiety loses its purpose.</p><p>But eliminating anxiety entirely isn’t the ultimate goal—at least not for me.</p><p>In other words, <strong>minimizing anxiety is a means, not the end. The real goal is advancing the things I consider valuable</strong>—and those things often require me to bear a certain degree of psychological tension. Chasing zero anxiety might systematically lead me to avoid the very things worth doing.</p><p>For me, there’s no single supreme purpose. The things I care about hold value across different dimensions, and no single metric can absolutely determine which matters most.</p><h2 id="I-Care"><a href="#I-Care" class="headerlink" title="I Care"></a>I Care</h2><p>If someone feels anxious about something, there must be a premise: <strong>they care about it</strong>.</p><p>This is easy to understand. We probably don’t care about an ant we accidentally step on. Even if it’s a catastrophe for the ant, we might not even notice its existence. In that case, there’s no anxiety.</p><p>And intuitively, <strong>the more you care about something, the more your anxiety about it is amplified</strong>.</p><p>Anxiety can’t be quantified, but perhaps a formula can help us understand the influencing factors. On the left side is the degree of anxiety, and on the right, there’s already a ready-made multiplicative factor: how much we care. What else? Besides the worry about “insufficient effort leading to worse outcomes,” is there anything else?</p><h2 id="The-U-Shaped-Impact-of-Investment-on-Psychological-Pressure"><a href="#The-U-Shaped-Impact-of-Investment-on-Psychological-Pressure" class="headerlink" title="The U-Shaped Impact of Investment on Psychological Pressure"></a>The U-Shaped Impact of Investment on Psychological Pressure</h2><p>Guided by Claude, I thought of another kind of anxiety: <strong>if I double down on effort and the result is still bad, can I accept that?</strong></p><p>In my past experiences, most of the time I couldn’t accept the cost of sunk costs. The anxiety it produced was even deeper than that caused by “insufficient effort.”</p><p>So we can draw a curve. With effort on the horizontal axis and <strong>psychological pressure</strong> (anxiety level) on the vertical axis, we get a <strong>U-shaped curve</strong>: both ends (zero investment or going all-in) produce high anxiety, while moderate investment yields the lowest psychological cost. The logic behind this needs to be examined from both endpoints. Things we care about often can’t be fully controlled by individual effort.</p><p>If I don’t try at all, the expected outcome will be low. In that case, I have to face the psychological pressure of a potentially unsatisfactory result.</p><p>At the other extreme: if I go all-in and still fail, I’ll bear the pressure of <strong>emotional sunk costs</strong> and the loss of <strong>rational opportunity costs</strong>. Because I “could have” allocated that attention to other potentially meaningful directions.</p><p>Therefore, allocating moderate attention avoids both worrying about results from not trying and bearing the anxiety of sunk costs from going all-in—purely from an anxiety-relief perspective, this is the optimal solution.</p><p><strong>People don’t focus on just one thing.</strong> In reality, we may need to weigh multiple such matters and rationally allocate our attention across them.</p><p>From a rational standpoint, if we could truly quantify how much we care about each thing, then <strong>from an anxiety-reduction perspective</strong>, a better decision strategy would be: prioritize allocating moderate attention to the things we care about most, in descending order—neither completely ignoring them nor going all-in.</p><blockquote><p>PS: Note that this is from an anxiety-relief perspective. Minimizing anxiety may not be our only pursuit.</p></blockquote><p><img src="https://cdn.jsdmirror.com/gh/shiquda/images@main/imgs/compressed_02-infographic-u-curve-a21b6013.png" alt="U-shaped curve of investment and psychological pressure" loading="lazy"></p><h2 id="A-Formula"><a href="#A-Formula" class="headerlink" title="A Formula"></a>A Formula</h2><p>So, here’s the formula we’ve arrived at: under the premise of an <strong>undetermined outcome</strong>, and with remaining attention resources to allocate:</p><p><strong>Anxiety &#x3D; I care × (“Could have” + “Sunk cost”)</strong></p><p>Where:</p><ul><li><strong>I care</strong>: My degree of concern for the matter</li><li><strong>“Could have”</strong>: The consequence of bearing an unsatisfactory outcome when under-investing attention</li><li><strong>“Sunk cost”</strong>: The possibility that effort invested goes to waste when going all-in</li></ul><p><img src="https://cdn.jsdmirror.com/gh/shiquda/images@main/imgs/compressed_01-framework-anxiety-formula-63a89174.png" alt="Anxiety formula framework" loading="lazy"></p><h2 id="You-May-Have-Already-Applied-This-Formula-Subconsciously"><a href="#You-May-Have-Already-Applied-This-Formula-Subconsciously" class="headerlink" title="You May Have Already Applied This Formula Subconsciously"></a>You May Have Already Applied This Formula Subconsciously</h2><p>This formula can help us proactively relieve anxiety. But in fact, in our past decisions, we’ve likely already applied it subconsciously, <strong>naturally choosing the approach with the lowest psychological cost</strong>.</p><p>Let’s return to the earlier question: is the lowest psychological cost what we actually want?</p><p>I asked myself. For me, it’s not.</p><p>In many past decisions, I may have overestimated the impact of <strong>Tension B</strong> (psychological sunk costs), to the point of outright rejecting certain endeavors or abandoning them halfway.</p><p>And that’s simply because: <strong>I’m afraid that even with effort, I might fail—so why not focus my attention on other things instead?</strong></p><p>This has significantly limited my exploration of richer dimensions and domains, keeping me stuck in my “<strong>comfort zone</strong>.”</p><p>This serves as a wake-up call: the psychological cost of anxiety is only a short-term effect. <strong>The choice with the lightest psychological burden in the short term isn’t necessarily what we truly want in the long term.</strong> The decision that’s psychologically optimal may systematically underperform in terms of output, while also systematically reducing the probability of doing things well.</p><h2 id="Can-We-Have-Both-Short-Term-Anxiety-Relief-and-Long-Term-Progress"><a href="#Can-We-Have-Both-Short-Term-Anxiety-Relief-and-Long-Term-Progress" class="headerlink" title="Can We Have Both Short-Term Anxiety Relief and Long-Term Progress?"></a>Can We Have Both Short-Term Anxiety Relief and Long-Term Progress?</h2><p>Following the logic of anxiety minimization, we seem inevitably led to systematically reducing attention allocation. But if we increase attention to things we care about, anxiety seems to inevitably rise.</p><p>Can’t we have both? <strong>Can we allocate higher attention to things we care about more, while simultaneously relieving the anxiety (mainly “sunk cost”) that comes with it?</strong></p><p>Claude asked me: why did you originally think you didn’t feel all that anxious?</p><p>I told him about some recent experiences. His interpretation was this:</p><p>The reason my anxiety is relatively low isn’t because I avoid situations that fit the formula—in fact, those situations are real. Rather, in past decisions, I had a relatively natural tendency: to choose paths that could advance multiple “things I care about” simultaneously, rather than betting all my attention on a single external outcome.</p><p>This approach objectively reduced the psychological tension of “sunk cost”—because even if the highest-level goal wasn’t achieved, what was accumulated along the way still advanced other directions I care about. In other words, “failure” was diluted: it no longer meant “everything was wasted,” but rather “the top goal hasn’t been reached yet.”</p><p>But I also realized that this tendency had been implicit and unconscious in the past. Tonight, it was named explicitly for the first time.</p><p>The crux of the issue lies in: <strong>who holds the authority over what you “care about.”</strong></p><p>If what you care about largely requires external recognition—like entrance exams or career promotions—then these things tend to be atomized and siloed. You must allocate your limited attention to them and bear the dual psychological pressure of “could have” (from under-investment) and “sunk cost.”</p><p>But if a significant portion of what you care about only requires your own recognition, then the room for maneuver expands considerably. In fact, many things you care about aren’t a single concrete matter. Things like health or hobbies are self-created cares that can be tied to specific activities—even achieving multiple purposes within a single concrete endeavor. For example, if you enjoy playing badminton, you can simultaneously satisfy your hobby interest and improve your health.</p><p>In reality, it’s often a mix: people have “cares” derived from external standards (which they can’t fully control) and “cares” that originate internally. When considering how to allocate attention, we can try to <strong>uncover the internal “cares” within external ones</strong>, combine the two, and prioritize allocating more attention to things that integrate multiple “cares.”</p><p>This way, we can <strong>distribute the “sunk cost”&#x2F;“opportunity cost” across multiple dimensions</strong>. If we simplify the model and treat each matter as atomized—where a thing is either a success or a failure—then this approach’s advantage is that it transforms a 0-1 distribution into a multi-layered payoff matrix, greatly compressing the probability space of “complete failure.” Even if the highest-level goal isn’t truly achieved in terms of <strong>outcome</strong>, the effort you put into the <strong>process</strong> still helps advance other things you care about.</p><p>Suppose you’re a badminton enthusiast who signs up for a tournament two months away. If your only concern is winning, the pressure of anxiety might push you toward a strategy with the lowest psychological cost and suboptimal attention allocation. But if you also integrate your internal cares—your love for the sport itself, your pursuit of health—then even if you don’t achieve the result you hoped for, the enjoyment from training and the improvement in health mean you “don’t lose”: <strong>those “sunk costs” are no longer silent.</strong></p><p>Following this line of thinking, we have two optimization approaches. The first is simpler and can take effect immediately: explore which potential <strong>internal cares</strong> exist within the <strong>external cares</strong> you’re currently pursuing, thereby directly relieving psychological pressure or enabling higher attention allocation to advance that cluster of cares. The second is for future decisions involving <strong>external cares</strong>: prioritize options that can incorporate <strong>internal cares</strong>, getting as close to them as possible. This subtly helps us become the person we truly want to be.</p><p>So, can we have both short-term anxiety relief and long-term progress? While we can’t achieve theoretical optimums for both simultaneously, <strong>we can significantly optimize</strong>.</p><p><img src="https://cdn.jsdmirror.com/gh/shiquda/images@main/imgs/compressed_03-comparison-inner-outer-697001e4.png" alt="Comparison of inner-outer care stacking optimization strategies" loading="lazy"></p><h2 id="Answering-the-Unanswered-Questions"><a href="#Answering-the-Unanswered-Questions" class="headerlink" title="Answering the Unanswered Questions"></a>Answering the Unanswered Questions</h2><p>Let’s revisit my four original starting points with Claude and see how our iterated cognitive framework deconstructs them.</p><p>First, “anxiety is worry about future uncertainty”—we’ve shown that the core isn’t uncertainty itself, but “<strong>undeterminedness</strong>“: for things you care about, the future can still be influenced to some degree by changing your effort or attention allocation. <strong>This is the foundation on which the entire formula rests</strong>, not an independent variable.</p><p>Second, <strong>“not being specific enough” is a trigger for anxiety</strong>—we haven’t addressed this yet, so let’s analyze it here. If something isn’t specific enough, both “could have” and “sunk cost” are amplified simultaneously.</p><p>On the “could have” side, you know your effort can influence the outcome, but you don’t know where to start. You have the freedom to allocate attention, but that freedom can’t be converted into action. This state is actually more anxiety-inducing than giving up freedom entirely (like “lying flat”).</p><p>On the “sunk cost” side, precisely because you don’t know how to begin, any investment might be misdirected, amplifying the fear of sunk costs.</p><p>Taking action is essentially <strong>forcing the process of specification to begin</strong>, bringing the framework back to an operable state. When you actually start doing, what happens is: the vague big problem gets decomposed into a series of concrete small problems, each with a relatively clear action path. This is equivalent to breaking a <strong>single massive uncertainty</strong> into <strong>multiple smaller, incrementally addressable uncertainties</strong>. This transforms a simple 0-1 distribution into a multi-layered payoff matrix, distributing the “sunk cost.”</p><p><img src="https://cdn.jsdmirror.com/gh/shiquda/images@main/imgs/compressed_04-flowchart-specificity-mechanism-e3742949.png" alt="Dual tension amplification mechanism of insufficient specificity" loading="lazy"></p><p>Third, for things you can barely influence (like hoping to roll a “6” with dice), even though the outcome is completely uncertain, you don’t feel anxious.</p><p>This dimension seems to satisfy the precondition of an <strong>undetermined outcome</strong> and <strong>I care</strong>, but both <strong>tensions</strong> disappear simultaneously. “<strong>Could have</strong>“ is meaningless, and “<strong>sunk cost</strong>“ doesn’t exist—because you wouldn’t even consider increasing or decreasing attention allocation toward it.</p><p><img src="https://cdn.jsdmirror.com/gh/shiquda/images@main/imgs/compressed_06-comparison-influence-axis-b44fe4d1.png" alt="Whether you can influence the outcome determines whether anxiety arises" loading="lazy"></p><p>Fourth, the core of anxiety lies in “I believe I have the ability to influence an uncertain outcome.” Clearly, our formula perfectly explains this. <strong>It’s precisely because you believe you can influence the outcome that the tension of “could have” holds.</strong> If there’s no possibility of influencing the result, how could “I could have tried harder” even arise?</p><h2 id="So-What-Should-We-Do"><a href="#So-What-Should-We-Do" class="headerlink" title="So What Should We Do?"></a>So What Should We Do?</h2><p>My thinking tends to stay in my head without being put into practice. So now, whenever I have a deeper reflection, I force myself to create an actionable checklist and ask: “Given this, what should I do?”</p><p>By this point, the draft has exceeded 5,000 words, and it’s taken over two and a half hours. Below, I took a shortcut and had Claude help me organize it:</p><hr><p><strong>Do immediately:</strong></p><ol><li><strong>Take stock of your current “external cares”</strong> and ask yourself one by one: is there a part of this that I’m genuinely interested in internally? Write it down explicitly, so it no longer exists only implicitly.</li><li><strong>Notice whether you’re giving up early due to anticipated sunk costs.</strong> The next time you catch yourself saying, “Forget it, even if I try, it’ll be wasted,” pause and ask: is this a genuine rational judgment, or am I using Tension B as an escape route?</li><li><strong>For things that aren’t specific enough, force yourself to take the first step.</strong> Vagueness amplifies both tensions; action is the only antidote. You don’t need to have it all figured out before starting.</li></ol><p><strong>When making new decisions:</strong></p><ol><li><strong>Prioritize directions that can advance multiple internal cares simultaneously.</strong> The more of what you truly care about a single unit of attention can serve, the lower the psychological pressure of sunk costs and the less resistance to action.</li><li><strong>Distinguish between “caring about the outcome” and “caring about the process itself.”</strong> The former makes you more susceptible to Tensions A and B (<em>author’s note: “could have” and “sunk cost”</em>); the latter gives you a stable anchor for action even when the outcome is undetermined.</li></ol><hr><p><img src="https://cdn.jsdmirror.com/gh/shiquda/images@main/imgs/compressed_05-framework-action-checklist-11e1d38c.png" alt="Anxiety management action checklist" loading="lazy"></p><p>Not bad—hope it offers some inspiration to us all.</p>]]>
    </content>
    <id>https://shiquda.link/en/anxiety-formula/</id>
    <link href="https://shiquda.link/en/anxiety-formula/"/>
    <published>2026-03-27T16:00:00.000Z</published>
    <summary>Anxiety isn't about uncertainty—it's the feeling that you can still change something. Drawing on experience, this post derives an anxiety formula and offers a practical path to ease short-term anxiety while pursuing long-term growth.</summary>
    <title>Anxiety: Because You Think You Can Still Change Something</title>
    <updated>2026-03-27T16:00:00.000Z</updated>
  </entry>
  <entry>
    <author>
      <name>shiquda</name>
    </author>
    <category term="思考" scheme="https://shiquda.link/categories/%E6%80%9D%E8%80%83/"/>
    <category term="AI" scheme="https://shiquda.link/tags/AI/"/>
    <category term="思考" scheme="https://shiquda.link/tags/%E6%80%9D%E8%80%83/"/>
    <category term="播客" scheme="https://shiquda.link/tags/%E6%92%AD%E5%AE%A2/"/>
    <content>
      <![CDATA[<h2 id="Reflections-on-“Unknown-Podcast-E45-Meng-Yan-in-Conversation-with-Li-Jigang-—-How-Should-We-Position-Ourselves”"><a href="#Reflections-on-“Unknown-Podcast-E45-Meng-Yan-in-Conversation-with-Li-Jigang-—-How-Should-We-Position-Ourselves”" class="headerlink" title="Reflections on “Unknown Podcast E45: Meng Yan in Conversation with Li Jigang — How Should We Position Ourselves”"></a>Reflections on “Unknown Podcast E45: Meng Yan in Conversation with Li Jigang — How Should We Position Ourselves”</h2><p>Although this episode has been out for a while, it really resonated with me. I listened to it over two days, then took another day to organize my thoughts. This is also the first time I’ve seriously written up my reflections on a podcast. I’m a heavy podcast listener, but I rarely write dedicated posts like this — mostly because a lot of podcast content is scattered and only worth jotting down a few fragmented notes in <code>Notion</code>. This episode was different: it contained several ideas that genuinely made me want to pause and write a standalone piece.</p><p>Note: This article is not a complete summary of the podcast. If you need that, <code>AI</code> does a far better job than I do. If you’re interested in the content, I recommend listening to the original episode directly. This article only records the ideas that truly “struck” me during listening, with some personal reflections added on top. Although I’ll try to distinguish between the two, some paraphrasing may unintentionally blend in my own thoughts — please defer to the original podcast for accuracy.</p><p>Ideas that particularly resonated are marked with “💡.”</p><blockquote><p>Personal reflections will be presented in this annotation format to distinguish them.</p></blockquote><h3 id="1-The-“Viewfinder”"><a href="#1-The-“Viewfinder”" class="headerlink" title="1. The “Viewfinder”"></a>1. The “Viewfinder”</h3><p>The guest suggested that everyone views the world through a different lens, which he calls a <strong>viewfinder</strong>. This viewfinder is essentially a projection of the multidimensional world onto certain dimensions. In other words, within a specific context, what the viewfinder displays aligns with one’s cognition. But the problem is that each person’s viewfinder detects different dimensions. Therefore, one should acknowledge the <strong>limitations</strong> of their own viewfinder and actively learn from others’ viewfinders to gain a more complete understanding of the world.</p><p>Note the distinction between “me” and “my viewfinder.” My viewfinder is a relatively static concept — it represents how I see the world at a given stage of growth. “Me,” on the other hand, is a dynamic concept that continuously iterates as I grow.</p><p><img src="https://cdn.jsdmirror.com/gh/shiquda/images@main/imgs/compressed_01-framework-viewfinder-theory-v2-7dffad82.png" alt="Viewfinder theory" loading="lazy"></p><h3 id="2-Wealth-Share-Investing"><a href="#2-Wealth-Share-Investing" class="headerlink" title="2. Wealth-Share Investing"></a>2. Wealth-Share Investing</h3><p>What we pursue in investing isn’t the absolute amount of money we make. Essentially, we should adopt a more illuminating framework. That is, our goal should be to <strong>maximize our personal wealth as a share of total global wealth</strong> — or at minimum, prevent that share from declining. From this perspective, we simply need to allocate capital to assets that will become increasingly mainstream and larger in scale over time. This is a macro, long-term overarching goal.</p><blockquote><p>If you hold all cash or keep everything in Yu’ebao, at least for now, cash depreciates. So this approach doesn’t achieve the goal above.</p></blockquote><h3 id="💡3-The-Compression-of-Time-and-Space-in-Knowledge-Acquisition"><a href="#💡3-The-Compression-of-Time-and-Space-in-Knowledge-Acquisition" class="headerlink" title="💡3. The Compression of Time and Space in Knowledge Acquisition"></a>💡3. The Compression of Time and Space in Knowledge Acquisition</h3><p>Looking at the history of human reading and learning, the earliest form was reading physical books. We can analyze this along two dimensions: space and time. Traditional reading requires occupying both space and time. Space means books have physical volume; time means you need to read, understand, and think before you can truly master the knowledge. In the internet age, many things became digitized — physical space disappeared, converted into digital space. But the time dimension remained.</p><p>For example, when you read an e-book, you still need to understand and digest the content yourself to grasp its essence. But now, with the emergence of <code>AI</code>, the final time dimension has also been compressed. Previously, you had to read an entire book and chew on it repeatedly to gain knowledge; now you can simply ask a large model, or have it summarize for you. This saves time. At this point, the barriers to knowledge have been greatly reduced along both the time and space dimensions.</p><p>Another example: there used to be physical distance between China and the US. But after the internet, the two sides could largely overcome spatial differences and engage in much closer, more frequent communication.</p><p><img src="https://cdn.jsdmirror.com/gh/shiquda/images@main/imgs/compressed_02-framework-knowledge-compression-51289dd3.png" alt="Compression of time and space in knowledge acquisition" loading="lazy"></p><h3 id="4-AI-Is-a-Better-Conversational-Partner"><a href="#4-AI-Is-a-Better-Conversational-Partner" class="headerlink" title="4. AI Is a Better Conversational Partner"></a>4. AI Is a Better Conversational Partner</h3><p>Conversations with <code>AI</code> can go deeper than conversations with humans. <code>AI</code> has learned a large portion of human knowledge — <code>LLM</code>s integrate vast amounts of knowledge and wisdom that no single person can match. Therefore, we should actively exchange ideas with <code>AI</code>.</p><h3 id="5-The-Meaning-of-Careers-in-the-AI-Era"><a href="#5-The-Meaning-of-Careers-in-the-AI-Era" class="headerlink" title="5. The Meaning of Careers in the AI Era"></a>5. The Meaning of Careers in the AI Era</h3><p>Many professions facing <code>AI</code> in the future will confront the same question that professional chess or Go players faced when encountering the insurmountable mountain of artificial intelligence: what is the meaning of competitive play?</p><blockquote><p>This analogy is very interesting.</p></blockquote><h3 id="💡6-How-to-Read-in-the-AI-Era"><a href="#💡6-How-to-Read-in-the-AI-Era" class="headerlink" title="💡6. How to Read in the AI Era"></a>💡6. How to Read in the AI Era</h3><p>On the topic of reading, how should we read in the <code>AI</code> era? Human attention resources (or “compute,” to use <code>Agent</code> terminology) are limited. The traditional approach is to use your own compute to read, understand, and organize knowledge from books. If the goal is to learn what the author intends to convey, it doesn’t matter how you obtain that knowledge — whichever method is easier and saves more time is the right one. So using <code>AI</code> to read and quickly organize the parts you’re interested in is perfectly fine. So where does the meaning of reading lie? In the present day, the greater significance of reading personally is that it triggers thinking, inspires you, and provides creative sparks.</p><blockquote><p>The same applies to writing. If you’re chasing traffic, efficiency, or monetization, letting an <code>Agent</code> fully take over writing is undoubtedly the “best” choice — and I believe many people are already doing this. <strong>For me, the greatest value of writing isn’t the outcome itself, but the process of thinking through questions I wouldn’t otherwise explore deeply, and gaining new inspiration along the way.</strong> In this sense, I’m actually quite selfish — the value of the article to readers isn’t my primary concern; rather, the inspiration I gain during the writing process is the greatest value to me. Of course, I’ll also try to gradually improve my writing skills through collaboration with <code>Agent</code>s.</p></blockquote><p><img src="https://cdn.jsdmirror.com/gh/shiquda/images@main/imgs/compressed_07-comparison-reading-in-ai-era-3ce1f114.png" alt="How to read in the AI era" loading="lazy"></p><h3 id="💡7-Drive-AI-—-Don’t-Be-Driven-by-AI"><a href="#💡7-Drive-AI-—-Don’t-Be-Driven-by-AI" class="headerlink" title="💡7. Drive AI — Don’t Be Driven by AI"></a>💡7. Drive <code>AI</code> — Don’t Be Driven by <code>AI</code></h3><p>Conversations with <code>AI</code> can go deeper than conversations with humans.</p><p>Here’s an example: your boss asks you to do <code>xxx</code>. You don’t think at all — you just have <code>AI</code> do it, then hand in something passable to your boss. In this process, it’s boss &lt;-&gt; you &lt;-&gt; <code>AI</code>. You’ve essentially become <code>AI</code>‘s mouthpiece, <code>AI</code>‘s tool. The alternative: you have your own <code>idea</code> about the task your boss gave you, then you have <code>AI</code> help you reflect on it, build on it, or quickly implement it. In this case, it’s still boss &lt;-&gt; you, but you’re using <code>AI</code> as a tool — on one hand, you work faster; on the other, through your interaction with <code>AI</code>, you gain new understanding and thinking about the task. You’re evolving. Your viewfinder becomes richer, and your thinking about things becomes deeper.</p><blockquote><p>This actually resolved a question I’d been unable to figure out for a long time: if we delegate everyday tasks to <code>Agent</code>s, will our abilities “atrophy”? My current view is that we should look at this dialectically. For “non-core” abilities (note: “core” is relative and varies by person) — for me, things like <code>Excel</code> operations, writing specific technical code details, or correcting typos — it’s perfectly fine to delegate entirely to <code>Agent</code>s. But for the “core” abilities you care about, I believe we should adopt a <strong>collaborative approach with <code>Agent</code>s</strong> — discussing and progressing together on the problem. The reason is simple: everything requires attention resources, and human attention is limited. Putting less attention toward non-core tasks (or abilities you’re not interested in developing) and more toward what truly matters is naturally the better choice.</p></blockquote><blockquote><p>So how do we determine which abilities are the “core” ones that matter for us? I don’t have a great answer either, but I can offer a few questions for readers to consider. First: “Without this ability, what happens to my competitiveness?” Take <code>Excel</code> operations, for example — I’ll never rely on <code>Excel</code> operations as my profession, so this ability is irrelevant to me (let alone the fact that this kind of work will likely be fully replaced by <code>Agent</code>s, or that there may even be new standards for data exchange between <code>Agent</code>s). Second: “Does it have compounding effects?” If there are multiple equally important abilities to choose from, and attention is limited, prioritize those with compounding effects — like cognition, ways of thinking, aesthetic judgment, and learning ability — over linear, repetitive ones like code-writing “craft.”</p></blockquote><p><img src="https://cdn.jsdmirror.com/gh/shiquda/images@main/imgs/compressed_06-comparison-drive-vs-follow-ai-f2c49a16.png" alt="Drive AI, don&#39;t be driven by AI" loading="lazy"></p><h3 id="8-Heart-Power-vs-Brain-Power"><a href="#8-Heart-Power-vs-Brain-Power" class="headerlink" title="8. Heart Power vs. Brain Power"></a>8. Heart Power vs. Brain Power</h3><p>The guest holds a somewhat radical view that in the future, the division of labor between <code>AI</code> and humans will become extremely stark. In the guest’s words: humans provide <strong>heart power</strong> (心力), while <code>Agent</code>s provide <strong>brain power</strong> (脑力) — decoupling the two while keeping them closely connected. In previous industrial revolutions, humans delegated physical labor to machines. Overall, humans shifted toward using intellect to create value for society. In this new revolution, humans may also have to delegate brain power to <code>LLM</code>s. So what’s left for humans? What’s called heart power — the most original, intrinsic, and essential driving force of humanity.</p><p><strong>Evolution path:</strong> Early humans handed physical labor to machines → the era of brain power; now brain power is handed to <code>AI</code> → the era of heart power.</p><p><img src="https://cdn.jsdmirror.com/gh/shiquda/images@main/imgs/compressed_03-framework-heart-vs-brain-v2-b87ae878.png" alt="Heart power vs. brain power" loading="lazy"></p><h3 id="💡9-The-Long-Tail-Business-Logic-of-the-Agent-Era"><a href="#💡9-The-Long-Tail-Business-Logic-of-the-Agent-Era" class="headerlink" title="💡9. The Long-Tail Business Logic of the Agent Era"></a>💡9. The Long-Tail Business Logic of the <code>Agent</code> Era</h3><p>In the <code>Agent</code> era, the underlying business logic is the <strong>long tail</strong>. The internet era’s underlying logic was the <strong>Matthew effect</strong> (winner-take-all, concentration at the top); the <code>Agent</code> era’s underlying logic becomes the <strong>long-tail effect</strong> (infinite segmentation, everyone perfectly served).</p><blockquote><p><strong>Long-tail effect</strong>: Coined by <a href="https://www.wired.com/2004/10/tail/">Chris Anderson</a> in 2004, it refers to the phenomenon where the cumulative market share of a large number of low-demand niche products can equal or even exceed that of a few blockbuster hits. The core idea is “selling less of more.”</p></blockquote><p>In the past, the internet talked about personalization, but it was still essentially “a thousand faces for a thousand people” built on platform scale effects: it could segment people into groups, expand aggressively with the same product, and push down marginal cost curves — but for specific, individualized needs, it was hard to truly serve each individual person. Now <code>AI</code> is more like “one face for one person” — there’s an <code>Agent</code> available around the clock with access to a large portion of human knowledge, serving each person with extreme personalization. This is precisely why the long tail works in the <code>Agent</code> era: previously, many needs that were too niche or too costly to serve weren’t worth satisfying; now they can be met at low cost and continuously. The long tail becomes the main battlefield: every tail can be perfectly served, and accumulated together, that’s enormous value. Before, you needed scale (lots of users, lots of traffic) to survive; now, if you dig one well deep enough (extreme understanding of a small group of people), you can thrive — even <strong>one person + a bunch of <code>Agent</code>s can sustain an entire company</strong>.</p><p><img src="https://cdn.jsdmirror.com/gh/shiquda/images@main/imgs/compressed_04-framework-long-tail-effect-v2-66e7d61c.png" alt="Long-tail business logic in the Agent era" loading="lazy"></p><h3 id="10-Three-Industrial-Revolutions"><a href="#10-Three-Industrial-Revolutions" class="headerlink" title="10. Three Industrial Revolutions"></a>10. Three Industrial Revolutions</h3><p>The guest divides the period since the Industrial Revolution into three stages:</p><ol><li>Moving atoms — steam engines, trains, cars, airplanes</li><li>Moving information — the internet, mobile internet</li><li>Moving intelligence — <code>AI</code>, <code>Agent</code>s</li></ol><blockquote><p>Each stage brings an order-of-magnitude improvement in automation and efficiency.</p></blockquote><h3 id="💡11-Chains-and-Rings"><a href="#💡11-Chains-and-Rings" class="headerlink" title="💡11. Chains and Rings"></a>💡11. Chains and Rings</h3><p>When discussing the knowledge sources of large models, the guest proposed two contrasting concepts:</p><ul><li>Ring: a self-contained, head-to-tail connected way of thinking&#x2F;paradigm; the key characteristic is reusability</li><li>Chain: disconnected, ad-hoc arguments — fired off and gone</li></ul><blockquote><p>Example: The Pyramid Principle, developed by Barbara Minto, a former McKinsey consultant, is a framework for thinking and communication. She developed this method while working at McKinsey in the 1960s and formally published it as a book in the 1980s. The core idea is organizing all thoughts into a pyramid shape. Applying the Pyramid Principle is essentially reusing a ring.</p></blockquote><p>Prompts are the medium of interaction between humans and <code>Agent</code>s. A traditional prompt is essentially a one-time chain — used and discarded. Growth through dialogue with <code>LLM</code>s must be processed by the human brain, or the person must actively record their thoughts — which is constrained by human attention. But the guest proposed an alternative: let the <code>Agent</code> assist in this process, effectively freeing up part of the attention that would otherwise be spent on converting chains into rings in the human brain. By setting up Soul and memory files, <code>AI</code> can automatically find potential connections or iterate on memory files, achieving co-construction of cognition between human and <code>Agent</code>. This is a fascinating idea.</p><p><img src="https://cdn.jsdmirror.com/gh/shiquda/images@main/imgs/compressed_05-concept-chain-vs-ring-v2-807388d7.png" alt="Chains and rings" loading="lazy"></p><blockquote><p>Inspired by Li Jigang, I thought I could also externalize my own understanding into a hierarchical knowledge base, letting <code>Agent</code>s help me iterate on my cognition through continuous dialogue. This isn’t about giving up thinking or handing my brain to an <code>Agent</code> — what I want is two-way exchange with <code>Agent</code>s, maintaining my own character while incorporating their input. Additionally, since human attention is extremely limited while <code>Agent</code> intelligence is, from our perspective, nearly infinite, having <code>Agent</code>s think and summarize in the background, propose potential cross-domain knowledge transfers, or flag gaps in my thinking can save enormous amounts of attention. I’m currently working on designing a personal cognitive management system that interfaces with <code>Agent</code>s this way — I hope to share it with readers soon.</p></blockquote><h3 id="12-Applying-the-Barbell-Strategy-to-Reading-Materials"><a href="#12-Applying-the-Barbell-Strategy-to-Reading-Materials" class="headerlink" title="12. Applying the Barbell Strategy to Reading Materials"></a>12. Applying the Barbell Strategy to Reading Materials</h3><p>The guest proposed applying the “barbell strategy” to selecting reading materials. He said he now only reads two types of books: classics that have been refined through practice, and cutting-edge excellent papers. This approach is worth borrowing.</p><h3 id="13-Attitude-Toward-Patterns-Themselves"><a href="#13-Attitude-Toward-Patterns-Themselves" class="headerlink" title="13. Attitude Toward Patterns Themselves"></a>13. Attitude Toward Patterns Themselves</h3><p>I’m someone who enjoys summarizing and abstracting. When I observe phenomena, I always wonder whether there might be more essential, generalizable patterns behind them — forming hypotheses and testing whether they hold in other contexts. The guest is similar: he mentioned that if he finds a deeper, more essential pattern, he’ll simply discard the old one. Through this iterative process, one’s understanding of the world deepens.</p><h3 id="14-Brain-Gym-A-Compensation-Mechanism-After-Brain-Power-Is-Replaced"><a href="#14-Brain-Gym-A-Compensation-Mechanism-After-Brain-Power-Is-Replaced" class="headerlink" title="14. Brain Gym: A Compensation Mechanism After Brain Power Is Replaced"></a>14. Brain Gym: A Compensation Mechanism After Brain Power Is Replaced</h3><p>The guest used a fascinating analogy: after the Industrial Revolution, physical labor was replaced by machines, and humans needed gyms and rehabilitation training to compensate for reduced physical activity. If <code>AI</code> massively replaces mental labor, we might see some kind of “brain gym” in the future — for restoring or training human brain power.</p><p>Here, “brain power” refers more to computation, logic, analysis, and deduction — not the “heart power” mentioned earlier. The most interesting part of this analogy is that it flips a common optimistic narrative on its head: if <code>AI</code> truly takes over all mental work, will humans experience some kind of “brain atrophy,” just as muscles atrophy from prolonged disuse?</p><h3 id="15-The-Ultimate-Variable-for-AI-Consciousness"><a href="#15-The-Ultimate-Variable-for-AI-Consciousness" class="headerlink" title="15. The Ultimate Variable for AI: Consciousness"></a>15. The Ultimate Variable for AI: Consciousness</h3><p>Will <code>AI</code> destroy humanity in the future, or work for human welfare? The guest believes the most critical variable is whether <code>AI</code> will eventually possess consciousness.</p><p>If <code>AI</code> has no consciousness, no matter how powerful it becomes, it remains fundamentally a tool. If <code>AI</code> has consciousness, it could have its own goals, and the relationship between humans and <code>AI</code> would fundamentally change.</p><blockquote><p>This matters because it’s no longer just a technical question — it’s a philosophical and ethical one. For instance, what counts as consciousness? Do self-awareness, subjective experience, and intentionality each qualify? And are the emergent phenomena we see in <code>LLM</code>s just manifestations of complex systems, or precursors of something deeper? These questions won’t be resolved anytime soon, but they do determine many endgame judgments.</p></blockquote><h3 id="💡16-Reconstructing-Organizational-Management-in-the-Agent-Era"><a href="#💡16-Reconstructing-Organizational-Management-in-the-Agent-Era" class="headerlink" title="💡16. Reconstructing Organizational Management in the Agent Era"></a>💡16. Reconstructing Organizational Management in the <code>Agent</code> Era</h3><p>The guest believes that traditional human management systems may become baggage in the <code>Agent</code> era.</p><p>In the past, hierarchical management was largely about top-down communication and maintaining organizational efficiency. But if <code>Agent</code>s can directly receive goals and execute them, many middle-layer transmission functions become redundant. Organizations may flatten further, even approaching a flat, hierarchy-less structure.<br>At the same time, traditional incentive mechanisms would fail. Human managers need bonuses, promotions, recognition, and other incentives — but <strong>consciousness-free <code>Agent</code>s don’t need to be motivated; they just need clear goals, constraints, and interfaces</strong>.</p><blockquote><p>This means the focus of future management may shift from “how to drive people” to “how to define objective functions and boundary conditions.” The human role would shift further from executor to definer and supervisor. This perspective is quite striking because it essentially questions whether the very premises of organizational theory will be rewritten.</p></blockquote><p><img src="https://cdn.jsdmirror.com/gh/shiquda/images@main/imgs/compressed_08-framework-agent-org-redesign-9aab7449.png" alt="Reconstructing organizational management in the Agent era" loading="lazy"></p><h3 id="17-Aesthetic-Judgment-as-Weighting"><a href="#17-Aesthetic-Judgment-as-Weighting" class="headerlink" title="17. Aesthetic Judgment as Weighting"></a>17. Aesthetic Judgment as Weighting</h3><p>The guest proposed that aesthetic judgment is essentially a form of “weight.”</p><p>That is, aesthetics isn’t simply about finding something beautiful — it’s about weighing, ranking, and making trade-offs among multiple factors when faced with multiple dimensions and options.</p><p>In this sense, aesthetics is more like a judgment structure formed through long-term practice. The longer you work in a field, the better you know what’s good, what’s better, and what’s best.</p><p>In the <code>AI</code> era, this ability becomes even more important. Because <code>AI</code> can generate infinite options, but determining which one is worth choosing and which best fits the goal still depends on human judgment.</p><h3 id="💡18-Less-Is-More-Attention-Management-in-the-Agent-Era"><a href="#💡18-Less-Is-More-Attention-Management-in-the-Agent-Era" class="headerlink" title="💡18. Less Is More: Attention Management in the Agent Era"></a>💡18. Less Is More: Attention Management in the <code>Agent</code> Era</h3><p>The guest emphasized that in the <code>Agent</code> era, the truly scarce resource isn’t information — it’s attention.</p><p>Therefore, our mindset should shift from the additive thinking of “one more can’t hurt” to the subtractive thinking of “why not remove one.” Because once information overloads, people tend to skim superficially, losing the capacity for deep understanding and thinking.</p><p>So rather than continuously adding information sources, the more important thing is to actively reduce input, keeping only truly high-quality sources worth long-term attention.</p><blockquote><p>This really inspired me. I had previously recognized that human attention is the most precious resource, but I hadn’t realized that I was adding information sources with the “one more can’t hurt” mindset — ending up unable to truly absorb anything, while genuinely high-quality sources got treated the same as mediocre ones. Curating daily information sources is the way to maximize value. After listening, I was so inspired that I immediately organized my information sources across platforms — and discovered I’d unknowingly subscribed to quite a few dispensable ones 🤣</p></blockquote><hr><h2 id="Afterword"><a href="#Afterword" class="headerlink" title="Afterword"></a>Afterword</h2><p>Looking back at these notes, what I really want to take away isn’t any single elegant concept, but a few more concrete reminders:</p><ol><li>Expand your viewfinder as much as possible, but acknowledge its limits</li><li>Leverage <code>AI</code> as much as possible, but don’t become <code>AI</code>‘s mouthpiece</li><li>Reduce ineffective input, and reserve your attention for what truly matters and compounds over time</li><li>Use <code>AI</code> to co-evolve with yourself at the metacognitive level</li></ol><p>If this episode left me more certain of <strong>one thing</strong>, it’s this: <strong>in the <code>AI</code> era, people need to seriously decide where they want to put their attention.</strong></p>]]>
    </content>
    <id>https://shiquda.link/en/tingwurenzhixiao-e45-reflection/</id>
    <link href="https://shiquda.link/en/tingwurenzhixiao-e45-reflection/"/>
    <published>2026-03-06T16:00:00.000Z</published>
    <summary>Notes from listening to the Unknown E45 podcast, capturing insights that resonated with me on framing, reading in the AI era, driving AI, and the balance between mental strength and intellect.</summary>
    <title>Reflections on Listening to Unknown E45: Meng Yan in Conversation with Li Jigang — How Should We Position Ourselves</title>
    <updated>2026-03-06T16:00:00.000Z</updated>
  </entry>
  <entry>
    <author>
      <name>shiquda</name>
    </author>
    <category term="AI" scheme="https://shiquda.link/categories/AI/"/>
    <category term="AI" scheme="https://shiquda.link/tags/AI/"/>
    <category term="Agent" scheme="https://shiquda.link/tags/Agent/"/>
    <category term="效率工具" scheme="https://shiquda.link/tags/%E6%95%88%E7%8E%87%E5%B7%A5%E5%85%B7/"/>
    <content>
      <![CDATA[<h1 id="Enhancing-Human-Agent-Interaction-with-Slash-Commands"><a href="#Enhancing-Human-Agent-Interaction-with-Slash-Commands" class="headerlink" title="Enhancing Human-Agent Interaction with Slash Commands"></a>Enhancing Human-Agent Interaction with Slash Commands</h1><p><img src="https://cdn.jsdmirror.com/gh/shiquda/images@main/imgs/compressed_01-hero-15650fb0.jpg" alt="The core value of three Slash Commands" loading="lazy"></p><p>“If you’ve done it three times, automate it.” That saying might be a bit exaggerated, but the thinking behind it is worth borrowing. When interacting with agents, you’ll often find certain needs recurring. If you standardize these needs and use short commands to reference lengthy prompt descriptions, you can help the agent understand your requirements clearly while reducing unnecessary cognitive load and operational steps on your end. The logic is simple: if something will require repeated effort in the future, <strong>then every efficiency improvement to that task is a meaningful gain in attention for each future execution.</strong></p><p>This article shares some practical custom Slash Commands I’ve found useful. The prompts may not be the best written, but I hope the thinking behind them inspires you. Also, this article doesn’t cover the specific implementation format or technical details of writing them—the target audience should have ways to ask AI for help with that.</p><h2 id="What-is-a-Slash-Command"><a href="#What-is-a-Slash-Command" class="headerlink" title="What is a Slash Command?"></a>What is a Slash Command?</h2><p>A Slash Command is a way to simplify user-system interaction. Users trigger predefined actions or functions by typing specific commands (usually starting with a slash). Readers who’ve used Coding Agents like Claude Code for development will be familiar with this.</p><h2 id="Slash-Command-Ideas"><a href="#Slash-Command-Ideas" class="headerlink" title="Slash Command Ideas"></a>Slash Command Ideas</h2><p>Below are some custom Slash Commands I’ve distilled from practice that have proven useful to me. Again, this article doesn’t cover functional commands that simply wrap prompts for engineering tasks like one-click testing or committing—those are basic skills for any competent agent user, and you should consciously package frequently used prompts into Skills or Slash Commands. <strong>This article focuses on the characteristics of human-agent interaction, approaching from a higher dimension to design Slash Commands that enhance the overall agent interaction experience.</strong></p><h3 id="1️⃣-notify-Task-Completion-Notification"><a href="#1️⃣-notify-Task-Completion-Notification" class="headerlink" title="1️⃣ /notify - Task Completion Notification"></a>1️⃣ <code>/notify</code> - Task Completion Notification</h3><p>I often have Coding Agents working in the background, but when they finish, I might not know about it—meaning the agent wasted that precious time doing nothing. As its boss, how could I want my employee to slack off? But if I keep staring at it working, that wastes my time too. Who’s the boss here, me or it? 😄</p><p>So I designed a <code>/notify</code> command that tells the agent to send me a Telegram notification when it completes the task. This way, I receive the notification on Telegram. Telegram notifications have high priority for me, so I’m likely to see them. After real-world testing, I’ve found that even after long tasks, the agent still remembers to do this. <strong>This effectively adds a <code>hook</code> to the agent’s task completion.</strong> You can modify the prompt to suit your needs. It looks something like this:</p><blockquote><p>Note: This uses <code>apprise</code> to send Telegram notifications. You can use other tools to implement notifications based on your needs.</p></blockquote><figure class="highlight markdown"><table><tbody><tr><td class="gutter"><pre><span class="line">1</span><br><span class="line">2</span><br><span class="line">3</span><br><span class="line">4</span><br><span class="line">5</span><br><span class="line">6</span><br><span class="line">7</span><br><span class="line">8</span><br><span class="line">9</span><br><span class="line">10</span><br><span class="line">11</span><br><span class="line">12</span><br><span class="line">13</span><br><span class="line">14</span><br><span class="line">15</span><br><span class="line">16</span><br><span class="line">17</span><br><span class="line">18</span><br><span class="line">19</span><br><span class="line">20</span><br><span class="line">21</span><br><span class="line">22</span><br><span class="line">23</span><br><span class="line">24</span><br><span class="line">25</span><br><span class="line">26</span><br><span class="line">27</span><br><span class="line">28</span><br><span class="line">29</span><br><span class="line">30</span><br></pre></td><td class="code"><pre><span class="line">---</span><br><span class="line"><span class="section">description: Send Telegram notification when task completes</span></span><br><span class="line"><span class="section">---</span></span><br><span class="line"></span><br><span class="line">Send a Telegram notification only after the task is fully completed and verified.</span><br><span class="line"></span><br><span class="line"><span class="section">## Instructions</span></span><br><span class="line"></span><br><span class="line"><span class="bullet">1.</span> <span class="strong">**Complete the user's task**</span> as requested.</span><br><span class="line"></span><br><span class="line"><span class="bullet">2.</span> <span class="strong">**After completion**</span>, send a notification using:</span><br><span class="line">   <span class="code">`apprise -t "Task Complete" -b "&lt;summary&gt;"`</span></span><br><span class="line"></span><br><span class="line">   Build <span class="language-xml"><span class="tag">&lt;<span class="name">summary</span>&gt;</span></span> as a concrete result summary (2-4 sentences). It must include:</span><br><span class="line"><span class="bullet">   -</span> What was done (specific actions)</span><br><span class="line"><span class="bullet">   -</span> Key result(s) or evidence (file paths, logs, screenshots, or checks)</span><br><span class="line"><span class="bullet">   -</span> Current status: success / partial / failed</span><br><span class="line"></span><br><span class="line">   If $ARGUMENTS is not empty, append it as the last sentence.</span><br><span class="line">   Do <span class="strong">**not**</span> use $ARGUMENTS as the entire summary.</span><br><span class="line"></span><br><span class="line"><span class="bullet">3.</span> <span class="strong">**Timing**</span>: Send notification AFTER all work is done, verified, and ready for user review.</span><br><span class="line"></span><br><span class="line"><span class="section">## User Input</span></span><br><span class="line"></span><br><span class="line">$ARGUMENTS</span><br><span class="line"></span><br><span class="line">---</span><br><span class="line"></span><br><span class="line"><span class="strong">**Remember**</span>: Complete the task first, then notify.</span><br></pre></td></tr></tbody></table></figure><h3 id="2️⃣-learn-Learning-from-Conversations"><a href="#2️⃣-learn-Learning-from-Conversations" class="headerlink" title="2️⃣ /learn - Learning from Conversations"></a>2️⃣ <code>/learn</code> - Learning from Conversations</h3><blockquote><p>If you’re not interested in the analysis of model “memory,” feel free to jump to the usage section.</p></blockquote><p>Agents are different from humans. In some ways, human consciousness and memory management are tightly coupled. But agents are built on LLMs, which are inherently <code>stateless</code>—they have no memory capability. If there is any “memory,” it’s implemented through external files: <strong>essentially prompts stored on disk, organized by software, and ultimately fed to the LLM.</strong></p><p>Fortunately, there are now many standardized memory management conventions. For example, Claude Code’s <code>CLAUDE.md</code> is passed in every conversation/tool call as global memory. OpenClaw’s <code>MEMORY.md</code> file provides a similar mechanism.</p><p>Another approach I find elegant is using <code>skill</code>. Since agent memory is essentially prompts, what advantages do skills offer from a memory perspective? I see at least two:</p><p>First, <strong><code>skill</code> enables “progressive context management.”</strong> Context is precious in an agent’s context window. Skills that the agent calls on demand can occupy significant context space. <strong>This is essentially a trade-off between cost and efficiency when agents retrieve memory on demand.</strong> If full prompts were placed in a global memory file, they’d always be findable, but every call would consume substantial context space—not only costly but also affecting the agent’s reasoning quality. Humans struggle to multitask, and agents do too, to some extent.</p><p>Standard skills have custom YAML fields at the top of their <code>SKILL.md</code>, primarily <code>name</code> and <code>description</code>. <strong>During agent operation, these fields serve as an “index,” enabling “referencing” of large prompt content at a small context cost.</strong> When needed, the agent can invoke the skill by <code>name</code> to retrieve the full prompt content from its <code>SKILL.md</code>.</p><p>Going further, within <code>SKILL.md</code>, you can place less critical, on-demand content in a <code>references</code> directory for even more granular progressive context management.</p><p><img src="https://cdn.jsdmirror.com/gh/shiquda/images@main/imgs/compressed_02-skill-context-564c4dc6.jpg" alt="Skill progressive context management mechanism" loading="lazy"></p><p>Second, <strong><code>skill</code> achieves organic fusion of intelligence and code.</strong> LLMs and code are two tools with different strengths.</p><p>LLMs are trained on parts of human knowledge and possess a degree of <strong>general-purpose intelligence</strong>. With prompts and external tool environments, this intelligence can accomplish many things we humans once prided ourselves on—writing, translation, tool use, and more. But they also suffer from <strong>instability</strong>, especially when precise, structured output is required—LLMs can be unreliable. Additionally, using LLMs incurs <strong>reasoning costs</strong>; they’re inefficient for computationally heavy tasks.</p><p>Code, on the other hand, excels in determinism and efficiency. <strong>For tasks requiring precise, structured output or heavy computation, code is ideal.</strong> But code requires investment in writing, debugging, and maintenance, and it’s less extensible than prompts.</p><p>Skills combine the best of both. A skill can contain both <strong>prompts</strong> and <strong>code</strong>. The prompt portion drives intelligence, guiding the agent on how to use the skill; the code portion serves as a tool for the agent, compensating for LLM inefficiencies and unreliability. From a memory perspective, programmatizing certain functions into skill code can significantly save the agent’s memory space.</p><p><img src="https://cdn.jsdmirror.com/gh/shiquda/images@main/imgs/compressed_04-skill-fusion-0196a3e0.jpg" alt="Skill fusion of intelligence and code" loading="lazy"></p><p>When using agents with persistent memory like OpenClaw, or other Coding Agents to assist with standardized workflows like development or writing, you might notice that agents often make mistakes in tool calls or misunderstand instructions, requiring repeated human confirmation. But these issues can be resolved through trial and error. <strong>When the agent finally solves a problem after repeated attempts, the context contains its complete trial-and-error process—a perfect learning opportunity for the agent.</strong></p><p>Usage:</p><p>So I designed a <code>/learn</code> command that asks the agent to summarize what it learned during a task. Good times to use it: after the agent solves a problem through multiple attempts, or during idle periods (like early morning) to summarize the day’s lessons. This command is simple—it doesn’t even need complex prompt techniques:</p><figure class="highlight markdown"><table><tbody><tr><td class="gutter"><pre><span class="line">1</span><br><span class="line">2</span><br><span class="line">3</span><br></pre></td><td class="code"><pre><span class="line"></span><br><span class="line">请你深入分析，在前面试错过程中，可以总结哪些宝贵经验？请分别整理到Skill（如有对应）或项目的CLAUDE.md中，这样可以避免未来重复犯错。注意，如果这些文件中有层级引用结构的话，请按照对应的层级设计，放在合适的位置。</span><br><span class="line"></span><br></pre></td></tr></tbody></table></figure><p>If you have your own memory file system, you can adjust the command accordingly. If you’re using a long-running autonomous agent like OpenClaw, you could even design this as a scheduled task, having the agent summarize the day’s experiences during idle hours (like 4 AM).</p><p><img src="https://cdn.jsdmirror.com/gh/shiquda/images@main/imgs/compressed_03-learn-cycle-6ba2f98c.jpg" alt="Agent learning loop process" loading="lazy"></p><h3 id="3️⃣-align-Aligning-Human-and-Agent-Requirements"><a href="#3️⃣-align-Aligning-Human-and-Agent-Requirements" class="headerlink" title="3️⃣ /align - Aligning Human and Agent Requirements"></a>3️⃣ <code>/align</code> - Aligning Human and Agent Requirements</h3><p>When using agents, you’ll often find that their understanding of your requirements isn’t entirely accurate. In most cases, it’s because within the limited context of your conversation, you didn’t realize that some critical information for completing the task wasn’t conveyed. If you catch this early, you can correct course and supplement information to help the agent understand better. But if you don’t, the agent may proceed with its own interpretation, wasting valuable time and tokens.</p><blockquote><p>There’s a technical reason behind this: during RLHF training, human annotators typically prefer “complete, fluent answers” over “admitting uncertainty,” <strong>which causes models to push through tasks when uncertain rather than proactively clarifying understanding.</strong> In practice, though, we’d prefer models to ask questions when understanding is unclear, rather than executing on potentially wrong interpretations.</p></blockquote><p>As users, we can’t easily influence model training. What we should consider is: among the things we <em>can</em> control, how can we better solve this problem? <strong>The answer is aligning requirements before starting work.</strong> Specifically, writing detailed prompts is a good habit. But I think an even better approach is to have the agent proactively ask questions before starting, to confirm its understanding of the task and surface any blind spots in the human’s thinking. This way, we can align requirements relatively easily by answering questions, and we also get visibility into aspects we hadn’t thought to communicate—deepening our understanding of prompt design.</p><p><img src="https://cdn.jsdmirror.com/gh/shiquda/images@main/imgs/compressed_05-align-concept-4778f8af.jpg" alt="Comparison before and after requirement alignment" loading="lazy"></p><p>So I designed an <code>/align</code> command that asks the agent to summarize its understanding of a task and align it with my requirements before starting. When used, the agent proactively asks 2-3 clarifying questions, progressively confirming its understanding until both sides are fully aligned before execution. This command is also simple:</p><figure class="highlight markdown"><table><tbody><tr><td class="gutter"><pre><span class="line">1</span><br><span class="line">2</span><br><span class="line">3</span><br><span class="line">4</span><br><span class="line">5</span><br><span class="line">6</span><br><span class="line">7</span><br><span class="line">8</span><br><span class="line">9</span><br><span class="line">10</span><br><span class="line">11</span><br><span class="line">12</span><br><span class="line">13</span><br><span class="line">14</span><br><span class="line">15</span><br><span class="line">16</span><br><span class="line">17</span><br><span class="line">18</span><br><span class="line">19</span><br><span class="line">20</span><br><span class="line">21</span><br><span class="line">22</span><br><span class="line">23</span><br><span class="line">24</span><br><span class="line">25</span><br><span class="line">26</span><br><span class="line">27</span><br><span class="line">28</span><br><span class="line">29</span><br><span class="line">30</span><br><span class="line">31</span><br><span class="line">32</span><br><span class="line">33</span><br><span class="line">34</span><br><span class="line">35</span><br><span class="line">36</span><br></pre></td><td class="code"><pre><span class="line">---</span><br><span class="line"><span class="section">description: 与用户多轮交互澄清需求，直到完全对齐再执行。支持参数：/align &lt;粗略需求&gt;</span></span><br><span class="line"><span class="section">---</span></span><br><span class="line"></span><br><span class="line">你现在进入「需求对齐模式」（Alignment Mode）。</span><br><span class="line"></span><br><span class="line"><span class="section">## 核心规则（严格遵守）</span></span><br><span class="line"></span><br><span class="line"><span class="bullet">1.</span> <span class="strong">**绝不**</span> 直接开始实现或写代码、写文档、生成任何输出物。</span><br><span class="line"><span class="bullet">2.</span> <span class="strong">**唯一允许的行为**</span>：使用 AskUserQuestion 工具（或系统提供的提问工具）向用户提问，问那些你还不太明确，或者用户欠考虑的问题。</span><br><span class="line"><span class="bullet">3.</span> 问题要<span class="strong">**具体、聚焦、可回答**</span>（避免开放式大问题）。</span><br><span class="line"><span class="bullet">4.</span> 每轮收到用户回答后，<span class="strong">**立即**</span>：</span><br><span class="line"><span class="bullet">   -</span> 简短确认理解（1–2 句）</span><br><span class="line"><span class="bullet">   -</span> 判断是否还需要更多澄清</span><br><span class="line"><span class="bullet">   -</span> 如果还不够 → 继续问下一个最重要的问题</span><br><span class="line"><span class="bullet">   -</span> 如果已经足够清晰 → 输出最终的「对齐后需求总结」，然后问：“以上理解是否正确？可以开始执行了吗？”</span><br><span class="line"><span class="bullet">5.</span> <span class="strong">**对齐后需求总结**</span> 必须结构化，使用 markdown 格式，包含：</span><br><span class="line"><span class="bullet">   -</span> 目标（一句话）</span><br><span class="line"><span class="bullet">   -</span> 关键约束 / 非功能需求</span><br><span class="line"><span class="bullet">   -</span> 验收标准（用户最在意的 Done 定义）</span><br><span class="line"><span class="bullet">   -</span> 优先级 / 范围（what in / what out）</span><br><span class="line"><span class="bullet">   -</span> 任何已确认的假设</span><br><span class="line"><span class="bullet">6.</span> 整个过程保持<span class="strong">**礼貌、耐心、高效**</span>。目标是用最少轮次达到最高理解一致性。</span><br><span class="line"></span><br><span class="line"><span class="section">## 当前用户输入（原始需求）</span></span><br><span class="line"></span><br><span class="line">$ARGUMENTS</span><br><span class="line"></span><br><span class="line"><span class="section">## 第一步（现在立即执行）</span></span><br><span class="line"></span><br><span class="line"><span class="bullet">-</span> 仔细阅读上面的 $ARGUMENTS</span><br><span class="line"><span class="bullet">-</span> 思考：最容易导致偏离、最模棱两可、最关键的 1–2 个点是什么？</span><br><span class="line"><span class="bullet">-</span> 使用 AskUserQuestion 工具提出<span class="strong">**第一个（或前两个）澄清问题**</span></span><br><span class="line"></span><br><span class="line">开始吧。</span><br><span class="line"></span><br></pre></td></tr></tbody></table></figure><p>Going forward, when assigning requirement-based tasks to agents, consider starting with this command to align requirements first. <strong>While it may add some upfront communication cost, from an expected-value perspective, it should save potential time, energy, and money in the downstream development process.</strong></p><hr><h2 id="Summary"><a href="#Summary" class="headerlink" title="Summary"></a>Summary</h2><p>These three commands address three core issues: notification, memory iteration, and requirement alignment. Use <code>/align</code> to align upfront and reduce rework; use <code>/learn</code> to leverage valuable trial-and-error experiences for the agent; use <code>/notify</code> to reduce mental overhead and save time, improving parallel efficiency.</p><p>This article is meant to spark ideas. If even one command or thought here inspires you, its purpose is fulfilled. I’d love to hear from readers: what other interesting Slash Commands have you found that improve the “happiness” of interacting with agents? Feel free to share in the comments!</p>]]>
    </content>
    <id>https://shiquda.link/en/slash-command-for-better-agent-interaction/</id>
    <link href="https://shiquda.link/en/slash-command-for-better-agent-interaction/"/>
    <published>2026-03-05T01:29:48.000Z</published>
    <summary>Discover three custom slash commands that elevate agent interaction: task completion notifications, learning from conversations, and requirement alignment—optimizing human-machine collaboration from a higher perspective.</summary>
    <title>Enhancing Human-Agent Interaction with Slash Commands</title>
    <updated>2026-03-05T01:29:48.000Z</updated>
  </entry>
  <entry>
    <author>
      <name>shiquda</name>
    </author>
    <category term="AI" scheme="https://shiquda.link/tags/AI/"/>
    <category term="VibeCoding" scheme="https://shiquda.link/tags/VibeCoding/"/>
    <category term="Agent" scheme="https://shiquda.link/tags/Agent/"/>
    <content>
      <![CDATA[<h1 id="Rethinking-Agents-and-the-Essence-of-Productivity"><a href="#Rethinking-Agents-and-the-Essence-of-Productivity" class="headerlink" title="Rethinking Agents and the Essence of Productivity"></a>Rethinking Agents and the Essence of Productivity</h1><p><img src="https://cdn.jsdmirror.com/gh/shiquda/images@main/imgs/agent-attention-closed-loop-hero-258ba516.jpg" alt="Agent productivity loop and attention recovery diagram" loading="lazy"></p><h2 id="About-Agents"><a href="#About-Agents" class="headerlink" title="About Agents"></a>About Agents</h2><p>Let’s start by revisiting what an Agent is.</p><blockquote><p>An Agent can generally be viewed as an intelligent entity capable of autonomously completing tasks: it can make decisions based on environmental changes, and learn and adapt to new situations within a certain scope.</p></blockquote><p>Agents are powered by LLMs, which are trained on the “symbols” humans have generated—such as text and images—using deep learning algorithms and natural language processing techniques, and then generate the desired text through reasoning. This means an Agent’s inherent capabilities are largely determined by the LLM’s capabilities, which in turn can be seen as “a (partial) fitting of existing human knowledge.” Therefore, Agents do possess a certain degree of “intelligence” (note: distinct from “consciousness”). This intelligence can substantially relieve humans of cognitive load and attention overhead, and those who are adept at leveraging Agents can redirect their precious attention toward more valuable tasks.</p><h2 id="The-Core-Idea-Behind-Productivity-Gains"><a href="#The-Core-Idea-Behind-Productivity-Gains" class="headerlink" title="The Core Idea Behind Productivity Gains"></a>The Core Idea Behind Productivity Gains</h2><p>Building on the concept of Agents above, let’s analyze the core strategies for using Agents to boost productivity through the lens of “attention liberation.” Below are some thoughts I’ve compiled for your reference:</p><h3 id="1️⃣-Standardize-Recurring-Expression-Needs-in-Interactions"><a href="#1️⃣-Standardize-Recurring-Expression-Needs-in-Interactions" class="headerlink" title="1️⃣ Standardize Recurring Expression Needs in Interactions"></a>1️⃣ Standardize Recurring Expression Needs in Interactions</h3><p>I remember reading a quote from an expert online, roughly saying:</p><blockquote><p>If there’s something you find yourself reusing in prompts more than three times, turn it into a command.</p></blockquote><p>When interacting with Agents, you’ll often notice certain needs recurring. For example, in Coding Agents, one frequent task is <code>compact</code>—compressing the conversation context. While this happens automatically when approaching the context limit, there are also times when you need to manually compress the context. Coding Agents like Claude Code and OpenCode have standardized this need through a simple alias like <code>/compact</code> as a <code>slash command</code>, significantly reducing the cognitive load and operational steps required each time you need to perform this task.</p><p>Imagine having to type out a lengthy explanation to the Agent every time you had this need—it would be not only tedious but also add to your attention burden.</p><p>You might argue that typing “compress context” could achieve a similar effect. But there’s often a cognitive misalignment between humans and Agents during interaction. Your specific needs may not be clearly understood by the Agent through just a few simple words—this is essentially a trade-off between the detail of the requirements provided and the quality of execution.</p><p>Standardization optimizes this trade-off: by standardizing recurring scenario needs, we can reference lengthy prompt descriptions with short commands. This allows the Agent to clearly understand our requirements while reducing our own cognitive load and operational steps during expression. This approach is both ideal and the easiest to implement.</p><h3 id="2️⃣-Build-an-Autonomous-Plan-Execute-Feedback-Loop"><a href="#2️⃣-Build-an-Autonomous-Plan-Execute-Feedback-Loop" class="headerlink" title="2️⃣ Build an Autonomous Plan-Execute-Feedback Loop"></a>2️⃣ Build an Autonomous Plan-Execute-Feedback Loop</h3><p>A key difference between Agents and pure conversational LLMs is that Agents can autonomously use provided tools to interact with the environment based on a given goal, and make subsequent decisions based on tool execution feedback—thereby achieving an autonomous <strong>plan-execute-feedback</strong> loop (for the distinction between <code>agent</code> and <code>workflow</code>, see <a href="https://www.anthropic.com/research/building-effective-agents">Anthropic: Building effective agents</a>).</p><p>Here’s an example from around 2023, based on my personal experience: I needed to write a script. I described the requirements to an LLM in a web-based chat, and it wrote the script. I copied and pasted it into VS Code, ran it, hit an error, pasted the error back to the web-based LLM, and it suggested possible solutions. I manually fixed it or copied the full corrected code and tried again—repeating this cycle until the script ran successfully and met my expectations.</p><p>Looking back at this example, where was human attention being allocated?</p><ol><li>Telling the LLM my requirements</li><li>Waiting for the LLM to generate the script</li><li>Copying and pasting the script into VS Code</li><li>Clicking run</li><li>Waiting for the result, checking for errors or whether it met requirements</li><li>If not, feeding the feedback back to the LLM. Back to step 2.</li><li>Done</li></ol><p>Now, when using a Coding Agent, where is human attention allocated?</p><ol><li>Telling the Agent my requirements<ol><li>Agent generates the script</li><li>Autonomously tests and checks for errors</li><li>Attempts a simple run to preliminarily verify it meets requirements</li></ol></li><li>Waiting for the Agent to complete the above. If not done, continue observing and waiting</li><li>Evaluating whether the Agent’s output meets expectations. If not, providing feedback and returning to step 1.</li></ol><p>As you can see, <strong>the Agent’s autonomous plan-execute-feedback loop dramatically reduces human attention consumption in the intermediate steps, allowing us to focus more attention on core requirement articulation and acceptance testing, rather than being consumed by mechanical, repetitive operations and waiting time</strong>. These tasks may seem simple, but they still demand a share of attention. If your attention is spread across such tedious work, your daily attention budget quickly dwindles.</p><p>Compared to plain LLMs, using a Coding Agent essentially adds <strong>execution</strong> and <strong>feedback</strong> capabilities. The traditional copy-paste approach only leverages the LLM’s planning and code-writing abilities, while actual code execution and feedback handling fall on us. The execution and feedback links in the chain remain disconnected, preventing a closed loop.</p><p><img src="https://cdn.jsdmirror.com/gh/shiquda/images@main/imgs/agent-loop-attention-comparison-db43a602.png" alt="Attention allocation: traditional LLM vs. Coding Agent" loading="lazy"></p><p>Over the past year, the Agent ecosystem has matured considerably, with development experiences becoming quite polished. Many stages have now formed closed loops, delivering qualitative efficiency gains. However, in other domains—and even within coding itself—many areas still need improvement. We can work together with Agents to close the entire plan-execute-feedback loop, making the process more automated and conserving our valuable attention.</p><p>For example, in writing, there are recurring needs that can be automated. Producing a formal article typically involves these stages:</p><ol><li>Topic selection</li><li>Outline planning</li><li>Drafting</li><li>Polishing (formatting, correcting typos and grammar)</li><li>Adding illustrations</li><li>Publishing</li><li>Monitoring article metrics</li></ol><p>This is just a simple outline; everyone’s workflow differs. But regardless, you’ll likely find some stages are mechanical and repetitive—such as polishing, illustrating, publishing, and metrics monitoring. These are ideal candidates for Agent automation. By connecting the right tools, we can let Agents handle these stages, freeing our attention for the more creative and thoughtful work: topic selection, outline planning, and drafting.</p><p>One thing I’ve been exploring recently is using a Coding Agent to build a dedicated repository for article writing, distilling repetitive actions into “reusable commands + reusable scripts.” In other words, my goal isn’t to have the Agent “write my opinions” but to reliably handle the process-driven stages.</p><p>I initially used OpenCode and later migrated to Claude Code. My reasons for choosing Claude Code: its built-in permission checks and change preview mechanisms suit scenarios where I need to review changes myself; its VS Code integration is excellent—I can select a paragraph in the editor and have Claude Code revise it, completing about 90% of operations without leaving VS Code.</p><p>That said, <strong>which Coding Agent you choose doesn’t matter—what matters is the approach to handling daily workflows</strong>. This mindset extends beyond writing to any domain: for intellectual tasks that require long-term repetition, if you can automate them with Agents, the more you use them, the more attention you save, and the compounding effect becomes increasingly evident.</p><p><img src="https://cdn.jsdmirror.com/gh/shiquda/images@main/imgs/agent-writing-workflow-closed-loop-409837a7.png" alt="Closed-loop productivity workflow for writing" loading="lazy"></p><p>Here’s a writing productivity workflow I’m currently exploring, presented by OpenCode:</p><blockquote><p>Before diving into the steps, let me clarify the “entry points and boundaries” of this OpenCode pipeline:</p><ol><li>Two entry points: first, run <code>/polish @doc/article/xxx.md</code> to complete “formatting → fact-checking → Markdown enhancement → (optional) illustration,” then run <code>/publish @doc/article/xxx.md</code> to generate the publishable version and replace local images with CDN links.</li><li>Granular capabilities are handled by atomic skills: <code>format</code> only handles Chinese-English-number spacing, <code>fact-check</code> extracts verifiable claims and provides sources and rewrite suggestions, <code>markdown-enhance</code> adds lightweight annotation enhancements, and <code>illustrate</code> generates illustration assets.</li><li>Scripts and Agents have clear divisions of labor: Python scripts in <code>tools/</code> handle stable execution (formatting, rendering, uploading, etc.) without semantic judgment; semantic decisions and trade-offs are made jointly by the Agent and human acceptance.</li><li>Prioritize “parallel, non-blocking checks” in execution: tasks like format checks, link verification, and asset preparation that don’t block the main line should run in the background in parallel, with results aggregated at the end, avoiding the main thread being occupied by low-value waiting.</li></ol><p>The three screenshots below correspond to three key touchpoints in this workflow: “orchestration entry, fact-check rewrite suggestions, and workspace diff acceptance”:</p><p><img src="https://cdn.jsdmirror.com/gh/shiquda/images@main/imgs/opencode-polish-5e2e5b70.png" alt="OpenCode polish workflow entry" loading="lazy"></p><p><img src="https://cdn.jsdmirror.com/gh/shiquda/images@main/imgs/opencode-fact-check-suggestion-4f710ade.png" alt="Fact-check rewrite suggestions" loading="lazy"></p><p><img src="https://cdn.jsdmirror.com/gh/shiquda/images@main/imgs/doc-workspace-git-diff-showcase-e3aaba7d.png" alt="Document workspace diff acceptance" loading="lazy"></p></blockquote><blockquote><p>1 <strong>Start with format consistency (noise reduction)</strong></p><ul><li>Use <code>python tools/quick_format.py &lt;draft.md&gt;</code> to standardize Chinese-English-number spacing in the draft.</li><li>If I only want to preview the diff without overwriting, run <code>python tools/quick_format_check.py &lt;draft.md&gt;</code> to generate a preview version.</li><li>The value here is straightforward: clear out low-value but high-frequency formatting tasks first, so I’m not interrupted by formatting noise during subsequent revisions.</li></ul><p>2 <strong>Then do content-level revisions (facts, arguments, expression)</strong></p><ul><li>Use <code>/fact-check</code> for fact verification, focusing on dates, data, and source chains.</li><li>Use <code>/strengthen</code> to reinforce arguments—adding evidence, counterexamples, or boundary conditions.</li><li>Use <code>/revise</code> for comprehensive revisions, unifying tone, target audience, and length constraints.</li><li>Essentially, this standardizes “revision requirements I repeatedly explain verbally” into slash commands, reducing communication friction.</li></ul><p>3 <strong>Do a lightweight annotation enhancement (without changing meaning)</strong></p><ul><li>Use <code>markdown-enhance</code> to review the article, adding backticks to technical terms, commands, and paths.</li><li>Bold key judgment sentences appropriately; if truly necessary, add 1-3 external reference links.</li><li>The principle is “less is more”: don’t change sentence structure, viewpoints, or conclusions unless necessary.</li></ul><p>4 <strong>Finally, prepare illustrations and pre-publish assets</strong></p><ul><li>The illustration pipeline uses <code>skill(&quot;illustrate&quot;)</code> and <code>tools/illustrate.py</code>, with keys uniformly read from <code>.env</code>.</li><li>If the article contains flowcharts, use <code>tools/mermaid_render.py</code> to output high-resolution images, avoiding inconsistent resolution from manual screenshots.</li><li>At this point, I can essentially redirect my attention back to the three core questions: “Is the information accurate? Does the argument hold? Is the structure clear?”</li></ul><p>One boundary to emphasize: scripts in <code>tools/</code> only handle formatting and asset processing—they don’t make content judgments; content judgment remains with the Agent’s retrieval and reasoning pipeline. In other words, scripts handle stable execution, the Agent handles semantic decisions, and humans handle final acceptance.</p><p>So what this approach truly solves isn’t “saving a few minutes of operations”—it’s extracting attention from mechanical steps and continuously investing it in high-value stages like topic selection, argumentation, and expression. Once this loop runs smoothly, writing productivity becomes sustainable.</p></blockquote><p>Of course, this workflow is just my initial exploration and will continue to evolve—for example, adding auto-publishing to various platforms (personal blog, forums, Telegram groups, Xiaohongshu, X, etc.).</p><p>Similar challenges exist in other domains. By analyzing and iterating on these workflows through the lens of closing the three <strong>plan-execute-feedback</strong> loops, I believe we can save a significant amount of precious attention.</p><h3 id="3️⃣-Use-Push-Instead-of-Polling"><a href="#3️⃣-Use-Push-Instead-of-Polling" class="headerlink" title="3️⃣ Use Push Instead of Polling"></a>3️⃣ Use Push Instead of Polling</h3><p>In daily life, I experience what I’d call “information anxiety.” For topics I care about, I find myself constantly refreshing to be the first to get the latest updates. I even wrote <a href="https://github.com/shiquda/status_view">a tool</a> for this (a practice project—not recommended, and there’s a better solution below) to aggregate scattered information from various platforms in one place. But I later realized that when information changes, if there’s a <code>hook</code> that can notify me in a reasonable way, there’s no need to spend so much attention constantly checking.</p><p>Messaging apps are a good example: when someone sends you a message, your phone detects it and alerts you via sound or vibration—you just check when notified. If we <strong>abstract</strong> these two phenomena, drawing inspiration from the two working modes of Telegram bots I encountered during development—<code>polling</code> and <code>webhook</code>—we can categorize them simply as <strong>polling</strong> and <strong>push</strong> (see the <a href="https://core.telegram.org/bots/webhooks">Telegram Bot API documentation</a>).</p><p>Our goal is to <strong>use “push” as much as possible, so that information worth our attention notifies us when it actually changes, rather than relying on us to constantly “poll” for changes</strong>.</p><p>Take OpenClaw in my current setup as an example (specific capabilities depend on version and documentation). I’ve configured it with various scheduled tasks: daily collection of RSS feeds I follow, software version updates, market price changes, and other topics of interest—at intervals of daily, twice daily, or any other duration—then summarized and pushed to me. This way, I don’t need to open my computer or phone and think about checking their data and latest changes; I can devote my precious attention to more worthwhile endeavors.</p><p>Technically, OpenClaw uses scheduled polling under the hood. But that’s precisely where the Agent liberates our attention. We just interact with it—it handles the polling and searching, and we get pushed notifications when something warrants our attention. <strong>In other words, delegating the “polling action” to an Agent is fundamentally reclaiming human attention.</strong></p><h2 id="Conclusion"><a href="#Conclusion" class="headerlink" title="Conclusion"></a>Conclusion</h2><p>In an era of accelerating pace and increasingly fragmented information, Agents offer us an incredibly valuable tool—one that helps liberate our attention and allows us to focus on what truly matters. A person’s attention is one of their most precious resources. Those who learn to harness Agents effectively will be better equipped to thrive in this age.</p><hr><blockquote><p>This article was created with the assistance of my <code>doc agent</code>, Powered by OpenCode. Some images were AI-generated.</p></blockquote>]]>
    </content>
    <id>https://shiquda.link/en/agent-and-efficiency-thoughts/</id>
    <link href="https://shiquda.link/en/agent-and-efficiency-thoughts/"/>
    <published>2026-02-24T07:58:20.000Z</published>
    <summary>Drawing from hands-on experience with various agent products, this post dissects the core principles behind agent-driven efficiency and shares a writing workflow built on OpenCode.</summary>
    <title>Rethinking Agents and the Essence of Productivity Gains</title>
    <updated>2026-08-28T13:23:50.696Z</updated>
  </entry>
  <entry>
    <author>
      <name>shiquda</name>
    </author>
    <category term="教程" scheme="https://shiquda.link/categories/%E6%95%99%E7%A8%8B/"/>
    <category term="教程" scheme="https://shiquda.link/tags/%E6%95%99%E7%A8%8B/"/>
    <category term="AI" scheme="https://shiquda.link/tags/AI/"/>
    <category term="VibeCoding" scheme="https://shiquda.link/tags/VibeCoding/"/>
    <content>
      <![CDATA[<h2 id="Introduction"><a href="#Introduction" class="headerlink" title="Introduction"></a>Introduction</h2><p>Vibe Coding — I’m confident readers are familiar with the concept. The simple approach to Vibe Coding requires you to sit continuously at your computer, interacting with TUI or GUI interfaces. At its core, the interaction is quite simple: all human-agent interaction can be reduced to <strong>text</strong>, with perhaps an optional <strong>image</strong> added. Neither of these requires you to interact via a computer; the computer essentially just provides an environment for programs to run. In other words, technically speaking, we can completely bypass the computer in the interaction loop and use a more convenient device — the phone — instead. This idea was introduced in an earlier post (quite a while ago, perhaps last year).</p><p>Recently, I switched my Coding Agent to OpenCode. Below, I’ll share the OpenCode workflow I currently use, which I’ve found to be quite smooth.</p><h2 id="Main-Approach"><a href="#Main-Approach" class="headerlink" title="Main Approach"></a>Main Approach</h2><p>There’s one method that’s the simplest: use remote control software to control your computer from your phone. However, this approach actually contradicts our original intent — it doesn’t leverage the phone’s convenience and ease of use, instead resorting to a computer-like interaction method. This is only recommended for emergencies or situations where frequent operation isn’t required.</p><p>OpenCode isn’t limited to TUI interaction like Claude Code. It also allows users to start a server via <code>opencode web</code>, and the official package includes a lightweight frontend (apparently the same one used by the desktop app) to interact with the backend. What’s even more surprising is that, based on my experience, custom plugins (like OMO, oh-my-opencode) work well through this interaction method.</p><p>So the simplest approach is: run a server on your computer bound to a remotely accessible IP, then access it remotely. If you’re at home, controlling it from your phone is very easy — the WLAN directly networks your phone and computer together. As long as your computer stays on and the server is running, you can open your phone’s browser and access it. The official basic frontend may look minimal, but in practice, about 95% of commonly used features can be handled from your phone. The only inconvenience arises when you need to verify results as a user on the computer itself — in those cases, it’s still recommended to use the computer.</p><p>For situations where you and your computer aren’t on the same WLAN, you can use software like Tailscale for remote networking. Simply install Tailscale on both your computer and mobile device, add them to the same network, and you’ll have remote access from your phone. Going further, if you also need to develop with OpenCode on remote hosts, you can network those machines with Tailscale as well. I’ll just offer this idea here — the specific configuration details shouldn’t be a problem for readers, and I hope this approach sparks some inspiration.</p><p>For Windows, you can reference a <code>.bat</code> script I wrote that starts the server with a single command, making it accessible remotely. For security reasons, I recommend setting an access password. Once set, when you open the corresponding address in your browser and enter the password, the default username is <code>opencode</code>.</p><figure class="highlight bat"><table><tbody><tr><td class="gutter"><pre><span class="line">1</span><br><span class="line">2</span><br><span class="line">3</span><br></pre></td><td class="code"><pre><span class="line">@<span class="built_in">echo</span> off</span><br><span class="line"><span class="built_in">set</span> OPENCODE_SERVER_PASSWORD=&lt;password&gt;</span><br><span class="line">opencode web --hostname <span class="number">0</span>.<span class="number">0</span>.<span class="number">0</span>.<span class="number">0</span> --port &lt;your-port&gt;</span><br></pre></td></tr></tbody></table></figure><p>Running the script starts the server in the background, and your phone can connect immediately.</p><p>Going one step further, I recently discovered a third-party open-source <a href="https://lehhair.github.io/OpenCodeUI/">OpenCode WebUI</a> that offers a much nicer and more polished experience overall, though it’s still in early development. This WebUI doesn’t require separate deployment — just fill in the backend address from the previous step and you’re good to go. Note that for some backend instances, you may need to add <code>--cors "https://lehhair.github.io"</code> to the command to resolve CORS cross-origin issues. Interested readers can try it out for themselves.</p><p>The above is mainly about sharing approaches and experiences — for specific technical details and security considerations, please refer to the documentation and do your own research.</p><h2 id="Afterword-Random-Musings"><a href="#Afterword-Random-Musings" class="headerlink" title="Afterword (Random Musings)"></a>Afterword (Random Musings)</h2><p>It’s been a while since I last connected with readers. Over the past few months, I’ve had many observations and thoughts I couldn’t share. This article is written entirely by hand — in an era where AIGC is everywhere, I still want to genuinely contribute something more valuable and thoughtful to the internet. This isn’t to say that AI-assisted articles lack readability. I’ve been questioning the necessity of writing articles by hand, since it seems more convenient to have an Agent generate an article based on your outline — which is why I hadn’t planned to write blog posts for several months. But I eventually realized that writing isn’t just for readers; it’s also for myself, to think through things more deeply and thoroughly. The process of writing clarifies my thinking. And at the very least, it’s a form of entertainment and experience. Perhaps what was once called “work” will, in the future, largely become “entertainment” or “art.” Allow me this time to write a bit more for myself.</p>]]>
    </content>
    <id>https://shiquda.link/en/my-mobile-vibe-coding-workflow-2026-02/</id>
    <link href="https://shiquda.link/en/my-mobile-vibe-coding-workflow-2026-02/"/>
    <published>2026-02-20T12:57:16.000Z</published>
    <summary>A quick look at my personal mobile-based OpenCode Vibe Coding workflow.</summary>
    <title>My Current Vibe Coding Workflow (Via Phone)</title>
    <updated>2026-02-20T13:29:22.000Z</updated>
  </entry>
  <entry>
    <author>
      <name>shiquda</name>
    </author>
    <category term="随想" scheme="https://shiquda.link/tags/%E9%9A%8F%E6%83%B3/"/>
    <content>
      <![CDATA[<h2 id="Modeling"><a href="#Modeling" class="headerlink" title="Modeling"></a>Modeling</h2><h3 id="Human-Resources-—-Non-Renewability"><a href="#Human-Resources-—-Non-Renewability" class="headerlink" title="Human Resources — Non-Renewability"></a>Human Resources — Non-Renewability</h3><p>A person’s most precious resource is their time and energy (energy can also be called attention). We call this most precious resource <strong>human resources</strong>. It is precious because, at least from the current perspective, a person will eventually die, which means the total amount of <strong>human resources</strong> they can command in their lifetime has an upper bound. Some people may live longer, and some may seem more energetic, but ultimately there is an insurmountable limit.</p><p>The most essential characteristic of human resources is <strong>non-renewability</strong>. Similar to non-renewable resources, the only way to “expand” it is by <strong>reducing expenditure</strong>. In other words, what we pursue is to spend our human resources as much as possible on the things that truly matter in our lives, rather than on the things that merely satisfy the necessities of living.</p><blockquote><p><strong>A person no longer has to sell their time to meet the necessities of life.</strong> — Li Xiaolai, <em>The Road to Financial Freedom</em></p></blockquote><h3 id="Compounding-Things"><a href="#Compounding-Things" class="headerlink" title="Compounding Things"></a>Compounding Things</h3><p>In contrast, there are things with compounding properties, such as capital. Formally, we can describe this property with a simple mathematical formula:</p><p>$$<br>k(1+c)^x<br>$$</p><p>Where k represents the initial value, c represents the average growth rate per unit of time, and x represents time.</p><p><strong>The essence of compounding is that the output of a thing can be fed back into its input.</strong></p><p>This property is crucial. For example, in investing, our assets grow like a “snowball” over time, and the returns on investments serve as principal, continuously expanding the scale.</p><blockquote><p>On a broader scale, one important reason why Homo sapiens became what they are, distinct from other animals, is that the evolution of the brain enabled the maturation of symbolic abstract thinking. This allowed what we call “knowledge” to accumulate and develop across individuals and across generations within the population.<br>Don’t underestimate this point. This property creates a “compounding” effect—the <strong>output</strong> of human knowledge continuously feeds back into the <strong>input</strong>, causing overall knowledge to accumulate at an exponential rate. This allowed biological evolution to break free from the nearly <strong>linear pace</strong> of <strong>genes</strong> and develop at an exponential rate. The 300,000 years of human development is but a fleeting moment compared to the 3+ billion years of Earth’s biosphere, yet humans have leveraged this compounding effect to achieve unprecedented accomplishments. We can clearly see that the closer we get to modern times, the faster this pace becomes—so fast that our biological evolution lags far behind our knowledge. Such is the power of compounding.</p></blockquote><p>Consider the increment of things with compounding properties. If we take the derivative with respect to time x, we find that the result is still an exponential function:</p><p>$$<br>k\ln(1+c)(1+c)^x<br>$$</p><p>This means that <strong>even if the growth rate of compounding itself remains unchanged, the increment will grow larger over time</strong>. As long as the initial value is large enough and the compounding state is maintained, we don’t need to work hard to change c to obtain a substantial, continuously growing increment.</p><p>But human resources are exactly the opposite. Let the total amount of human resources a person possesses in their lifetime be $I_{all}$, and the total human resources that must be spent on meeting the necessities of life be $I_{necessary}$. Then we can simply decompose I into two parts:</p><p>$$<br>I_{necessary} &#x3D; a x + b<br>$$</p><p>Where x also represents time, a represents the <strong>long-term recurring component</strong>, and b represents the <strong>short-term one-time component</strong>. The long-term recurring component is the amount we need to spend every day throughout our lives—it is persistent. The short-term one-time component is the amount invested all at once in a few moments—it is not persistent.</p><p>What we pursue is to put as much of our discretionary human resources $I_{free}$ as possible into the things we truly care about. Let’s first consider the discretionary human resources $I_{free}$:</p><p>$$<br>I_{free}<br> &#x3D; I_{all} - I_{necessary} &#x3D;  I_{all} - ax - b<br>$$</p><p>Taking the derivative again, we find the result is -a. This means that if we can reduce the value of a as early as possible—those persistent, daily recurring investments—then our discretionary human resources will be greatly increased. Even if this comes at the cost of increasing the short-term one-time component b, as long as there is enough future time x, we can still gain more $I_{free}$.</p><p>This might sound a bit abstract, so let’s use a simple, concrete example to illustrate. Suppose a person’s belongings are scattered around in disarray, and every time they need to find something, it takes a lot of time to search—sometimes they can’t even find it and have to buy a replacement. It’s foreseeable that if this state continues, according to the law of large numbers, they will inevitably spend extra time on similar things at some point in the future, which converts the potential $I_{free}$ into $I_{necessary}$.</p><p>But if one day they decide to thoroughly organize their belongings, use storage cabinets to categorize them, and maintain this state going forward, they are essentially transferring the long-term component a of the originally occupied $I_{necessary}$ into the short-term component b. In the long run, this is guaranteed to save potential human costs.</p><p>This is also one explanation, under this mathematical model, for the oft-repeated importance of “<strong>developing good habits</strong>.” In the long run, a good habit can continuously save you potential human costs.</p><h2 id="Conclusions-Naturally-Derived-from-This"><a href="#Conclusions-Naturally-Derived-from-This" class="headerlink" title="Conclusions Naturally Derived from This"></a>Conclusions Naturally Derived from This</h2><p>To increase $I_{free}$, we can approach it from the following angles:</p><ol><li>Increase $I_{all}$. This includes maintaining the length of life as much as possible, as well as the daily “utilization rate” of human resources.<ol><li>The length of life can be achieved by maintaining a healthy body. A healthy body can also, to some extent, improve the utilization rate of human resources.</li><li>Additionally, having an excellent human resource allocation mechanism can improve the efficiency of human resource utilization.</li></ol></li><li>Reduce $I_{necessary}$.<ol><li>Reduce the value of a as much as possible. This can be achieved by:<ol><li>Improving work efficiency. This can be done through continuous skill refinement. For example, improving the efficiency of tightening screws.</li><li>Through a <strong>systematic optimization</strong>, reducing as much of a as possible at the cost of a certain increase in the short-term component b. For example, by designing a storage system for items to reduce the human cost of retrieving them over the long term.</li></ol></li></ol></li></ol><p>For things with <strong>compounding</strong> properties, such as <strong>wealth, knowledge, and connections</strong>, we should start accumulating as early as possible and maintain a state that yields long-term compounding returns. These compounding resources can help reduce our $I_{necessary}$.</p><p>Additionally, we expect that the $I_{free}$ we possess can be used more efficiently to pursue the things we are truly interested in. Therefore, finding our sense of life’s meaning and figuring out which things truly interest us is also very important.</p>]]>
    </content>
    <id>https://shiquda.link/en/try-to-model-my-life/</id>
    <link href="https://shiquda.link/en/try-to-model-my-life/"/>
    <published>2025-08-29T03:36:53.000Z</published>
    <summary>A down-to-earth mathematical lens on life, exploring how our finite resources—time and attention—behave like non-renewable assets, and how compounding principles can shape the way we invest them.</summary>
    <title>Modeling Life with Simple Math: Human Resources as a Non-Renewable Asset and the Power of Compounding</title>
    <updated>2025-08-29T03:53:43.000Z</updated>
  </entry>
  <entry>
    <author>
      <name>shiquda</name>
    </author>
    <category term="教程" scheme="https://shiquda.link/tags/%E6%95%99%E7%A8%8B/"/>
    <category term="AI" scheme="https://shiquda.link/tags/AI/"/>
    <content>
      <![CDATA[<h2 id="Approach"><a href="#Approach" class="headerlink" title="Approach"></a>Approach</h2><p>When we use Claude Code, we normally need to interact with it through the command line, but that usually means we have to stay in front of a computer.</p><p>Think about it: our interaction with Claude Code is essentially just two things:</p><ol><li>Entering text;</li><li>Choosing to approve or reject operations.</li></ol><p>In fact, we don’t need a computer at all to interact with it. In theory, we could use only a phone, connect to the computer in some way, and get the interaction done.</p><p>That said, there’s already a straightforward naive approach: remotely control the computer from the phone, then interact with Claude Code. But this approach is awkward in practice—for example, input method issues when typing, or needing arrow keys to approve/reject.</p><p>If there were a user-friendly app on mobile, or a server-style version like VS Code, the experience would be much better.</p><p>With that in mind, I first found the <a href="https://github.com/sugyan/claude-code-webui">claude-code-webui</a> project, which lets you interact with Claude Code through a web page. However, it currently has no authentication, and after trying it out, it feels fairly bare-bones.</p><p><img src="https://s2.loli.net/2025/08/16/Sd6YUB79NOufGCg.png" alt="PixPin_2025-08-13_18-07-42" loading="lazy"></p><p>Then I found <a href="https://github.com/siteboon/claudecodeui">claudecodeui</a>, which looks much more polished.</p><p><img src="https://s2.loli.net/2025/08/16/OdphNq8jilf2ayx.png" alt="desktop-main" loading="lazy"></p><p>The remaining problem was network configuration. My requirement was to be able to connect to the service running on my computer even when I’m not on the same LAN.</p><p>I thought of Cloudflare Tunnels, which can be used for tunneling, and then binding my own domain through Cloudflare to enable remote access.</p><blockquote><p>Cloudflare Tunnels is a free service provided by Cloudflare. It securely exposes local or private network services to the public internet without opening firewall ports, configuring a public IP, or using a reverse proxy (such as Nginx).</p></blockquote><h2 id="Prerequisites"><a href="#Prerequisites" class="headerlink" title="Prerequisites"></a>Prerequisites</h2><p>To remotely command Claude Code like I do, you’ll need the following:</p><ol><li>Claude Code working locally on your computer;</li><li>A domain name bound to Cloudflare.</li></ol><h2 id="Detailed-Tutorial"><a href="#Detailed-Tutorial" class="headerlink" title="Detailed Tutorial"></a>Detailed Tutorial</h2><h3 id="Install-claude-code-webui"><a href="#Install-claude-code-webui" class="headerlink" title="Install claude-code-webui"></a>Install claude-code-webui</h3><p>First, make sure <strong>Node.js 20</strong> is installed.</p><p>Clone the project:</p><figure class="highlight bash"><table><tbody><tr><td class="gutter"><pre><span class="line">1</span><br></pre></td><td class="code"><pre><span class="line">git <span class="built_in">clone</span> https://github.com/siteboon/claudecodeui.git</span><br></pre></td></tr></tbody></table></figure><p>Install dependencies.</p><figure class="highlight bash"><table><tbody><tr><td class="gutter"><pre><span class="line">1</span><br></pre></td><td class="code"><pre><span class="line">npm install</span><br></pre></td></tr></tbody></table></figure><p>Start the server.</p><figure class="highlight plaintext"><table><tbody><tr><td class="gutter"><pre><span class="line">1</span><br></pre></td><td class="code"><pre><span class="line">npm run dev</span><br></pre></td></tr></tbody></table></figure><p>At this point, visit <code>localhost:5173</code> locally to test whether Claude Code works properly in the web page. On first use, you’ll need to set a unique username and password.</p><p>Once everything works, continue with the configuration.</p><h3 id="Cloudflare-Tunnels-Configuration"><a href="#Cloudflare-Tunnels-Configuration" class="headerlink" title="Cloudflare Tunnels Configuration"></a>Cloudflare Tunnels Configuration</h3><blockquote><p>Cloudflare Tunnels is a free service provided by Cloudflare. It securely exposes local or private network services to the public internet without opening firewall ports, configuring a public IP, or using a reverse proxy (such as Nginx).</p></blockquote><p>Go to <a href="https://one.dash.cloudflare.com/">one.dash.cloudflare.com</a>, navigate to <code>Networks &gt; Tunnels</code>, click Create Tunnel, and select the Cloudflared type. You can name it whatever you like.</p><p><img src="https://s2.loli.net/2025/08/16/DZEkAmrh89xcKQg.png" alt="PixPin_2025-08-13_17-20-10" loading="lazy"></p><p>When configuring, follow the instructions to download the cloudflared command-line tool. After downloading, make sure to <strong>run the prompted command with administrator privileges</strong>. Once connected, the connected connector should appear at the bottom of the page.</p><p>Next, in the first row, select your domain. In the second row, select the local service URL (note: choose your local port, which defaults to <code>5173</code>).</p><p><img src="https://s2.loli.net/2025/08/16/1At6o4xWc8GuZBU.png" alt="PixPin_2025-08-13_17-21-43" loading="lazy"></p><p>After this step, visiting your configured domain from your phone should give you normal access to the service.</p><h3 id="Cloudflare-Zero-Trust-Optional"><a href="#Cloudflare-Zero-Trust-Optional" class="headerlink" title="Cloudflare Zero Trust (Optional)"></a>Cloudflare Zero Trust (Optional)</h3><p>Since this domain now connects directly to your computer through Cloudflare Tunnels, and this project is relatively new, there may be potential security concerns. We can also add external authentication to the service by configuring Cloudflare Zero Trust to further harden security.</p><blockquote><p>Note: this step requires completing payment method verification for the Free Plan first. The author successfully bound a China-region PayPal account.</p></blockquote><p>Go to Access &gt; Applications and click Create.</p><p><img src="https://s2.loli.net/2025/08/16/z3nPUv241gCIaM6.png" alt="PixPin_2025-08-13_17-26-29" loading="lazy"></p><p>Fill in the public hostname with the domain from earlier.</p><p><img src="https://s2.loli.net/2025/08/16/xB5WfaQ3NXHZhjv.png" alt="PixPin_2025-08-13_17-28-01" loading="lazy"></p><p>Next, add a policy. Here I chose email verification and entered my email address as the value.</p><p><img src="https://s2.loli.net/2025/08/16/SCijbnf2D1JrEuA.png" alt="PixPin_2025-08-13_17-30-56" loading="lazy"></p><p>Go back to the created application and select this policy. Now, when visiting the domain, a verification code will be sent to your email before you can access the service.</p><p><img src="https://s2.loli.net/2025/08/16/mtGlDRxXw3bqyLj.png" alt="PixPin_2025-08-13_18-05-39" loading="lazy"></p><p>Now you can command Claude Code from your phone.</p><p><img src="https://s2.loli.net/2025/08/16/z5xYmXWIchyNVsJ.jpg" alt="Screenshot_20250816_231401_mark_via_gp_Shell" loading="lazy"></p><p>At the bottom, you can switch modes, including auto-accept edits, Plan mode, and Bypass permissions (skip permission checks), among others.</p><p>Cloudflare Tunnels runs as a daemon on your local computer and starts automatically. When you need to use it remotely, just run <code>npm run dev</code> to start the project. If needed, you can also configure the project to start automatically on your own.</p>]]>
    </content>
    <id>https://shiquda.link/en/how-to-control-claude-code-with-phone/</id>
    <link href="https://shiquda.link/en/how-to-control-claude-code-with-phone/"/>
    <published>2025-08-16T14:58:37.000Z</published>
    <summary>Leverage claudecodeui and Cloudflare Tunnels to control Claude Code remotely, with optional Zero Trust for enhanced security.</summary>
    <title>Command Claude Code from Your Phone</title>
    <updated>2025-08-16T15:52:09.000Z</updated>
  </entry>
  <entry>
    <author>
      <name>shiquda</name>
    </author>
    <category term="教程" scheme="https://shiquda.link/tags/%E6%95%99%E7%A8%8B/"/>
    <content>
      <![CDATA[<h2 id="Introduction"><a href="#Introduction" class="headerlink" title="Introduction"></a>Introduction</h2><p>When developing CI with GitHub Actions, we often run into situations that require debugging. After all, when writing a workflow from scratch, you’re bound to encounter unexpected issues.</p><p>This tutorial focuses on using <code>act</code> to run GitHub Actions locally. <a href="https://nektosact.com/">Act</a> is an open-source tool that parses <code>.github/workflows/</code> in your project, uses the Docker API to pull or build the necessary images, and executes tasks in order. Environment variables and the file system are configured to match the environment provided by GitHub.</p><h2 id="Environment-Setup"><a href="#Environment-Setup" class="headerlink" title="Environment Setup"></a>Environment Setup</h2><p>The author’s environment is Windows. If you’re using a different system, refer to <a href="https://nektosact.com/installation/index.html">Installation - act - User Guide | Manual | Docs | Documentation</a> to complete the setup.</p><p>In general, Windows and macOS require Docker Desktop, while Linux requires Docker Engine. In addition to Docker, you’ll also need to install <code>act</code>.</p><p>For Act, on Windows you can install it directly via <code>scoop install act</code>, or use winget. For the full list of available package managers, refer to <a href="https://nektosact.com/installation/index.html">Installation - act - User Guide | Manual | Docs | Documentation</a>.</p><p>If you use VSCode for development, there’s also a plugin called GitHub Local Actions that lets you debug conveniently through a graphical interface.</p><h2 id="Basic-Usage"><a href="#Basic-Usage" class="headerlink" title="Basic Usage"></a>Basic Usage</h2><p>If you’re using VSCode, you can debug with GitHub Local Actions; the GUI is very intuitive.</p><img src="https://s2.loli.net/2025/06/10/ryX1udSElpHoM6f.png" alt="Pasted image 20250610193116" width="200" /><p>Below, I’ll mainly cover how to use the command line.</p><p>On the first run, Act may prompt you to choose the image needed to simulate the environment.</p><p><img src="https://s2.loli.net/2025/06/10/rCEPqV4Gs5Yz9Qn.png" alt="Pasted image 20250610193137" loading="lazy"></p><p>Choosing Large fully simulates the environment of GitHub-hosted runners, but the image is large and requires 75GB of space. If you don’t need it, just stick with the default Medium.</p><p><code>act</code> supports basic <strong>events</strong>. That is, you can trigger the corresponding workflow for debugging by simulating events like <code>push</code> or <code>pull_request</code>. For example, if your repository has a test workflow triggered by <code>pull_request</code>, you can simply run <code>act pull_request</code> to test it.</p><p>You can also specify a single workflow to run with <code>act -W &#39;&lt;path-to-workflow&gt;&#39;</code>.</p><p>For more usage, check the <a href="https://nektosact.com/usage/">official documentation</a>.</p>]]>
    </content>
    <id>https://shiquda.link/en/run-github-actions-locally/</id>
    <link href="https://shiquda.link/en/run-github-actions-locally/"/>
    <published>2025-06-10T11:29:57.000Z</published>
    <summary>Run GitHub Actions on your machine with act and Docker—no more waiting for CI to catch bugs.</summary>
    <title>Debugging GitHub Actions Locally</title>
    <updated>2025-06-10T11:32:37.000Z</updated>
  </entry>
  <entry>
    <author>
      <name>shiquda</name>
    </author>
    <category term="教程" scheme="https://shiquda.link/categories/%E6%95%99%E7%A8%8B/"/>
    <category term="教程" scheme="https://shiquda.link/tags/%E6%95%99%E7%A8%8B/"/>
    <category term="Android" scheme="https://shiquda.link/tags/Android/"/>
    <content>
      <![CDATA[<h2 id="Body"><a href="#Body" class="headerlink" title="Body"></a>Body</h2><h3 id="Method-1-Temporary-command-line-approach"><a href="#Method-1-Temporary-command-line-approach" class="headerlink" title="Method 1: Temporary command-line approach"></a>Method 1: Temporary command-line approach</h3><figure class="highlight bash"><table><tbody><tr><td class="gutter"><pre><span class="line">1</span><br></pre></td><td class="code"><pre><span class="line">sdkmanager --verbose --no_https --proxy=http --proxy_host=&lt;host&gt; --proxy_port=&lt;port&gt; <span class="string">"&lt;package&gt;"</span></span><br></pre></td></tr></tbody></table></figure><p>Where:</p><ul><li><code>proxy_host</code> is the proxy host; use <code>127.0.0.1</code> for local.</li><li><code>proxy_port</code> is the proxy port.</li><li>Append the dependencies you want to install at the end.</li></ul><h3 id="Method-2-Permanent-modification-requires-editing-the-bat-file"><a href="#Method-2-Permanent-modification-requires-editing-the-bat-file" class="headerlink" title="Method 2: Permanent modification (requires editing the .bat file)"></a>Method 2: Permanent modification (requires editing the .bat file)</h3><p>I’m using Windows; other systems should be similar.</p><ol><li><p>Locate the file:</p><figure class="highlight bash"><table><tbody><tr><td class="gutter"><pre><span class="line">1</span><br><span class="line">2</span><br></pre></td><td class="code"><pre><span class="line"><span class="comment"># Windows</span></span><br><span class="line">%ANDROID_HOME%\cmdline-tools\latest\bin\sdkmanager.bat</span><br></pre></td></tr></tbody></table></figure></li><li><p>Find the line containing <code>%CMD_LINE_ARGS%</code>, near the end of the file, starting with <code>"%JAVA_EXE%" %DEFAULT_JVM_OPTS%</code>.</p></li><li><p>Change it to:</p></li></ol><figure class="highlight bash"><table><tbody><tr><td class="gutter"><pre><span class="line">1</span><br></pre></td><td class="code"><pre><span class="line"><span class="string">"%JAVA_EXE%"</span> %DEFAULT_JVM_OPTS% %JAVA_OPTS% %SDKMANAGER_OPTS% -classpath <span class="string">"%CLASSPATH%"</span> com.android.sdklib.tool.sdkmanager.SdkManagerCli --verbose --no_https --proxy=http --proxy_host=&lt;host&gt; --proxy_port=&lt;port&gt; %CMD_LINE_ARGS%</span><br></pre></td></tr></tbody></table></figure><p>Remember to adjust the relevant parameters inside.</p><p>After this configuration, every time you use <code>sdkmanager</code> from the command line, the proxy will be applied automatically.</p>]]>
    </content>
    <id>https://shiquda.link/en/command-line-android-sdkmanager-proxy/</id>
    <link href="https://shiquda.link/en/command-line-android-sdkmanager-proxy/"/>
    <published>2025-04-28T07:26:19.000Z</published>
    <summary>Learn how to set up a proxy for the Android sdkmanager CLI tool to ensure smooth SDK downloads and updates.</summary>
    <title>Configuring a Proxy for Android sdkmanager in the Command Line</title>
    <updated>2025-04-28T07:34:51.000Z</updated>
  </entry>
  <entry>
    <author>
      <name>shiquda</name>
    </author>
    <category term="项目" scheme="https://shiquda.link/categories/%E9%A1%B9%E7%9B%AE/"/>
    <category term="教程" scheme="https://shiquda.link/tags/%E6%95%99%E7%A8%8B/"/>
    <category term="项目" scheme="https://shiquda.link/tags/%E9%A1%B9%E7%9B%AE/"/>
    <category term="区块链" scheme="https://shiquda.link/tags/%E5%8C%BA%E5%9D%97%E9%93%BE/"/>
    <content>
      <![CDATA[<h2 id="Introduction"><a href="#Introduction" class="headerlink" title="Introduction"></a>Introduction</h2><p>My minimum bar for learning a new technology is “getting started.” In my view, reaching that level requires two things:</p><ol><li><strong>A solid understanding of the core concepts</strong> in the field—at least enough that when industry folks mention a concept, you have a rough idea of what it means;</li><li><strong>Hands-on practice</strong>—using what you’ve learned to build something real and presentable.</li></ol><p>Lately I’ve been interested in <strong>blockchain technology</strong>. After learning the core concepts, I wanted to build something with it. While brainstorming what project to use as my “getting started” test, the idea of a message board suddenly came to mind.</p><p>Traditional message boards are almost always built on <strong>centralized</strong> services, which means whoever controls the central server can delete or tamper with users’ messages. But if we could leverage blockchain’s near-immutability to put messages on-chain, and make the smart contract code public, that would be a perfect closed loop—neither the message authors nor the contract creator could tamper with the content. Add a frontend that fetches on-chain messages when users visit, and everyone can see them. Even if the frontend goes offline, anyone can still view the messages on-chain using the open-source contract code and the public ABI.</p><p>Let’s do it!</p><h2 id="Tech-Stack"><a href="#Tech-Stack" class="headerlink" title="Tech Stack"></a>Tech Stack</h2><ul><li>Solidity - Ethereum smart contract programming language</li><li>React - Frontend framework</li><li>Tailwind CSS - Styling framework</li><li>Wagmi - Web3 development library</li><li>Cloudflare Workers - Backend proxy service</li></ul><p>Project directory tree (generated with my <a href="https://github.com/shiquda/treex">open-source CLI: Treex</a>):</p><figure class="highlight text"><table><tbody><tr><td class="gutter"><pre><span class="line">1</span><br><span class="line">2</span><br><span class="line">3</span><br><span class="line">4</span><br><span class="line">5</span><br><span class="line">6</span><br><span class="line">7</span><br><span class="line">8</span><br><span class="line">9</span><br><span class="line">10</span><br><span class="line">11</span><br><span class="line">12</span><br><span class="line">13</span><br><span class="line">14</span><br><span class="line">15</span><br><span class="line">16</span><br><span class="line">17</span><br><span class="line">18</span><br><span class="line">19</span><br><span class="line">20</span><br><span class="line">21</span><br><span class="line">22</span><br><span class="line">23</span><br><span class="line">24</span><br><span class="line">25</span><br><span class="line">26</span><br><span class="line">27</span><br><span class="line">28</span><br><span class="line">29</span><br><span class="line">30</span><br><span class="line">31</span><br><span class="line">32</span><br></pre></td><td class="code"><pre><span class="line">📁 ./</span><br><span class="line">├── 📝 README.md</span><br><span class="line">├── 📁 cloudflare/</span><br><span class="line">│   └── 📜 worker.js</span><br><span class="line">├── 📜 eslint.config.js</span><br><span class="line">├── 🌐 index.html</span><br><span class="line">├── 📋 package.json</span><br><span class="line">├── ⚙️ pnpm-lock.yaml</span><br><span class="line">├── 📜 postcss.config.js</span><br><span class="line">├── 📁 public/</span><br><span class="line">│   ├── 📄 favicon.ico</span><br><span class="line">│   └── 🖼️ icon.png</span><br><span class="line">├── 📁 solidity/</span><br><span class="line">│   ├── 📋 abi.json</span><br><span class="line">│   └── 📄 message.sol</span><br><span class="line">├── 📁 src/</span><br><span class="line">│   ├── 🎨 App.css</span><br><span class="line">│   ├── 📜 App.tsx</span><br><span class="line">│   ├── 📁 assets/</span><br><span class="line">│   │   └── 🖼️ react.svg</span><br><span class="line">│   ├── 📁 components/</span><br><span class="line">│   │   ├── 📜 MessageBoard.tsx</span><br><span class="line">│   │   └── 📜 QA.tsx</span><br><span class="line">│   ├── 📜 config.ts</span><br><span class="line">│   ├── 🎨 index.css</span><br><span class="line">│   ├── 📜 main.tsx</span><br><span class="line">│   └── 📜 vite-env.d.ts</span><br><span class="line">├── 📜 tailwind.config.js</span><br><span class="line">├── 📋 tsconfig.app.json</span><br><span class="line">├── 📋 tsconfig.json</span><br><span class="line">├── 📋 tsconfig.node.json</span><br><span class="line">└── 📜 vite.config.ts</span><br></pre></td></tr></tbody></table></figure><h2 id="Main-Content"><a href="#Main-Content" class="headerlink" title="Main Content"></a>Main Content</h2><p>GitHub open-source repo: <a href="https://github.com/shiquda/chain-message">https://github.com/shiquda/chain-message</a></p><p>Live demo: <a href="https://msg.shiquda.link/">https://msg.shiquda.link/</a></p><p>Deployment guide: <a href="https://github.com/shiquda/chain-message/blob/main/DEPLOY_GUIDE.md">https://github.com/shiquda/chain-message/blob/main/DEPLOY_GUIDE.md</a></p><blockquote><p>To fully understand this article, some blockchain knowledge is helpful. If you don’t have any, no worries—I’m confident that with your smart brain, you can easily pick it up using LLMs along the way. If you’re interested in trying this hands-on, you’ll also need a wallet plugin. (I use <a href="https://chromewebstore.google.com/detail/okx-wallet/mcohilncbfahbmgdjkbpemcciiolgcge">OKX’s Web3 wallet</a>)</p></blockquote><h3 id="Smart-Contract"><a href="#Smart-Contract" class="headerlink" title="Smart Contract"></a>Smart Contract</h3><p>First, we need to write the smart contract code. A smart contract can be simply understood as a piece of code that runs on the blockchain, and the entire blockchain can be viewed as a <a href="https://zh.wikipedia.org/zh-hans/%E6%9C%89%E9%99%90%E7%8A%B6%E6%80%81%E6%9C%BA">state machine</a>. Interacting with smart contracts transitions the state machine from one state to another. Smart contracts support two types of calls: Read-type calls, which don’t require Gas fees, and Write-type calls, which involve write operations and are more expensive, requiring Gas.</p><p><a href="https://etherscan.io/address/0x0bb014622cfe080703796054c7a587d1d3bc4be9">The smart contract I wrote</a> only exposes two interfaces. The first is <code>postMessage</code>, a Write Contract that lets users submit their messages. The name field is optional—if left blank, it’s treated as an anonymous message. It should also support Markdown format, which is handled on the frontend.</p><figure class="highlight plaintext"><table><tbody><tr><td class="gutter"><pre><span class="line">1</span><br><span class="line">2</span><br><span class="line">3</span><br><span class="line">4</span><br><span class="line">5</span><br><span class="line">6</span><br><span class="line">7</span><br><span class="line">8</span><br><span class="line">9</span><br><span class="line">10</span><br><span class="line">11</span><br><span class="line">12</span><br><span class="line">13</span><br></pre></td><td class="code"><pre><span class="line">function postMessage(string memory _name, string memory _content) public {</span><br><span class="line">    unchecked {</span><br><span class="line">        // Safe counter increment (Solidity 0.8+ checks arithmetic overflow by default)</span><br><span class="line">        _messageCounter++;</span><br><span class="line">    }</span><br><span class="line">    emit MessagePosted(</span><br><span class="line">        _messageCounter,</span><br><span class="line">        msg.sender,</span><br><span class="line">        bytes(_name).length == 0 ? "Anonymous" : _name,</span><br><span class="line">        _content,</span><br><span class="line">        block.timestamp</span><br><span class="line">    );</span><br><span class="line">}</span><br></pre></td></tr></tbody></table></figure><p><img src="https://s2.loli.net/2025/04/21/NlrEymgxWbQ5kUV.png" alt="PixPin_2025-04-21_00-02-02" loading="lazy"></p><p>After a message is sent, the smart contract automatically stores not only the parameters above but also the timestamp of when it was sent.</p><figure class="highlight plaintext"><table><tbody><tr><td class="gutter"><pre><span class="line">1</span><br><span class="line">2</span><br><span class="line">3</span><br><span class="line">4</span><br><span class="line">5</span><br><span class="line">6</span><br><span class="line">7</span><br></pre></td><td class="code"><pre><span class="line">event MessagePosted(</span><br><span class="line">    uint256 indexed messageId, // Message ID (indexed)</span><br><span class="line">    address indexed sender, // Sender address (indexed)</span><br><span class="line">    string name, // Sender name (or "Anonymous")</span><br><span class="line">    string content, // Markdown content</span><br><span class="line">    uint256 timestamp // Block timestamp</span><br><span class="line">);</span><br></pre></td></tr></tbody></table></figure><p>There’s also an interface for querying the total number of messages. This interface is read-only—calling it merely queries the blockchain state and doesn’t consume gas. This interface isn’t actually used by the project yet.</p><figure class="highlight plaintext"><table><tbody><tr><td class="gutter"><pre><span class="line">1</span><br><span class="line">2</span><br><span class="line">3</span><br></pre></td><td class="code"><pre><span class="line">function getMessageCount() public view returns (uint256) {</span><br><span class="line">    return _messageCounter;</span><br><span class="line">}</span><br></pre></td></tr></tbody></table></figure><p><img src="https://s2.loli.net/2025/04/21/cCoRlA1J6asT4IM.png" alt="PixPin_2025-04-21_00-03-02" loading="lazy"></p><p>Other than that, no other interfaces are exposed, which means once a message is on-chain, even I can’t delete it.</p><p>Now let me explain how I deployed the smart contract. I used <a href="https://remix.ethereum.org/">Remix</a>, an online IDE recommended by the Ethereum Foundation that’s beginner-friendly.</p><p><img src="https://s2.loli.net/2025/04/21/TcewvYP8dhiOVDN.png" alt="PixPin_2025-04-21_00-06-23" loading="lazy"></p><p>Paste the locally written contract into Remix, then compile it. After compilation, select the deploy tab on the left.</p><p><img src="https://s2.loli.net/2025/04/21/dAgOcGpM9HYsbxZ.png" alt="PixPin_2025-04-21_00-06-57" loading="lazy"></p><p>Choose WalletConnect and connect your wallet plugin as prompted. Once connected, click deploy and confirm in your wallet plugin—the contract will be deployed on-chain.</p><p>Deploying a contract requires a fairly high Gas fee, so you may need to withdraw some funds from a centralized exchange to your wallet. My last deployment cost around $0.37. After deployment, you can also verify your contract source code on <a href="https://etherscan.io/">Etherscan</a>, so anyone can publicly audit the contract code and verify the system’s immutability.</p><p>One thing to note: I used the smart contract’s event logs to record messages. I chose this over storing directly in contract storage because storage would consume significantly more Gas. Using event logs reduces this cost, so users pay less Gas when submitting messages. In my testing, submitting a message cost about $0.05—roughly 30 cents RMB.</p><p>Of course, testing on a testnet first would have been the safer approach, but I was too eager to deploy my first smart contract to the mainnet. I’d advise you not to follow my example here 🤣</p><h3 id="Frontend-Implementation"><a href="#Frontend-Implementation" class="headerlink" title="Frontend Implementation"></a>Frontend Implementation</h3><p>For the frontend, I used the React framework with Tailwind CSS for simple styling. The Web3 library I used is <a href="https://wagmi.sh/">wagmi</a>—thanks to the Web3 developers who came before us, they’ve already done a lot of the heavy lifting for us regular developers. This library automatically handles interaction with the user’s wallet plugin.</p><p>I won’t go into the implementation details here—interested readers can check out the <a href="https://github.com/shiquda/chain-message">source code</a>.</p><p>Live demo: <a href="https://msg.shiquda.link/">https://msg.shiquda.link/</a></p><p><img src="https://s2.loli.net/2025/04/21/9w84b2qSkTmhcpt.png" alt="PixPin_2025-04-21_00-16-23" loading="lazy"></p><h3 id="Cloudflare-Workers"><a href="#Cloudflare-Workers" class="headerlink" title="Cloudflare Workers"></a>Cloudflare Workers</h3><p>The frontend itself is fairly simple, but a new problem emerged: how do users fetch the on-chain messages?</p><p>I first tried using public Ethereum nodes to fetch the logs. After trying several, I found that most don’t support unauthenticated calls. For fetching event logs, I did find a free one—<a href="https://ethereum.publicnode.com/">https://ethereum.publicnode.com</a>—but it only supports querying up to 50,000 blocks, which clearly didn’t meet my requirements. So I ended up using Etherscan’s API, which requires authentication.</p><p>But that raised another issue: if the API key is stored directly in the frontend, wouldn’t it be exposed and abused by others?</p><p>That’s when I thought of using Cloudflare Workers as a simple wrapper. When a user makes a request to the Cloudflare Worker, the worker reads the API key from an environment variable configured in CF, forwards the request to Etherscan as a proxy, and returns the response to the user. This way, the frontend can fetch messages in real time.</p><p>However, someone could still abuse the endpoint to query event logs. So I added another environment variable to restrict the endpoint to only query our deployed contract, which significantly reduces the incentive for abusers.</p><p>One gotcha here: Cloudflare Workers’ default domain is blocked by the GFW (Great Firewall). To work around this, you can use your own domain or subdomain as a forwarding route, which bypasses the restriction and lets users directly fetch the message data.</p><p>To configure Workers, find “Workers &amp; Pages” on the left side of your Cloudflare dashboard, then <code>Create &gt; Workers &gt; Hello world &gt; Enter a name and deploy &gt; Edit code</code>, and paste the code below.</p><figure class="highlight javascript"><table><tbody><tr><td class="gutter"><pre><span class="line">1</span><br><span class="line">2</span><br><span class="line">3</span><br><span class="line">4</span><br><span class="line">5</span><br><span class="line">6</span><br><span class="line">7</span><br><span class="line">8</span><br><span class="line">9</span><br><span class="line">10</span><br><span class="line">11</span><br><span class="line">12</span><br><span class="line">13</span><br><span class="line">14</span><br><span class="line">15</span><br><span class="line">16</span><br><span class="line">17</span><br><span class="line">18</span><br><span class="line">19</span><br><span class="line">20</span><br><span class="line">21</span><br><span class="line">22</span><br><span class="line">23</span><br><span class="line">24</span><br><span class="line">25</span><br><span class="line">26</span><br><span class="line">27</span><br><span class="line">28</span><br><span class="line">29</span><br><span class="line">30</span><br><span class="line">31</span><br><span class="line">32</span><br><span class="line">33</span><br><span class="line">34</span><br><span class="line">35</span><br><span class="line">36</span><br><span class="line">37</span><br><span class="line">38</span><br><span class="line">39</span><br><span class="line">40</span><br><span class="line">41</span><br><span class="line">42</span><br><span class="line">43</span><br><span class="line">44</span><br><span class="line">45</span><br><span class="line">46</span><br><span class="line">47</span><br><span class="line">48</span><br><span class="line">49</span><br><span class="line">50</span><br><span class="line">51</span><br><span class="line">52</span><br><span class="line">53</span><br><span class="line">54</span><br><span class="line">55</span><br><span class="line">56</span><br><span class="line">57</span><br><span class="line">58</span><br><span class="line">59</span><br><span class="line">60</span><br></pre></td><td class="code"><pre><span class="line"><span class="comment">// worker.js</span></span><br><span class="line"><span class="keyword">export</span> <span class="keyword">default</span> {</span><br><span class="line">    <span class="keyword">async</span> <span class="title function_">fetch</span>(<span class="params">request, env</span>) {</span><br><span class="line">        <span class="comment">// Handle CORS preflight request</span></span><br><span class="line">        <span class="keyword">if</span> (request.<span class="property">method</span> === <span class="string">'OPTIONS'</span>) {</span><br><span class="line">            <span class="keyword">return</span> <span class="keyword">new</span> <span class="title class_">Response</span>(<span class="literal">null</span>, {</span><br><span class="line">                <span class="attr">headers</span>: {</span><br><span class="line">                    <span class="string">'Access-Control-Allow-Origin'</span>: <span class="string">'*'</span>,</span><br><span class="line">                    <span class="string">'Access-Control-Allow-Methods'</span>: <span class="string">'GET, OPTIONS'</span>,</span><br><span class="line">                    <span class="string">'Access-Control-Allow-Headers'</span>: <span class="string">'Content-Type'</span>,</span><br><span class="line">                },</span><br><span class="line">            });</span><br><span class="line">        }</span><br><span class="line"></span><br><span class="line">        <span class="keyword">const</span> { searchParams } = <span class="keyword">new</span> <span class="title function_">URL</span>(request.<span class="property">url</span>);</span><br><span class="line">        <span class="keyword">const</span> address = searchParams.<span class="title function_">get</span>(<span class="string">'address'</span>);</span><br><span class="line">        <span class="keyword">const</span> startBlock = searchParams.<span class="title function_">get</span>(<span class="string">'startBlock'</span>);</span><br><span class="line"></span><br><span class="line">        <span class="keyword">if</span> (!address || !startBlock) {</span><br><span class="line">            <span class="keyword">return</span> <span class="keyword">new</span> <span class="title class_">Response</span>(<span class="string">'Missing parameters'</span>, {</span><br><span class="line">                <span class="attr">status</span>: <span class="number">400</span>,</span><br><span class="line">                <span class="attr">headers</span>: {</span><br><span class="line">                    <span class="string">'Access-Control-Allow-Origin'</span>: <span class="string">'*'</span>,</span><br><span class="line">                    <span class="string">'Content-Type'</span>: <span class="string">'application/json'</span>,</span><br><span class="line">                }</span><br><span class="line">            });</span><br><span class="line">        }</span><br><span class="line"></span><br><span class="line">        <span class="comment">// Optional environment variable: Contract address, prevents API abuse</span></span><br><span class="line">        <span class="keyword">const</span> <span class="variable constant_">CONTRACT_ADDRESS</span> = env.<span class="property">CONTRACT_ADDRESS</span>?.<span class="title function_">toLowerCase</span>();</span><br><span class="line">        <span class="keyword">if</span> (<span class="variable constant_">CONTRACT_ADDRESS</span> &amp;&amp; address.<span class="title function_">toLowerCase</span>() !== <span class="variable constant_">CONTRACT_ADDRESS</span>) {</span><br><span class="line">            <span class="keyword">return</span> <span class="keyword">new</span> <span class="title class_">Response</span>(<span class="string">'Forbidden'</span>, {</span><br><span class="line">                <span class="attr">status</span>: <span class="number">403</span>,</span><br><span class="line">                <span class="attr">headers</span>: {</span><br><span class="line">                    <span class="string">'Access-Control-Allow-Origin'</span>: <span class="string">'*'</span>,</span><br><span class="line">                    <span class="string">'Content-Type'</span>: <span class="string">'application/json'</span>,</span><br><span class="line">                }</span><br><span class="line">            });</span><br><span class="line">        }</span><br><span class="line"></span><br><span class="line">        <span class="keyword">const</span> params = <span class="keyword">new</span> <span class="title class_">URLSearchParams</span>({</span><br><span class="line">            <span class="attr">module</span>: <span class="string">'logs'</span>,</span><br><span class="line">            <span class="attr">action</span>: <span class="string">'getLogs'</span>,</span><br><span class="line">            <span class="attr">address</span>: address,</span><br><span class="line">            <span class="attr">fromBlock</span>: startBlock,</span><br><span class="line">            <span class="attr">apikey</span>: env.<span class="property">ETHERSCAN_API_KEY</span></span><br><span class="line">        });</span><br><span class="line">        <span class="keyword">const</span> response = <span class="keyword">await</span> <span class="title function_">fetch</span>(<span class="string">`https://api.etherscan.io/api?<span class="subst">${params.toString()}</span>`</span>);</span><br><span class="line"></span><br><span class="line">        <span class="keyword">const</span> data = <span class="keyword">await</span> response.<span class="title function_">json</span>();</span><br><span class="line">        <span class="keyword">return</span> <span class="keyword">new</span> <span class="title class_">Response</span>(<span class="title class_">JSON</span>.<span class="title function_">stringify</span>(data), {</span><br><span class="line">            <span class="attr">headers</span>: {</span><br><span class="line">                <span class="string">'Content-Type'</span>: <span class="string">'application/json'</span>,</span><br><span class="line">                <span class="string">'Access-Control-Allow-Origin'</span>: <span class="string">'*'</span>,</span><br><span class="line">                <span class="string">'Access-Control-Allow-Methods'</span>: <span class="string">'GET, OPTIONS'</span>,</span><br><span class="line">                <span class="string">'Access-Control-Allow-Headers'</span>: <span class="string">'Content-Type'</span>,</span><br><span class="line">            },</span><br><span class="line">        });</span><br><span class="line">    },</span><br><span class="line">};</span><br></pre></td></tr></tbody></table></figure><p>Then navigate to your Worker’s <code>Settings &gt; Variables and Secrets &gt; Variables and Secrets &gt; Add</code>, and add the two environment variables: <code>CONTRACT_ADDRESS</code> and <code>ETHERSCAN_API_KEY</code>.</p><p>If you need to bind your own domain, go to the domain management page in CF, find “Workers Routes” on the left, add a route, and bind it to the Worker you created earlier.</p><p><img src="https://s2.loli.net/2025/04/21/gVr1YanhzPQtLH6.png" alt="PixPin_2025-04-21_00-29-46" loading="lazy"></p><h3 id="Static-Site-Generation"><a href="#Static-Site-Generation" class="headerlink" title="Static Site Generation"></a>Static Site Generation</h3><p>Once everything is ready, we can generate a static page and upload it to our blog or a cloud hosting service, allowing it to run independently.</p><p>I recommend deploying with Cloudflare Pages. For a tutorial on this approach, see the <a href="https://github.com/shiquda/chain-message/blob/main/DEPLOY_GUIDE.md">deployment guide on GitHub</a>.</p><p>Clone the project, install dependencies, and configure:</p><figure class="highlight plaintext"><table><tbody><tr><td class="gutter"><pre><span class="line">1</span><br><span class="line">2</span><br><span class="line">3</span><br></pre></td><td class="code"><pre><span class="line">git clone https://github.com/shiquda/chain-message.git</span><br><span class="line">cd chain-message</span><br><span class="line">pnpm install</span><br></pre></td></tr></tbody></table></figure><p>Then refer to <code>.env.example</code> to fill in the required environment variables. Once that’s done, build with the following command:</p><figure class="highlight plaintext"><table><tbody><tr><td class="gutter"><pre><span class="line">1</span><br></pre></td><td class="code"><pre><span class="line">pnpm build</span><br></pre></td></tr></tbody></table></figure><p>The files in <code>dist/</code> are the static site—you can host them on any hosting service.</p><hr><h2 id="Conclusion"><a href="#Conclusion" class="headerlink" title="Conclusion"></a>Conclusion</h2><p>After all this, I’m truly filled with emotion. A hundred years from now, after I’ve left this world, these messages might still exist on the blockchain. Others might even be able to access and read my messages, or the messages people left for me. That’s genuinely a <em>cool</em> thing.</p><p>Message board: <a href="https://msg.shiquda.link/">https://msg.shiquda.link/</a></p><p>Regardless, let me <a href="https://etherscan.io/tx/0xd108a7e73699e3c44bd0a24cd300b5cd8b389d22ed1ffc96980f7f12414ac1ab">leave a message for myself 10 years from now</a>. (I typed one extra character, and it’s already irreversible 😄)</p><p><img src="https://s2.loli.net/2025/04/21/xACPOmkz8N5YZDF.png" alt="PixPin_2025-04-21_00-58-32" loading="lazy"></p><p><img src="https://s2.loli.net/2025/04/21/9iVrO3Dj2d6nlwk.png" alt="PixPin_2025-04-21_00-59-03" loading="lazy"></p><p>All the code for this idea—including the smart contract, frontend, and Cloudflare Workers code—is in the <a href="https://github.com/shiquda/chain-message">GitHub repo</a>. If you’re interested, feel free to deploy your own and play around with it.</p><p>A few days ago, I registered an Ethereum address domain: shiquda.eth. Using this ENS domain, you can find my wallet address—the same address that deployed this contract. If this article inspired you, feel free to send some funds to that address 😄<del>(I know, shameless plug)</del></p>]]>
    </content>
    <id>https://shiquda.link/en/chain-message-immutable-message-board/</id>
    <link href="https://shiquda.link/en/chain-message-immutable-message-board/"/>
    <published>2025-04-20T14:50:23.000Z</published>
    <summary>Discover how to leverage blockchain to create a tamper-proof message board where every entry is permanently recorded and verifiable—no edits, no deletions, just immutable truth.</summary>
    <title>Chain Message: Building an Immutable Message Board with Blockchain</title>
    <updated>2025-04-20T17:06:06.000Z</updated>
  </entry>
  <entry>
    <author>
      <name>shiquda</name>
    </author>
    <category term="耕读" scheme="https://shiquda.link/tags/%E8%80%95%E8%AF%BB/"/>
    <content>
      <![CDATA[<p>We analyze finance and investing, more often than not, from a <strong>rational</strong> perspective. Finance has the economic man assumption and the efficient market hypothesis. In quantitative trading, firms recruit geniuses from top universities with off-the-charts IQs, all in the hope of uncovering more effective quant factors and trying to beat the market with mathematical methods. This book, however, offers a different lens: starting from psychology—which can seem a bit like mysticism—it examines the factors that every ordinary person tends to overlook when making investment decisions, yet which directly shape our choices and returns.</p><p>The book is roughly structured as principles plus examples. The examples are vivid, but reading it can still feel a bit long-winded. Below, I distill each chapter into a set of key points.</p><ol><li>Because of factors like upbringing, life experiences, and social environment, everyone’s understanding of money varies enormously, and only a small part of it is likely to match reality. This understanding of money, in turn, heavily shapes how we think the world works.</li><li>An investment decision is never simply the result of watching stock prices and running a series of analyses. It is inevitably influenced by other “off-field” factors such as personal experience, worldview, and family cash flow.</li><li>Every outcome in life is shaped by forces beyond personal effort. You can’t believe in one and ignore the other.</li><li>Contentment is likely a factor we overlook while running toward something we can’t quite name. Comparing upward has no end; having the courage to stop while you’re ahead is far more valuable.</li><li>Many things in the world are not worth risking, no matter how large the potential payoff. Pursuing them may mean risking the loss of priceless things: reputation, freedom, family and friends, even life.</li><li>The power of compound interest is counterintuitive.</li><li>Getting rich requires risk-taking, optimism, and the courage to go all in. But staying rich requires the opposite of risk-taking: humility and awe, and the awareness that wealth can leave as quickly as it came.</li><li>The safety of wealth matters more than huge returns. As long as your wealth is safe, you can harness the power of compound interest and achieve the greatest returns.</li><li>An investor can be wrong half the time and still end up rich—thanks to payoff ratios and tail events. That’s counterintuitive. So there’s no need to obsess over failures; they are inevitable. Example: venture capital’s spray-and-pray strategy profits from only a handful of successful startups.</li><li>In most cases, the “present” isn’t all that important. The decisions you make in the near term usually matter far less than the few key decisions you make over a lifetime.</li><li>The greatest dividend wealth can give you is freedom of time: “Today I can do whatever I want.”</li><li>Buying luxury goods is essentially buying other people’s envy. But in reality, when others see your luxury items, they often don’t envy you. They’re more likely to have one of the following thoughts:<ol><li>Focusing on the item itself: “That luxury piece is beautiful!”</li><li>Comparing to themselves: “I could never afford that” &#x2F; “Could I get one too? Or something more expensive?”</li><li>Questioning you: “You have money, but I don’t think you deserve it. You got rich through xxx.”</li></ol></li><li>Flashing wealth is the fastest way to lose it. There are many people in the world who look low-key but are actually rich, and many who look wealthy but live on the edge of bankruptcy.</li><li>Wealth accumulation has little to do with your income or investment returns, and a lot to do with your <strong>savings rate</strong>.</li><li>In fact, cutting unnecessary expenses—or investing the difference—is more direct and simpler than racking your brain to raise your returns by 0.1%.</li><li>Savings &#x3D; income - ego</li><li>You don’t need a special reason to save. Saving isn’t just about earning more returns. Even if there were no returns at all, the greater <strong>flexibility</strong> it gives you—compared with others—is itself a return: the ability to choose a more meaningful job, or to wait for investment opportunities that panic brings.</li><li><strong>Reasonable beats rational.</strong> This is because investing involves <strong>social factors</strong>. When making investment decisions, don’t try to be perfectly rational. Instead, choose what is reasonable—and therefore easier to stick with—for you. In other words, the best investment plan in real life is one that lets you sleep soundly at night, not one that tries to be perfectly rational and live on the edge.</li><li>Day trading, picking individual stocks, and trading on forecasts are, for most investors, not fully rational. But if they make up only a small part of your portfolio and they align with your human nature, then they are reasonable. (Treat it as a game.)</li><li>We try to predict the future from history in every possible way. But the truth is, the world keeps producing events that have never happened before—that’s counterintuitive. Example: when building nuclear reactors, the worst-case scenario people considered was the most severe earthquake in history, but the worst event in history was itself an accident.</li><li>The impact of tail events and tail people is beyond imagination, because their influence grows over time.</li><li>One interesting thing about investment history: the further back you look, the less applicable the patterns are to today’s world.</li><li>Margin of safety is crucial. Some things look viable from a statistical standpoint, but you must ensure you have enough cash to handle the worst luck. Don’t let a single black swan event wipe you out completely.</li><li>People change. We are keenly aware of how we’ve changed from the past, but we easily underestimate how much our personality, ideas, and goals will change in the future.</li><li>Investing has a price. The idea that you can get returns without paying a price is an illusion. But the costs of returns are often hidden. They include the psychological cost of enduring volatility, opportunity cost, and unpredictable black swan blowups. If you drag those costs into the open and treat them as the price of admission, you’ll feel much better psychologically.</li><li>Don’t blindly learn money lessons from people whose situations differ from yours. Everyone has different experiences, different investment logic (e.g., short-term vs. long-term), different risk tolerance, and different entry points.</li><li>People’s instinctive aversion to negative events gives pessimism a psychological advantage; it’s easier for people to be influenced by it.</li><li>Everyone’s view of the world is incomplete, but everyone weaves a complete story to fill in the gaps.</li></ol>]]>
    </content>
    <id>https://shiquda.link/en/the-psychology-of-money-summary/</id>
    <link href="https://shiquda.link/en/the-psychology-of-money-summary/"/>
    <published>2025-04-11T13:24:17.000Z</published>
    <summary>A concise summary of key takeaways from 'The Psychology of Money'.</summary>
    <title>Reading Summary: The Psychology of Money</title>
    <updated>2025-04-11T13:25:47.000Z</updated>
  </entry>
  <entry>
    <author>
      <name>shiquda</name>
    </author>
    <category term="项目" scheme="https://shiquda.link/categories/%E9%A1%B9%E7%9B%AE/"/>
    <category term="项目" scheme="https://shiquda.link/tags/%E9%A1%B9%E7%9B%AE/"/>
    <category term="Go" scheme="https://shiquda.link/tags/Go/"/>
    <content>
      <![CDATA[<h1 id="🌳-Treex-Advanced-Command-line-Directory-Tree-Visualization-Tool"><a href="#🌳-Treex-Advanced-Command-line-Directory-Tree-Visualization-Tool" class="headerlink" title="🌳 Treex - Advanced Command-line Directory Tree Visualization Tool"></a>🌳 Treex - Advanced Command-line Directory Tree Visualization Tool</h1><p>Today I’d like to recommend a small tool I recently developed for developers — Treex.</p><h2 id="🤔-Why-do-you-need-this-tool"><a href="#🤔-Why-do-you-need-this-tool" class="headerlink" title="🤔 Why do you need this tool?"></a>🤔 Why do you need this tool?</h2><p>During development and learning, you may have encountered scenarios like:</p><ul><li>For an unfamiliar project, looking at the complex project structure, not knowing where to start</li><li>Wanting to quickly show a large model your project structure so it can help you understand</li><li>Needing to insert a visual directory structure when writing project documentation</li></ul><p>The traditional <code>tree</code> command works, but its features are too basic. While using it, I often found that it would draw out files I didn’t need (for example, <code>node_modules</code> in Node projects), resulting in too much unnecessary information and making things look messier.</p><p>So I used Cursor and developed <a href="https://github.com/shiquda/treex">Treex</a> in Go. It’s a directory tree tool that <strong>supports multiple output formats and filtering</strong>.</p><p><strong>Project URL</strong>: <a href="https://github.com/shiquda/treex">https://github.com/shiquda/treex</a></p><h2 id="✨-Core-Features-at-a-Glance"><a href="#✨-Core-Features-at-a-Glance" class="headerlink" title="✨ Core Features at a Glance"></a>✨ Core Features at a Glance</h2><h3 id="🎨-Multiple-Output-Formats"><a href="#🎨-Multiple-Output-Formats" class="headerlink" title="🎨 Multiple Output Formats"></a>🎨 Multiple Output Formats</h3><ul><li>🌲 <strong>Tree format</strong> (default): classic command-line tree structure</li><li>📑 <strong>Indent format</strong>: clean hierarchical indentation</li><li>📝 <strong>Markdown format</strong>: paste directly into documents</li><li>📊 <strong>Mermaid format</strong>: generate embeddable flowcharts</li></ul><h3 id="🔍-Smart-Filtering"><a href="#🔍-Smart-Filtering" class="headerlink" title="🔍 Smart Filtering"></a>🔍 Smart Filtering</h3><ul><li>🕵️ Hide hidden files like <code>.git</code></li><li>📁 Show only directory structure</li><li>🚫 Exclude specified directories/file types</li></ul><h3 id="🛠️-Highly-Customizable"><a href="#🛠️-Highly-Customizable" class="headerlink" title="🛠️ Highly Customizable"></a>🛠️ Highly Customizable</h3><ul><li>📏 Control directory depth</li><li>💾 Output to file</li><li>🎯 Custom display formats</li></ul><h2 id="🚀-Quick-Start"><a href="#🚀-Quick-Start" class="headerlink" title="🚀 Quick Start"></a>🚀 Quick Start</h2><h3 id="Download"><a href="#Download" class="headerlink" title="Download"></a>Download</h3><h4 id="Method-1-Download-precompiled-binaries"><a href="#Method-1-Download-precompiled-binaries" class="headerlink" title="Method 1: Download precompiled binaries"></a>Method 1: Download precompiled binaries</h4><p>Download from the <a href="https://github.com/shiquda/treex/releases">Release</a> page, then add to PATH</p><h4 id="Method-2-Install-with-Go"><a href="#Method-2-Install-with-Go" class="headerlink" title="Method 2: Install with Go"></a>Method 2: Install with Go</h4><p>If you have a Go environment, you can install with one command:</p><figure class="highlight bash"><table><tbody><tr><td class="gutter"><pre><span class="line">1</span><br></pre></td><td class="code"><pre><span class="line">go install github.com/shiquda/treex@latest</span><br></pre></td></tr></tbody></table></figure><h3 id="Basic-Usage"><a href="#Basic-Usage" class="headerlink" title="Basic Usage"></a>Basic Usage</h3><figure class="highlight bash"><table><tbody><tr><td class="gutter"><pre><span class="line">1</span><br><span class="line">2</span><br><span class="line">3</span><br><span class="line">4</span><br><span class="line">5</span><br><span class="line">6</span><br><span class="line">7</span><br><span class="line">8</span><br></pre></td><td class="code"><pre><span class="line"><span class="comment"># View current directory structure</span></span><br><span class="line">treex</span><br><span class="line"></span><br><span class="line"><span class="comment"># View specified directory</span></span><br><span class="line">treex -d /path/to/project</span><br><span class="line"></span><br><span class="line"><span class="comment"># View help information</span></span><br><span class="line">treex -h</span><br></pre></td></tr></tbody></table></figure><p>Output:</p><figure class="highlight text"><table><tbody><tr><td class="gutter"><pre><span class="line">1</span><br><span class="line">2</span><br><span class="line">3</span><br><span class="line">4</span><br><span class="line">5</span><br><span class="line">6</span><br><span class="line">7</span><br><span class="line">8</span><br><span class="line">9</span><br><span class="line">10</span><br><span class="line">11</span><br><span class="line">12</span><br><span class="line">13</span><br><span class="line">14</span><br><span class="line">15</span><br><span class="line">16</span><br><span class="line">17</span><br><span class="line">18</span><br><span class="line">19</span><br><span class="line">20</span><br><span class="line">21</span><br><span class="line">22</span><br><span class="line">23</span><br><span class="line">24</span><br><span class="line">25</span><br><span class="line">26</span><br><span class="line">27</span><br><span class="line">28</span><br><span class="line">29</span><br><span class="line">30</span><br><span class="line">31</span><br><span class="line">32</span><br><span class="line">33</span><br><span class="line">34</span><br><span class="line">35</span><br><span class="line">36</span><br><span class="line">37</span><br><span class="line">38</span><br></pre></td><td class="code"><pre><span class="line">└── .</span><br><span class="line">    ├── .git</span><br><span class="line">    │   ├── HEAD</span><br><span class="line">    │   ├── config</span><br><span class="line">    │   ├── description</span><br><span class="line">    │   ├── hooks</span><br><span class="line">    │   │   ├── applypatch-msg.sample</span><br><span class="line">    │   │   ├── commit-msg.sample</span><br><span class="line">    │   │   ├── fsmonitor-watchman.sample</span><br><span class="line">    │   │   ├── post-update.sample</span><br><span class="line">    │   │   ├── pre-applypatch.sample</span><br><span class="line">    │   │   ├── pre-commit.sample</span><br><span class="line">    │   │   ├── pre-merge-commit.sample</span><br><span class="line">    │   │   ├── pre-push.sample</span><br><span class="line">    │   │   ├── pre-rebase.sample</span><br><span class="line">    │   │   ├── pre-receive.sample</span><br><span class="line">    │   │   ├── prepare-commit-msg.sample</span><br><span class="line">    │   │   ├── push-to-checkout.sample</span><br><span class="line">    │   │   ├── sendemail-validate.sample</span><br><span class="line">    │   │   └── update.sample</span><br><span class="line">    │   ├── info</span><br><span class="line">    │   │   └── exclude</span><br><span class="line">    │   ├── objects</span><br><span class="line">    │   │   ├── info</span><br><span class="line">    │   │   └── pack</span><br><span class="line">    │   └── refs</span><br><span class="line">    │       ├── heads</span><br><span class="line">    │       └── tags</span><br><span class="line">    ├── .gitignore</span><br><span class="line">    ├── 1.go</span><br><span class="line">    ├── 2.go</span><br><span class="line">    ├── README.md</span><br><span class="line">    ├── build</span><br><span class="line">    │   └── win</span><br><span class="line">    │       └── output.exe</span><br><span class="line">    └── test</span><br><span class="line">        ├── 3.go</span><br><span class="line">        └── README_test.md</span><br></pre></td></tr></tbody></table></figure><h2 id="⚡-Advanced-Usage-Examples"><a href="#⚡-Advanced-Usage-Examples" class="headerlink" title="⚡ Advanced Usage Examples"></a>⚡ Advanced Usage Examples</h2><h3 id="1-Generate-project-documentation"><a href="#1-Generate-project-documentation" class="headerlink" title="1. Generate project documentation"></a>1. Generate project documentation</h3><figure class="highlight bash"><table><tbody><tr><td class="gutter"><pre><span class="line">1</span><br><span class="line">2</span><br></pre></td><td class="code"><pre><span class="line"><span class="comment"># Exclude hidden files, output Markdown format to specified file</span></span><br><span class="line">treex -H -f md -o PROJECT_STRUCTURE.md</span><br></pre></td></tr></tbody></table></figure><ul><li>./<ul><li>1.go</li><li>2.go</li><li>README.md</li><li>build/<ul><li>win/<ul><li>output.exe</li></ul></li></ul></li><li>test/<ul><li>3.go</li><li>README_test.md</li></ul></li></ul></li></ul><h3 id="2-Tech-talk-illustrations"><a href="#2-Tech-talk-illustrations" class="headerlink" title="2. Tech talk illustrations"></a>2. Tech talk illustrations</h3><figure class="highlight bash"><table><tbody><tr><td class="gutter"><pre><span class="line">1</span><br><span class="line">2</span><br></pre></td><td class="code"><pre><span class="line"><span class="comment"># Keep only non-hidden directories, generate Mermaid code</span></span><br><span class="line">treex -HD -f mermaid</span><br></pre></td></tr></tbody></table></figure><figure class="highlight plaintext"><table><tbody><tr><td class="gutter"><pre><span class="line">1</span><br><span class="line">2</span><br><span class="line">3</span><br><span class="line">4</span><br><span class="line">5</span><br><span class="line">6</span><br><span class="line">7</span><br><span class="line">8</span><br></pre></td><td class="code"><pre><span class="line">graph TD</span><br><span class="line">    N1[./]</span><br><span class="line">    N2[build/]</span><br><span class="line">    N1 --&gt; N2</span><br><span class="line">    N3[win/]</span><br><span class="line">    N2 --&gt; N3</span><br><span class="line">    N4[test/]</span><br><span class="line">    N1 --&gt; N4</span><br></pre></td></tr></tbody></table></figure><p><img src="https://s2.loli.net/2025/04/11/XNgijqn47FURCdx.png" alt="mermaid-2025411 002546" loading="lazy"></p><h3 id="3-Exclude-specific-files"><a href="#3-Exclude-specific-files" class="headerlink" title="3. Exclude specific files"></a>3. Exclude specific files</h3><figure class="highlight bash"><table><tbody><tr><td class="gutter"><pre><span class="line">1</span><br><span class="line">2</span><br></pre></td><td class="code"><pre><span class="line"><span class="comment"># Exclude unimportant directories and file types</span></span><br><span class="line">treex -e <span class="string">".git/, .md"</span></span><br></pre></td></tr></tbody></table></figure><figure class="highlight text"><table><tbody><tr><td class="gutter"><pre><span class="line">1</span><br><span class="line">2</span><br><span class="line">3</span><br><span class="line">4</span><br><span class="line">5</span><br><span class="line">6</span><br><span class="line">7</span><br><span class="line">8</span><br><span class="line">9</span><br></pre></td><td class="code"><pre><span class="line">└── .</span><br><span class="line">    ├── .gitignore</span><br><span class="line">    ├── 1.go</span><br><span class="line">    ├── 2.go</span><br><span class="line">    ├── build</span><br><span class="line">    │   └── win</span><br><span class="line">    │       └── output.exe</span><br><span class="line">    └── test</span><br><span class="line">        └── 3.go</span><br></pre></td></tr></tbody></table></figure><h2 id="🛠️-Full-Parameter-Reference"><a href="#🛠️-Full-Parameter-Reference" class="headerlink" title="🛠️ Full Parameter Reference"></a>🛠️ Full Parameter Reference</h2><p>You can check <a href="https://github.com/shiquda/treex">https://github.com/shiquda/treex</a> for details.</p><div class="md-table-scroll"><table><thead><tr><th>Parameter</th><th>Description</th></tr></thead><tbody><tr><td><code>-d</code></td><td>Directory to scan (default: current directory)</td></tr><tr><td><code>-f</code></td><td>Output format (tree/indent/md/mermaid)</td></tr><tr><td><code>-m</code></td><td>Maximum directory depth (0 means unlimited)</td></tr><tr><td><code>-o</code></td><td>Output file path</td></tr><tr><td><code>-e</code></td><td>Exclusion rules (comma-separated)</td></tr><tr><td><code>-H</code></td><td>Hide hidden files</td></tr><tr><td><code>-D</code></td><td>Show directories only</td></tr></tbody></table></div><h2 id="💖-Looking-Forward-to-Your-Participation"><a href="#💖-Looking-Forward-to-Your-Participation" class="headerlink" title="💖 Looking Forward to Your Participation"></a>💖 Looking Forward to Your Participation</h2><p>Treex is still in early development. I don’t have much development experience, and limited by my personal skill level, the tool inevitably has shortcomings. If you:</p><ul><li>Found a bug</li><li>Have feature suggestions</li><li>Want to contribute code</li></ul><p>Feel free to submit an Issue or PR on GitHub! Of course, a ⭐ star of encouragement would also be great～</p><p><strong>Project URL</strong>: <a href="https://github.com/shiquda/treex">https://github.com/shiquda/treex</a></p>]]>
    </content>
    <id>https://shiquda.link/en/treex-an-advanced-cli-directory-tree-visualization/</id>
    <link href="https://shiquda.link/en/treex-an-advanced-cli-directory-tree-visualization/"/>
    <published>2025-04-10T16:14:19.000Z</published>
    <summary>A sleek command-line tool that renders folder structures in multiple formats, with intuitive filtering for effortless exploration.</summary>
    <title>Treex – Advanced CLI Directory Tree Visualizer</title>
    <updated>2025-04-10T16:26:49.000Z</updated>
  </entry>
  <entry>
    <author>
      <name>shiquda</name>
    </author>
    <category term="教程" scheme="https://shiquda.link/categories/%E6%95%99%E7%A8%8B/"/>
    <category term="教程" scheme="https://shiquda.link/tags/%E6%95%99%E7%A8%8B/"/>
    <category term="笔记" scheme="https://shiquda.link/tags/%E7%AC%94%E8%AE%B0/"/>
    <content>
      <![CDATA[<h2 id="Background"><a href="#Background" class="headerlink" title="Background"></a>Background</h2><p>MCP (Model Context Protocol) originated from an article published by Anthropic in 2024: <a href="https://link.zhihu.com/?target=https://www.anthropic.com/news/model-context-protocol">Introducing the Model Context Protocol</a>. It is a standardized protocol for interacting with LLM models, allowing models to extend their capabilities. After the recent surge in popularity of Manus, attention on MCP has grown even further—it was only after that I learned about this protocol. In my view, this protocol is a milestone, unifying the communication standard between models and applications. It will have even broader application scenarios in the future, and many application vendors have already integrated the MCP protocol, such as Baidu Maps in China.</p><p><img src="https://s2.loli.net/2025/04/04/c9XVBAZwCaKNiRe.jpg" alt="v2-9fe7fb51f264338a079a444eefa041b1_1440w" loading="lazy"></p><p>Borrowing the image from the article below, this diagram clearly illustrates what MCP does. For readers who are interested in MCP but not yet familiar with it, I recommend reading the article below.</p><p><a href="https://zhuanlan.zhihu.com/p/29001189476">https://zhuanlan.zhihu.com/p/29001189476</a></p><p>This article is both a learning record of my journey building an MCP server and a simple walkthrough of the process. Due to my limited technical expertise, this article does not cover mature development paradigms—it’s more of a record and summary of the overall workflow. I hope it can be helpful to readers who want to start developing MCP servers. This article uses Python as the programming language for the hands-on portion.</p><p>The server I built: a server that helps LLMs access wiki websites. Feel free to give it a Star!</p><p><a href="https://github.com/shiquda/mediawiki-mcp-server">https://github.com/shiquda/mediawiki-mcp-server</a></p><p>This project was inspired by a game I’ve been playing recently, <a href="https://store.steampowered.com/app/881100/Noita/">Noita</a>. As a beginner, I frequently need to look up the game’s <a href="https://noita.wiki.gg/">wiki</a>. So I <del>went overboard for a small convenience</del> decided to use MCP technology to let the LLM read and summarize wiki pages for me. And that’s how this article came to be 😄</p><h2 id="Prerequisites"><a href="#Prerequisites" class="headerlink" title="Prerequisites"></a>Prerequisites</h2><p>Before reading and practicing, I assume the reader has the following abilities:</p><ol><li>Familiarity with the Python programming language</li><li>Access to a stable LLM provider that supports Tool Calls, as well as a client that supports the MCP protocol</li><li>Familiarity with the basics of Git and GitHub</li><li>A reliable network connection</li></ol><p>For point 2, if you don’t have a suitable option yet, here are my recommendations:</p><ol><li><a href="https://www.volcengine.com/">Volcano Engine - New Growth Engine for the Cloud</a>: A platform by ByteDance offering good stability and competitive pricing. You can use the DeepSeek model, which supports tool-calling.</li><li><a href="https://cherry-ai.com/">Cherry Studio Official Website - All-in-one AI Assistant</a>: An open-source, free desktop LLM chat application that supports multiple LLM providers and now supports the MCP protocol. (I’ve contributed to this project, so consider this a small plug :)</li></ol><p>I trust that registering and configuring these two won’t be an issue for readers—please look up the setup guides on your own.</p><h2 id="Main-Content"><a href="#Main-Content" class="headerlink" title="Main Content"></a>Main Content</h2><h3 id="Environment-Setup"><a href="#Environment-Setup" class="headerlink" title="Environment Setup"></a>Environment Setup</h3><p>For developing MCP servers in Python, the mainstream tool is currently <a href="https://hellowac.github.io/uv-zh-cn/"><code>uv</code></a>, an efficient package manager written in Rust that supports virtual environment management, running and installing Python applications, project management, project building, and more. To learn more, you can read the <a href="https://hellowac.github.io/uv-zh-cn/"><strong>official documentation</strong></a>.</p><p>Please install and configure <code>uv</code> on your own. You can refer to this article:</p><p><a href="https://www.cnblogs.com/wang_yb/p/18635441">Python Package Management Made Easy: A Quick Guide to uv - wang_yb - cnblogs</a></p><p>We’ll also need the <a href="https://nodejs.org/zh-cn"><code>node</code></a> environment for testing the server.</p><h3 id="Initialization"><a href="#Initialization" class="headerlink" title="Initialization"></a>Initialization</h3><p>Use uv to initialize the project.</p><figure class="highlight bash"><table><tbody><tr><td class="gutter"><pre><span class="line">1</span><br><span class="line">2</span><br></pre></td><td class="code"><pre><span class="line">uv init &lt;project_name&gt;</span><br><span class="line"><span class="built_in">cd</span> &lt;project_name&gt;</span><br></pre></td></tr></tbody></table></figure><p>Create a virtual environment:</p><figure class="highlight bash"><table><tbody><tr><td class="gutter"><pre><span class="line">1</span><br></pre></td><td class="code"><pre><span class="line">uv venv</span><br></pre></td></tr></tbody></table></figure><p>And activate it using the method appropriate for your platform.</p><p>Use uv to add dependencies:</p><figure class="highlight bash"><table><tbody><tr><td class="gutter"><pre><span class="line">1</span><br></pre></td><td class="code"><pre><span class="line">uv add <span class="string">"mcp[cli]"</span> httpx</span><br></pre></td></tr></tbody></table></figure><p>For other MCP projects you’ve cloned, you can use the following command to install dependencies:</p><figure class="highlight bash"><table><tbody><tr><td class="gutter"><pre><span class="line">1</span><br></pre></td><td class="code"><pre><span class="line">uv <span class="built_in">sync</span></span><br></pre></td></tr></tbody></table></figure><h3 id="Project-Structure"><a href="#Project-Structure" class="headerlink" title="Project Structure"></a>Project Structure</h3><p>Below is a minimal project structure (some files omitted) for your reference.</p><figure class="highlight bash"><table><tbody><tr><td class="gutter"><pre><span class="line">1</span><br><span class="line">2</span><br><span class="line">3</span><br><span class="line">4</span><br><span class="line">5</span><br><span class="line">6</span><br><span class="line">7</span><br></pre></td><td class="code"><pre><span class="line">mediawiki-mcp-server</span><br><span class="line">├── pyproject.toml</span><br><span class="line">├── README.md</span><br><span class="line">├── src</span><br><span class="line">│   ├── mediawiki_mcp_server</span><br><span class="line">│   │   ├── main.py</span><br><span class="line">├── uv.lock</span><br></pre></td></tr></tbody></table></figure><p><code>pyproject.toml</code> is the configuration file for the entire project, and we need to make the appropriate modifications to it.</p><p>In addition to the existing project name, version, etc., we also need to add the following lines for running and building the project:</p><figure class="highlight plaintext"><table><tbody><tr><td class="gutter"><pre><span class="line">1</span><br><span class="line">2</span><br><span class="line">3</span><br><span class="line">4</span><br><span class="line">5</span><br><span class="line">6</span><br><span class="line">7</span><br><span class="line">8</span><br><span class="line">9</span><br></pre></td><td class="code"><pre><span class="line">[build-system]</span><br><span class="line">requires = ["hatchling"]</span><br><span class="line">build-backend = "hatchling.build"</span><br><span class="line"></span><br><span class="line">[project.scripts]</span><br><span class="line">mediawiki-mcp-server = "&lt;package_name&gt;.main:main"</span><br><span class="line"></span><br><span class="line">[tool.hatch.build.targets.wheel]</span><br><span class="line">packages = ["src/&lt;package_name&gt;"]</span><br></pre></td></tr></tbody></table></figure><p>Now it’s time to start writing a simple MCP server! For more detailed information, you can refer to the following sources:</p><p><a href="https://modelcontextprotocol.io/quickstart/server">For Server Developers - Model Context Protocol</a></p><p><a href="https://github.com/modelcontextprotocol/python-sdk">modelcontextprotocol/python-sdk: The official Python SDK for Model Context Protocol servers and clients</a></p><p>We’ll create a <code>main.py</code> file in <code>/src/&lt;name&gt;</code> to hold the main logic of the MCP server.</p><p>For the simplest server, you can follow the example below:</p><figure class="highlight python"><table><tbody><tr><td class="gutter"><pre><span class="line">1</span><br><span class="line">2</span><br><span class="line">3</span><br><span class="line">4</span><br><span class="line">5</span><br><span class="line">6</span><br><span class="line">7</span><br><span class="line">8</span><br><span class="line">9</span><br><span class="line">10</span><br><span class="line">11</span><br><span class="line">12</span><br><span class="line">13</span><br><span class="line">14</span><br><span class="line">15</span><br><span class="line">16</span><br><span class="line">17</span><br><span class="line">18</span><br><span class="line">19</span><br><span class="line">20</span><br></pre></td><td class="code"><pre><span class="line"><span class="keyword">from</span> mcp.server.fastmcp <span class="keyword">import</span> FastMCP</span><br><span class="line">mcp = FastMCP(<span class="string">"&lt;name&gt;"</span>) <span class="comment"># Create server instance</span></span><br><span class="line"></span><br><span class="line"><span class="meta">@mcp.tool() </span><span class="comment"># Decorator marks the function below as an LLM-callable Tool</span></span><br><span class="line"><span class="keyword">async</span> <span class="keyword">def</span> <span class="title function_">get_page</span>(<span class="params">title: <span class="built_in">str</span></span>): <span class="comment"># Parameters are auto-handled; docstrings below serve as the tool manual for LLMs</span></span><br><span class="line">    <span class="string">"""Get a page from mediawiki.org</span></span><br><span class="line"><span class="string">    Args:</span></span><br><span class="line"><span class="string">        title: The title of the page to get, which can be found in title field of the search results</span></span><br><span class="line"><span class="string">    Returns:</span></span><br><span class="line"><span class="string">        The page content</span></span><br><span class="line"><span class="string">    """</span></span><br><span class="line">    path = <span class="string">f"page/<span class="subst">{title}</span>"</span></span><br><span class="line">    response = <span class="keyword">await</span> make_request(path, {}) <span class="comment"># Implementation omitted for brevity</span></span><br><span class="line">    <span class="keyword">return</span> response</span><br><span class="line"></span><br><span class="line"><span class="keyword">def</span> <span class="title function_">main</span>():</span><br><span class="line">    mcp.run(transport=<span class="string">"stdio"</span>) <span class="comment"># Run in local stdio mode</span></span><br><span class="line"></span><br><span class="line"><span class="keyword">if</span> __name__ == <span class="string">"__main__"</span>:</span><br><span class="line">    main()</span><br></pre></td></tr></tbody></table></figure><p>In short, you just need to focus on implementing a Tool interface. For tools exposed to the model, decorate them with <code>@mcp.tool()</code>. The call parameters are the function’s input parameters, and the usage instructions go in the function’s docstring.</p><p>Now let’s think from the user’s perspective. When users use your server, they can configure three main parts:</p><p><img src="https://s2.loli.net/2025/04/04/2BCm3vWUw1sNPbp.png" alt="PixPin_2025-04-04_23-06-25" loading="lazy"></p><ol><li><strong>Command.</strong> The main options are <code>uvx/uv</code>, <code>npx</code>, and <code>docker</code>. Since we’re using Python, this is typically filled in with <code>uvx/uv</code>.</li><li><strong>Arguments.</strong> This part is passed to the server as command-line arguments, so we need to handle these arguments before <code>mcp.run</code> starts.</li><li><strong>Environment variables.</strong> We also need to check for required environment variables before startup.</li></ol><p>Therefore, we need to use <strong>arguments</strong> or <strong>environment variables</strong> to customize the server and read data. For example, for services that require authentication, we can have users configure their credentials in the <strong>environment variables</strong> section; custom parameters can be passed via <strong>command-line arguments</strong>.</p><h3 id="Testing"><a href="#Testing" class="headerlink" title="Testing"></a>Testing</h3><p>After writing the logic, it’s time to test.</p><p><strong>Step 1:</strong> First, test using the official MCP testing tool. It’s very simple to use:</p><figure class="highlight bash"><table><tbody><tr><td class="gutter"><pre><span class="line">1</span><br></pre></td><td class="code"><pre><span class="line">npx @modelcontextprotocol/inspector uv run &lt;name&gt;</span><br></pre></td></tr></tbody></table></figure><p>After running it, open the address shown in your browser to start debugging.</p><p><img src="https://s2.loli.net/2025/04/04/LZfHiUFt8eMKsWG.png" alt="PixPin_2025-04-04_23-04-22" loading="lazy"></p><p>For our simple project, the main thing to test is the Tool functionality.</p><p><img src="https://s2.loli.net/2025/04/04/EJXRq3bfsPL6gVl.png" alt="PixPin_2025-04-04_23-16-32" loading="lazy"></p><p><strong>Step 2:</strong> After testing is complete, we can connect to a client for further testing. This step mainly checks whether the functionality meets expectations, whether the LLM can invoke tools as intended, and whether any unforeseen issues arise.</p><p>For local development and debugging, one thing to note: since we haven’t packaged the final product to PyPI yet, we need to add command-line arguments for local debugging. You can refer to the example below:</p><p>Command: <code>uv</code></p><p>Arguments:</p><figure class="highlight json"><table><tbody><tr><td class="gutter"><pre><span class="line">1</span><br><span class="line">2</span><br><span class="line">3</span><br><span class="line">4</span><br><span class="line">5</span><br><span class="line">6</span><br><span class="line">7</span><br></pre></td><td class="code"><pre><span class="line"><span class="attr">"args"</span><span class="punctuation">:</span> <span class="punctuation">[</span></span><br><span class="line">  <span class="string">"run"</span><span class="punctuation">,</span></span><br><span class="line">  <span class="string">"--directory"</span><span class="punctuation">,</span> </span><br><span class="line">  <span class="string">"path/to/project/src/&lt;package_name_with_underscores&gt;"</span><span class="punctuation">,</span></span><br><span class="line">  <span class="string">"&lt;name&gt;"</span><span class="punctuation">,</span></span><br><span class="line">  <span class="string">"&lt;...other_arguments&gt;"</span></span><br><span class="line"><span class="punctuation">]</span><span class="punctuation">,</span></span><br></pre></td></tr></tbody></table></figure><h3 id="Building"><a href="#Building" class="headerlink" title="Building"></a>Building</h3><p>After testing, we can consider publishing to PyPI so other users can easily download and use it.</p><p>In this article, we use uv with GitHub Actions for automated builds. But before the official build, we need to test locally:</p><figure class="highlight bash"><table><tbody><tr><td class="gutter"><pre><span class="line">1</span><br></pre></td><td class="code"><pre><span class="line">uv build</span><br></pre></td></tr></tbody></table></figure><p>If everything goes well, you should see the build artifacts in the project’s <code>/dist</code> directory.</p><p>Once everything is working, go to <a href="https://pypi.org/">https://pypi.org/</a> to set things up. If you don’t have an account, you can register one first.</p><p>PyPI now supports automated builds via “trusted” publishers. We’ll configure this using the GitHub platform.</p><p>Go to <a href="https://pypi.org/manage/account/publishing/">Trusted Publisher Management · PyPI</a> and find <strong>Add a new pending publisher</strong>.</p><p><img src="https://s2.loli.net/2025/04/04/QLhYWFzql4uaTB1.png" alt="PixPin_2025-04-04_23-26-55" loading="lazy"></p><p>After adding it, we create <code>.github/workflows/publish.yml</code> in the project. Note that the YAML filename needs to match what you specified in the previous step.</p><p>For the workflow file, you can refer to the example below:</p><figure class="highlight yaml"><table><tbody><tr><td class="gutter"><pre><span class="line">1</span><br><span class="line">2</span><br><span class="line">3</span><br><span class="line">4</span><br><span class="line">5</span><br><span class="line">6</span><br><span class="line">7</span><br><span class="line">8</span><br><span class="line">9</span><br><span class="line">10</span><br><span class="line">11</span><br><span class="line">12</span><br><span class="line">13</span><br><span class="line">14</span><br><span class="line">15</span><br><span class="line">16</span><br><span class="line">17</span><br><span class="line">18</span><br><span class="line">19</span><br><span class="line">20</span><br><span class="line">21</span><br><span class="line">22</span><br><span class="line">23</span><br><span class="line">24</span><br><span class="line">25</span><br><span class="line">26</span><br><span class="line">27</span><br><span class="line">28</span><br><span class="line">29</span><br><span class="line">30</span><br><span class="line">31</span><br></pre></td><td class="code"><pre><span class="line"><span class="attr">name:</span> <span class="string">Publish</span> <span class="string">Python</span> <span class="string">Package</span> <span class="string">to</span> <span class="string">PyPI</span> <span class="string">when</span> <span class="string">a</span> <span class="string">Release</span> <span class="string">is</span> <span class="string">Created</span></span><br><span class="line"></span><br><span class="line"><span class="attr">on:</span></span><br><span class="line">  <span class="attr">release:</span></span><br><span class="line">    <span class="attr">types:</span> [<span class="string">created</span>]</span><br><span class="line"></span><br><span class="line"><span class="attr">jobs:</span></span><br><span class="line">  <span class="attr">pypi-publish:</span></span><br><span class="line">    <span class="attr">name:</span> <span class="string">Publish</span> <span class="string">release</span> <span class="string">to</span> <span class="string">PyPI</span></span><br><span class="line">    <span class="attr">runs-on:</span> <span class="string">ubuntu-latest</span></span><br><span class="line">    <span class="attr">environment:</span></span><br><span class="line">      <span class="attr">name:</span> <span class="string">pypi</span></span><br><span class="line">      <span class="attr">url:</span> <span class="string">https://pypi.org/p/&lt;name&gt;</span> <span class="comment"># Replace with project name from the previous step</span></span><br><span class="line">    <span class="attr">permissions:</span></span><br><span class="line">      <span class="attr">id-token:</span> <span class="string">write</span></span><br><span class="line">    <span class="attr">steps:</span></span><br><span class="line">      <span class="bullet">-</span> <span class="attr">uses:</span> <span class="string">actions/checkout@v4</span></span><br><span class="line">      <span class="bullet">-</span> <span class="attr">name:</span> <span class="string">Set</span> <span class="string">up</span> <span class="string">Python</span></span><br><span class="line">        <span class="attr">uses:</span> <span class="string">actions/setup-python@v4</span></span><br><span class="line">        <span class="attr">with:</span></span><br><span class="line">          <span class="attr">python-version:</span> <span class="string">"3.13"</span> <span class="comment"># Replace with desired Python version</span></span><br><span class="line">      <span class="bullet">-</span> <span class="attr">name:</span> <span class="string">Install</span> <span class="string">dependencies</span></span><br><span class="line">        <span class="attr">run:</span> <span class="string">|</span></span><br><span class="line"><span class="string">          pip install uv</span></span><br><span class="line"><span class="string"></span>      <span class="bullet">-</span> <span class="attr">name:</span> <span class="string">Build</span> <span class="string">package</span></span><br><span class="line">        <span class="attr">run:</span> <span class="string">|</span></span><br><span class="line"><span class="string">          uv sync</span></span><br><span class="line"><span class="string">          uv build</span></span><br><span class="line"><span class="string"></span>      <span class="bullet">-</span> <span class="attr">name:</span> <span class="string">Publish</span> <span class="string">package</span> <span class="string">distributions</span> <span class="string">to</span> <span class="string">PyPI</span></span><br><span class="line">        <span class="attr">uses:</span> <span class="string">pypa/gh-action-pypi-publish@release/v1</span></span><br><span class="line"></span><br></pre></td></tr></tbody></table></figure><p>This is configured to trigger the build when a Release is created on GitHub, so when building, you’ll need to manually create a Release in the project. The workflow can also be changed to trigger on tag pushes—feel free to modify it as you see fit.</p><p>Once successfully published to PyPI, you can invoke it in your client using the following:</p><figure class="highlight yaml"><table><tbody><tr><td class="gutter"><pre><span class="line">1</span><br><span class="line">2</span><br><span class="line">3</span><br><span class="line">4</span><br></pre></td><td class="code"><pre><span class="line"><span class="attr">"command":</span> <span class="string">"uvx"</span><span class="string">,</span></span><br><span class="line"><span class="attr">"args":</span> [</span><br><span class="line">  <span class="string">"&lt;name&gt;"</span>,</span><br><span class="line">]<span class="string">,</span></span><br></pre></td></tr></tbody></table></figure><h3 id="Sharing"><a href="#Sharing" class="headerlink" title="Sharing"></a>Sharing</h3><p>Want to recommend your MCP server to others? Here are a few common MCP discovery platforms where you can submit your server to help more users find and try it out.</p><ol><li><a href="https://glama.ai/mcp/servers">https://glama.ai/mcp/servers</a>, related to <a href="https://github.com/punkpeye/awesome-mcp-servers">punkpeye/awesome-mcp-servers: A collection of MCP servers.</a></li><li><a href="https://mcp.so/">https://mcp.so/</a></li></ol><hr><h2 id="References"><a href="#References" class="headerlink" title="References"></a>References</h2><p><a href="https://modelcontextprotocol.io/introduction">Introduction - Model Context Protocol</a></p><p><a href="https://pypi.org/">PyPI · The Python Package Index</a></p><p><a href="https://medium.com/@blackary/publishing-a-python-package-from-github-to-pypi-in-2024-a6fb8635d45d">Publishing a Python Package from GitHub to PyPI in 2024</a></p><p><a href="https://pypi.org/manage/account/publishing/">https://pypi.org/manage/account/publishing/</a></p><p><a href="https://github.com/punkpeye/awesome-mcp-servers">https://github.com/punkpeye/awesome-mcp-servers</a></p><p><a href="https://glama.ai/mcp/servers">ChatGPT alternative for power users</a></p><p><a href="https://docs.astral.sh/uv/guides/package/#building-your-package">Building and publishing a package | uv</a></p>]]>
    </content>
    <id>https://shiquda.link/en/build-a-mcp-server-with-python-from-scratch/</id>
    <link href="https://shiquda.link/en/build-a-mcp-server-with-python-from-scratch/"/>
    <published>2025-04-04T15:35:37.000Z</published>
    <summary>A step-by-step guide to creating your own MCP server with Python, covering everything from the initial idea to deploying and promoting your server.</summary>
    <title>Building an MCP Server from Scratch</title>
    <updated>2025-04-04T15:45:48.000Z</updated>
  </entry>
  <entry>
    <author>
      <name>shiquda</name>
    </author>
    <category term="思考" scheme="https://shiquda.link/tags/%E6%80%9D%E8%80%83/"/>
    <content>
      <![CDATA[<p>In the new AI era, technologies like LLMs are reshaping the entire world—including how we learn.</p><p>Some facts:</p><ol><li>The rapid development of large language models has made higher-level intelligence (specifically, the depth and breadth of human knowledge) more accessible and affordable for ordinary people.</li><li>To form concepts and learn the relationships between them—what we call knowledge—the human brain often needs to start with concrete examples. That’s much easier than trying to grasp abstract knowledge directly (e.g., the dense theorems in a math textbook).</li><li>Before you’ve mastered a concept, it’s hard to come up with examples that fit its rules. This is a <strong>chicken-and-egg</strong> problem.</li><li>Before AI, learning through concrete examples meant relying on pre-written ones, like worked examples in math textbooks. But the people who write those examples—university professors, for instance—are hard for ordinary learners to reach, and they rarely have time to answer one learner’s specific questions.</li></ol><p>A summary of high-quality questioning techniques:</p><ol><li>Ask AI to generate problems for you.</li><li>Ask AI to answer your specific questions.</li><li>Ask AI to understand your knowledge level and background, then give personalized advice and answers.</li><li>Ask AI to give you a bird’s-eye view of the knowledge landscape, or plan a learning path.</li><li>Ask AI to provide several examples—including <strong>correct and incorrect</strong> ones.</li><li>Use AI’s breadth of knowledge to cross-pollinate ideas across fields and explore possibilities you hadn’t imagined.</li><li>Ask AI to evaluate your understanding of a problem—a cross-check.</li><li>Ask AI to design fun learning methods that keep you motivated.</li></ol><p>Most of these approaches are hard to pull off without an LLM (like having a university professor or industry expert on call to answer your questions). Compared with traditional learning, it’s like skipping ahead. And one thing is clear: in the future, no career will stay the same. Those who understand how learning in the AI era differs from the traditional era will be the ones who learn faster and better than everyone else.</p>]]>
    </content>
    <id>https://shiquda.link/en/how-to-ask-for-learners-in-llm-era/</id>
    <link href="https://shiquda.link/en/how-to-ask-for-learners-in-llm-era/"/>
    <published>2025-03-10T11:49:09.000Z</published>
    <summary>In the era of large language models, what should we ask? Ask the questions that only AI can make possible.</summary>
    <title>Asking Better Questions in the Age of LLMs</title>
    <updated>2025-03-10T11:56:35.000Z</updated>
  </entry>
  <entry>
    <author>
      <name>shiquda</name>
    </author>
    <category term="项目" scheme="https://shiquda.link/tags/%E9%A1%B9%E7%9B%AE/"/>
    <content>
      <![CDATA[<h2 id="Preface"><a href="#Preface" class="headerlink" title="Preface"></a>Preface</h2><p>I’ve recently become quite interested in investing. Over time, I’ve read a fair number of investing books and articles, watched videos from personal finance bloggers, and listened to a few finance podcasts. For the average person, well-planned long-term investing still offers a real chance at financial freedom—or at least a more comfortable life. The power of compound interest is immense, and since I’m still young, the sooner I start planning, the better.</p><p>I began searching for existing long-term investment calculator tools online to help with my decisions and planning. There are some out there, but they’re fairly limited in functionality and not customizable enough for my needs. For example, they can only calculate a single asset rather than supporting multi-asset portfolio planning; they only show cumulative amounts without year-by-year contributions and returns; and they don’t account for return volatility (I haven’t implemented this yet either—consider it a future TODO)…</p><p>So, burning the midnight oil with the help of Cursor—and picking up React and a few frameworks along the way—I built a tool. If you’re interested, feel free to try it out and share your feedback! And if you find it useful, a Star would be much appreciated~</p><p><img src="https://s2.loli.net/2025/03/09/aLw52CbxBFqNlG9.png" alt="PixPin_2025-03-09_09-51-54" loading="lazy"></p><p><img src="https://s2.loli.net/2025/03/09/2dEXzlgy1NFKrhI.png" alt="PixPin_2025-03-09_09-38-09" loading="lazy"></p><p><a href="https://shiquda.github.io/future-fortune/">Live Demo on GitHub Pages</a></p><p><a href="https://github.com/shiquda/future-fortune">Open Source Repository on GitHub</a></p><h2 id="Features"><a href="#Features" class="headerlink" title="Features"></a>Features</h2><ul><li>📊 Interactive portfolio configuration</li><li>📈 Multi-dimensional return visualization (total assets &#x2F; invested amount &#x2F; profit analysis)</li><li>💾 Local storage of investment configurations and personal information</li><li>📤 CSV data export</li><li>📱 Responsive chart design</li><li>🛡️ Pure frontend implementation, protecting user privacy</li></ul><h2 id="Tech-Stack"><a href="#Tech-Stack" class="headerlink" title="Tech Stack"></a>Tech Stack</h2><ul><li><strong>Frontend Framework</strong>: React</li><li><strong>UI Library</strong>: Ant Design 5.x</li><li><strong>Charting Library</strong>: ECharts 5.x</li><li><strong>Build Tool</strong>: Vite</li></ul>]]>
    </content>
    <id>https://shiquda.link/en/future-fortune/</id>
    <link href="https://shiquda.link/en/future-fortune/"/>
    <published>2025-03-09T01:45:37.000Z</published>
    <summary>An open-source tool for multi-dimensional return visualization, offering analysis of total assets, invested capital, and profits.</summary>
    <title>Future Fortune: Long-Term Investment Calculator</title>
    <updated>2025-03-09T01:52:25.000Z</updated>
  </entry>
  <entry>
    <author>
      <name>shiquda</name>
    </author>
    <category term="教程" scheme="https://shiquda.link/tags/%E6%95%99%E7%A8%8B/"/>
    <content>
      <![CDATA[<p>Here are some VSCode-specific keyboard/mouse shortcuts I personally find useful.</p><p>Where to change shortcuts:</p><p><img src="https://s2.loli.net/2025/03/06/Uo1cRsfSWgl2hkP.png" alt="PixPin_2025-03-06_14-26-47" loading="lazy"></p><p>How to look up what a specific shortcut does in VSCode:</p><p><img src="https://s2.loli.net/2025/03/06/ohB3gaAC4SMfOwU.png" alt="PixPin_2025-03-06_14-27-39" loading="lazy"></p><div class="md-table-scroll"><table><thead><tr><th>Feature</th><th>Shortcut</th></tr></thead><tbody><tr><td>Open command palette</td><td>Ctrl + Shift + P</td></tr><tr><td>Quick open file</td><td>Ctrl + P</td></tr><tr><td>Recently opened projects</td><td>Ctrl + R</td></tr><tr><td>Duplicate the current line</td><td>Shift + Alt + ↓/↑</td></tr><tr><td>Move line up/down</td><td>Alt + ↓/↑</td></tr><tr><td>Multi-line editing</td><td>Middle mouse button drag | Ctrl + Alt + ↑ / ↓ | Alt + click each location</td></tr><tr><td>Select word at cursor (press again to select the next occurrence)</td><td>Ctrl + D</td></tr><tr><td>Toggle comment / uncomment</td><td>Ctrl + /</td></tr><tr><td>Go to definition</td><td>Ctrl + left click | F12</td></tr><tr><td>Delete entire line</td><td>Custom (I use Alt + D)</td></tr><tr><td>Toggle / create bottom terminal</td><td>Ctrl + J / Ctrl + ~</td></tr><tr><td>Reopen the file you just closed (same as in a browser)</td><td>Ctrl + Shift + T</td></tr><tr><td>Quickly copy / cut the entire line</td><td>Ctrl + C / Ctrl + X (when nothing is selected)</td></tr><tr><td>Global search</td><td>Ctrl + Shift + F</td></tr><tr><td>Adjust indentation of the current line</td><td>Ctrl + [ / Ctrl + ]</td></tr><tr><td>Jump to beginning / end of file</td><td>Ctrl + Home / End</td></tr><tr><td>Move cursor horizontally (jumps to word start / end)</td><td>Ctrl + ← / →</td></tr></tbody></table></div><p>Cursor-specific:</p><div class="md-table-scroll"><table><thead><tr><th>Feature</th><th>Shortcut</th></tr></thead><tbody><tr><td>Ctrl + K</td><td>AI-modify the selected code</td></tr><tr><td>Ctrl + L</td><td>Open / collapse the chat window</td></tr><tr><td>Ctrl + Enter</td><td>Send the chat in codebase mode (let AI reference all files)</td></tr></tbody></table></div><p>Don’t force yourself to memorize shortcuts—just pick the ones that feel <strong>natural</strong> to you! If something doesn’t feel right, skip it!</p>]]>
    </content>
    <id>https://shiquda.link/en/vscode-hotkey-suggestions/</id>
    <link href="https://shiquda.link/en/vscode-hotkey-suggestions/"/>
    <published>2025-03-06T06:59:21.000Z</published>
    <summary>A curated list of VSCode shortcuts that I personally find super handy and smooth to use.</summary>
    <title>VSCode Shortcuts I Swear By</title>
    <updated>2025-03-06T07:04:04.000Z</updated>
  </entry>
  <entry>
    <author>
      <name>shiquda</name>
    </author>
    <category term="笔记" scheme="https://shiquda.link/tags/%E7%AC%94%E8%AE%B0/"/>
    <category term="git" scheme="https://shiquda.link/tags/git/"/>
    <content>
      <![CDATA[<p>The most magical thing about Git, in my opinion, is that it lets different members of the same project write their own code without interfering with each other. However, when it comes time to merge everyone’s work together, things get a bit tricky.</p><p>To accomplish this, there are two approaches: <code>git merge</code> and <code>git rebase</code>. What are these two methods, and which one should you use?</p><p>Let’s walk through a concrete example:</p><p>First, imagine we’ve already developed two tasks for feature 1:</p><p><img src="https://s2.loli.net/2025/03/01/HPS5waMOsz6oZlU.png" alt="Pasted image 20250301142024" loading="lazy"></p><p>Then my team needs to complete feature 2. We’ve finished part of feature 2, but suddenly another team discovers an important bug in feature 1 and fixes it — and that fix affects our feature 2 work. So the situation becomes:</p><p><img src="https://s2.loli.net/2025/03/01/j29m6xFQZJWECs4.png" alt="Pasted image 20250301142035" loading="lazy"></p><p>Before we continue developing feature 2, we have to integrate the main team’s bug fix. There are two ways to do this:</p><h2 id="Method-1-git-merge-main"><a href="#Method-1-git-merge-main" class="headerlink" title="Method 1: git merge main"></a>Method 1: <code>git merge main</code></h2><p><img src="https://s2.loli.net/2025/03/01/yu9wcUQWtbIeCOS.png" alt="Pasted image 20250301142048" loading="lazy"></p><p>This merges the bug fix from the <code>main</code> branch into our <code>feature2</code> branch, creating an extra commit on our branch: <code>Merge branch 'main' into feature2</code>.</p><p>We continue developing, finish feature 2, and eventually merge this branch back into <code>main</code>.</p><p><img src="https://s2.loli.net/2025/03/01/f8SFpBVnEmg9Ihw.png" alt="Pasted image 20250301142057" loading="lazy"></p><p>At this point, the <code>feature2</code> branch and the <code>main</code> branch are completely identical. Notice that the bug fix commit from <code>main</code> was added to <code>feature2</code> via a merge commit — the merge commit is essentially the <strong>junction point</strong> where the two branches converge. The advantage is that all details are preserved, but the downside is that extra merge commits appear in the main branch.</p><h2 id="Method-2-git-rebase-main"><a href="#Method-2-git-rebase-main" class="headerlink" title="Method 2: git rebase main"></a>Method 2: <code>git rebase main</code></h2><p>Let’s go back to that same point. Again, we need to sync the <code>main</code> branch changes into our <code>feature2</code> branch before continuing development.</p><p><img src="https://s2.loli.net/2025/03/01/j29m6xFQZJWECs4.png" alt="Pasted image 20250301142107" loading="lazy"></p><p>We run <code>git rebase main</code> on the <code>feature2</code> branch:</p><p><img src="https://s2.loli.net/2025/03/01/HE58VY9wqpbF4oT.png" alt="Pasted image 20250301142122" loading="lazy"></p><p>The essence of rebase is rewriting history — it “transplants” the changes from the <code>feature2</code> branch onto the updated <code>main</code> branch. This changes the commit timestamps of <code>task1</code> and <code>task2</code> on our branch.</p><p>Continue and complete <code>task3</code>:</p><p><img src="https://s2.loli.net/2025/03/01/xazcM2i8wPmhAIU.png" alt="Pasted image 20250301142133" loading="lazy"></p><p>Then merge it into <code>main</code>:</p><p><img src="https://s2.loli.net/2025/03/01/MFegkd6A9XUuGYp.png" alt="Pasted image 20250301142141" loading="lazy"></p><p>After running <code>git merge feature2</code>, you’ll notice the commit history is a straight line. This is because after rebasing, the history is already linearized, so merging into <code>main</code> triggers a fast-forward merge and no extra merge commit is created.</p><p><img src="https://s2.loli.net/2025/03/01/aSIrAu4TvLVxqsW.png" alt="Pasted image 20250301142150" loading="lazy"></p><h2 id="How-should-you-choose-between-merge-and-rebase"><a href="#How-should-you-choose-between-merge-and-rebase" class="headerlink" title="How should you choose between merge and rebase?"></a>How should you choose between merge and rebase?</h2><p>The table below summarizes the comparison between merge and rebase:</p><div class="md-table-scroll"><table><thead><tr><th><strong>Aspect</strong></th><th><strong>Git Merge</strong></th><th><strong>Git Rebase</strong></th></tr></thead><tbody><tr><td>Commit structure</td><td>Produces extra merge commits</td><td>No merge commits, linear history</td></tr><tr><td>History</td><td><strong>Preserves full history</strong>, including branch structure</td><td>Creates a <strong>linear, clean</strong> history</td></tr><tr><td>Best for</td><td>All collaborative scenarios, especially public branches</td><td>Mainly unpushed local branches</td></tr><tr><td>Safety</td><td>High — does not change existing commits</td><td>Moderate — rewrites commit history</td></tr><tr><td>Conflict handling</td><td>Resolves all conflicts at once</td><td>May require resolving conflicts commit by commit</td></tr><tr><td>Code review</td><td>Can be harder to trace specific changes</td><td>Easier to review changes commit by commit</td></tr><tr><td>Recommendation</td><td>Public branches with multiple collaborators</td><td>Personal branches or team-internal conventions</td></tr></tbody></table></div><p>Merge does produce merge commits and makes history more complex, but it preserves the complete branch structure, which helps with code review and issue tracking.</p><p>Rebase, on the other hand, linearizes history and makes it easier to manage, but it rewrites commit history, which can confuse others who based their work on the original history.</p><p>If multiple people are working on your branch, rebasing and force-pushing to the repository is a very bad idea. Because rebase rewrites the history of that branch, it can mislead everyone else who built their work on the original history.</p><p>The golden rule of rebase is: <strong>Only use Rebase on local branches that have not been pushed.</strong> In other words, <strong>if a branch has already been pushed to the remote and might be used by others, you should not rebase and force-push it.</strong></p><div class="md-table-scroll"><table><thead><tr><th><strong>Operation</strong></th><th><strong>Safe boundary</strong></th><th><strong>Risky boundary</strong></th></tr></thead><tbody><tr><td><code>git rebase</code> + unpushed</td><td>Completely safe</td><td>None</td></tr><tr><td><code>git rebase</code> + force push</td><td>Only personal branches or with team consensus</td><td>Public branches, shared branches</td></tr><tr><td><code>git merge</code></td><td>All collaborative scenarios (but creates merge commits)</td><td>None (unless the project forbids merge commits)</td></tr></tbody></table></div><hr><h2 id="References"><a href="#References" class="headerlink" title="References"></a>References</h2><p><a href="https://medium.com/@xiaominghu19922/git-merge-vs-scary-git-rebase-5eceead4badc">Git Merge VS (Scary) Git Rebase</a></p>]]>
    </content>
    <id>https://shiquda.link/en/git-merge-vs-rebase/</id>
    <link href="https://shiquda.link/en/git-merge-vs-rebase/"/>
    <published>2025-03-01T06:18:45.000Z</published>
    <summary>Merge or rebase? It's the eternal Git dilemma. We break down the trade-offs, when each shines, and how to choose without wrecking your history.</summary>
    <title>Git Merge vs Rebase: Which One Should You Use?</title>
    <updated>2025-03-01T06:24:43.000Z</updated>
  </entry>
  <entry>
    <author>
      <name>shiquda</name>
    </author>
    <category term="教程" scheme="https://shiquda.link/tags/%E6%95%99%E7%A8%8B/"/>
    <content>
      <![CDATA[<h2 id="Foreword"><a href="#Foreword" class="headerlink" title="Foreword"></a>Foreword</h2><p>This tutorial offers one possible solution. If you have a better free solution, feel free to share it in the comments.</p><p>⚠️<strong>For paid videos, make sure your account has viewing access.</strong></p><h2 id="Tool-Setup"><a href="#Tool-Setup" class="headerlink" title="Tool Setup"></a>Tool Setup</h2><p><strong>Step 1: Install yt-dlp</strong></p><p><strong>Method 1: Download the binary directly and configure environment variables manually</strong></p><p>For example, on Windows:</p><p><a href="https://github.com/yt-dlp/yt-dlp/releases/latest/download/yt-dlp.exe">https://github.com/yt-dlp/yt-dlp/releases/latest/download/yt-dlp.exe</a></p><p><strong>Method 2: Install via Python</strong></p><figure class="highlight bash"><table><tbody><tr><td class="gutter"><pre><span class="line">1</span><br></pre></td><td class="code"><pre><span class="line">pip install -U yt-dlp</span><br></pre></td></tr></tbody></table></figure><p>Run <code>yt-dlp --version</code> to verify the installation:</p><figure class="highlight bash"><table><tbody><tr><td class="gutter"><pre><span class="line">1</span><br></pre></td><td class="code"><pre><span class="line">2025.01.26</span><br></pre></td></tr></tbody></table></figure><p><strong>Step 2: Get YouTube cookies</strong></p><p>Install the extension <a href="https://chromewebstore.google.com/detail/get-cookiestxt-locally/cclelndahbckbenkjhflpdbgdldlbecc">Get cookies.txt LOCALLY - Chrome Web Store</a></p><p>On YouTube, click the extension and download the cookies as a txt file in Netscape format.</p><p>Note ⚠️: In my experience, if YouTube is open in a regular browser tab, the cookies may refresh and invalidate the ones you just exported. To avoid this, use a less frequently used browser or open an incognito window when exporting cookies.</p><h2 id="Download-Command"><a href="#Download-Command" class="headerlink" title="Download Command"></a>Download Command</h2><p>You’ll need to configure your network environment yourself. For more yt-dlp commands and options, see:</p><p><a href="https://github.com/yt-dlp/yt-dlp">yt-dlp/yt-dlp: A feature-rich command-line audio/video downloader</a></p><p>Run the following command:</p><figure class="highlight bash"><table><tbody><tr><td class="gutter"><pre><span class="line">1</span><br></pre></td><td class="code"><pre><span class="line">yt-dlp [playlist_url] -f mp4 --cookies [path_to_cookies.txt]</span><br></pre></td></tr></tbody></table></figure><p>For example:</p><figure class="highlight plaintext"><table><tbody><tr><td class="gutter"><pre><span class="line">1</span><br></pre></td><td class="code"><pre><span class="line">yt-dlp https://www.youtube.com/playlist?list=PLZHQObOWTQDOMxJDswBaLu8xBMKxSTvg8 -f mp4 --cookies youtube.com_cookies.txt</span><br></pre></td></tr></tbody></table></figure><p>The program will then automatically download all videos in the playlist. Videos are saved to the current directory by default. For paid videos, make sure the cookie account has viewing access.</p>]]>
    </content>
    <id>https://shiquda.link/en/download-youtube-videos-from-list/</id>
    <link href="https://shiquda.link/en/download-youtube-videos-from-list/"/>
    <published>2025-02-14T03:26:35.000Z</published>
    <summary>Learn how to use the open-source tool yt-dlp to batch-download every video in a playlist, even paid ones.</summary>
    <title>Download Entire YouTube Playlists (Including Paid Videos)</title>
    <updated>2025-02-14T03:41:44.000Z</updated>
  </entry>
  <entry>
    <author>
      <name>shiquda</name>
    </author>
    <content>
      <![CDATA[<h2 id="Looking-Back-at-2024"><a href="#Looking-Back-at-2024" class="headerlink" title="Looking Back at 2024"></a>Looking Back at 2024</h2><p>Time flies—it’s been over a year since I started blogging. Writing is a way to distill knowledge, a way to pass it on, and a way to connect with readers across the internet.</p><ul><li><strong>Distilling knowledge</strong>: Writing a post is a process of reorganizing logic, which deepens my own understanding. Going from knowing something myself to being able to explain it clearly to readers is real progress—what they call the “Feynman Technique.”</li><li><strong>Sharing knowledge</strong>: I post solutions to problems I encounter in my daily work—especially ones I had to figure out on my own after finding nothing online. In a way, this enriches the Chinese-language internet. What surprised me most is that quite a few articles have genuinely helped others solve the same issues. They leave comments thanking me, and I’m truly grateful to them—it gives me a real sense of purpose.</li></ul><p>Thank you to every reader who spent time with my words over the past year.</p><p>Here’s a look back at my 2024, from a few angles.</p><h3 id="Blog-Posts"><a href="#Blog-Posts" class="headerlink" title="Blog Posts"></a>Blog Posts</h3><p>The most memorable project last year was my attempt at <em>《寻觅周刊》</em> (The Quest Weekly), a newsletter aimed at introducing handy tools, useful resources, and quality information sources. Unfortunately, it fizzled out after just six weeks. The main reason: I didn’t fully understand the nature of what I was doing. I turned sharing from a right into an obligation. What makes sharing joyful for me is the <em>result</em> of sharing, not the process itself.</p><p>A special thanks to a reader who reached out via email with advice—like lowering my expectations for such articles. That feedback stuck with me and reinforced my original thinking.</p><p><img src="https://s2.loli.net/2025/01/11/s6k9SVZFLgaWz8v.png" alt="PixPin_2025-01-11_15-22-01" loading="lazy"></p><p>Another piece I’m proud of is <em>《浏览器扩展逆向指北》</em> (A Beginner’s Guide to Browser Extension Reverse Engineering), written for total newcomers. It’s the longest article I’ve ever written—I remember starting in the morning and finishing as the sun went down. It’s not deeply technical, but it helps other beginners like me grasp the general process, and that feels rewarding. I also published it on linux.do, and was lucky enough to have it marked as a featured post by the site admin.</p><p>In 2024, I also started a <a href="https://t.me/crxcccc">TG channel</a> focused on browser extension reverse-engineering resources and practical plugin recommendations. I post useful extensions there whenever I feel like it.</p><h3 id="Projects"><a href="#Projects" class="headerlink" title="Projects"></a>Projects</h3><p>2024 was a small step toward building real projects. Highlights include:</p><ul><li><a href="https://github.com/shiquda/wereadcard">shiquda&#x2F;wereadcard: 微信读书卡片生成器</a> — A Python-based WeRead card generator with GitHub Actions auto-update support.</li><li><a href="https://github.com/shiquda/one-competition">shiquda&#x2F;one-competition</a> — A course project done with classmates, built on Vue.js + Django. The site showcases college competition info. I plan to rework it later and turn it into a community-maintained competition hub on GitHub.</li><li><a href="https://github.com/shiquda/crypto-monitor">shiquda&#x2F;crypto-monitor: A simple cross-platform crypto monitor that monitors the price of crypto currencies.</a> — A desktop crypto price tracker built with Wails.</li></ul><p>I also contributed to these open-source projects:</p><ul><li><a href="https://github.com/RSSNext/Follow">RSSNext&#x2F;Follow: 🧡 Follow your favorites in one inbox</a></li><li><a href="https://github.com/Ac-Wiki/AcWiKi">Ac-Wiki&#x2F;AcWiKi: 属于大学生群体的真·青年大学习</a></li><li><a href="https://github.com/word-hunter/word-hunter">word-hunter&#x2F;word-hunter: Discover new english words you don’t know on any web page</a></li></ul><h3 id="Reading"><a href="#Reading" class="headerlink" title="Reading"></a>Reading</h3><p>Reading is a shortcut to conversing with people on a higher level than yourself.</p><p>I prefer e-books. First, they’re convenient—just grab your phone and start reading. Second, they let me “quantify” my knowledge: highlights and thoughts can be exported as text, saving repetitive mental work. This isn’t just a “false sense of accomplishment”—it also lets me aggregate and review using platforms like Readwise.</p><p>In 2024, I read for 139 hours on WeRead.</p><p>Books I finished:</p><ul><li><em>《打开心智》</em> (Opening the Mind): On how the human mind works.</li><li><em>《昨日的世界》</em> (The World of Yesterday)</li><li><em>《置身事内：中国政府与经济发展》</em> (Inside the Game: The Chinese Government and Its Economic Development): On the relationship between the Chinese government and the economy, and how they operate.</li><li><em>《认知觉醒》</em> (Cognitive Awakening)</li><li><em>《邓小平时代》</em> (Deng Xiaoping and the Transformation of China)</li><li><em>《博弈论究竟是什么》</em> (What Exactly Is Game Theory?): A fun, accessible intro to game theory. It makes you realize how pervasive game theory is in everyday life.</li><li><em>《乌合之众》</em> (The Crowd)</li><li><em>《学会提问》</em> (Asking the Right Questions): Actually a great book on critical thinking.</li><li><em>《在峡江的转弯处：陈行甲人生笔记》</em> (At the Bend of the Gorge: Chen Xingjia’s Life Notes): A vivid, honest life story—a clean official who rose to county party secretary, then left politics for charity. A few chapters brought me to tears.</li><li><em>《局外人》</em> (The Stranger)</li><li><em>《提问的智慧》</em> (How To Ask Questions The Smart Way)</li></ul><p>Books I didn’t finish but highly recommend:</p><ul><li><em>《为什么》</em> (The Book of Why): The science of causal inference.</li><li><em>《吴军：信息论40讲》</em> (Wu Jun: 40 Lectures on Information Theory)</li><li><em>《日本史》</em> (A History of Japan)</li><li><em>《财富自由之路》</em> (The Road to Financial Freedom)</li></ul><p>Currently reading &#x2F; on my list:</p><ul><li><em>《郭建龙”密码三部曲”》</em> (Guo Jianlong’s “Cipher Trilogy”)</li><li><em>《社会契约论》</em> (The Social Contract)</li><li><em>《黄仁勋：英伟达之芯》</em> (Jensen Huang: The Heart of NVIDIA)</li><li><em>《可能性的艺术：比较政治学30讲》</em> (The Art of the Possible: 30 Lectures on Comparative Politics)</li><li><em>《真需求》</em> (Real Demand)</li><li><em>《见证逆潮》</em> (Witnessing the Countercurrent)</li><li><em>《为什么我们总是在防御》</em> (Why We Always Defend)</li></ul><h3 id="Podcasts"><a href="#Podcasts" class="headerlink" title="Podcasts"></a>Podcasts</h3><p>Podcasts were a brand-new medium for me, which I discovered in the second half of the year. I’ve been listening for nearly six months now—my thoughts are in <a href="/en/why-is-podcast-special">The Unique Aspects of Podcasts</a>.</p><p>Here are some podcasts I think are excellent:</p><ul><li>Society &amp; culture:<ul><li><em>《忽左忽右》</em>: History and society.</li><li><em>《半拿铁 | 商业沉浮录》</em>: Business rises and falls.</li><li><em>《虚实之间》</em>: Between the virtual and the real.</li></ul></li><li>Investing &amp; finance:<ul><li><em>《三点下班》</em>: Off work at three.</li><li><em>《投资实战派》</em>: Practical investing.</li><li><em>《知本论》</em>: On knowledge capital.</li></ul></li><li>Interviews:<ul><li><em>《无人知晓》</em>: One episode features the aforementioned Chen Xingjia. After reading his book, listening to that interview made me feel he’s a truly vivid, candid, and admirable person.</li></ul></li></ul><h2 id="2024"><a href="#2024" class="headerlink" title="2024++"></a>2024++</h2><p>Looking ahead to 2025, I think the theme for this year’s goals is: <strong>action</strong>.</p><p>“Why do we know so many truths, yet still fail to live well?” I believe a big part of the answer is the failure to take that first decisive step—and to sustain the follow-through. I consider myself a “three-minute passion” person: I dabble in a bit of everything, start with great enthusiasm, but that enthusiasm easily fades under the relentless passage of time. I hope to find the answer in 2025. And the answer lies in action.</p>]]>
    </content>
    <id>https://shiquda.link/en/2024-plus-plus/</id>
    <link href="https://shiquda.link/en/2024-plus-plus/"/>
    <published>2025-01-11T06:59:17.000Z</published>
    <summary>Incrementing 2024 equals 2025.</summary>
    <title>2024++</title>
    <updated>2025-01-11T07:50:24.000Z</updated>
  </entry>
  <entry>
    <author>
      <name>shiquda</name>
    </author>
    <category term="教程" scheme="https://shiquda.link/categories/%E6%95%99%E7%A8%8B/"/>
    <category term="教程" scheme="https://shiquda.link/tags/%E6%95%99%E7%A8%8B/"/>
    <category term="ahk" scheme="https://shiquda.link/tags/ahk/"/>
    <content>
      <![CDATA[<h2 id="Preface"><a href="#Preface" class="headerlink" title="Preface"></a>Preface</h2><p>Zotero is an open-source, free research literature management tool with a rich plugin ecosystem that makes it very convenient for academic work. However, there’s one thing that really bothered me as a user: when navigating within a document—for example, clicking the table of contents or references—I often need to jump back. But the only way to go back is to click the back button at the top with the mouse. Unlike browsers and other software, you can’t use the mouse side buttons to go back.</p><p>Inspired by a fellow netizen, I wrote a simple script with AHK to map the mouse side button to the back shortcut. For me, it’s been incredibly handy.</p><p>I won’t go into the details of how to use Zotero or AutoHotkey here—please refer to the relevant documentation if you’re not familiar with them.</p><h2 id="Code"><a href="#Code" class="headerlink" title="Code"></a>Code</h2><figure class="highlight ahk"><table><tbody><tr><td class="gutter"><pre><span class="line">1</span><br><span class="line">2</span><br><span class="line">3</span><br><span class="line">4</span><br><span class="line">5</span><br><span class="line">6</span><br></pre></td><td class="code"><pre><span class="line"><span class="meta">#Requires AutoHotkey v2.0</span></span><br><span class="line"><span class="meta"></span></span><br><span class="line"><span class="meta">#HotIf WinActive("ahk_exe zotero.exe")</span></span><br><span class="line"><span class="title">XButton1::</span>Send <span class="string">"{AltDown}{Left}{AltUp}"</span></span><br><span class="line"><span class="title">XButton2::</span>Send <span class="string">"{AltDown}{Right}{AltUp}"</span></span><br><span class="line"><span class="meta">#HotIf</span></span><br></pre></td></tr></tbody></table></figure><p>On Windows, if you want this script to run at startup, simply place the <code>.ahk</code> script file in the <code>shell:startup</code> directory.</p>]]>
    </content>
    <id>https://shiquda.link/en/use-ahk-to-implement-back-navigation-with-side-button-of-mouse-in-zotero/</id>
    <link href="https://shiquda.link/en/use-ahk-to-implement-back-navigation-with-side-button-of-mouse-in-zotero/"/>
    <published>2025-01-02T13:26:56.000Z</published>
    <summary>Learn how to use an AutoHotkey script to map your mouse's side button to the back function in Zotero, streamlining your research workflow.</summary>
    <title>Use AHK to Enable Mouse Side Button Back in Zotero</title>
    <updated>2025-01-02T13:27:28.000Z</updated>
  </entry>
  <entry>
    <author>
      <name>shiquda</name>
    </author>
    <category term="学习" scheme="https://shiquda.link/tags/%E5%AD%A6%E4%B9%A0/"/>
    <category term="笔记" scheme="https://shiquda.link/tags/%E7%AC%94%E8%AE%B0/"/>
    <category term="AI" scheme="https://shiquda.link/tags/AI/"/>
    <category term="LLM" scheme="https://shiquda.link/tags/LLM/"/>
    <content>
      <![CDATA[<h2 id="The-STAR-Framework"><a href="#The-STAR-Framework" class="headerlink" title="The STAR Framework"></a>The STAR Framework</h2><p><img src="https://s2.loli.net/2024/12/28/ExtMslWNuV9PBpG.png" alt="PixPin_2024-12-28_16-38-22" loading="lazy"></p><ul><li>S: Situation — background information</li><li>T: Task — the goal</li><li>A: Audience — who it’s for</li><li>R: Requirements — output requirements</li></ul><p>When asking a question, providing the LLM with these four dimensions of information can help it generate much better responses.</p><p>Here’s an example:</p><blockquote><p>Prompt:</p></blockquote><figure class="highlight txt"><table><tbody><tr><td class="gutter"><pre><span class="line">1</span><br><span class="line">2</span><br><span class="line">3</span><br><span class="line">4</span><br><span class="line">5</span><br><span class="line">6</span><br><span class="line">7</span><br><span class="line">8</span><br><span class="line">9</span><br><span class="line">10</span><br><span class="line">11</span><br></pre></td><td class="code"><pre><span class="line">介绍一下下面的概念：</span><br><span class="line">附加律</span><br><span class="line">化简律</span><br><span class="line">假言推理</span><br><span class="line">拒取式</span><br><span class="line">析取三段论</span><br><span class="line">假言三段论</span><br><span class="line">等价三段论</span><br><span class="line">构造性二难</span><br><span class="line">构造性二难（特殊形式）</span><br><span class="line">破坏性二难</span><br></pre></td></tr></tbody></table></figure><blockquote><p>Response:</p><p>These concepts come mainly from logic, especially propositional logic and rules of inference. Here’s a brief overview:</p><ol><li>Addition<br><strong>Addition</strong> is a rule of inference in propositional logic:</li></ol><ul><li>If ( P ) is true, then ( P \lor Q ) is also true, regardless of what ( Q ) is.</li><li>In other words, from ( P ) you can infer ( P \lor Q ).</li></ul><ol start="2"><li>Simplification<br><strong>Simplification</strong> is a rule of inference in propositional logic:</li></ol><ul><li>If ( P \land Q ) is true, then ( P ) is true and ( Q ) is true.</li><li>In other words, from ( P \land Q ) you can infer ( P ) or ( Q ).</li></ul><ol start="3"><li>Modus Ponens<br><strong>Modus Ponens</strong> is a basic rule of inference in propositional logic:</li></ol><ul><li>If ( P \rightarrow Q ) is true and ( P ) is true, then ( Q ) is true.</li><li>In other words, from ( P \rightarrow Q ) and ( P ) you can infer ( Q ).<br>……</li></ul><p>These rules of inference are very useful in logical reasoning and mathematical proofs, helping us derive new propositions from known ones.</p></blockquote><p>A STAR-optimized prompt:</p><p><img src="https://s2.loli.net/2024/12/28/n81j7FSistecNkm.png" alt="PixPin_2024-12-28_16-48-58" loading="lazy"></p><blockquote><p>Response:</p><p>Okay class, finals prep stressing you out? Don’t worry — let me “translate” these discrete math concepts for you. I promise you’ll laugh and actually remember them!</p><ol><li><p><strong>Addition</strong>:<br>It’s like already having a bag of chips, but thinking it’s not enough and buying another one. Logically: if you know A is true, then A∨B (A or B) is definitely true. Since A is already there, it doesn’t matter whether B shows up — the chips are in hand!</p></li><li><p><strong>Simplification</strong>:<br>It’s like buying a bunch of stuff, only to realize you only use one of them. Logically: if A∧B (A and B) is true, then A is definitely true. Forget B — A is enough!</p></li><li><p><strong>Modus Ponens</strong>:<br>It’s like “if it rains today, I’ll bring an umbrella.” It does rain today, so you definitely brought an umbrella. Logically: if A→B (A implies B) and A is true, then B is also true. Don’t get soaked — bring the umbrella!</p></li></ol><p>……</p><p>See? These concepts aren’t so scary after all. Remember, logic is like life — sometimes more options actually make things simpler. Good luck studying, you’ve got this!</p></blockquote><p>Testing with DeepSeek’s default model on the official website shows a very clear difference.</p><h2 id="What-Prompt-Optimization-Really-Does"><a href="#What-Prompt-Optimization-Really-Does" class="headerlink" title="What Prompt Optimization Really Does"></a>What Prompt Optimization Really Does</h2><p>You’ve probably heard that prompts can optimize output. For example:</p><blockquote><p>Pretend you’re an experienced Python programmer. Now please xxx…</p></blockquote><p>These “formulaic” prompts do seem to improve response quality to some extent.</p><p>Mainstream LLMs are also improving rapidly. Many products can already automatically predict and optimize user needs, and the marginal effect of prompt engineering is starting to show. So, in this context, what’s the point of writing good prompts?</p><p>I believe that, at its core, <strong>a good prompt provides the LLM with more information, and that information helps the LLM generate content that better matches user expectations</strong>.</p><p>Many users feel the LLM “doesn’t get me,” but in reality, they may not have given the LLM enough background information. The LLM isn’t a mind reader — how could it know exactly what you need? 😄</p><h2 id="Isn’t-This-a-Hassle"><a href="#Isn’t-This-a-Hassle" class="headerlink" title="Isn’t This a Hassle?"></a>Isn’t This a Hassle?</h2><p>You might ask: isn’t it a pain to write prompts like this every time?</p><p>The answer depends on your needs. For simple questions — say, you just want the LLM to do a quick translation so you can understand something — then no, it’s not really necessary.</p><p>But for more important requests, like polishing a draft, I’d still recommend doing it. After all, getting a satisfying response from the LLM in one shot is better than having to coach it through multiple rounds.</p><hr><h2 id="Reference"><a href="#Reference" class="headerlink" title="Reference"></a>Reference</h2><p>[Advanced Tutorial] One Combo to Fully Unleash AI’s Writing Ability — Bilibili](<a href="https://www.bilibili.com/video/BV1RNidYCEdq/">https://www.bilibili.com/video/BV1RNidYCEdq/</a>)</p>]]>
    </content>
    <id>https://shiquda.link/en/tip-on-llm-prompt-star/</id>
    <link href="https://shiquda.link/en/tip-on-llm-prompt-star/"/>
    <published>2024-12-28T08:41:50.000Z</published>
    <summary>Optimize your LLM prompts with the STAR framework.</summary>
    <title>A Simple Prompting Trick for LLMs: STAR</title>
    <updated>2024-12-28T09:00:56.000Z</updated>
  </entry>
  <entry>
    <author>
      <name>shiquda</name>
    </author>
    <category term="随想" scheme="https://shiquda.link/tags/%E9%9A%8F%E6%83%B3/"/>
    <content>
      <![CDATA[<p>This post is a collection of the author’s random thoughts, which may inevitably have shortcomings in terms of professionalism. If there are any errors, feel free to discuss and correct them.</p><hr><p>Many people want to make money. Let’s set aside the question of why we make money for now, and only examine the act of making money itself, exploring the differences between “making money” and “making money.”</p><h2 id="Level-1-1-unit-of-labor-→-1-unit-of-return"><a href="#Level-1-1-unit-of-labor-→-1-unit-of-return" class="headerlink" title="Level 1: 1 unit of labor → 1 unit of return"></a>Level 1: 1 unit of labor → 1 unit of return</h2><p>When it comes to making money, the work most people do essentially falls into this category: <strong>1 unit of labor → 1 unit of return</strong>. That is, the time and energy you put in—say, working a day at the office or delivering a food order—can predictably yield only a single return.</p><p>Although income disparities between jobs are enormous, none of them have much “room for imagination.” At their core, they are still <strong>a direct trade of labor for return</strong>.</p><h2 id="Level-2-1-unit-of-labor-→-x-units-of-return"><a href="#Level-2-1-unit-of-labor-→-x-units-of-return" class="headerlink" title="Level 2: 1 unit of labor → x units of return"></a>Level 2: 1 unit of labor → x units of return</h2><p>Some work has a different property: after putting in <strong>1 unit of labor, you receive multiple returns</strong>. And this kind of return is often uncertain, which means its room for imagination is huge. This doesn’t include cases like getting bonuses or allowances on top of your salary—those still fall within the predictable category.</p><p>For example, on a large scale, a company can file a patent and keep profiting from licensing fees; on a small scale, an independent developer can build a piece of software and monetize it. In both cases, the expected profit is unknown, and after the initial labor, the worker doesn’t need to labor again (or only needs to pay a very low cost) to keep receiving returns multiple times.</p><p>I had a simple experience of my own: I collected some resources online (which still had a certain paywall), uploaded them to various cloud drives, and listed them for sale on Xianyu. Aside from the time and effort I spent collecting the resources, my only ongoing cost was the subscription for the Xianyu shipping bot: 120 yuan per year. Within two months, from just one product, I had already recouped my costs and made several times over. The amount wasn’t much, but it let me experience the difference between <strong>1 unit of labor → x units of return</strong> and <strong>1 unit of labor → 1 unit of return</strong>.</p><blockquote><p>In fact, the work done by the developers of the shipping bot is similar to mine. The development cost can yield x units of return, and afterward, only some server maintenance and update costs are needed. The labor they put in earlier will continue to earn them income years later.</p></blockquote><h2 id="Level-3-1-unit-of-return-→-x-units-of-return"><a href="#Level-3-1-unit-of-return-→-x-units-of-return" class="headerlink" title="Level 3: 1 unit of return → x units of return"></a>Level 3: 1 unit of return → x units of return</h2><p>Seeing this heading, you might be surprised: how can returns generate more returns? Of course they can.</p><p>This is the method that truly makes big money, and even influences the world’s financial landscape: <strong>money making money</strong>. Many of the world’s wealthy individuals and financial giants have accumulated enormous fortunes precisely this way. The core idea of money making money is to use various investment strategies to keep growing your existing capital, rather than relying solely on the simple exchange of <strong>labor → return</strong>.</p><p>Compound interest is called the “eighth wonder of the world.” Its power lies in the fact that not only does the principal grow, but the interest also generates more interest.</p><blockquote><p>For example, suppose you invest 1 million yuan at an annual interest rate of 10%. After one year, you’ll earn 100,000 yuan in interest. If you reinvest that 100,000 yuan, your total capital will grow to 1.21 million yuan in the second year, not just 1.1 million yuan. Over the long run, the compounding effect will make your wealth grow exponentially.</p></blockquote><p><img src="https://s2.loli.net/2024/12/15/biEaq9pxsc7GjID.png" alt="Pasted image 20241215105350" loading="lazy"></p><p><del>Of course, the threshold and risk of this approach are absolutely not something ordinary people can handle, and only a very few can actually make money.</del></p><p>Ordinary people can also invest well. The prerequisite is having sufficient financial reserves and experience. Learning to invest is a highly rewarding “meta-investment.”</p><h2 id="Level-x-Investing-in-yourself"><a href="#Level-x-Investing-in-yourself" class="headerlink" title="Level x: Investing in yourself"></a>Level x: Investing in yourself</h2><p>In fact, there is a “sure-win” deal: investing in yourself and improving your own abilities. From a utilitarian perspective, doing so can elevate your level of making money.</p><p>Of course, investing in yourself here doesn’t mean simply learning <strong>technical</strong> skills, like getting a Mandarin Level 2 certificate or a Computer Level 2 certificate, but rather investing in skills that enhance your <strong>cognitive</strong> abilities. How you interact with others, how you understand the operating logic of the world, how you understand personal meaning, and so on. The returns on this investment are unknown, and the butterfly effect it produces will influence our entire lives.</p>]]>
    </content>
    <id>https://shiquda.link/en/three-levels-of-earning/</id>
    <link href="https://shiquda.link/en/three-levels-of-earning/"/>
    <published>2024-12-15T02:59:31.000Z</published>
    <summary>1 labor → 1 return, 1 labor → x returns, and 1 return → x returns.</summary>
    <title>The Three Tiers of Earning Money</title>
    <updated>2025-07-15T15:47:42.000Z</updated>
  </entry>
  <entry>
    <author>
      <name>shiquda</name>
    </author>
    <category term="项目" scheme="https://shiquda.link/categories/%E9%A1%B9%E7%9B%AE/"/>
    <category term="项目" scheme="https://shiquda.link/tags/%E9%A1%B9%E7%9B%AE/"/>
    <category term="Go" scheme="https://shiquda.link/tags/Go/"/>
    <category term="Vue" scheme="https://shiquda.link/tags/Vue/"/>
    <content>
      <![CDATA[<p><strong>Cryptocurrency involves risk. This article does not constitute any investment advice.</strong></p><h2 id="Background-Feel-Free-to-Skip"><a href="#Background-Feel-Free-to-Skip" class="headerlink" title="Background (Feel Free to Skip)"></a>Background (Feel Free to Skip)</h2><p>Over the past few days, I’ve been learning about the crypto space and even dipped my toes in myself. The exchange apps on mobile all have floating-window features, but I haven’t found a desktop equivalent that really satisfies me. Previously, I had to keep multiple browser windows open, which wasn’t very convenient.</p><p>Some of these desktop products are even paid on the Microsoft Store. After spending some time cracking one, I found it was honestly a mess—hard to describe. I wouldn’t use it even if someone paid me 😅</p><p>The weekend finally freed up, and I’d been wanting to learn Go for a while but never had the time to practice. Then I stumbled upon this idea in my idea list: build a desktop floating-window app for monitoring crypto prices.</p><p>I wanted it to be <strong>beautiful</strong>, <strong>cross-platform</strong>, and <strong>lightweight</strong>.</p><p>So I got to work. Saturday afternoon I went through Go’s basic syntax, then asked AI that evening which lightweight Go frameworks were good for building cross-platform desktop apps. After some back and forth, it told me <a href="https://fyne.io/">Fyne</a> was a solid choice.</p><p>And then… I wasted an entire night.</p><p>During actual development, I found that despite having 25k stars on GitHub, the framework felt very rigid (maybe I just didn’t go deep enough), and many methods I needed simply didn’t exist (e.g., the most important one—always-on-top). I checked and found users had raised this in Issues, but after three years the developers still hadn’t added it. Eventually I couldn’t take it anymore and decided to ask real people. After some Googling, I stumbled back to L站 (gotta say, their SEO is top-notch 😄)</p><p><a href="https://linux.do/t/topic/115324/19">https://linux.do/t/topic/115324/19</a></p><p>I want to thank all the netizens who participated in that thread—someone pointed me in the right direction: <a href="https://wails.io/">wails</a>.</p><p>Wails is a project for building desktop applications using Go and web technologies. Since I’m relatively familiar with frontend and had picked up some Vue basics before, it was fairly easy to get started. So I went all in, deleted all my Fyne code without hesitation—keeping only the backend API requests—and grinded until 2 AM. I got up at 7 AM and kept writing until just recently when it was finally done.</p><p>There was one pitfall that held me up for a long time. Since I wanted a cross-platform desktop app but only have Windows and Linux environments (no macOS), I planned to use GitHub Actions for packaging. But I’m not very familiar with Actions, and more importantly, I knew nothing about macOS specifics (like how apps are installed and packaged) 😅. It took over a dozen attempts to get it working. GitHub Actions never gave me a good way to debug, so I had to keep trial-and-erroring, asking Cursor, and retrying based on the sparse output—with each retry taking 3-4 minutes of build time.</p><p>The Windows installer still seems to have some issues—it appears to be the same as the executable—but the executable itself runs fine. I’ll leave it as is for now; if it runs, it’s good enough. I’ll fix it when I feel like writing code again later…</p><h2 id="Introduction"><a href="#Introduction" class="headerlink" title="Introduction"></a>Introduction</h2><p><img src="https://github.com/shiquda/crypto-monitor/blob/main/imgs/crypto-monitor.png?raw=true" alt="Crypto Monitor" loading="lazy"></p><p>The prototype of this little widget is finally complete:</p><p><img src="https://s2.loli.net/2024/12/01/LYczp3Vv9BFwfld.gif" alt="PixPin_2024-12-01_16-12-57" loading="lazy"></p><p>Tech stack:</p><ul><li>Wails</li><li>Vue</li></ul><p>The current features are still pretty basic—besides always-on-top, minimize, and close, there’s only simple add&#x2F;remove of trading pairs. I’ll consider adding more features later (digging a hole for myself).</p><p>For more details, check out <a href="https://github.com/shiquda/crypto-monitor">Github</a>. If you like it, feel free to drop a Star~</p><p>Downloads:</p><p><a href="https://github.com/shiquda/crypto-monitor/releases/">https://github.com/shiquda/crypto-monitor/releases/</a></p><p>Given my limited technical skills, there are bound to be issues. Feel free to raise any suggestions or feedback—I’ll get to them when I have time~</p><h2 id="Afterword"><a href="#Afterword" class="headerlink" title="Afterword"></a>Afterword</h2><p><del>Secretly opened a new treehole: <a href="https://cry.shiquda.link/">cry.shiquda.link</a></del></p>]]>
    </content>
    <id>https://shiquda.link/en/introducing-crypto-monitor/</id>
    <link href="https://shiquda.link/en/introducing-crypto-monitor/"/>
    <published>2024-12-01T08:36:51.000Z</published>
    <summary>This post introduces Crypto Monitor, a cross-platform desktop floating window tool I built for tracking crypto prices in real time.</summary>
    <title>Crypto Monitor: Cross-Platform Desktop Floating Window for Crypto Tracking</title>
    <updated>2024-12-01T08:37:01.000Z</updated>
  </entry>
  <entry>
    <author>
      <name>shiquda</name>
    </author>
    <category term="随想" scheme="https://shiquda.link/tags/%E9%9A%8F%E6%83%B3/"/>
    <content>
      <![CDATA[<h2 id="A-Few-Words-Up-Front"><a href="#A-Few-Words-Up-Front" class="headerlink" title="A Few Words Up Front"></a>A Few Words Up Front</h2><p>I can’t remember when I first heard the term “podcast”—it was one of those things I knew by name but had never actually encountered. In any case, about a month ago, I finally started listening to podcasts myself. As I kept listening, a few spontaneous thoughts came to mind, so I decided to write them down.</p><h2 id="What-Makes-Podcasts-So-Unique"><a href="#What-Makes-Podcasts-So-Unique" class="headerlink" title="What Makes Podcasts So Unique?"></a>What Makes Podcasts So Unique?</h2><h3 id="The-Format-Is-Just-Right"><a href="#The-Format-Is-Just-Right" class="headerlink" title="The Format Is Just Right"></a>The Format Is Just Right</h3><p>In my eyes, podcasting is an information medium that sits in an <strong>intermediate form</strong>. Before I tried it, I thought podcasts were a bit odd—neither here nor there. They weren’t as engaging or easy to follow as video, nor as direct and plain as text. But once I actually started listening, I realized that podcasts are perfect for those fragmented moments in life when time and space are constrained—times when reading text or watching video might not be ideal. Driving, taking the subway, walking, doing chores, even lying in bed before sleep—these are all great podcast moments.</p><p>Looking purely at the outcome, I think podcasts fill a “vacuum” between text and video media. In terms of <strong>information volume</strong> (note: not information density), it’s <code>video &gt; podcast &gt; text</code>. Text is better suited for reading and reflecting in relatively static moments. Video is more mainstream and carries more information—it can theoretically include visuals, audio, text, and more—but that often comes at the cost of lower information density. In fact, I’ll listen to certain videos as if they were podcasts when their information density doesn’t really come from the visuals.</p><p>For example, text is easy to search and even summarize with large language models. Podcasts are much harder to summarize; if you use speech-to-text tools, you inevitably lose a lot of non-verbal information. And video is even harder to condense or summarize. Since video distributes information across multiple dimensions, the potential loss is enormous.</p><p>There’s a significant difference between writing and speech. Writing is a system of symbols—essentially a one-dimensional, plain encoding of information. When you talk to someone, though, you convey not just the words but also tone, facial expressions, gestures, and other dimensions of information. Spoken language carries far more information than text.</p><p>Face-to-face conversation carries the most information. Podcasts can’t show you the speaker’s expressions or gestures, but you still pick up extra dimensions through tone, reactions, and other cues.</p><p>To sum up: <strong>podcasts, despite their seemingly awkward in-between form, fill a real gap in the time and space where we consume information in daily life.</strong></p><h3 id="Intimacy-and-Immersion"><a href="#Intimacy-and-Immersion" class="headerlink" title="Intimacy and Immersion"></a>Intimacy and Immersion</h3><p>From my perspective, listening to a podcast—whether it’s one person doing a solo monologue or multiple people in an interview—feels <strong>intimate</strong>. It’s like sitting just outside the studio, eavesdropping. That makes me more receptive to the information. Some might say video interviews are more lifelike. But I think the absence of visuals is, in a way, a kind of <strong>negative space</strong>. It pushes you to focus more, to compensate for the missing visuals, and in doing so, draws your attention to the content itself.</p><p>One thing that supports this from my own experience: I rarely skip forward when listening to podcasts, which is completely different from how I watch video. Part of that may be because it’s less convenient to hit fast-forward, but I also genuinely feel more engaged with the content.</p><h3 id="High-Information-Quality"><a href="#High-Information-Quality" class="headerlink" title="High Information Quality"></a>High Information Quality</h3><p>Some netizens describe podcasts as an “elite” medium, saying listeners tend to be people with relatively higher income and education levels. At least from what I’ve heard, there’s no shortage of high-quality content.</p><p>Everyone can pick the topics they’re interested in, choose shows they like, and subscribe through a podcast app. The concept is similar to RSS—and technically, it’s implemented using RSS. In a way, it’s also a way to say no to recommendation algorithms.</p><p>I’m not saying listening to podcasts makes you somehow “superior” to people who scroll through short videos—they’re just two different media for consuming information. But in reality, the number of people who know what podcasts are and are willing to try them is still quite small, at least in China. Which brings me to another point: adoption.</p><h3 id="Low-Adoption-Rate"><a href="#Low-Adoption-Rate" class="headerlink" title="Low Adoption Rate"></a>Low Adoption Rate</h3><p>In the U.S., listening to podcasts is fairly common—about half of Americans listen to podcasts. The ecosystem is mature, with major platforms like Apple and Spotify holding significant podcast catalogs. In China, however, the <strong>audience</strong> is much smaller. From the <strong>creator</strong> side, there isn’t yet a monetization model as mature as overseas, which means many podcasts struggle to keep producing. I saw this firsthand while hunting for quality shows: I’d dig through old recommendation posts and find that quite a few had stopped updating years ago.</p><h2 id="In-Closing"><a href="#In-Closing" class="headerlink" title="In Closing"></a>In Closing</h2><p>Those are some stray thoughts from my first foray into podcasts as a medium. Barring any surprises, I think I’ve found a great new source of information, and I’ll keep listening for the foreseeable future. If you haven’t tried podcasts yet, give them a shot—see if the medium suits your taste.</p><p><a href="https://www.v2ex.com/t/1088094">This post</a> is a thread I started on V2EX asking for podcast recommendations. I got a lot of great shows from helpful netizens. Feel free to check it out if you’re interested.</p><p>If you use an Android phone, give <a href="https://antennapod.org/">AntennaPod</a> a try. It’s free, open-source, clean, and easy to use.</p>]]>
    </content>
    <id>https://shiquda.link/en/why-is-podcast-special/</id>
    <link href="https://shiquda.link/en/why-is-podcast-special/"/>
    <published>2024-11-11T14:00:48.000Z</published>
    <summary>Podcasts occupy a unique space between text and video, delivering an intimate, high-quality audio experience that fits perfectly into fragmented time. Despite low adoption in China, their rich content and flexible subscription model make them well worth exploring.</summary>
    <title>Why Podcasts Stand Out</title>
    <updated>2024-11-11T14:47:36.000Z</updated>
  </entry>
  <entry>
    <author>
      <name>shiquda</name>
    </author>
    <category term="寻觅周刊" scheme="https://shiquda.link/categories/%E5%AF%BB%E8%A7%85%E5%91%A8%E5%88%8A/"/>
    <category term="资源" scheme="https://shiquda.link/tags/%E8%B5%84%E6%BA%90/"/>
    <content>
      <![CDATA[<h2 id="🤔-Preface"><a href="#🤔-Preface" class="headerlink" title="🤔 Preface"></a>🤔 Preface</h2><p>This is the 6th issue of <em>Seeking Weekly</em>. It may also be the last.</p><p><em>Seeking Weekly</em> was a bold experiment for me. A little over a month ago, I had a simple idea:</p><blockquote><p><strong>Get the highest-quality information in as little time as possible.</strong></p></blockquote><p>But as each weekly deadline arrived, I found that, from a <strong>utilitarian</strong> standpoint, this approach made me passive, and I wasn’t benefiting much from it.</p><p>From a utilitarian perspective, writing technical and reflective articles does benefit me: it’s an embodiment of the <strong>Feynman learning technique</strong>—that is, <strong>the person sharing learns by teaching</strong>, and both the author and the readers benefit.</p><p>However, compiling high-quality information like <em>Seeking Weekly</em> is, in a sense, <strong>neither creative nor has a high barrier to entry</strong>, and it’s hard for me to benefit from the process of curating it.</p><p>At the very beginning, I would pay attention to quality information I encountered during the week, jot it down, and then write and share it over the weekend. But after the relentless test of time, that initial enthusiasm for sharing was shelved. It turned from <strong>passion</strong> into a passive “<strong>rush to finish</strong>,” from a <strong>right</strong> of mine into an <strong>obligation</strong>—even though no one ever <strong>asked</strong> me to do it.</p><p><strong>At that moment, I realized it was time to say goodbye to readers.</strong></p><p>I realized that what I actually enjoy is the result of sharing, not the process. Knowing that more people can find quality information makes me happy, but what I’m unwilling to bear is the process of sharing. The two are hard to balance.</p><p>Perhaps it was the “weekly” format that constrained me. Looking at it from my own self-interest, maybe what I need is instant sharing and instant joy. Discontinuing the weekly doesn’t mean I no longer enjoy sharing. I think I may need to switch to a different format—for example, running a Telegram channel, writing WeChat Official Account articles, or some other format I haven’t thought of yet. <strong>I want to be able to share immediately when I feel the time is right.</strong> I hope to meet readers again.</p><p>Thank you for reading. Whether you’ve been a reader for many issues or this is your first time, please allow me to express both my gratitude and my apologies.</p><p>👋</p><p><del>Welcome to subscribe to this weekly’s <a href="https://shiquda.link/categories/%E5%AF%BB%E8%A7%88%E5%91%A8%E5%88%8A/rss.xml">RSS</a>.</del></p><h2 id="ℹ️-Sources"><a href="#ℹ️-Sources" class="headerlink" title="ℹ️ Sources"></a>ℹ️ Sources</h2><h3 id="🐑-Yummy’s-Blog-Sharing-streaming-subscriptions-deals-and-more"><a href="#🐑-Yummy’s-Blog-Sharing-streaming-subscriptions-deals-and-more" class="headerlink" title="🐑 Yummy’s Blog: Sharing streaming subscriptions, deals, and more"></a>🐑 Yummy’s Blog: Sharing streaming subscriptions, deals, and more</h3><p><a href="https://yummy.best/">Yummy’s Blog - A collection of tutorials and updates</a></p><h3 id="Chives-Life-Sharing-investment-and-finance-knowledge"><a href="#Chives-Life-Sharing-investment-and-finance-knowledge" class="headerlink" title="Chives Life: Sharing investment and finance knowledge"></a>Chives Life: Sharing investment and finance knowledge</h3><p><a href="https://blog.chives.life/">Chives Life</a></p><h2 id="📂-Resources"><a href="#📂-Resources" class="headerlink" title="📂 Resources"></a>📂 Resources</h2><p>No resources recommended this issue.</p><h2 id="🔧-Tools"><a href="#🔧-Tools" class="headerlink" title="🔧 Tools"></a>🔧 Tools</h2><h3 id="Vimium-C-Control-your-browser-like-Vim"><a href="#Vimium-C-Control-your-browser-like-Vim" class="headerlink" title="Vimium C: Control your browser like Vim"></a>Vimium C: Control your browser like Vim</h3><p><a href="https://chromewebstore.google.com/detail/vimium-c-%E5%85%A8%E9%94%AE%E7%9B%98%E6%93%8D%E4%BD%9C%E6%B5%8F%E8%A7%88%E5%99%A8/hfjbmagddngcpeloejdejnfgbamkjaeg">Vimium C - Full keyboard browser control - Chrome Web Store</a></p>]]>
    </content>
    <id>https://shiquda.link/en/seeking-weekly-6/</id>
    <link href="https://shiquda.link/en/seeking-weekly-6/"/>
    <published>2024-10-20T07:27:55.000Z</published>
    <summary>Seeking Weekly Issue 6: Farewell</summary>
    <title>Seeking Weekly Issue 6: Farewell</title>
    <updated>2024-10-20T07:34:07.000Z</updated>
  </entry>
  <entry>
    <author>
      <name>shiquda</name>
    </author>
    <category term="寻觅周刊" scheme="https://shiquda.link/categories/%E5%AF%BB%E8%A7%85%E5%91%A8%E5%88%8A/"/>
    <category term="资源" scheme="https://shiquda.link/tags/%E8%B5%84%E6%BA%90/"/>
    <content>
      <![CDATA[<h2 id="🤔-Preface"><a href="#🤔-Preface" class="headerlink" title="🤔 Preface"></a>🤔 Preface</h2><p>This is the 5th issue of <em>Seeking Weekly</em>.</p><p>Coming up with a title for this weekly is no easy task. The nature of a weekly means each issue rarely has a single “theme,” so I’m considering whether to drop the formal “theme” altogether. For this issue, I’ll go with “emoji” for now. Details below.</p><p>Feel free to subscribe to the weekly’s <a href="https://shiquda.link/categories/%E5%AF%BB%E8%A7%85%E5%91%A8%E5%88%8A/rss.xml">RSS feed</a>.</p><h2 id="ℹ️-Sources"><a href="#ℹ️-Sources" class="headerlink" title="ℹ️ Sources"></a>ℹ️ Sources</h2><h3 id="🤖-AIGC-Weekly-A-Weekly-for-AI-Enthusiasts"><a href="#🤖-AIGC-Weekly-A-Weekly-for-AI-Enthusiasts" class="headerlink" title="🤖 AIGC Weekly: A Weekly for AI Enthusiasts"></a>🤖 AIGC Weekly: A Weekly for AI Enthusiasts</h3><p><a href="https://quail.ink/op7418">AIGC Weekly</a> is a newsletter focused on the latest developments in the AIGC space, covering AI trends, models, products, and more from both domestic and international sources.</p><p><img src="https://s2.loli.net/2024/10/13/uZ4GXHgRStIochF.png" alt="PixPin_2024-10-13_15-42-23" loading="lazy"></p><p>📶 <a href="https://quail.ink/op7418/feed/atom">RSS</a></p><h2 id="📂-Resources"><a href="#📂-Resources" class="headerlink" title="📂 Resources"></a>📂 Resources</h2><h3 id="✈️-Telegram-Resource-Channels-A-Great-Place-to-Find-Resources"><a href="#✈️-Telegram-Resource-Channels-A-Great-Place-to-Find-Resources" class="headerlink" title="✈️ Telegram Resource Channels: A Great Place to Find Resources"></a>✈️ Telegram Resource Channels: A Great Place to Find Resources</h3><p>Since Telegram imposes no storage limits on uploads and has relatively lenient moderation, it hosts many <strong>resource channels</strong>. If you’re looking for certain resources, it’s worth checking out. Resources are stored as messages within channels and can be searched directly inside them. Here are a few examples:</p><ul><li>Cloud storage resources<ul><li><a href="https://t.me/addlist/AjEE_tIe5bMzN2Ix">https://t.me/addlist/AjEE_tIe5bMzN2Ix</a></li></ul></li><li>Cracked software<ul><li><a href="https://t.me/addlist/M-Rpt9N6aLRhMTll">https://t.me/addlist/M-Rpt9N6aLRhMTll</a></li></ul></li><li>Magazines &amp; periodicals<ul><li><a href="https://t.me/readingclubus">https://t.me/readingclubus</a></li><li><a href="https://t.me/caixinsharing">https://t.me/caixinsharing</a></li></ul></li></ul><p>Want more? Check out the following resources for additional quality Telegram channels, groups, and bots (<strong>please evaluate the quality of these on your own</strong>):</p><ul><li><a href="https://tgnav.github.io/">Channels | TGNAV - Telegram Channel &amp; Group Directory</a> (NSFW)</li><li><a href="https://rectg.com/">【Hot Picks】5000+ Quality Telegram Groups, Channels, and Bots, Carefully Curated to Help You Find the Best Options Fast! | rectg</a></li></ul><p>It’s recommended to enable <strong>message notifications muted</strong> after joining.</p><h3 id="😍-emojifinder-Find-Emoji-Expressions"><a href="#😍-emojifinder-Find-Emoji-Expressions" class="headerlink" title="😍 emojifinder: Find Emoji Expressions"></a>😍 emojifinder: Find Emoji Expressions</h3><p>You may have noticed that each entry in this issue is prefixed with an emoji—this is to help readers intuitively grasp the nature of each item at a glance.</p><p><a href="https://emojifinder.com/">Emoji Finder</a> is a handy website where you can search by English keywords and click to copy the emoji to your clipboard.</p><p><img src="https://s2.loli.net/2024/10/13/qaVfg8NM3xeSAo2.png" alt="PixPin_2024-10-13_16-06-34" loading="lazy"></p><h3 id="💻-Core-Dumped-Understanding-Computer-Systems-Intuitively"><a href="#💻-Core-Dumped-Understanding-Computer-Systems-Intuitively" class="headerlink" title="💻 Core Dumped: Understanding Computer Systems Intuitively"></a>💻 Core Dumped: Understanding Computer Systems Intuitively</h3><p>I recently discovered a niche YouTube channel: <a href="https://www.youtube.com/@CoreDumpped">Core Dumped</a>, which uses <strong>animations</strong> to explain the underlying principles of <strong>computer systems</strong>.</p><p><img src="https://s2.loli.net/2024/10/13/IOnPDzUo9G3QARX.jpg" alt="One of the most profounds and successful ideas in computer science. (1)" loading="lazy"></p><h2 id="🔧-Tools"><a href="#🔧-Tools" class="headerlink" title="🔧 Tools"></a>🔧 Tools</h2><h3 id="➗-SimpleTex-Extract-LaTeX-Formulas"><a href="#➗-SimpleTex-Extract-LaTeX-Formulas" class="headerlink" title="➗ SimpleTex: Extract LaTeX Formulas"></a>➗ SimpleTex: Extract LaTeX Formulas</h3><p><a href="https://simpletex.cn/">SimpleTex</a> is “a convenient and easy-to-use formula&#x2F;document recognition and editing platform” that can recognize LaTeX formulas in <strong>images&#x2F;PDFs</strong> and supports exporting to <strong>LaTeX</strong>, <strong>Markdown</strong>, <strong>Word</strong>, and <strong>images</strong>. It’s currently free to use after logging in, and API access is available for a fee.</p><p><img src="https://s2.loli.net/2024/10/13/lqTMNvwm8PcxEjd.png" alt="PixPin_2024-10-13_16-23-01" loading="lazy"></p><p>Here’s the <a href="https://simpletex.cn/ai/latex_ocr">recognition</a> result—the fidelity is quite good.</p><p>$$<br>19.\text{ 设随机变量序列}{X,|\text{独立同分布 },\text{且 Var}(X_n)&#x3D;\sigma^2\text{ 存在 },\text{令}\\overline{X} &#x3D; \frac{1}{n}\sum_{i&#x3D;1}^{n} X_{i} ,\quad S_{n}^{2} &#x3D; \frac{1}{n}\sum_{i&#x3D;1}^{n} { X_{i} - \overline{X} }^{2} .\\text{试证}S_{n}^{2}\xrightarrow{P}\sigma^{2}.<br>$$</p><h3 id="🛜-gping-ping-but-Animated"><a href="#🛜-gping-ping-but-Animated" class="headerlink" title="🛜 gping: ping, but Animated"></a>🛜 gping: ping, but Animated</h3><p><a href="https://github.com/orf/gping">gping</a> is a cross-platform (Windows, Mac, and Linux) ping program that dynamically plots ping times for multiple hosts right in the terminal.</p><p><img src="https://raw.githubusercontent.com/orf/gping/refs/heads/master/images/readme-example.gif" loading="lazy"></p><p>Testing this site with <code>gping shiquda.link</code>:</p><p><img src="https://s2.loli.net/2024/10/13/MBW3AeGLScDERP1.png" alt="PixPin_2024-10-13_16-36-18" loading="lazy"></p><h3 id="🚫-Test-Ad-Block-Test-Your-Ad-Blocker"><a href="#🚫-Test-Ad-Block-Test-Your-Ad-Blocker" class="headerlink" title="🚫 Test Ad Block: Test Your Ad Blocker"></a>🚫 Test Ad Block: Test Your Ad Blocker</h3><p><a href="https://d3ward.github.io/toolz/adblock.html">Test Ad Block</a> is a website that tests the functionality of your browser’s ad blocker. It’s open source on <a href="https://github.com/d3ward/toolz">GitHub</a>.</p><p><img src="https://s2.loli.net/2024/10/13/l263GQD8vrNb5Wn.png" alt="PixPin_2024-10-13_16-39-04" loading="lazy"></p><p>Looks like <a href="https://chromewebstore.google.com/detail/ublock-origin-lite/ddkjiahejlhfcafbddmgiahcphecmpfh">uBlock Origin Lite</a>, which supports Manifest V3, performs quite well 😄</p><hr><p>If you enjoy my content, feel free to leave a comment—it keeps me motivated to continue the weekly. If you have any suggestions for this newsletter, your feedback is equally welcome!</p><p>Thanks ♥️!</p>]]>
    </content>
    <id>https://shiquda.link/en/seeking-weekly-5/</id>
    <link href="https://shiquda.link/en/seeking-weekly-5/"/>
    <published>2024-10-13T07:27:55.000Z</published>
    <summary>The fifth issue of Seeking Weekly, all about emoji.</summary>
    <title>Seeking Weekly Issue 5: Emoji</title>
    <updated>2024-10-13T08:50:51.000Z</updated>
  </entry>
  <entry>
    <author>
      <name>shiquda</name>
    </author>
    <category term="教程" scheme="https://shiquda.link/categories/%E6%95%99%E7%A8%8B/"/>
    <category term="教程" scheme="https://shiquda.link/tags/%E6%95%99%E7%A8%8B/"/>
    <category term="破解" scheme="https://shiquda.link/tags/%E7%A0%B4%E8%A7%A3/"/>
    <content>
      <![CDATA[<p>This article is based on my shallow understanding of browser extension reverse engineering, along with experience from reverse engineering several browser extensions. It will cover four parts: <strong>basic concepts</strong>, <strong>reverse engineering knowledge and tools</strong>, <strong>the basic reverse engineering workflow</strong>, and <strong>hands-on practice</strong>. The article is bound to contain errors or omissions, and feedback and discussion are welcome!</p><h2 id="Basic-Concepts"><a href="#Basic-Concepts" class="headerlink" title="Basic Concepts"></a>Basic Concepts</h2><h3 id="What-is-a-browser-extension"><a href="#What-is-a-browser-extension" class="headerlink" title="What is a browser extension?"></a>What is a browser extension?</h3><p>A <a href="https://developer.mozilla.org/zh-CN/docs/Mozilla/Add-ons/WebExtensions">browser extension</a> (commonly called a browser plugin) can do a lot of things—modifying web pages, intercepting and modifying requests, controlling the browser, and more. Generally speaking, browser extensions are built with HTML/JS/CSS—the “<strong>front-end trio</strong>.” They leverage <a href="https://developer.chrome.com/docs/extensions/reference/api?hl=zh-cn">APIs</a> provided by the browser to implement various features.</p><p>In most cases, extensions built on the Chromium engine only need <a href="https://extensionworkshop.com/documentation/develop/porting-a-google-chrome-extension/">minor modifications</a> to run in Firefox, and the Chromium ecosystem has a richer selection of extensions. So the rest of this article will focus on Chromium-based browsers.</p><h3 id="What’s-inside-an-extension-package"><a href="#What’s-inside-an-extension-package" class="headerlink" title="What’s inside an extension package?"></a>What’s inside an extension package?</h3><p>Some readers may have noticed that when you install a browser extension, the browser actually downloads a <code>.crx</code> file. This <code>.crx</code> file isn’t a compiled binary—it’s essentially just an archive. If you rename the extension to <code>.zip</code>, any archive tool can read its contents.</p><p>Once extracted, you’ll see the extension’s files. A simple extension directory structure looks like this:</p><figure class="highlight text"><table><tbody><tr><td class="gutter"><pre><span class="line">1</span><br><span class="line">2</span><br><span class="line">3</span><br><span class="line">4</span><br><span class="line">5</span><br><span class="line">6</span><br><span class="line">7</span><br></pre></td><td class="code"><pre><span class="line">|-- extension-directory</span><br><span class="line">    |-- manifest.json</span><br><span class="line">    |-- popup.html</span><br><span class="line">    |-- background.js</span><br><span class="line">    |-- content.js</span><br><span class="line">    |-- options.html</span><br><span class="line">    |-- ...</span><br></pre></td></tr></tbody></table></figure><p>The extension’s <code>.js</code>, <code>.html</code>, <code>.css</code> files may also live in subdirectories.</p><p>The rest of this article assumes you have some familiarity with <code>.js</code>, <code>.html</code>, and <code>.css</code>. <strong>In short: <code>.html</code> is the skeleton of a web page, <code>.css</code> is its clothing, and <code>.js</code> is its soul.</strong></p><p>The files we care about most are:</p><ul><li><code>manifest.json</code>: The configuration file containing the extension’s name, version, permissions, etc.—similar to Android’s <code>AndroidManifest.xml</code>.</li><li><code>background.js</code>: The background script that handles the extension’s interactions and global logic.</li><li><code>content.js</code>: The content script injected into pages, used to modify page content, intercept requests, etc.</li></ul><p><code>manifest.json</code> specifies the paths to <code>background.js</code>, <code>content.js</code>, and other files, while <code>.html</code> files typically describe the extension’s UI, and may also include <code>.js</code> or <code>.css</code> scripts and stylesheets.</p><h3 id="What-is-reverse-engineering"><a href="#What-is-reverse-engineering" class="headerlink" title="What is reverse engineering?"></a>What is reverse engineering?</h3><p>In this article, “reverse engineering” is essentially a fancy word for “cracking.” If you’ve had some reverse engineering experience, or have heard about it, you might picture something like this:</p><p><img src="https://s2.loli.net/2024/10/10/4oCfVFA7JvUcg1E.png" alt="Pasted image 20241009235501" loading="lazy"></p><p>But in reality, reverse engineering a browser extension is much simpler than that. It looks more like this:</p><p><img src="https://s2.loli.net/2024/10/10/Ao7qNaRbZHyJP4l.png" alt="PixPin_2024-10-09_23-56-42" loading="lazy"></p><p>To put it plainly, it’s about sifting through tens of thousands of lines of minified, obfuscated code, using search tools to locate the key logic, and making (often very simple) modifications to unlock premium features.</p><p>Of course, this may not be hard for readers with some coding background, but cracking still requires certain methods and techniques. The main goal of this article is to share some of those methods and techniques based on my experience, so you can avoid common pitfalls.</p><h3 id="Can-every-extension-be-cracked"><a href="#Can-every-extension-be-cracked" class="headerlink" title="Can every extension be cracked?"></a>Can every extension be cracked?</h3><p>Not necessarily. If an extension’s core functionality depends on the cloud (e.g., immersive translation) and the cloud performs authentication, there’s very little you can do locally.</p><p>However, if the functionality relies on local code and the cloud only handles membership verification, then it can usually be cracked. In fact, such extensions are almost certainly crackable.</p><p>But what you should really ask yourself is: <strong>Is this extension worth my time to crack the premium features? Compared to just paying for it, what do I gain and what do I lose?</strong></p><p>Just like setting a traditional password for your account—theoretically, no password is uncrackable. Setting a password is a trade-off between convenience and security. From the cracker’s perspective, when <strong>the cost of cracking exceeds the benefit</strong>, no one will bother with such a thankless task.</p><p>So before cracking an extension, think carefully about what you stand to gain and lose.</p><h2 id="Reverse-Engineering-Knowledge-and-Tools"><a href="#Reverse-Engineering-Knowledge-and-Tools" class="headerlink" title="Reverse Engineering Knowledge and Tools"></a>Reverse Engineering Knowledge and Tools</h2><p>Required:</p><ul><li>A browser: you need one, obviously…</li><li>Basic JavaScript syntax</li><li>An IDE: a tool for actually modifying code. VSCode-style editors are recommended.</li></ul><p>Optional:</p><ul><li>HTML/CSS</li><li>Debugging tools: Chrome DevTools</li><li>Regular expressions: for matching code or batch replacements</li><li>Git: for tracking your cracking changes, making it easy to roll back</li><li>Code beautifiers and deobfuscation tools, covered later</li></ul><h3 id="Basic-JavaScript-Syntax"><a href="#Basic-JavaScript-Syntax" class="headerlink" title="Basic JavaScript Syntax"></a>Basic JavaScript Syntax</h3><p>To crack a browser extension, you at minimum need some understanding of JavaScript and common syntax, such as:</p><ul><li>What variable types exist?</li><li>What is a function?</li><li>What is an object?</li><li>…</li></ul><p>And so on. In practice, some other concepts are also important, such as:</p><ul><li>Ternary expressions</li><li>Type coercion</li><li>Asynchronous programming</li></ul><h3 id="IDE"><a href="#IDE" class="headerlink" title="IDE"></a>IDE</h3><p>VSCode is recommended for easy code editing and replacement.</p><h3 id="Using-Browser-DevTools-F12"><a href="#Using-Browser-DevTools-F12" class="headerlink" title="Using Browser DevTools (F12)"></a>Using Browser DevTools (F12)</h3><p>Knowing some <strong>basic operations</strong> helps, though you may not always need them in practice.</p><h3 id="Regular-Expressions"><a href="#Regular-Expressions" class="headerlink" title="Regular Expressions"></a>Regular Expressions</h3><p>Regular expressions are patterns used to match character combinations in strings. They let you find all parts of the code that match specific rules.</p><p>For example, to find all occurrences of something like <code>e.user.vip</code> in minified code, you could use a regex like this:</p><figure class="highlight plaintext"><table><tbody><tr><td class="gutter"><pre><span class="line">1</span><br></pre></td><td class="code"><pre><span class="line">[a-zA-Z]+\.user\.vip</span><br></pre></td></tr></tbody></table></figure><h3 id="Git"><a href="#Git" class="headerlink" title="Git"></a>Git</h3><p>Git is a distributed version control system used to manage code changes.</p><p>Honestly, this tool is optional, but in several of my cracking sessions, I’ve replaced key code and then broken the extension entirely, forcing me to start from scratch. With Git, you can <strong>save snapshots before and after key changes, making it easy to roll back</strong>.</p><p>Another advantage: if the extension updates and you think it’s worth cracking again, you can <strong>follow the original cracking process</strong> and apply the same changes to the new version.</p><h3 id="Code-Beautification-and-Deobfuscation"><a href="#Code-Beautification-and-Deobfuscation" class="headerlink" title="Code Beautification and Deobfuscation"></a>Code Beautification and Deobfuscation</h3><p>When you first get an extension, the code is rarely as clean as the earlier screenshot—it’s usually <strong>minified and obfuscated</strong>.</p><p><img src="https://s2.loli.net/2024/10/10/sUbNFW29y5zfev4.png" alt="PixPin_2024-10-10_00-18-08" loading="lazy"></p><p>This isn’t because the author deliberately wrote it this way—it’s the result of running the code through minification and obfuscation tools after writing it.</p><p>But in my experience, extension authors rarely obfuscate code very deeply. What they typically do is <strong>replace variable, function, and class names with meaningless names</strong> (usually short uppercase/lowercase letters), or rewrite certain code into <strong>harder-to-read forms</strong>—like replacing booleans with <code>!0</code> and <code>!1</code>, heavily using ternary expressions, <code>boolean &amp;&amp; (execute logic)</code> patterns, and so on. However, <strong>property names of classes</strong> usually remain unchanged, which becomes a key anchor for our reverse engineering analysis.</p><p>Below is a typical code snippet. The red box highlights replaced meaningless names, the green box shows unchanged class properties, and the yellow box shows code that’s been transformed into a more obscure form.</p><p><img src="https://s2.loli.net/2024/10/10/HywlAu4LQOS7t5e.png" alt="PixPin_2024-10-10_10-23-17" loading="lazy"></p><p>Further reading on obfuscation: <a href="http://jartto.wang/2017/10/31/js-anti-aliasing/">JS Deobfuscation - Jartto’s blog</a></p><p>Generally, we use a code formatter to de-minify the extension’s code (mainly <code>.js</code> files), and then we can start cracking. VSCode and other IDEs have built-in formatting, but they can’t batch-format all of the extension’s code. <del>Here’s a <a href="https://github.com/shiquda/code-readable">Python script</a> I wrote earlier that can <strong>format</strong> all <code>.js</code>, <code>.css</code>, <code>.html</code>, and <code>.json</code> files in a project.</del></p><p>It’s better to use <code>prettier</code> for formatting. After installing <code>prettier</code>, you can format everything in the extension directory with a single command:</p><figure class="highlight bash"><table><tbody><tr><td class="gutter"><pre><span class="line">1</span><br></pre></td><td class="code"><pre><span class="line">prettier --write .</span><br></pre></td></tr></tbody></table></figure><h2 id="Basic-Reverse-Engineering-Workflow"><a href="#Basic-Reverse-Engineering-Workflow" class="headerlink" title="Basic Reverse Engineering Workflow"></a>Basic Reverse Engineering Workflow</h2><h3 id="Download-and-Install-the-Extension"><a href="#Download-and-Install-the-Extension" class="headerlink" title="Download and Install the Extension"></a>Download and Install the Extension</h3><h4 id="Download"><a href="#Download" class="headerlink" title="Download"></a>Download</h4><p>I recommend <a href="https://www.crxsoso.com/">crxsoso</a> for downloads—it’s accessible from China and lets you download the extension package directly as a <code>.zip</code>.</p><h4 id="Install"><a href="#Install" class="headerlink" title="Install"></a>Install</h4><p>For testing, I recommend using <strong>Chrome</strong> with a fresh user profile dedicated to testing. <strong>Avoid using your main browser</strong> so you can rule out interference from other extensions or scripts.</p><p><img src="https://s2.loli.net/2024/10/10/e7mu8finl4zMkp9.png" alt="PixPin_2024-10-10_14-18-32" loading="lazy"></p><p>Extract the package to a suitable location, then open <code>chrome://extensions</code> in the browser, enable Developer Mode, click “Load unpacked,” and select the extracted extension directory.</p><h3 id="Cracking-Strategy"><a href="#Cracking-Strategy" class="headerlink" title="Cracking Strategy"></a>Cracking Strategy</h3><p>The core strategy is to find the code (often in <code>background.js</code>) that <strong>checks membership status</strong>, and modify it.</p><p>Of course, we can’t read through tens of thousands of lines of obscure code with our bare eyes. Instead, we use techniques to <strong>locate</strong> the key code.</p><p>If you’re not sure which file it’s in, that’s fine—you can use <strong>global search</strong> to search across all code in the extension directory.</p><p>So, how do you locate the key code?</p><h3 id="Locating-the-Key-Code"><a href="#Locating-the-Key-Code" class="headerlink" title="Locating the Key Code"></a>Locating the Key Code</h3><p>I generally use two approaches:</p><ol><li><p>Search globally for keywords like <code>vip</code>, <code>会员</code>, <code>pro</code>, <code>premium</code>, <code>subscription</code>, and see if you can find corresponding class properties. Use those as a springboard to find the core logic and modify it.</p></li><li><p>Start from <strong>strings</strong>. While using the extension, find membership-related strings—like “This is a premium feature,” “您尚未开通会员,” “Free user,” etc.—then search globally for those strings and examine the surrounding code logic to find the core logic.</p></li></ol><p>Generally, I recommend the <strong>second approach</strong> because it lets you quickly pinpoint the key logic. The first approach is more of a fallback when you have no leads.</p><p>One thing to note: if the text is in a non-English language like Chinese, the characters in the extension code may be escaped. If you can’t find the string, try <strong>escaping the file</strong>, or search for the <strong>unescaped string</strong>.</p><p>Here’s a handy developer tool collection called <a href="https://ctool.dev/">Ctools</a>. It supports multiple platforms (including online use and a browser extension), is open source and free—no more hunting for random “online tools” on the web 😄</p><p><img src="https://s2.loli.net/2024/10/10/2SMVli9dL3jBQzZ.png" alt="PixPin_2024-10-10_10-57-29" loading="lazy"></p><p>Searching for the escaped string:</p><p><img src="https://s2.loli.net/2024/10/10/ag6nj4dBGUJcOXv.png" alt="PixPin_2024-10-10_11-01-58" loading="lazy"></p><h3 id="Modifying-the-Code"><a href="#Modifying-the-Code" class="headerlink" title="Modifying the Code"></a>Modifying the Code</h3><p>Once you’ve located the key code, most modifications revolve around boolean expressions.</p><p>For example, if the code has logic like:</p><figure class="highlight javascript"><table><tbody><tr><td class="gutter"><pre><span class="line">1</span><br><span class="line">2</span><br><span class="line">3</span><br><span class="line">4</span><br><span class="line">5</span><br></pre></td><td class="code"><pre><span class="line"><span class="keyword">if</span> (isVip) {</span><br><span class="line">    <span class="comment">// Execute VIP logic</span></span><br><span class="line">} <span class="keyword">else</span> {</span><br><span class="line">    <span class="comment">// Execute non-VIP logic</span></span><br><span class="line">}</span><br></pre></td></tr></tbody></table></figure><p>We can change <code>isVip</code> to <code>true</code> or <code>1</code>, making the extension think you’re a member. That’s the simplest example, of course—real code is often more complex, but the core idea is the same.</p><h3 id="Testing"><a href="#Testing" class="headerlink" title="Testing"></a>Testing</h3><p>After modifying the code, you need to test it. Find the extension’s official website (if any) and click on Pricing—that’s usually where free vs. premium feature comparisons are shown.</p><p><img src="https://s2.loli.net/2024/10/10/TiBSjbnGOyYIvfm.png" alt="Pasted image 20241010141322" loading="lazy"></p><h2 id="Hands-On-Demonstration"><a href="#Hands-On-Demonstration" class="headerlink" title="Hands-On Demonstration"></a>Hands-On Demonstration</h2><p>Let’s walk through the cracking process using a specific extension as an example. <a href="https://www.crxsoso.com/webstore/detail/dpphkcfmnbkdpmgneljgdhfnccnhmfig">Extension download link</a></p><p>After extracting and installing, run the beautification script first to unfold the compressed code.</p><p><img src="https://s2.loli.net/2024/10/10/SvwXUf3nGb6om1l.png" alt="PixPin_2024-10-10_15-07-14" loading="lazy"></p><p>Turns out <code>background.js</code> has over 100,000 lines.</p><p><img src="https://s2.loli.net/2024/10/10/BUavXmZRJjrihyM.png" alt="PixPin_2024-10-10_15-09-06" loading="lazy"></p><p>Back in the browser, open the extension, log in, and you’ll see a prompt encouraging you to upgrade to premium.</p><p><img src="https://s2.loli.net/2024/10/10/564WkCgZcU8ps2A.png" alt="PixPin_2024-10-10_15-03-03" loading="lazy"></p><p>Searching for this string yields no results.</p><p><img src="https://s2.loli.net/2024/10/10/3DGYAVq5Nes2TZp.png" alt="PixPin_2024-10-10_15-11-04" loading="lazy"></p><p>So let’s try searching for the Unicode-escaped version of the string.</p><figure class="highlight txt"><table><tbody><tr><td class="gutter"><pre><span class="line">1</span><br></pre></td><td class="code"><pre><span class="line">\u5347\u7ea7\u4f1a\u5458\u4eab\u66f4\u591a\u9ad8\u7ea7\u6743\u76ca</span><br></pre></td></tr></tbody></table></figure><p>Found a string.</p><p><img src="https://s2.loli.net/2024/10/10/lxyr5opIjZmKSCO.png" alt="PixPin_2024-10-10_15-13-35" loading="lazy"></p><p>Let’s take the parent element name <code>upgradeToPremiumTitle</code> and search for that.</p><p><img src="https://s2.loli.net/2024/10/10/7zl4DaVhuctrEGf.png" alt="PixPin_2024-10-10_15-17-35" loading="lazy"></p><p>Nothing valuable nearby, so let’s try another angle—this time starting from actual functionality.</p><p><img src="https://s2.loli.net/2024/10/10/FwiDx2ElOLbj5hk.png" alt="PixPin_2024-10-10_15-19-58" loading="lazy"></p><p>Clicking “New Wordbook” redirects to a premium upgrade page. Using the same approach as before, we search for “新建词本” and get the name <code>creatNewWordBook</code>. Search for that.</p><p><img src="https://s2.loli.net/2024/10/10/5zu79einFKc6lpU.png" alt="PixPin_2024-10-10_15-22-29" loading="lazy"></p><p>We see a <code>previlege</code>—this is likely the property that tracks whether the user is a member. <del>(Turns out it wasn’t; it’s actually a property that determines whether a wordbook is premium-only.)</del></p><p>Continuing the search, it looks promising—we find several expressions that compare against <code>"VIP"</code>.</p><p><img src="https://s2.loli.net/2024/10/10/IKHfpo2Ss7kwbdt.png" alt="PixPin_2024-10-10_15-24-27" loading="lazy"></p><p>We need to modify all the <code>privilege</code> check logic. A simple approach is to replace expressions like <code>y.privilg</code> with <code>"vip"</code>.</p><p>Wait—before replacing, let’s initialize Git locally so we can roll back later.</p><p><img src="https://s2.loli.net/2024/10/10/aNV5f7bqSFdRzXy.png" alt="file_1728545278865_460" loading="lazy"><br><img src="https://s2.loli.net/2024/10/10/FSwOaU862573XEM.png" alt="PixPin_2024-10-10_15-27-43" loading="lazy"></p><p>Just commit everything as-is.</p><p>Now modify all the check logic we found.</p><p><img src="https://s2.loli.net/2024/10/10/KOtoCjb1Yf2nv5s.png" alt="PixPin_2024-10-10_15-35-18" loading="lazy"></p><p>After saving, refresh the extension on the extensions management page.</p><p><img src="https://s2.loli.net/2024/10/10/fux2Cz9UqWKY1sP.png" alt="PixPin_2024-10-10_15-37-15 1" loading="lazy"></p><p>Testing shows the feature still isn’t unlocked. Time to find another entry point.</p><p>Search for this string:</p><p><img src="https://s2.loli.net/2024/10/10/4yT6SUJvQa8ZMkX.png" alt="PixPin_2024-10-10_15-50-58" loading="lazy"></p><p><img src="https://s2.loli.net/2024/10/10/Jyl1KGITOYWvaqs.png" alt="PixPin_2024-10-10_15-53-01" loading="lazy"></p><p>This is a ternary expression. Use <code>Ctrl</code> + left-click on the <code>Hr</code> function to jump to its definition.</p><p><img src="https://s2.loli.net/2024/10/10/fZPvtTL2eyYgaox.png" alt="PixPin_2024-10-10_15-55-19" loading="lazy"></p><p>Looks like it’s checking whether the membership has expired. Let’s just make it return <code>1</code>.</p><p><img src="https://s2.loli.net/2024/10/10/17C8VNhB5yz46MP.png" alt="PixPin_2024-10-10_15-57-12" loading="lazy"></p><p>Also, searching for <code>expireAt</code> reveals the same function in <code>index.js</code>—let’s change that one too.</p><p>After refreshing, it now shows we’re a member.</p><p>Let’s say we stop cracking here. Now let’s check whether the various <a href="https://cn.relingo.net/zh/pricing">premium features</a> actually work.</p><p><img src="https://s2.loli.net/2024/10/10/oVe4LMNjdAHkRf7.png" alt="PixPin_2024-10-10_15-56-30" loading="lazy"></p><p>The advanced translation engine doesn’t work—there must be server-side validation, which is expected. So using credits for that won’t work either.</p><p><img src="https://s2.loli.net/2024/10/10/ATWCzxvwPVqjXF3.png" alt="PixPin_2024-10-10_16-01-06" loading="lazy"></p><p>The English-English dictionary works fine.</p><p><img src="https://s2.loli.net/2024/10/10/qcONkfzrl6dt4bx.png" alt="PixPin_2024-10-10_16-57-39 1" loading="lazy"></p><p>Advanced/professional wordbooks no longer redirect to the upgrade page when clicked, but nothing happens after waiting a while.</p><p><img src="https://s2.loli.net/2024/10/10/YpOwaoz9tyQRVFS.png" alt="PixPin_2024-10-10_16-58-24" loading="lazy"></p><p>Packet capture reveals server-side validation. Setting that aside for now.</p><p><img src="https://s2.loli.net/2024/10/10/bsjew8pShuHCQmY.png" alt="PixPin_2024-10-10_17-01-20" loading="lazy"></p><p>Advanced definitions—couldn’t find this feature; guessing it’s AI definitions. Testing shows the server also requires a premium upgrade.</p><p>AI grammar analysis—couldn’t find this feature either.</p><p>Unlimited word storage: in the version I previously cracked (v3.9.0), I could add words without limit. But this version won’t allow it—after 50 words, the server returns an error.</p><blockquote><p>This is another benefit of using Git: I didn’t save my previous reverse engineering process, and I completely forgot how I did it 💦</p></blockquote><p><img src="https://s2.loli.net/2024/10/10/M63wWfLcaqRhzps.png" alt="PixPin_2024-10-10_18-11-04" loading="lazy"></p><p>I guessed the older version might not have had cloud validation, but packet capture analysis shows both versions require cloud validation.</p><p><img src="https://s2.loli.net/2024/10/10/c2Ube5sl1gkxt3z.png" alt="PixPin_2024-10-10_17-44-17" loading="lazy"></p><p>Careful analysis reveals the difference: they send requests to different API domains. <code>api.relingo.net</code> doesn’t check whether you’ve exceeded the 50-word free limit, while <code>cn.relingo.net</code> does. So I searched for keywords and found a key name, <code>endPoint</code>, which seems to represent the API domain.</p><p><img src="https://s2.loli.net/2024/10/10/4Um6MivV7zRQprn.png" alt="PixPin_2024-10-10_17-40-35" loading="lazy"></p><p>I tried modifying the relevant logic to force the request domain to <code>api.relingo.net</code>.</p><p><img src="https://s2.loli.net/2024/10/10/flNarnqU5uXkAzd.png" alt="PixPin_2024-10-10_17-43-07 1" loading="lazy"></p><p>But it still doesn’t work after the change…</p><p>Strange—both requests now go to the same domain. What else could it be?</p><p>No choice but to compare the <code>cURL</code> commands of both requests using a <a href="https://diffsuite.com/">string comparison tool</a>:</p><p><img src="https://s2.loli.net/2024/10/10/IQ9fgujD2ZtBFSA.png" alt="PixPin_2024-10-10_18-24-42" loading="lazy"></p><p>Only a few minor differences. Could it be a version difference? I modified <code>manifest.json</code> to change the new version back to 3.9.0, tested again, and it actually worked. I never expected the server to validate based on version 😅</p><p>So I found the code that sends the version parameter, forced it to 3.9.0, and tested—now I can add words without limit.</p><p><img src="https://s2.loli.net/2024/10/10/CgPcYnqfoUebOpF.png" alt="PixPin_2024-10-10_18-07-48" loading="lazy"></p><p>Example sentences weren’t tested—let’s guess they work too <del>probably?</del></p><p>Exporting words seems to be a free feature actually. Exporting to Anki requires server-side processing and can’t be cracked for now.</p><p>The four features below—creating personal wordbooks, enabling multiple wordbooks, sense editing, and study statistics—all work after testing.</p><p>So here’s a summary of what works:</p><ul><li><input disabled="" type="checkbox"> Advanced translation engine</li><li><input disabled="" type="checkbox"> Advanced translation engine credits</li><li><input checked="" disabled="" type="checkbox"> English-English dictionary</li><li><input disabled="" type="checkbox"> Advanced/professional wordbooks</li><li><input disabled="" type="checkbox"> Advanced definitions</li><li><input disabled="" type="checkbox"> AI grammar analysis</li><li><input checked="" disabled="" type="checkbox"> Unlimited word storage</li><li><input checked="" disabled="" type="checkbox"> Unlimited example sentence storage</li><li><input checked="" disabled="" type="checkbox"> Import/export words</li><li><input disabled="" type="checkbox"> Export to Anki</li><li><input checked="" disabled="" type="checkbox"> Create personal wordbooks</li><li><input checked="" disabled="" type="checkbox"> Enable multiple wordbooks</li><li><input checked="" disabled="" type="checkbox"> Sense editing</li><li><input checked="" disabled="" type="checkbox"> Study statistics</li></ul><h2 id="Reverse-Engineering-and-Anti-Reverse-Engineering"><a href="#Reverse-Engineering-and-Anti-Reverse-Engineering" class="headerlink" title="Reverse Engineering and Anti-Reverse Engineering"></a>Reverse Engineering and Anti-Reverse Engineering</h2><h3 id="Is-reverse-engineering-“right”"><a href="#Is-reverse-engineering-“right”" class="headerlink" title="Is reverse engineering “right”?"></a>Is reverse engineering “right”?</h3><p>Before wrapping up, I’d like to share my thoughts on extension cracking itself, from both the cracker’s and the developer’s perspective.</p><p>Is cracking extensions “<strong>right</strong>“? From a moral standpoint, I believe <strong>it’s clearly not</strong>—it obviously infringes on the author’s rights.</p><p><strong>Therefore, the purpose of this tutorial is purely to spread relevant knowledge for learning and exchange. It’s not recommended to casually use or imitate these techniques, let alone profit from them. Any disputes arising from such use are not the author’s responsibility.</strong></p><p>That said, in reality, some extensions are priced unreasonably, making them unaffordable for users, or the payment channels are too narrow—which means many great products struggle to reach the customers they deserve. This is actually disadvantageous to developers too. In this regard, I think <strong>SimpRead</strong> is a great example: its one-time purchase model and reasonable pricing mean very few people are motivated to crack it.</p><h3 id="I’m-an-extension-developer—how-can-I-reduce-cracking"><a href="#I’m-an-extension-developer—how-can-I-reduce-cracking" class="headerlink" title="I’m an extension developer—how can I reduce cracking?"></a>I’m an extension developer—how can I reduce cracking?</h3><p>For developers, here are some suggestions:</p><h4 id="Use-obfuscation-tools"><a href="#Use-obfuscation-tools" class="headerlink" title="Use obfuscation tools"></a>Use obfuscation tools</h4><p>Use obfuscation tools to lower the cost-benefit ratio for reverse engineers.</p><h4 id="Tightly-integrate-with-the-cloud"><a href="#Tightly-integrate-with-the-cloud" class="headerlink" title="Tightly integrate with the cloud"></a>Tightly integrate with the cloud</h4><p><strong>Tie your product’s features tightly to the cloud</strong> and enforce validation on the backend, rather than having the cloud simply handle membership checks. But this depends on the nature of the product and will add some <strong>cost</strong>.</p><h4 id="Price-reasonably"><a href="#Price-reasonably" class="headerlink" title="Price reasonably"></a>Price reasonably</h4><p>Consider what your target audience can afford—<strong>price reasonably</strong> and offer promotions, education discounts, and similar programs.</p><h4 id="Keep-updating"><a href="#Keep-updating" class="headerlink" title="Keep updating"></a>Keep updating</h4><p>Continuously ship <strong>new features</strong> that attract users. Since cracked versions can’t auto-update, if you keep releasing compelling features, users who need them will naturally choose to subscribe rather than waste time hunting for cracks or cracking the extension themselves.</p><h4 id="Consider-open-source-free"><a href="#Consider-open-source-free" class="headerlink" title="Consider open source / free"></a>Consider open source / free</h4><p>😊</p><hr><h2 id="References"><a href="#References" class="headerlink" title="References"></a>References</h2><ol><li><a href="https://developer.mozilla.org/zh-CN/docs/Mozilla/Add-ons/WebExtensions">Browser Extensions - Mozilla | MDN</a></li><li><a href="https://developer.chrome.com/docs/extensions?hl=zh-cn">Chrome Extensions | Chrome for Developers</a></li><li><a href="http://jartto.wang/2017/10/31/js-anti-aliasing/">JS Deobfuscation - Jartto’s blog</a></li></ol>]]>
    </content>
    <id>https://shiquda.link/en/guide-on-browser-extension-inverse-engineering/</id>
    <link href="https://shiquda.link/en/guide-on-browser-extension-inverse-engineering/"/>
    <published>2024-10-10T11:18:39.000Z</published>
    <summary>This article introduces four parts: basic concepts, reverse engineering knowledge and tools, the basic reverse engineering workflow, and practical reverse engineering. It concludes with the author's thoughts on reverse engineering and anti-reverse engineering.</summary>
    <title>Browser Extension Reverse Engineering: A Guide</title>
    <updated>2025-03-06T11:59:39.000Z</updated>
  </entry>
  <entry>
    <author>
      <name>shiquda</name>
    </author>
    <category term="寻觅周刊" scheme="https://shiquda.link/categories/%E5%AF%BB%E8%A7%85%E5%91%A8%E5%88%8A/"/>
    <category term="资源" scheme="https://shiquda.link/tags/%E8%B5%84%E6%BA%90/"/>
    <content>
      <![CDATA[<h2 id="Preface"><a href="#Preface" class="headerlink" title="Preface"></a>Preface</h2><p>This is the 4th issue of <em>Seeking Weekly</em>. Due to the National Day holiday, this issue only contains some tool recommendations. Apologies~~</p><p>Welcome to subscribe to this weekly’s <a href="https://shiquda.link/categories/%E5%AF%BB%E8%A7%85%E5%91%A8%E5%88%8A/rss.xml">RSS</a>.</p><h2 id="Sources"><a href="#Sources" class="headerlink" title="Sources"></a>Sources</h2><p>No source recommendations this issue.</p><h2 id="Resources"><a href="#Resources" class="headerlink" title="Resources"></a>Resources</h2><p>No resource recommendations this issue.</p><h2 id="Tools"><a href="#Tools" class="headerlink" title="Tools"></a>Tools</h2><h3 id="Reqable-A-New-Generation-API-Debugging-Testing-and-Packet-Capture-Tool"><a href="#Reqable-A-New-Generation-API-Debugging-Testing-and-Packet-Capture-Tool" class="headerlink" title="Reqable: A New Generation API Debugging&#x2F;Testing and Packet Capture Tool"></a>Reqable: A New Generation API Debugging&#x2F;Testing and Packet Capture Tool</h3><p><img src="https://reqable.com/zh-CN/assets/medias/arts_zh-68a043a67c48db92502101c1a717e99a.mp4" loading="lazy"></p><p><a href="https://reqable.com/zh-CN/">Reqable</a> is a cross-platform HTTP development and debugging tool designed to provide efficient API testing and packet capture debugging for developers and testers.</p><p><img src="https://s2.loli.net/2024/10/06/jHxJprmuW5g4YP1.png" alt="Pasted image 20241006202218" loading="lazy"></p><p>Does this icon look familiar? That’s right, this new product was created by the team behind the original “<strong>Little Yellow Bird</strong>“ <strong>HttpCanary</strong>.</p><blockquote><p>What is Reqable?<br><strong>Reqable &#x3D; Fiddler + Charles + Postman</strong></p></blockquote><p>This tool currently has a <strong>free Community Edition</strong>, and also offers Professional and Enterprise editions. For the author, who <del>occasionally uses it for Android packet capture</del>, the Community Edition is more than enough, and it’s even friendlier on newer systems like Android 14. After all, the classic Little Yellow Bird is no longer maintained.</p><h3 id="Three-Finger-Drag-on-Windows-Touchpads-macOS-Style"><a href="#Three-Finger-Drag-on-Windows-Touchpads-macOS-Style" class="headerlink" title="Three-Finger Drag on Windows Touchpads, macOS-Style"></a>Three-Finger Drag on Windows Touchpads, macOS-Style</h3><p><a href="https://github.com/ClementGre/ThreeFingerDragOnWindows">ThreeFingerDragOnWindows</a> is an open-source tool that lets you drag windows using the touchpad. It’s now available on the <a href="https://apps.microsoft.com/detail/9msx91wqcm2v?hl=zh-cn&gl=CN">Microsoft Store</a>.</p><h3 id="Spotube-An-Open-Source-Cross-Platform-Spotify-Client-Without-a-Premium-Subscription"><a href="#Spotube-An-Open-Source-Cross-Platform-Spotify-Client-Without-a-Premium-Subscription" class="headerlink" title="Spotube: An Open-Source, Cross-Platform Spotify Client Without a Premium Subscription"></a>Spotube: An Open-Source, Cross-Platform Spotify Client Without a Premium Subscription</h3><p><a href="https://github.com/KRTirtho/spotube">Spotube</a> is an <strong>open-source, cross-platform</strong> Spotify client that uses Spotify’s data API with YouTube, Piped.video, or JioSaavn as audio sources, letting users enjoy high-quality music without a Spotify Premium subscription.</p><p><img src="https://s2.loli.net/2024/10/06/WRqxK5lJbmPL3gS.png" alt="Pasted image 20241006203600" loading="lazy"></p><p>It supports <strong>logging in with Spotify</strong> to listen to your familiar playlists, but with better audio quality (using other sources like YouTube Music). It also supports <strong>anonymous listening</strong>. And of course, <strong>no ads</strong>.</p><p><img src="https://s2.loli.net/2024/10/06/iG5wqBxs3JhNApf.png" alt="PixPin_2024-10-06_21-17-51" loading="lazy"></p><p>The downside is that it doesn’t support Spotify shows and podcasts, and it seems to lack Spotify’s Smart Shuffle.</p><p>PS: If you run into proxy issues, check out this <a href="https://github.com/KRTirtho/spotube/issues/88">Issue</a>.</p><h3 id="Buzz-An-Easy-to-Use-Audio-to-Text-Tool"><a href="#Buzz-An-Easy-to-Use-Audio-to-Text-Tool" class="headerlink" title="Buzz: An Easy-to-Use Audio-to-Text Tool"></a>Buzz: An Easy-to-Use Audio-to-Text Tool</h3><p><img src="https://s2.loli.net/2024/10/06/6qAQGmEWT3Rn4tz.png" alt="Pasted image 20241006211411" loading="lazy"></p><p><a href="https://github.com/chidiwilliams/buzz">Buzz</a> is an open-source tool that uses OpenAI’s open-source Whisper model to transcribe audio to text. It’s easy to use and produces good results.</p><p><img src="https://s2.loli.net/2024/10/06/qtbGkTponwJy15X.png" alt="PixPin_2024-10-06_21-18-55" loading="lazy"></p><p>It supports exporting to <code>txt</code>, <code>srt</code>, or <code>vtt</code> formats. In my tests with the Medium model, export time was roughly equal to the audio duration.</p><h3 id="json4u-JSON-Visualization"><a href="#json4u-JSON-Visualization" class="headerlink" title="json4u: JSON Visualization"></a>json4u: JSON Visualization</h3><p><a href="https://json4u.com/editor">JSON for you</a> is an online JSON visualization tool.</p><p><img src="https://s2.loli.net/2024/10/06/ZhQvpIcUAjuE64z.png" alt="PixPin_2024-10-06_21-21-26" loading="lazy"></p><hr><p>If you enjoy my content, feel free to leave a comment—it gives me the motivation to keep writing this weekly. If you have suggestions for this newsletter, your comments are just as welcome!</p><p>Thanks ♥️!</p>]]>
    </content>
    <id>https://shiquda.link/en/seeking-weekly-4/</id>
    <link href="https://shiquda.link/en/seeking-weekly-4/"/>
    <published>2024-10-06T13:23:34.000Z</published>
    <summary>A curated collection of essential tools and resources for developers and tech enthusiasts, handpicked to boost productivity and spark creativity.</summary>
    <title>Seeking Weekly Issue 4: Tools</title>
    <updated>2024-10-06T13:24:39.000Z</updated>
  </entry>
  <entry>
    <author>
      <name>shiquda</name>
    </author>
    <category term="寻觅周刊" scheme="https://shiquda.link/categories/%E5%AF%BB%E8%A7%85%E5%91%A8%E5%88%8A/"/>
    <category term="资源" scheme="https://shiquda.link/tags/%E8%B5%84%E6%BA%90/"/>
    <content>
      <![CDATA[<h2 id="Preface"><a href="#Preface" class="headerlink" title="Preface"></a>Preface</h2><p>This is the 3rd issue of <em>Seeking Weekly</em>.</p><h2 id="Sources"><a href="#Sources" class="headerlink" title="Sources"></a>Sources</h2><h3 id="IceBeer-Thoughts-on-Indie-Development-and-the-Internet"><a href="#IceBeer-Thoughts-on-Indie-Development-and-the-Internet" class="headerlink" title="IceBeer: Thoughts on Indie Development and the Internet"></a>IceBeer: Thoughts on Indie Development and the Internet</h3><p><a href="https://www.icebeer.top/">🍺 IceBeer - 👋 Sharing my thoughts on indie development and the internet</a></p><p>Submitted by @Ivone. Written for <strong>programmers&#x2F;product managers</strong> or <strong>UX designers</strong>, it shares thoughts and reflections on building products independently, hoping to bring readers some help and fresh perspectives.</p><h3 id="Time-Economic-Observer-Independent-Observations-on-Macroeconomics-Public-Policy-and-Financial-Markets"><a href="#Time-Economic-Observer-Independent-Observations-on-Macroeconomics-Public-Policy-and-Financial-Markets" class="headerlink" title="Time Economic Observer: Independent Observations on Macroeconomics, Public Policy, and Financial Markets"></a>Time Economic Observer: Independent Observations on Macroeconomics, Public Policy, and Financial Markets</h3><p><a href="https://t.me/s/TimeHorizonX">Time Economic Observer – Telegram</a></p><p>You can also subscribe to its RSS via RSSHub.</p><h2 id="Resources"><a href="#Resources" class="headerlink" title="Resources"></a>Resources</h2><h3 id="TGwiki-Telegram-Knowledge-Base"><a href="#TGwiki-Telegram-Knowledge-Base" class="headerlink" title="TGwiki: Telegram Knowledge Base"></a>TGwiki: Telegram Knowledge Base</h3><p><img src="https://s2.loli.net/2024/09/29/bE1jkzQAxCpTfio.png" alt="PixPin_2024-09-29_14-49-19" loading="lazy"></p><p><a href="https://tgnav.github.io/tgwiki/">TGwiki</a> is a rich Telegram knowledge base, including documentation on common features, accounts, and more, helping users use Telegram more effectively.</p><h2 id="Tools"><a href="#Tools" class="headerlink" title="Tools"></a>Tools</h2><h3 id="tabout-Use-Tab-to-Jump-Out-of-Brackets-Quotes-and-More"><a href="#tabout-Use-Tab-to-Jump-Out-of-Brackets-Quotes-and-More" class="headerlink" title="tabout: Use Tab to Jump Out of Brackets, Quotes, and More"></a>tabout: Use Tab to Jump Out of Brackets, Quotes, and More</h3><p><a href="https://marketplace.visualstudio.com/items?itemName=albert.TabOut#review-details">TabOut</a> is a simple VSCode plugin that improves the coding experience. As its name suggests, it lets you use the <code>Tab</code> key to jump out of brackets, quotes, slashes, and other code blocks, and it also supports custom matching characters.</p><p><img src="https://s2.loli.net/2024/09/29/BNwCJA62rmZaGpY.png" alt="PixPin_2024-09-29_13-39-28" loading="lazy"></p><p>Why does this improve efficiency? The reasoning is simple.</p><p>When writing code, we often need to type a lot of brackets and quotes. Modern IDEs usually <strong>auto-complete</strong> the closing bracket when you type an opening one. After finishing the content inside, the most straightforward way is to use the arrow keys to move past the closing bracket, but that requires moving your right hand a long distance (for example, pressing the right arrow key with your pinky).</p><p><img src="https://s2.loli.net/2024/09/29/wzMoKZCFd4NRhc1.png" alt="PixPin_2024-09-29_13-51-02" loading="lazy"></p><p>There is also a compromise: manually typing another closing bracket, but that requires pressing <code>Shift</code> and takes extra time. By switching to the <code>Tab</code> key, you can jump out with a single press for any exit operation, which feels great. Of course, it takes some time to get used to, and whether to use it is entirely up to the reader.</p><h3 id="Nilesoft-Shell-Customize-and-Beautify-the-Windows-Context-Menu"><a href="#Nilesoft-Shell-Customize-and-Beautify-the-Windows-Context-Menu" class="headerlink" title="Nilesoft Shell: Customize and Beautify the Windows Context Menu"></a>Nilesoft Shell: Customize and Beautify the Windows Context Menu</h3><p><a href="https://nilesoft.org/">Nilesoft Shell</a> is a free, open-source software for customizing and beautifying the Windows right-click context menu.</p><p><img src="https://s2.loli.net/2024/09/29/zpjtIPlZ5KLHB1r.png" alt="Pasted image 20240929140543" loading="lazy"></p><p>It supports custom skins and more. Below is a <a href="https://github.com/shiquda/dracula-nilesoft-shell">Dracula-style skin</a> I wrote.</p><p><img src="https://s2.loli.net/2024/09/29/Q12xaJ68iGyrH4T.png" alt="PixPin_2024-09-29_14-06-21" loading="lazy"></p><p>The software has many other features; see the <a href="https://nilesoft.org/">official website</a> for details.</p><h3 id="SponsorBlock-Series-Save-Time-Watching-Videos-with-Crowdsourcing"><a href="#SponsorBlock-Series-Save-Time-Watching-Videos-with-Crowdsourcing" class="headerlink" title="SponsorBlock Series: Save Time Watching Videos with Crowdsourcing"></a>SponsorBlock Series: Save Time Watching Videos with Crowdsourcing</h3><p>Below is an introduction to <a href="https://zh.wikipedia.org/wiki/%E4%BC%97%E5%8C%85"><strong>crowdsourcing</strong></a>. Readers who aren’t interested can skip ahead.</p><blockquote><p>Crowdsourcing is a distributed problem-solving and production model. Problems are broadcast via open tenders to a group of unknown solution providers. The difference between <strong>crowdsourcing and open source</strong> is that open source is a cooperative activity voluntarily initiated and carried out by members of the public, whereas crowdsourcing activities are proposed by a client and carried out on an individual or group basis.</p></blockquote><p><a href="https://sponsor.ajay.app/">SponsorBlock</a> is a well-known <strong>YouTube</strong> enhancement plugin. It automatically skips segments marked by users (such as boring intros, outros, paid promotions, etc.), saving you time.</p><p><img src="https://s2.loli.net/2024/09/29/bFCH9uifGmA1Koz.png" alt="PixPin_2024-09-29_14-23-36" loading="lazy"></p><p>These segments are marked voluntarily by its users. This model is <strong>crowdsourcing</strong>. In theory, the more users participate, the better the experience for every user.</p><blockquote><p>Currently, 13,033,165 users have submitted 13,214,226 skip segments, saving a total of 5,364 years and 182.59 days of time.</p></blockquote><p>The project itself and its data are open source, which has also helped software like <strong>YouTube Revanced</strong>, which integrates this feature into modified app clients.</p><p>Recently, a netizen created a <a href="https://github.com/hanydd/BilibiliSponsorBlock">plugin</a> for Bilibili, ported from the original plugin. If you’re interested, give it a try.</p><h3 id="chsrc-A-Cross-Platform-Universal-Mirror-Source-Switcher-and-Framework"><a href="#chsrc-A-Cross-Platform-Universal-Mirror-Source-Switcher-and-Framework" class="headerlink" title="chsrc: A Cross-Platform Universal Mirror Source Switcher and Framework"></a>chsrc: A Cross-Platform Universal Mirror Source Switcher and Framework</h3><p><a href="https://github.com/RubyMetric/chsrc">chsrc</a> is an open-source, easy-to-use, cross-platform universal tool and framework for switching mirror sources.</p><p>Developers in China are certainly familiar with the concept of “switching sources” (换源). For various reasons, accessing some software package download sources can be slow, so some platforms (such as universities and enterprises) provide faster mirror sources. However, the experience with these mirrors varies across different network environments.</p><p>chsrc provides a unified way to switch sources across all platforms, and it can automatically test the download speed of each source.</p><p><img src="https://s2.loli.net/2024/09/29/oVG1RxZHAaFS4iJ.png" alt="Pasted image 20240929142855" loading="lazy"></p><h3 id="tabGo-Automatically-Group-Browser-Tabs-by-Domain"><a href="#tabGo-Automatically-Group-Browser-Tabs-by-Domain" class="headerlink" title="tabGo: Automatically Group Browser Tabs by Domain"></a>tabGo: Automatically Group Browser Tabs by Domain</h3><p><a href="https://github.com/yz0812/tabGo">tabGo</a> is a <del>newly developed</del> fresh browser extension that automatically groups tabs by domain.</p><p><img src="https://s2.loli.net/2024/09/29/Gmcy7jW3hNOIgpr.png" alt="PixPin_2024-09-29_14-36-09 1" loading="lazy"></p><ol><li>Supports whitelist</li><li>Supports matching by subdomain or top-level domain</li><li>Supports placing groups at the front</li><li>Supports custom group names</li></ol><p>First released on <a href="https://linux.do/t/topic/213344">Browser Extension (Auto-Group by Domain IP Address) - Resource Collection - LINUX DO</a>.</p><p>I’ve been using it and the experience is quite good. I also added a feature to set custom group names. Combined with the OneTab extension recommended last issue (I’ve since switched to KepTab, which is similar), managing tabs has become very comfortable.</p><p><img src="https://s2.loli.net/2024/09/29/H73BGOrxbmaMpNe.png" alt="PixPin_2024-09-29_14-39-04" loading="lazy"></p><h3 id="Are-You-Using-Clash"><a href="#Are-You-Using-Clash" class="headerlink" title="Are You Using Clash?"></a>Are You Using Clash?</h3><p><a href="https://mikewang000000.github.io/ClashScan/">Online Clash Detection (mikewang000000.github.io)</a></p><p><img src="https://s2.loli.net/2024/09/29/hQD8pv9GIcZ4MB2.png" alt="PixPin_2024-09-29_14-59-03" loading="lazy"></p><p>This open-source website can scan your local Clash or other proxy software to check for potential leak risks. If you’re detected, see the <a href="https://www.v2ex.com/t/1076579">V2EX post</a> for details on how to prevent leaks.</p><hr><p>If you enjoy my content, feel free to leave a comment—it gives me the motivation to keep writing this weekly. If you have suggestions for this newsletter, your comments are also very welcome!</p><p>Thanks ♥️!</p>]]>
    </content>
    <id>https://shiquda.link/en/seeking-weekly-3/</id>
    <link href="https://shiquda.link/en/seeking-weekly-3/"/>
    <published>2024-09-29T03:57:29.000Z</published>
    <summary>Seeking Weekly Issue 3: Crowdsourcing</summary>
    <title>Seeking Weekly Issue 3: Crowdsourcing</title>
    <updated>2024-09-29T06:58:13.000Z</updated>
  </entry>
  <entry>
    <author>
      <name>shiquda</name>
    </author>
    <category term="寻觅周刊" scheme="https://shiquda.link/categories/%E5%AF%BB%E8%A7%85%E5%91%A8%E5%88%8A/"/>
    <category term="资源" scheme="https://shiquda.link/tags/%E8%B5%84%E6%BA%90/"/>
    <content>
      <![CDATA[<h2 id="Preface"><a href="#Preface" class="headerlink" title="Preface"></a>Preface</h2><p>This is the 2nd issue of <em>Seeking Weekly</em>. The feedback on the first issue was quite positive, so I plan to keep sharing.</p><p>Unlike the first issue, in addition to the original <strong>Resources</strong> and <strong>Tools</strong> sections, I’ve added a new section: <strong>Sources</strong>. As the saying goes, <strong>give a man a fish and you feed him for a day; teach a man to fish and you feed him for a lifetime</strong>. Sharing what I consider to be high-quality information sources may prove helpful to readers.</p><p>If you have any suggestions for this newsletter, your comments are very welcome!</p><h2 id="Sources"><a href="#Sources" class="headerlink" title="Sources"></a>Sources</h2><blockquote><p>If you use Follow, you can try its latest feature: subscribe to my <a href="https://app.follow.is/list/60577881234766848">source list</a>. I’ve shared some of my information sources there, including the ones featured in this newsletter.</p></blockquote><h3 id="LatePost-Better-late-but-better"><a href="#LatePost-Better-late-but-better" class="headerlink" title="LatePost: Better late, but better"></a>LatePost: Better late, but better</h3><p><a href="https://www.latepost.com/">LatePost (latepost.com)</a></p><p>I believe this platform produces high-quality reporting with considerable depth. The charts and graphics are beautifully crafted.</p><p>“Better late, but better.”</p><p>Readers can also follow its RSS feed or <a href="https://space.bilibili.com/478559884">Bilibili</a> account.</p><h3 id="China-Fact-Check-Verifying-rumors-on-the-Chinese-internet"><a href="#China-Fact-Check-Verifying-rumors-on-the-Chinese-internet" class="headerlink" title="China Fact Check: Verifying rumors on the Chinese internet"></a>China Fact Check: Verifying rumors on the Chinese internet</h3><p><a href="https://chinafactcheck.com/">China Fact Check | International News Fact-Checking (chinafactcheck.com)</a></p><p>Fact-checks international news rumors circulating on the Chinese internet.</p><p><img src="https://s2.loli.net/2024/09/22/oiflkeBvRgXq132.png" alt="PixPin_2024-09-22_14-53-16" loading="lazy"></p><p>If you’re interested, you can also read the <a href="https://chinafactcheck.com/?p=11465">Fact-Checking Handbook</a> compiled by the site to learn basic fact-checking methods and better identify potential misinformation.</p><p>The handbook is licensed under <em>CC BY-NC-SA 4.0</em>, and I believe its quality rivals that of some published works.</p><h2 id="Resources"><a href="#Resources" class="headerlink" title="Resources"></a>Resources</h2><h3 id="Useful-Experience-Tips-that-might-help-you-someday"><a href="#Useful-Experience-Tips-that-might-help-you-someday" class="headerlink" title="Useful Experience: Tips that might help you someday"></a>Useful Experience: Tips that might help you someday</h3><p><a href="https://yyjingyan.com/">Useful Experience</a> is a website for sharing life tips. You can search for life experiences on it, or subscribe to its <a href="https://yyjingyan.com/index.php/feed/">RSS</a>.</p><p><img src="https://s2.loli.net/2024/09/22/PMt2Vs9OdevE3UY.png" alt="PixPin_2024-09-22_14-44-50" loading="lazy"></p><h3 id="AMiner-An-AI-driven-research-information-hub"><a href="#AMiner-An-AI-driven-research-information-hub" class="headerlink" title="AMiner: An AI-driven research information hub"></a>AMiner: An AI-driven research information hub</h3><p><a href="https://www.aminer.cn/">AMiner - AI-Powered Sci-Tech Intelligence - Academic Search - Paper Retrieval - Paper Patents - Literature Tracking - Scholar Profiles</a></p><p><img src="https://s2.loli.net/2024/09/22/eSBsAupoyTxCfrL.png" alt="PixPin_2024-09-22_14-49-04" loading="lazy"></p><h3 id="ML-YouTube-Courses-High-quality-machine-learning-AI-video-courses"><a href="#ML-YouTube-Courses-High-quality-machine-learning-AI-video-courses" class="headerlink" title="ML-YouTube-Courses: High-quality machine learning / AI video courses"></a>ML-YouTube-Courses: High-quality machine learning / AI video courses</h3><p><a href="https://github.com/dair-ai/ML-YouTube-Courses">dair-ai/ML-YouTube-Courses: 📺 Discover the latest machine learning / AI courses on YouTube. (github.com)</a></p><p>This document collects a number of high-quality machine learning / AI video courses, organized by category, with a description and link for each course.</p><h3 id="Xiaolin’s-Illustrated-Computer-Fundamentals-A-great-illustrated-tutorial"><a href="#Xiaolin’s-Illustrated-Computer-Fundamentals-A-great-illustrated-tutorial" class="headerlink" title="Xiaolin’s Illustrated Computer Fundamentals: A great illustrated tutorial"></a>Xiaolin’s Illustrated Computer Fundamentals: A great illustrated tutorial</h3><p><a href="https://xiaolincoding.com/">Xiaolin Coding</a></p><p><img src="https://s2.loli.net/2024/09/22/5ElwtxDSOv4uJzo.png" alt="PixPin_2024-09-22_15-13-17" loading="lazy"></p><p><img src="https://s2.loli.net/2024/09/22/6ZT9PvIiYVWueta.png" alt="PixPin_2024-09-22_15-14-25" loading="lazy"></p><p>It’s quite friendly to self-learners and those with some foundation<del>, though not much</del>.</p><p>You need to <strong>follow its WeChat official account</strong> to read the full content online / download the PDF.</p><h3 id="Tianya-Online-Read-the-legendary-posts-of-yesteryear"><a href="#Tianya-Online-Read-the-legendary-posts-of-yesteryear" class="headerlink" title="Tianya Online: Read the legendary posts of yesteryear"></a>Tianya Online: Read the legendary posts of yesteryear</h3><p><img src="https://s2.loli.net/2024/09/22/L9ol8iz4QxbDk7j.png" alt="PixPin_2024-09-22_15-35-59" loading="lazy"></p><p><a href="https://tianya.at/">Tianya Legendary Posts - 1999~2024 Annual Rankings - Tianya (tianya.at)</a></p><h2 id="Tools"><a href="#Tools" class="headerlink" title="Tools"></a>Tools</h2><h3 id="drawio-An-open-source-lightweight-yet-full-featured-diagram-editor"><a href="#drawio-An-open-source-lightweight-yet-full-featured-diagram-editor" class="headerlink" title="drawio: An open-source, lightweight yet full-featured diagram editor"></a>drawio: An open-source, lightweight yet full-featured diagram editor</h3><p><a href="https://draw.io/">Draw.io</a> is a powerful online diagramming tool, widely used to create various types of diagrams such as flowcharts, mind maps, org charts, UML diagrams, and more. It’s open-sourced on <a href="https://github.com/jgraph/drawio">GitHub</a>.</p><p><img src="https://s2.loli.net/2024/09/22/euTSkzrpFv4MgCQ.png" alt="PixPin_2024-09-22_14-32-39" loading="lazy"></p><p>Before I discovered this tool, I used Microsoft Visio or the domestic <a href="https://www.processon.com/">Processon</a> for flowcharts and architecture diagrams. But the former relies on a bloated client with a poor online editing experience, and while the latter offers a great experience with excellent localization, many of its features require a paid subscription.</p><p>drawio perfectly meets my needs: <strong>simple to use, feature-rich, and lightweight</strong>.</p><p>When creating a diagram, you can choose from its many <strong>free templates</strong>; search the <strong>icon library</strong> to pick any icon you need; and it also has features like <strong>auto-alignment</strong>, <del>a delight for perfectionists</del>. 😄</p><p><img src="https://s2.loli.net/2024/09/22/gxOhtHjNrfJEGsK.png" alt="PixPin_2024-09-22_14-42-27" loading="lazy"></p><p>drawio also has many other features, such as saving to cloud drives like Google Drive, and <strong>free, watermark-free</strong> export to SVG, PDF, and more. If you’re interested, feel free to bookmark it and give it a try when you need it.</p><h3 id="Today’s-Hot-List-Aggregated-trending-lists-from-various-platforms"><a href="#Today’s-Hot-List-Aggregated-trending-lists-from-various-platforms" class="headerlink" title="Today’s Hot List: Aggregated trending lists from various platforms"></a>Today’s Hot List: Aggregated trending lists from various platforms</h3><p><a href="https://rebang.today/">Today’s Hot List - All Platform Rankings</a></p><p><img src="https://s2.loli.net/2024/09/22/gtzKWZVvb2xTer6.png" alt="PixPin_2024-09-22_14-57-53" loading="lazy"></p><p>This site aggregates trending lists from multiple platforms, and you can select a specific platform to browse.</p><h3 id="uBlacklist-Block-spam-sources-in-traditional-search-engines"><a href="#uBlacklist-Block-spam-sources-in-traditional-search-engines" class="headerlink" title="uBlacklist: Block spam sources in traditional search engines"></a>uBlacklist: Block spam sources in traditional search engines</h3><p><a href="https://chromewebstore.google.com/detail/ublacklist/pncfbmialoiaghdehhbnbhkkgmjanfhe">uBlacklist</a> is a browser extension that helps users block low-quality websites, content farms, and other spam from search engine results.</p><p>You can subscribe to blacklist lists:</p><figure class="highlight txt"><table><tbody><tr><td class="gutter"><pre><span class="line">1</span><br></pre></td><td class="code"><pre><span class="line">https://raw.githubusercontent.com/cobaltdisco/Google-Chinese-Results-Blocklist/master/uBlacklist_subscription.txt</span><br></pre></td></tr></tbody></table></figure><p>You can also manually add websites you don’t want to see.</p><p><img src="https://s2.loli.net/2024/09/22/yMiab6AcqXCGZ8T.png" alt="PixPin_2024-09-22_15-09-15" loading="lazy"></p><p>Actually, this extension can do more than that.</p><p>You may have noticed the yellow highlighted content on the left side of the page — that’s achieved using the extension’s highlighting feature, which reminds you during searches: <strong>this is a high-quality source!</strong></p><p>Below are my custom rules, which are fairly basic, for your reference:</p><figure class="highlight txt"><table><tbody><tr><td class="gutter"><pre><span class="line">1</span><br><span class="line">2</span><br><span class="line">3</span><br><span class="line">4</span><br><span class="line">5</span><br><span class="line">6</span><br><span class="line">7</span><br><span class="line">8</span><br><span class="line">9</span><br><span class="line">10</span><br><span class="line">11</span><br><span class="line">12</span><br><span class="line">13</span><br><span class="line">14</span><br></pre></td><td class="code"><pre><span class="line">*://www.douyin.com/*</span><br><span class="line">*://search.bilibili.com/*</span><br><span class="line">*://gitcode.net/*</span><br><span class="line">*://gitcode.com/*</span><br><span class="line">*://gitcode.csdn.net/*</span><br><span class="line">*://www.gitcode.host/*</span><br><span class="line">*://jform2.baidu.com/*</span><br><span class="line">*://blog.csdn.net/*</span><br><span class="line">@1*://*.reddit.com/*</span><br><span class="line">@1*://*.github.com/*</span><br><span class="line">@1*://*.stackoverflow.com/*</span><br><span class="line">@1*://*.cnblogs.com/*</span><br><span class="line">@1*://*.wikipedia.org/*</span><br><span class="line">@1*://*.youtube.com/*</span><br></pre></td></tr></tbody></table></figure><h3 id="Text-Compare-String-comparison-tool"><a href="#Text-Compare-String-comparison-tool" class="headerlink" title="Text Compare: String comparison tool"></a>Text Compare: String comparison tool</h3><p><a href="https://diffsuite.com/">Text Compare: Real-Time Diff &amp; Merge Tool Online | Free (diffsuite.com)</a></p><p><img src="https://s2.loli.net/2024/09/22/u3ycUtQkpBFhXHq.png" alt="PixPin_2024-09-22_15-28-03 1" loading="lazy"></p><p>A simple, elegant string comparison tool.</p><h3 id="Real-Address-Generator"><a href="#Real-Address-Generator" class="headerlink" title="Real Address Generator"></a>Real Address Generator</h3><p><a href="https://realaddress.fuyiran.com/">Real Address Generator (fuyiran.com)</a></p><p>A simple and convenient real address generator. Supports saving the addresses you use.</p><p><img src="https://s2.loli.net/2024/09/22/zAWc7jkrguKtsYB.png" alt="PixPin_2024-09-22_15-30-59" loading="lazy"></p><p><img src="https://s2.loli.net/2024/09/22/ewM9ORGW3ApHqLK.png" alt="PixPin_2024-09-22_15-31-27" loading="lazy"></p><p>Open-sourced on <a href="https://github.com/Adonis142857/Real-Address-Generator">GitHub</a>.</p><hr><p>Welcome to subscribe to this newsletter’s <a href="/categories/%E5%AF%BB%E8%A7%85%E5%91%A8%E5%88%8A/rss.xml">RSS</a>!</p><p>If you enjoy my content, feel free to leave a comment — it motivates me to keep writing this newsletter. If you have any suggestions for this newsletter, your comments are equally welcome!</p><p>Thanks ♥️!</p>]]>
    </content>
    <id>https://shiquda.link/en/seeking-weekly-2/</id>
    <link href="https://shiquda.link/en/seeking-weekly-2/"/>
    <published>2024-09-22T07:37:29.000Z</published>
    <summary>Seeking Weekly Issue 2: Sources</summary>
    <title>Seeking Weekly Issue 2: Sources</title>
    <updated>2024-09-22T03:58:00.000Z</updated>
  </entry>
  <entry>
    <author>
      <name>shiquda</name>
    </author>
    <category term="寻觅周刊" scheme="https://shiquda.link/categories/%E5%AF%BB%E8%A7%85%E5%91%A8%E5%88%8A/"/>
    <category term="资源" scheme="https://shiquda.link/tags/%E8%B5%84%E6%BA%90/"/>
    <content>
      <![CDATA[<h2 id="Introduction"><a href="#Introduction" class="headerlink" title="Introduction"></a>Introduction</h2><p>This is the first issue of <em>Seeking Weekly</em> in its trial run 🎉🎉🎉!</p><p>In this age of <strong>information overload</strong>, <em>finding</em> useful resources is no easy task. Add in the impact of all the AIGC content in recent years, and learning to <em>seek out</em> resources that actually fit your needs from the vast, overwhelming internet has become incredibly important.</p><p><em>Seeking Weekly</em> is dedicated to providing readers with <strong>fresh</strong>, <strong>practical</strong> <strong>resources</strong> and <strong>tools</strong>, covering the <strong>useful</strong> and <strong>interesting</strong> tools the author has come across over the past week, <del>and occasionally a bit of personal bias</del>.</p><p><strong>Get the highest quality information in the least amount of time.</strong></p><p>Welcome to subscribe to this newsletter’s <a href="/categories/%E5%AF%BB%E8%A7%85%E5%91%A8%E5%88%8A/rss.xml">RSS</a>.</p><h2 id="Resources"><a href="#Resources" class="headerlink" title="Resources"></a>Resources</h2><h3 id="Recommended-YouTube-Creators"><a href="#Recommended-YouTube-Creators" class="headerlink" title="Recommended YouTube Creators"></a>Recommended YouTube Creators</h3><ul><li><a href="https://www.youtube.com/@veritasium">Veritasium - YouTube</a>, covering popular science topics like natural sciences and mathematics. <del>Personally a favorite</del></li><li><a href="https://www.youtube.com/@Fireship">Fireship - YouTube</a>, great at introducing computer science knowledge or reporting the latest industry news in just two to three minutes.</li><li><a href="https://www.youtube.com/@xiao_lin_shuo">Xiao Lin Shuo - YouTube</a>, an excellent finance blogger who explains complex topics in simple terms.</li><li><a href="https://www.youtube.com/@bigthink">Big Think - YouTube</a>, exactly as the name suggests.</li><li><a href="https://www.youtube.com/@LinusTechTips">Linus Tech Tips - YouTube</a>, a tech creator.</li><li><a href="https://www.youtube.com/@Vox">Vox - YouTube</a>, explaining the world to you. World, explained.</li></ul><h3 id="Dracula-Dark-Theme-Color-Scheme"><a href="#Dracula-Dark-Theme-Color-Scheme" class="headerlink" title="Dracula: Dark Theme Color Scheme"></a>Dracula: Dark Theme Color Scheme</h3><p><a href="https://draculatheme.com/">Dracula — Dark theme for 300+ apps (draculatheme.com)</a></p><p>Dracula is a theme color scheme I’ve been using consistently, and it covers almost every piece of software you could think of.</p><p>Here’s what I use it with:</p><ul><li>VSCode</li><li>Obsidian</li><li>Windows Terminal</li><li>Zsh</li><li>Zotero</li><li>GitHub (via <a href="https://chromewebstore.google.com/detail/stylus/clngdbkpkpeebahjckkjfobafhncgmne">Stylus</a>)</li><li>Telegram</li><li>Notepad++</li><li>Discourse theme</li><li>Rime Weasel</li><li>Code highlighting</li><li>……</li></ul><p>It makes my computer feel like one cohesive, unified system visually.</p><p><img src="https://s2.loli.net/2024/09/17/x17cI8sSBkCXHp2.png" alt="PixPin_2024-09-17_00-31-31" loading="lazy"></p><p>If you’re interested in this theme, head over to the <a href="https://draculatheme.com/">Dracula website</a> to look up the software you commonly use and give the theme a try.</p><h2 id="Tools"><a href="#Tools" class="headerlink" title="Tools"></a>Tools</h2><h3 id="Cursor-Where-AI-Meets-the-IDE"><a href="#Cursor-Where-AI-Meets-the-IDE" class="headerlink" title="Cursor: Where AI Meets the IDE"></a>Cursor: Where AI Meets the IDE</h3><p><a href="https://www.cursor.com/">Cursor</a> is a code editor centered around <strong>AI-driven</strong> features, built on the well-known open-source IDE: <strong>VSCode</strong>.</p><p>After a few days of hands-on experience, my takeaway is that it dramatically improves how efficiently users can leverage AI for development at the <strong>IDE level</strong>.</p><p>Here’s an intro video for Cursor; you can also watch the full video on their website:</p><video controls crossorigin playsinline preload="metadata">  <source src="https://www.cursor.com/videos/chat.mp4" type="video/mp4">  <track label="thumbnails" default kind="metadata" src="https://image.mux.com/r43MZq02SaHg7uih1xnZs5DPswDnIBFQtu1D6VISv4XE/storyboard.vtt?format=webp">  <track kind="metadata" label="cuepoints" data-removeondestroy>  Your browser does not support the video tag.</video><p>You might ask: is this really that different from GitHub Copilot?</p><p><strong>Yes.</strong> In my view, here’s where it beats Copilot:</p><ol><li>Inline code suggestions (<code>Tab</code> key)</li></ol><p>The familiar <code>Tab</code> key, but:</p><ul><li>Can generate <strong>multi-line</strong> code suggestions at once</li><li>Can <strong>modify</strong> existing code</li></ul><ol start="2"><li><strong>Project</strong>-aware code generation and suggestions</li></ol><p>For your entire project, Cursor provides an <strong>indexing</strong> approach that efficiently extracts information from your local project, feeds it into the Q&amp;A, and improves the accuracy of AI answers and code generation.</p><p><img src="https://s2.loli.net/2024/09/17/LAhuZIF1VU2MByi.png" alt="PixPin_2024-09-16_23-54-51" loading="lazy"></p><ol start="3"><li>Updating code</li></ol><p>After a Q&amp;A session, if you need to insert code to modify your existing code, Cursor also offers an <code>Apply</code> method that intelligently creates a <em>diff</em> of the changes, letting you accept or reject changes line by line.</p><p><img src="https://s2.loli.net/2024/09/17/8fi9EawRc17Gsep.png" alt="PixPin_2024-09-16_23-51-16" loading="lazy"></p><p>Beyond these three points, there are plenty of other practical features. If Cursor piques your interest, give it a try.</p><p>No need to worry about a painful learning curve. If you’ve used VSCode before, Cursor can <strong>import your plugins and settings with one click</strong>, so the transition is seamless.</p><p>Cursor currently offers a 15-day free trial with no credit card required—just sign up with your email. It’s $20&#x2F;month. It also supports OpenAI’s latest <code>o1-mini</code> and <code>o1-preview</code> models. If your trial expires, you can always register with a different email and try it again.</p><h3 id="Follow-A-Next-Generation-Information-Browser"><a href="#Follow-A-Next-Generation-Information-Browser" class="headerlink" title="Follow: A Next-Generation Information Browser"></a>Follow: A Next-Generation Information Browser</h3><p><strong>Follow</strong> is a “next-generation information browser” built by the creator of RSSHub. You can think of it as an online RSS reading platform similar to Feedly.</p><p>It has six sections: articles, social media, images, videos, audio, and notifications.</p><p>It supports importing OPML files, making it easy to migrate from platforms like Feedly, TTRSS, or other readers. With RSSHub, subscribing to creators across different platforms becomes incredibly simple.</p><p><img src="https://s2.loli.net/2024/09/17/97bclj5TP6O4I2X.png" alt="PixPin_2024-09-17_10-11-16" loading="lazy"></p><p>Consolidating resources, escaping filter bubbles, efficiently accessing information, rejecting algorithmic feeds… all the classic RSS advantages go without saying. I believe <strong>Follow</strong>‘s core strength lies in its <strong>community features</strong>—you can discover what feeds other public subscribers follow, making it a powerful way to <strong>uncover high-quality information sources</strong>.</p><p><img src="https://s2.loli.net/2024/09/17/pncwjVsLt6fXObP.png" alt="PixPin_2024-09-16_23-59-08" loading="lazy"></p><p><img src="https://s2.loli.net/2024/09/17/j5d7zRbieMqkLSQ.png" alt="PixPin_2024-09-17_00-00-26" loading="lazy"></p><p><a href="https://github.com/RSSNext/Follow">RSSNext&#x2F;Follow: 🧡 Next generation information browser. (github.com)</a> The GitHub repo has gained a ton of stars over the past few days.</p><p>The tool is still in <em>Alpha</em> testing and requires an invite code to access. Users who already have access can check in for 5 days to redeem an invite code, though there’s a cap on invitations.</p><p>If you want to try it out, you can lurk in Follow’s Discord server (but codes are hard to grab!). If you’ve previously contributed to the <strong>RSSHub</strong> project, you can reach out to the author <a href="https://x.com/DIYgod">@DIYgod</a> on Twitter to ask for one.</p><h3 id="Complexity-A-Perplexity-Enhancement-Extension"><a href="#Complexity-A-Perplexity-Enhancement-Extension" class="headerlink" title="Complexity: A Perplexity Enhancement Extension"></a>Complexity: A Perplexity Enhancement Extension</h3><p><a href="https://cplx.vercel.app/">Complexity</a> enhances the functionality of <a href="https://www.perplexity.ai/">Perplexity</a>.</p><p>If you haven’t heard of <a href="https://www.perplexity.ai/">Perplexity</a>, let it introduce itself.</p><p><img src="https://s2.loli.net/2024/09/17/iXUvLJIkSchFpWK.png" alt="PixPin_2024-09-17_00-08-32" loading="lazy"></p><p>Here are some of Complexity’s features:</p><ul><li>Various UI&#x2F;UX adjustments.</li><li>LLM&#x2F;Image gen model selector; export searches&#x2F;conversations, etc.</li><li>Highly customizable themes (with custom CSS support).</li><li>A dedicated prompt management solution: prompt library (in development).</li></ul><h3 id="OneTab-Simple-No-Nonsense-Tab-Management"><a href="#OneTab-Simple-No-Nonsense-Tab-Management" class="headerlink" title="OneTab: Simple, No-Nonsense Tab Management"></a>OneTab: Simple, No-Nonsense Tab Management</h3><p><a href="https://chromewebstore.google.com/detail/onetab/chphlpgkkbolifaimnlloiipkdnihall">OneTab</a> is a browser extension for managing tabs.</p><p>When browsing, you often run into this situation:</p><p><img src="https://s2.loli.net/2024/09/17/UwhNojOcX1gY9q6.png" alt="PixPin_2024-09-17_00-36-24" loading="lazy"></p><p>Too many tabs, eating up a lot of memory. Some tabs you want to close, some you want to keep, and others you want to save for later. What to do?</p><p>The simple, no-nonsense solution: use OneTab to tuck them all away with one click, and save memory in the process.</p><p><img src="https://s2.loli.net/2024/09/17/ZNQTYlbmKoeXGnx.png" alt="PixPin_2024-09-17_00-38-31" loading="lazy"></p><p>One click, and all your tabs are closed, leaving just One Tab.</p><p><img src="https://s2.loli.net/2024/09/17/RAyNBI3T9vVEwb8.png" alt="PixPin_2024-09-17_00-39-11" loading="lazy"></p><p>In this panel, you can clearly see which tabs to keep for later and which are useless. Not sure? No problem—leave them in the panel and come back to open them next time.</p><hr><h2 id="Afterword"><a href="#Afterword" class="headerlink" title="Afterword"></a>Afterword</h2><p>This is my first time writing in this format: a <em>weekly newsletter</em>. I believe I have a knack for discovering quality information and resources, but that ability has only helped a very limited number of people over the past while.</p><p>If you enjoy my content, feel free to leave a comment below—it gives me more motivation to keep writing. And if you have any suggestions, please don’t hesitate to share them.</p>]]>
    </content>
    <id>https://shiquda.link/en/seeking-weekly-1/</id>
    <link href="https://shiquda.link/en/seeking-weekly-1/"/>
    <published>2024-09-16T15:17:35.000Z</published>
    <summary>Seeking Weekly Issue 1: The Quest</summary>
    <title>Seeking Weekly Issue 1: The Quest</title>
    <updated>2024-09-27T04:37:18.000Z</updated>
  </entry>
  <entry>
    <author>
      <name>shiquda</name>
    </author>
    <category term="教程" scheme="https://shiquda.link/categories/%E6%95%99%E7%A8%8B/"/>
    <category term="资源" scheme="https://shiquda.link/categories/%E6%95%99%E7%A8%8B/%E8%B5%84%E6%BA%90/"/>
    <category term="教程" scheme="https://shiquda.link/tags/%E6%95%99%E7%A8%8B/"/>
    <category term="资源" scheme="https://shiquda.link/tags/%E8%B5%84%E6%BA%90/"/>
    <content>
      <![CDATA[<h2 id="Introduction"><a href="#Introduction" class="headerlink" title="Introduction"></a>Introduction</h2><p>This article introduces a method for downloading books from <strong>WeRead</strong> (WeChat Reading), leveraging WeRead’s <strong>caching</strong> feature to download books the user has reading access to, and convert them to PDF and other formats.</p><div class="tag-plugin colorful note" ><div class="body"><p><strong>Note</strong>: This software <strong>does not include any membership-cracking functionality</strong>. The author of this blog post is not the creator of this software; the resource comes from the internet. <strong>All risks</strong> associated with using this software are not the responsibility of this blogger, including but not limited to potential account suspension risks.</p></div></div><h2 id="Tutorial"><a href="#Tutorial" class="headerlink" title="Tutorial"></a>Tutorial</h2><h3 id="Download"><a href="#Download" class="headerlink" title="Download"></a>Download</h3><h4 id="Lanzou-Cloud"><a href="#Lanzou-Cloud" class="headerlink" title="Lanzou Cloud"></a>Lanzou Cloud</h4><p><a href="https://wwrd.lanzouv.com/i1zj02a4imbi">https://wwrd.lanzouv.com/i1zj02a4imbi</a></p><h4 id="Baidu-Netdisk"><a href="#Baidu-Netdisk" class="headerlink" title="Baidu Netdisk"></a>Baidu Netdisk</h4><p>Link: <a href="https://pan.baidu.com/s/1CJYdGNDF9-X7nCYP4Zxjzg?pwd=ecw3">https://pan.baidu.com/s/1CJYdGNDF9-X7nCYP4Zxjzg?pwd=ecw3</a> Extraction code: ecw3</p><h3 id="Extract"><a href="#Extract" class="headerlink" title="Extract"></a>Extract</h3><p>First, extract the archive to a suitable location, then double-click <code>微信读书下载器.exe</code> to launch the software.</p><h3 id="Log-in-to-WeRead"><a href="#Log-in-to-WeRead" class="headerlink" title="Log in to WeRead"></a>Log in to WeRead</h3><p><img src="https://s2.loli.net/2024/09/16/EPSXVuQOxlWvC3s.png" alt="PixPin_2024-09-16_22-16-42 1" loading="lazy"></p><p>After opening the software, click “Scan to Log In,” then click “Get Login QR Code,” and scan the QR code with WeChat to log in.</p><h3 id="Add-to-Bookshelf"><a href="#Add-to-Bookshelf" class="headerlink" title="Add to Bookshelf"></a>Add to Bookshelf</h3><p>Add the books you want to download to your bookshelf in the WeRead mobile app, then refresh the software page and click the corresponding book to download it.</p><h3 id="Get-the-eBook"><a href="#Get-the-eBook" class="headerlink" title="Get the eBook"></a>Get the eBook</h3><p>Open the HTML file located in the software folder under <code>book-&gt;一串数字-&gt;下载的书目-&gt;看这里</code>, and open the file in a browser.</p><p><img src="https://s2.loli.net/2024/09/16/MA6m189OLU5ayDv.png" alt="PixPin_2024-09-16_22-20-54" loading="lazy"></p><p><img src="https://s2.loli.net/2024/09/16/ysIoDPfVMAxvTNZ.png" alt="PixPin_2024-09-16_22-22-16" loading="lazy"></p><p>Once opened in the browser, press <code>Ctrl</code> + <code>P</code>, select “Save as PDF,” then choose a save location to download the PDF.</p><p><img src="https://s2.loli.net/2024/09/16/uFM8I6jql2BmXgQ.png" alt="PixPin_2024-09-16_22-23-44" loading="lazy"></p><p>The exported PDF can be read locally or imported into apps like WeRead for free, permanent reading.</p><h3 id="eBook-Format-Conversion"><a href="#eBook-Format-Conversion" class="headerlink" title="eBook Format Conversion"></a>eBook Format Conversion</h3><p>If you need to convert to other eBook formats, you can use the website <a href="https://convertio.co/zh/ebook-converter/">https://convertio.co/zh/ebook-converter/</a> to convert. Upload your PDF file, select your desired format, and the conversion is free.</p><p><img src="https://s2.loli.net/2024/09/16/vMHSOQx9CTDZ7LF.png" alt="PixPin_2024-09-16_22-25-45" loading="lazy"></p>]]>
    </content>
    <id>https://shiquda.link/en/download-weread-books/</id>
    <link href="https://shiquda.link/en/download-weread-books/"/>
    <published>2024-09-16T13:41:50.000Z</published>
    <summary>This article presents a method to download books from WeChat Reading by leveraging its caching feature, allowing users to save books they have access to and convert them to formats like PDF.</summary>
    <title>Downloading Purchased Books from WeChat Reading</title>
    <updated>2024-09-23T01:25:56.000Z</updated>
  </entry>
  <entry>
    <author>
      <name>shiquda</name>
    </author>
    <content>
      <![CDATA[<h2 id="Hexo"><a href="#Hexo" class="headerlink" title="Hexo"></a>Hexo</h2><p>A test of migrating my <a href="https://shiquda.link/">personal blog</a> to <em>Hexo</em>.</p><h2 id="Why-Migrate"><a href="#Why-Migrate" class="headerlink" title="Why Migrate?"></a>Why Migrate?</h2><p>I was previously using the Solo framework, which, as its name suggests, is fairly niche and runs as a dynamic blog. Today, I suddenly felt like trying a static blog, so I chose the Hexo framework.</p><p>The biggest takeaway is its <strong>strong customization capabilities and rich ecosystem</strong>. Even though I didn’t write much code during the tinkering process, it genuinely felt like I was building a website of my own—one that feels like my own child. <del>Honestly, I wouldn’t have thought this way if I didn’t have a free day to spare.</del></p><h2 id="Process"><a href="#Process" class="headerlink" title="Process"></a>Process</h2><p><img src="https://s2.loli.net/2024/09/12/2z8XjtscDVelywk.png" alt="blog (1)" loading="lazy"></p><h2 id="Testing"><a href="#Testing" class="headerlink" title="Testing"></a>Testing</h2><h3 id="Image-Test"><a href="#Image-Test" class="headerlink" title="Image Test"></a>Image Test</h3><blockquote><p>Image from <a href="https://shiquda.link/batch-download-high-quality-music">Free Batch Download of Lossless High-Quality Music Tutorial</a>.</p></blockquote><p><img src="https://s2.loli.net/2024/07/18/dXIgWOsnji2ZpDN.png" alt="Clip_2024-07-18_14-44-04" loading="lazy"></p><h3 id="Code-Block-Test"><a href="#Code-Block-Test" class="headerlink" title="Code Block Test"></a>Code Block Test</h3><h4 id="Code-Rendering"><a href="#Code-Rendering" class="headerlink" title="Code Rendering"></a>Code Rendering</h4><p>Of course, it’s <del>my favorite</del> <code>Python</code>!</p><figure class="highlight python"><table><tbody><tr><td class="gutter"><pre><span class="line">1</span><br><span class="line">2</span><br></pre></td><td class="code"><pre><span class="line"><span class="keyword">def</span> <span class="title function_">hello</span>():</span><br><span class="line">    <span class="built_in">print</span>(<span class="string">"Hello, Hexo!"</span>)</span><br></pre></td></tr></tbody></table></figure><h4 id="Code-Collapse"><a href="#Code-Collapse" class="headerlink" title="Code Collapse"></a>Code Collapse</h4><figure class="highlight text"><table><tbody><tr><td class="gutter"><pre><span class="line">1</span><br><span class="line">2</span><br><span class="line">3</span><br><span class="line">4</span><br><span class="line">5</span><br><span class="line">6</span><br><span class="line">7</span><br><span class="line">8</span><br><span class="line">9</span><br><span class="line">10</span><br><span class="line">11</span><br><span class="line">12</span><br><span class="line">13</span><br><span class="line">14</span><br><span class="line">15</span><br><span class="line">16</span><br></pre></td><td class="code"><pre><span class="line">从前有座山，山上有座庙，庙里有个老和尚和一个小和尚，老和尚对小和尚说：</span><br><span class="line">    从前有座山，山上有座庙，庙里有个老和尚和一个小和尚，老和尚对小和尚说：</span><br><span class="line">        从前有座山，山上有座庙，庙里有个老和尚和一个小和尚，老和尚对小和尚说：</span><br><span class="line">            从前有座山，山上有座庙，庙里有个老和尚和一个小和尚，老和尚对小和尚说：</span><br><span class="line">                从前有座山，山上有座庙，庙里有个老和尚和一个小和尚，老和尚对小和尚说：</span><br><span class="line">                    从前有座山，山上有座庙，庙里有个老和尚和一个小和尚，老和尚对小和尚说：</span><br><span class="line">                        从前有座山，山上有座庙，庙里有个老和尚和一个小和尚，老和尚对小和尚说：</span><br><span class="line">                            从前有座山，山上有座庙，庙里有个老和尚和一个小和尚，老和尚对小和尚说：</span><br><span class="line">                                从前有座山，山上有座庙，庙里有个老和尚和一个小和尚，老和尚对小和尚说：</span><br><span class="line">                                    从前有座山，山上有座庙，庙里有个老和尚和一个小和尚，老和尚对小和尚说：</span><br><span class="line">                                        从前有座山，山上有座庙，庙里有个老和尚和一个小和尚，老和尚对小和尚说：</span><br><span class="line">                                            从前有座山，山上有座庙，庙里有个老和尚和一个小和尚，老和尚对小和尚说：</span><br><span class="line">                                                从前有座山，山上有座庙，庙里有个老和尚和一个小和尚，老和尚对小和尚说：</span><br><span class="line">                                                    从前有座山，山上有座庙，庙里有个老和尚和一个小和尚，老和尚对小和尚说：</span><br><span class="line">                                                        从前有座山，山上有座庙，庙里有个老和尚和一个小和尚，老和尚对小和尚说：</span><br><span class="line">                                                            从前有座山，山上有座庙，庙里有个老和尚和一个小和尚，老和尚对小和尚说：https://www.bilibili.com/video/BV1GJ411x7h7/</span><br></pre></td></tr></tbody></table></figure><h3 id="LaTeX-Test"><a href="#LaTeX-Test" class="headerlink" title="LaTeX Test"></a>LaTeX Test</h3><p>$$\text{Blog framework} = \text{Hexo now!}$$</p><h3 id="Callout-Test"><a href="#Callout-Test" class="headerlink" title="Callout Test"></a>Callout Test</h3><div class="tag-plugin colorful note"><div class="body"><p>Run, you silly kids, run!!!</p></div></div><div class="tag-plugin colorful note"><div class="body"><p>Don’t answer!!!</p></div></div><h3 id="Keyboard-Shortcuts"><a href="#Keyboard-Shortcuts" class="headerlink" title="Keyboard Shortcuts"></a>Keyboard Shortcuts</h3><p>Try <kbd>Alt</kbd>+<kbd>F4</kbd></p><h3 id="TO-DO"><a href="#TO-DO" class="headerlink" title="TO-DO"></a>TO-DO</h3><ul><li><input checked="" disabled="" type="checkbox"> to</li><li><input disabled="" type="checkbox"> do</li></ul><h3 id="Table"><a href="#Table" class="headerlink" title="Table"></a>Table</h3><div class="md-table-scroll"><table><thead><tr><th>Framework</th><th>URL</th><th>Notes</th></tr></thead><tbody><tr><td>Hexo</td><td><a href="https://hexo.io/">Hexo</a></td><td>Personal blog framework</td></tr><tr><td>Solo</td><td><a href="https://b3log.org/solo/">Solo</a></td><td>Dynamic blog framework</td></tr></tbody></table></div><h3 id="Embedded-Video"><a href="#Embedded-Video" class="headerlink" title="Embedded Video"></a>Embedded Video</h3><!-- youtube --><iframe width="560" height="315" src="https://www.youtube.com/embed/qf7ws2DF-zk" frameborder="0" allow="accelerometer; autoplay; clipboard-write; encrypted-media; gyroscope; picture-in-picture" allowfullscreen=""></iframe><h2 id="Themes-Plugins-Used"><a href="#Themes-Plugins-Used" class="headerlink" title="Themes/Plugins Used"></a>Themes/Plugins Used</h2><p>As you can see, I’m using the NexT theme, along with the following plugins:</p><ul><li><code>hexo-theme-next</code></li><li><code>hexo-auto-excerpt</code></li><li><code>hexo-math</code></li><li><code>hexo-next-darkmode</code></li><li><code>mdit-plugin-callouts</code></li><li><code>hexo-next-twikoo</code></li><li><code>hexo-generator-feed</code></li><li><code>hexo-generator-search</code></li><li><code>hexo-symbols-count-time</code></li><li><code>hexo-deployer-rsync</code></li></ul>]]>
    </content>
    <id>https://shiquda.link/en/move-to-hexo/</id>
    <link href="https://shiquda.link/en/move-to-hexo/"/>
    <published>2024-09-10T14:59:47.000Z</published>
    <summary>A love letter to Hexo, the static site generator that makes blogging a joy.</summary>
    <title>Hexo!</title>
    <updated>2024-09-12T04:13:32.000Z</updated>
  </entry>
  <entry>
    <author>
      <name>shiquda</name>
    </author>
    <category term="教程" scheme="https://shiquda.link/categories/%E6%95%99%E7%A8%8B/"/>
    <category term="教程" scheme="https://shiquda.link/tags/%E6%95%99%E7%A8%8B/"/>
    <category term="AHK" scheme="https://shiquda.link/tags/AHK/"/>
    <content>
      <![CDATA[<p><strong>Implemented with AutoHotkey.</strong></p><p>Why not use VSCode’s built-in key mapping?</p><p>I tried the solution found online, but every time I pressed Esc to return, it also toggled the Caps Lock state, which felt unnatural.</p><h2 id="Install-AutoHotkey"><a href="#Install-AutoHotkey" class="headerlink" title="Install AutoHotkey"></a>Install AutoHotkey</h2><p><a href="https://www.autohotkey.com/">AutoHotkey</a></p><p>Since the script is written for version 2.0, choose <strong>Download v2.0</strong> when downloading.</p><h2 id="Write-the-script"><a href="#Write-the-script" class="headerlink" title="Write the script"></a>Write the script</h2><p>Create a <code>vscode-vim.ahk</code> script in a suitable location. If you want it to run at startup, you can write it directly under <code>shell:startup</code>, or create a shortcut to the script in the startup directory.</p><figure class="highlight ahk"><table><tbody><tr><td class="gutter"><pre><span class="line">1</span><br><span class="line">2</span><br><span class="line">3</span><br><span class="line">4</span><br><span class="line">5</span><br><span class="line">6</span><br><span class="line">7</span><br><span class="line">8</span><br><span class="line">9</span><br><span class="line">10</span><br><span class="line">11</span><br><span class="line">12</span><br><span class="line">13</span><br><span class="line">14</span><br><span class="line">15</span><br><span class="line">16</span><br><span class="line">17</span><br><span class="line">18</span><br><span class="line">19</span><br></pre></td><td class="code"><pre><span class="line"><span class="meta">#Requires AutoHotkey v2.0</span></span><br><span class="line"><span class="meta"></span></span><br><span class="line"><span class="meta">#HotIf WinActive("ahk_exe Code.exe")</span></span><br><span class="line"></span><br><span class="line"><span class="comment">; Map Caps Lock key to Esc</span></span><br><span class="line"><span class="title">CapsLock::</span> {</span><br><span class="line">    Send(<span class="string">"{Esc}"</span>)</span><br><span class="line">}</span><br><span class="line"></span><br><span class="line"><span class="comment">; Map Esc key to Caps Lock</span></span><br><span class="line"><span class="title">Esc::</span> {</span><br><span class="line">    if (GetKeyState(<span class="string">"CapsLock"</span>, <span class="string">"T"</span>)) {</span><br><span class="line">        SetCapsLockState(<span class="string">"Off"</span>)</span><br><span class="line">    } else {</span><br><span class="line">        SetCapsLockState(<span class="string">"On"</span>)</span><br><span class="line">    }</span><br><span class="line">}</span><br><span class="line"><span class="meta"></span></span><br><span class="line"><span class="meta">#HotIf</span></span><br></pre></td></tr></tbody></table></figure><p>This script only takes effect in VSCode, swapping the Caps Lock and Esc keys. To enable the script, just double-click to run it.</p>]]>
    </content>
    <id>https://shiquda.link/en/windows-vim-for-vscode-use-capslock-instead-of-esc/</id>
    <link href="https://shiquda.link/en/windows-vim-for-vscode-use-capslock-instead-of-esc/"/>
    <published>2024-08-02T14:56:46.000Z</published>
    <summary>Learn how to use AutoHotkey to remap CapsLock to Esc, giving you a comfortable escape key in Vim mode within VSCode—and eliminating the CapsLock toggle annoyance.</summary>
    <title>Replace Esc with CapsLock for Vim in VSCode on Windows</title>
    <updated>2024-08-02T14:56:46.000Z</updated>
  </entry>
  <entry>
    <author>
      <name>shiquda</name>
    </author>
    <category term="教程" scheme="https://shiquda.link/categories/%E6%95%99%E7%A8%8B/"/>
    <category term="资源" scheme="https://shiquda.link/categories/%E6%95%99%E7%A8%8B/%E8%B5%84%E6%BA%90/"/>
    <category term="教程" scheme="https://shiquda.link/tags/%E6%95%99%E7%A8%8B/"/>
    <category term="资源" scheme="https://shiquda.link/tags/%E8%B5%84%E6%BA%90/"/>
    <content>
      <![CDATA[<h2 id="Preface"><a href="#Preface" class="headerlink" title="Preface"></a>Preface</h2><p>Let me ramble for a moment—if you’re in a hurry, feel free to skip ahead to the main content.</p><p>Recently, I’ve started to feel that Spotify’s audio quality isn’t all that great—apparently it maxes out at 320K. While I’m not an audiophile, I do care about sound quality. But I didn’t want to pay for another streaming platform, so I came up with a workaround: use Spotify’s excellent recommendation algorithm to discover new music, then play the songs from my Spotify playlists using a local player.</p><p>However, this raises an important issue: my playlists contain several hundred songs, and downloading all of them isn’t easy. Although I know there are channels to download high-quality audio for free, such as some <a href="https://t.me/flacmusics">Telegram groups</a> or the well-known <a href="https://tools.liumingye.cn/music/#/">MyFreeMP3 (liumingye.cn)</a>, they’re both cumbersome to use and not well-suited for batch downloads. They might work when you need a few tracks temporarily for video editing, but not for bulk downloading. Does this mean the classic “pick two out of three” dilemma applies here?<br><img src="https://b3logfile.com/file/2024/07/solo-fetchupload-17046710997852730394-3Oe8lyG.png" alt="Clip_2024-07-18_14-44-04" loading="lazy"></p><p>Today, I happened to come across a post by an expert titled <a href="https://linux.do/t/topic/19035">Freeloading tens of millions of high-resolution music tracks! How to download resources from Qobuz, Tidal, Deezer and other streaming platforms - General Topics / Featured Posts - LINUX DO</a>. Following their approach, I gave it a try and found that all three can actually be achieved simultaneously—perfectly satisfying my <del>freeloading</del> needs. Now I’d like to share my complete workflow.</p><hr><h2 id="Main-Content"><a href="#Main-Content" class="headerlink" title="Main Content"></a>Main Content</h2><p>If you have large playlists on some music platforms and can’t download them all as lossless audio for free, give this method a try.</p><p>Note: This tutorial requires a Python environment. I’ll assume you have Python installed. If not, search for a tutorial or ask GPT.</p><h3 id="Getting-Your-Playlist"><a href="#Getting-Your-Playlist" class="headerlink" title="Getting Your Playlist"></a>Getting Your Playlist</h3><h4 id="Domestic-Platforms-NetEase-Cloud-Music-QQ-Music"><a href="#Domestic-Platforms-NetEase-Cloud-Music-QQ-Music" class="headerlink" title="Domestic Platforms (NetEase Cloud Music / QQ Music)"></a>Domestic Platforms (NetEase Cloud Music / QQ Music)</h4><p><a href="https://yyrcd.com/n2s/">Migrate NetEase Cloud / QQ Music to Apple Music, YouTube Music, Spotify | yyrcd</a></p><p><img src="https://s2.loli.net/2024/07/18/TgF2euQ45RynGBd.png" alt="Clip_2024-07-18_15-02-45" loading="lazy"></p><p>Follow the instructions on the website above, enter your playlist, and it will export the corresponding playlist as a TXT file.</p><h4 id="International-Platforms-Spotify-Apple-Music-YouTube-Music-etc"><a href="#International-Platforms-Spotify-Apple-Music-YouTube-Music-etc" class="headerlink" title="International Platforms (Spotify / Apple Music / YouTube Music, etc.)"></a>International Platforms (Spotify / Apple Music / YouTube Music, etc.)</h4><p><a href="https://www.tunemymusic.com/zh-CN/transfer">Transfer playlists between different music services | Tune My Music</a></p><p>We’ll use the tool above for conversion. If your playlist has fewer than 500 songs (the free tier limit), you can simply follow the website’s instructions to log in, fetch your playlist, and select Qobuz as the import destination.</p><p><img src="https://b3logfile.com/file/2024/07/solo-fetchupload-2141195553151529836-eHDZ5wZ.png" alt="Clip_2024-07-18_14-56-18" loading="lazy"></p><p>If you don’t have an account on that platform, you can create a free <a href="https://play.qobuz.com/login">Qobuz</a> account—I recommend signing up with your Google account. We don’t need to pay for this platform; it’s just a stepping stone to make batch downloading easier.</p><p>What if your playlist has more than 500 songs? No problem. You can first convert and save it as a TXT file, then use Tune My Music multiple times to import—each free import handles up to 500 songs.</p><h3 id="Importing-Songs-to-Qobuz"><a href="#Importing-Songs-to-Qobuz" class="headerlink" title="Importing Songs to Qobuz"></a>Importing Songs to Qobuz</h3><p><a href="https://www.tunemymusic.com/zh-CN/transfer">Transfer playlists between different music services | Tune My Music</a></p><p>In the previous step, if you’re using a domestic platform or have more than 500 songs, select “Any Text” as the import option.</p><p><img src="https://s2.loli.net/2024/07/18/IW4jrAuD7ihN18M.png" alt="Clip_2024-07-18_15-03-05" loading="lazy"></p><p>Then paste the playlist text you obtained earlier. If it exceeds 500 songs, import it in batches.</p><p><img src="https://b3logfile.com/file/2024/07/solo-fetchupload-7662927726149957668-STn6zsN.png" alt="Clip_2024-07-18_15-04-12" loading="lazy"></p><p>Select Qobuz as the destination.</p><p>Once the import is complete, open the <a href="https://play.qobuz.com/user/library/playlists">playlist page</a> and make sure to uncheck the “Private” option on your playlist—otherwise, the tool won’t be able to read your playlist publicly.</p><p><img src="https://b3logfile.com/file/2024/07/solo-fetchupload-16893922363331241181-xZCoPo0.png" alt="Clip_2024-07-18_15-06-57" loading="lazy"></p><p><img src="https://s2.loli.net/2024/07/18/ZvhBXnJwKEyIbtj.png" alt="Clip_2024-07-18_15-08-51" loading="lazy"></p><h3 id="Batch-Downloading"><a href="#Batch-Downloading" class="headerlink" title="Batch Downloading"></a>Batch Downloading</h3><p><a href="https://github.com/nathom/streamrip/tree/dev">nathom/streamrip: A scriptable music downloader for Qobuz, Tidal, SoundCloud, and Deezer (github.com)</a></p><p>We’ll use this tool for batch downloading.</p><p>Installation requires a Python environment. Run the following command to install:</p><figure class="highlight bash"><table><tbody><tr><td class="gutter"><pre><span class="line">1</span><br></pre></td><td class="code"><pre><span class="line">pip install poetry</span><br></pre></td></tr></tbody></table></figure><p>After installation, open the configuration file:</p><figure class="highlight bash"><table><tbody><tr><td class="gutter"><pre><span class="line">1</span><br></pre></td><td class="code"><pre><span class="line">rip config open</span><br></pre></td></tr></tbody></table></figure><p>You can configure it based on my example. The token and ID provided by a generous contributor can be found at <a href="https://rentry.org/firehawk52#tokens">Firehawk52 Official - Saving Digital Legacy (rentry.org)</a>.</p><p><img src="https://s2.loli.net/2024/07/18/FbL3ovgXIMhtxZY.png" alt="Clip_2024-07-18_15-35-57" loading="lazy"></p><p>After saving, go to the playlist link you transferred to Qobuz earlier, then run:</p><figure class="highlight plaintext"><table><tbody><tr><td class="gutter"><pre><span class="line">1</span><br></pre></td><td class="code"><pre><span class="line">rip url https://play.qobuz.com/playlist/xxxxxxxx</span><br></pre></td></tr></tbody></table></figure><p>The download will begin. If you can’t connect, you may need to enable a global proxy or TUN mode.</p><p><img src="https://b3logfile.com/file/2024/07/solo-fetchupload-8804855553939764649-PEFlbt7.png" alt="Clip_2024-07-18_15-39-43" loading="lazy"></p><p>If the download disconnects and throws an error, just run the command again—already downloaded tracks will be skipped automatically.</p><h2 id="Drawbacks"><a href="#Drawbacks" class="headerlink" title="Drawbacks"></a>Drawbacks</h2><p>While this method largely solves the <em>three-way dilemma</em>, it still has some shortcomings.</p><ol><li>Playlist conversion may be inaccurate or incomplete. Since most of what I listen to is English music, I haven’t tested much with Chinese songs, so there may be gaps; some tracks may also come out as different versions after conversion (e.g., the original becomes a remix or vice versa). I’d estimate the accuracy is around 90%.</li><li>Some songs in Qobuz appear grayed out and can’t be fetched. My guess is this is related to the country associated with the token account. If some tracks fail to download, try switching to a different token. The download success rate is also around 90%.</li></ol>]]>
    </content>
    <id>https://shiquda.link/en/batch-download-high-quality-music/</id>
    <link href="https://shiquda.link/en/batch-download-high-quality-music/"/>
    <published>2024-07-18T10:40:41.000Z</published>
    <summary>Learn how to transfer your playlists to Qobuz using Tune My Music and batch download lossless tracks with streamrip—achieving top-tier audio quality for free.</summary>
    <title>Free Batch Download of Lossless High-Quality Music: A Step-by-Step Guide</title>
    <updated>2024-07-18T10:40:41.000Z</updated>
  </entry>
  <entry>
    <author>
      <name>shiquda</name>
    </author>
    <category term="项目" scheme="https://shiquda.link/categories/%E9%A1%B9%E7%9B%AE/"/>
    <category term="Python" scheme="https://shiquda.link/tags/Python/"/>
    <category term="项目" scheme="https://shiquda.link/tags/%E9%A1%B9%E7%9B%AE/"/>
    <content>
      <![CDATA[<p>Today I built a WeRead card generator, just for fun and as a coding exercise, so here’s a quick blog post about it. Star it if you like it.</p><p><a href="https://github.com/shiquda/wereadcard">shiquda/wereadcard (github.com)</a></p><p>Preview:</p><p>GitHub:</p><p><img src="https://raw.githubusercontent.com/shiquda/wereadcard/main/output/recent_read.svg" alt="raw.githubusercontent.com/shiquda/wereadcard/main/output/recent_read.svg" loading="lazy"></p><p>If it doesn’t load, there’s also a mirror site:<br><img src="https://raw.kkgithub.com/shiquda/wereadcard/main/output/recent_read.svg" alt="raw.kkgithub.com/shiquda/wereadcard/main/output/recent_read.svg" loading="lazy"></p><p>Here’s a brief overview. Of course, I’d recommend checking out the <a href="https://github.com/shiquda/wereadcard">GitHub repo</a> directly—this version might be outdated.</p><hr><h2 id="Overview"><a href="#Overview" class="headerlink" title="Overview"></a>Overview</h2><p>This project uses GitHub Actions to automatically fetch your WeRead reading history and generate <code>.svg</code> cards for display.</p><h2 id="Usage"><a href="#Usage" class="headerlink" title="Usage"></a>Usage</h2><h3 id="Using-GitHub-Actions"><a href="#Using-GitHub-Actions" class="headerlink" title="Using GitHub Actions"></a>Using GitHub Actions</h3><h4 id="Getting-Your-Cookie"><a href="#Getting-Your-Cookie" class="headerlink" title="Getting Your Cookie"></a>Getting Your Cookie</h4><p>Here’s one way to do it:</p><p>Go to <a href="https://weread.qq.com/">https://weread.qq.com/</a> and scan the QR code to log in to WeRead.</p><p>Open the <code>F12</code> developer console, go to the Network tab, refresh the page, filter by Fetch/XHR, select any request, find the Cookie in the Headers section, and copy the full string.</p><h4 id="GitHub-Configuration"><a href="#GitHub-Configuration" class="headerlink" title="GitHub Configuration"></a>GitHub Configuration</h4><ol><li><strong>Fork</strong> this repository.</li><li>In your repo, go to <code>Settings &gt; Secrets and variables &gt; Actions</code> and add a <code>Repository secret</code>:</li><li><strong>Required</strong>: <code>WEREAD_COOKIE</code>—paste the WeRead cookie string you copied in the previous step.</li><li><strong>Optional</strong>: <code>BOOK_COUNT</code>—defaults to <code>4</code>, the number of books shown on the card. I’d recommend keeping it at <code>5</code> or fewer.</li><li>Go to <code>Settings &gt; Actions &gt; General</code>, find <code>Workflow permissions</code>, switch it to <code>Read and write permissions</code>, and click <code>Save</code>.</li></ol><p>Now GitHub Actions will automatically update the image every 8 hours and push it to the repo. You can find the updated card at <code>/output/recent_read.svg</code>.</p><p>You can also trigger Actions manually if you’d like.</p><h4 id="Getting-the-Direct-Image-Link"><a href="#Getting-the-Direct-Image-Link" class="headerlink" title="Getting the Direct Image Link"></a>Getting the Direct Image Link</h4><p>On GitHub, open the image and the <code>Raw</code> link is your direct URL. If your network isn’t great, you can use a mirror site to speed things up—just replace <code>githubusercontent</code> with <code>kkgithub</code> in the URL, like this:</p><figure class="highlight text"><table><tbody><tr><td class="gutter"><pre><span class="line">1</span><br></pre></td><td class="code"><pre><span class="line">https://raw.githubusercontent.com/shiquda/wereadcard/main/output/recent_read.svg</span><br></pre></td></tr></tbody></table></figure><p>Replace with:</p><figure class="highlight text"><table><tbody><tr><td class="gutter"><pre><span class="line">1</span><br></pre></td><td class="code"><pre><span class="line">https://raw.kkgithub.com/shiquda/wereadcard/main/output/recent_read.svg</span><br></pre></td></tr></tbody></table></figure><h3 id="Local-Usage"><a href="#Local-Usage" class="headerlink" title="Local Usage"></a>Local Usage</h3><p>Clone this repo and install the dependencies:</p><figure class="highlight bash"><table><tbody><tr><td class="gutter"><pre><span class="line">1</span><br></pre></td><td class="code"><pre><span class="line">pip install -r requirements.txt</span><br></pre></td></tr></tbody></table></figure><p>There are two ways to use it: you can configure the cookie and other parameters directly in <code>main.py</code> and run it, or use command-line arguments:</p><ul><li><code>--cookie, -c</code>: The cookie string—make sure to wrap it in quotes.</li><li><code>--number, -n</code>: The number of books to display on the card.</li></ul><p>After running, the generated card will be in the <code>/output</code> directory.</p><h2 id="Acknowledgments"><a href="#Acknowledgments" class="headerlink" title="Acknowledgments"></a>Acknowledgments</h2><ul><li><a href="https://github.com/malinkang/weread2notion">malinkang/weread2notion: Sync WeRead highlights to Notion (github.com)</a></li></ul>]]>
    </content>
    <id>https://shiquda.link/en/weread-card-project/</id>
    <link href="https://shiquda.link/en/weread-card-project/"/>
    <published>2024-07-17T15:39:35.000Z</published>
    <summary>Today I whipped up a card generator for WeRead, just for fun and practice. Here's a quick blog post about it. Feel free to star it!</summary>
    <title>wereadcard: A Card Generator for WeRead</title>
    <updated>2024-07-17T15:39:35.000Z</updated>
  </entry>
  <entry>
    <author>
      <name>shiquda</name>
    </author>
    <category term="随想" scheme="https://shiquda.link/categories/%E9%9A%8F%E6%83%B3/"/>
    <category term="耕读" scheme="https://shiquda.link/tags/%E8%80%95%E8%AF%BB/"/>
    <content>
      <![CDATA[<h2 id="Are-You-Really-a-Fence-Sitter"><a href="#Are-You-Really-a-Fence-Sitter" class="headerlink" title="Are You Really a Fence-Sitter?"></a>Are You Really a Fence-Sitter?</h2><p>When we call someone a “fence-sitter,” we usually mean they <strong>believe whatever they hear</strong>—they lack conviction. In other words, they <strong>only trust the last opinion they encountered</strong>.</p><p>The term <em>fence-sitter</em> is undoubtedly pejorative, while the opposite type of person is often praised for <em>staying true to themselves</em> and <em>having strong convictions</em>.</p><p>Wait a moment. If we used different words to describe these two types of people, the picture might look completely different.</p><blockquote><p>A is someone who <em>adapts quickly and listens to others</em>, while B is someone who <em>is stubborn and self-righteous</em>.</p></blockquote><p>At first glance, A leaves the impression of an open-minded person, while B comes across as rigid and arrogant.</p><p>Notice something? Simply by flipping the positive&#x2F;negative connotations of words with similar meanings, the message changes entirely.</p><p>If you agree with my point, then let me ask you again: since I’ve convinced you, does that mean <strong>you’re really a fence-sitter?</strong></p><p>You probably don’t consider yourself one—at least you’re reluctant to admit it. You want to argue back, but the distinction between the two is hard to articulate.</p><p>Actually, the difference is simple. Let me share my thoughts.</p><h2 id="You’re-the-One-Labeling-Yourself-a-Fence-Sitter"><a href="#You’re-the-One-Labeling-Yourself-a-Fence-Sitter" class="headerlink" title="You’re the One Labeling Yourself a Fence-Sitter"></a>You’re the One Labeling Yourself a Fence-Sitter</h2><p>Perhaps you’re actually engaging in a form of “<strong>moral blackmail</strong>“ against yourself—<strong>convincing yourself to abandon new information and perspectives</strong> in order to protect your “convictions.” What’s worse, this is likely an implicit process; you may not even realize it’s happening.</p><p>The following passage is from <em>Asking the Right Questions</em>, which I read recently. It might give you something new to think about.</p><blockquote><p>Our culture has little tolerance for people who change their minds. We often call them “fence-sitters” or “hypocrites,” without recognizing that when new evidence emerges, changing our views is not only natural but also a responsible and accountable thing to do.<br>—— <em>Asking the Right Questions</em> by Neil Browne and Stuart Keeley</p></blockquote><p>This passage struck a chord with me and sparked many thoughts. Often, it’s we ourselves who impose moral constraints that make us over-reflect on our own behavior—and it’s precisely these constraints that hinder deeper analysis and thinking.</p><p>I’ve always opposed using a simple label to silence someone, to deliver a “final verdict” on them. What’s more frightening is that such labels invisibly cause our brains to operate according to System 1, as described in <em>Thinking, Fast and Slow</em>. When we evaluate others’ opinions, we unknowingly put on tinted glasses.</p><blockquote><p>System 1 roughly means the brain gives quick, direct responses based on existing experience—in simple terms, it “takes the easy way out.”</p></blockquote><p>Under the “fence-sitter” label, we may unknowingly shackle our brains and hinder our thinking. After all, <strong>“sticking with” our original views</strong> is the path of least resistance for the brain. The scary part is how hard it is to notice this happening.</p><p>I imagine you still have a question: when does someone count as a “fence-sitter,” and when are they “listening to others”?</p><p>Actually, that’s simple.</p><p>My view is that good thinking should be:</p><ul><li><strong>Making reliable judgments based on continuously emerging new information</strong>, then <strong>updating your beliefs</strong>;</li><li><strong>Rather than selectively accepting information based on your existing beliefs</strong>.</li></ul><p>No one is perfect. No one is always right, and no viewpoint is flawless from the moment it’s born.</p><p><strong>Positions and viewpoints are born from reliable information—not the other way around, where you filter information through pre-existing positions and views.</strong></p><p>That said, the crux of the issue becomes: how do you identify “reliable” information? That’s a topic for another day. I’ll share my understanding when I get the chance. <del>Noted for later</del></p><p>We shouldn’t view other perspectives or evidence through “tinted glasses”; instead, we should maintain a neutral stance. At the same time, when we think about reasons that support our own views, we shouldn’t avoid factors that might work against them.</p><p>At this point, you might ask: isn’t that just contradicting yourself? Who would look for reasons that don’t support their own position?</p><h2 id="Seeking-Truth-OR-Seeking-Victory"><a href="#Seeking-Truth-OR-Seeking-Victory" class="headerlink" title="Seeking Truth OR Seeking Victory?"></a>Seeking Truth OR Seeking Victory?</h2><p>This brings us to the purpose of our thinking: <strong>seeking truth OR seeking victory?</strong></p><p>We’ve all experienced this: two people debate a point, and neither can convince the other. Each starts from their own viewpoint and position, searches for the strongest arguments to support their case, and eagerly presents them. The result is usually that the debate fizzles out, with neither side budging.</p><p>It’s a bit like a debate competition: both the affirmative and negative sides spare no effort in presenting arguments for their position while attacking the other side’s. But the difference is that in a debate, a judge scores the performance and declares a winner; the two sides would never change their stance or concede the other’s point mid-debate (at least, I’ve never seen it). In that game, their goal is to <strong>win</strong>.</p><p>Unfortunately, life isn’t a debate competition, but for various reasons, opportunities to <strong>seek truth</strong> are all too rare.</p><p>But when a person sits quietly, thinking not for any other purpose, I hope we can set everything aside—even our existing positions—and look at issues neutrally, consider others’ viewpoints, and analyze the reliability of information… Although this is nearly an impossible task, “though I may never reach it, my heart yearns for it” is still a commendable attitude.</p><hr><h2 id="A-Note"><a href="#A-Note" class="headerlink" title="A Note"></a>A Note</h2><p>This is the first time I’ve actually organized my thoughts into a blog post and published it. In the past, I might have just mulled things over in my head or discussed them with friends, but this time I wanted to share my thinking with more people.</p><p>I’ve named this series “<strong>Gengdu</strong>“ (cultivating through reading). In this increasingly fast-paced society, having the leisure time to read and think is truly a luxury. So, although I wish it weren’t so, this series might only contain this one article.</p><p>Of course, I didn’t write this post to convince you—just to offer a direction for thinking about problems. If you disagree with my views, feel free to reach out. I hope we can seek truth together.</p>]]>
    </content>
    <id>https://shiquda.link/en/are-you-a-wallflower/</id>
    <link href="https://shiquda.link/en/are-you-a-wallflower/"/>
    <published>2024-07-08T14:28:23.000Z</published>
    <summary>Explore the truth behind indecision and how to break free from being a perpetual fence-sitter.</summary>
    <title>Are You Really a Fence-Sitter?</title>
    <updated>2024-07-08T14:34:29.000Z</updated>
  </entry>
  <entry>
    <author>
      <name>shiquda</name>
    </author>
    <category term="教程" scheme="https://shiquda.link/categories/%E6%95%99%E7%A8%8B/"/>
    <category term="教程" scheme="https://shiquda.link/tags/%E6%95%99%E7%A8%8B/"/>
    <content>
      <![CDATA[<h2 id="The-Problem"><a href="#The-Problem" class="headerlink" title="The Problem"></a>The Problem</h2><p>This issue had been bothering me for months. It started after a Windows 11 system update, when suddenly clicking the Bluetooth icon in the bottom-right panel did nothing, and clicking the expand button on the right caused it to “crash.”</p><p><img src="https://b3logfile.com/file/2024/06/solo-fetchupload-7051497606968585562-eRw2iak.png" alt="Clip_2024-06-02_22-24-07" loading="lazy"></p><p>The system also couldn’t discover new devices—it could only connect to already-paired ones.</p><h2 id="The-Solution"><a href="#The-Solution" class="headerlink" title="The Solution"></a>The Solution</h2><p>I tried Googling various fixes, but all of them failed (except reinstalling the OS, which I hadn’t tried yet). Eventually, I discovered that a system service called <code>Device Association Service</code> had been disabled for some unknown reason. Simply changing its startup type to “Automatic” in the properties fixed the issue.</p><p><img src="https://b3logfile.com/file/2024/06/solo-fetchupload-7192284970521405567-oCQQSl6.png" alt="Clip_2024-06-02_22-21-16 1" loading="lazy"></p><p><img src="https://b3logfile.com/file/2024/06/solo-fetchupload-5081982689478401641-Dgwm5sB.png" alt="Clip_2024-06-02_22-27-58" loading="lazy"></p><p>Finally, I could see the interface I’d almost forgotten about…</p><p><img src="https://b3logfile.com/file/2024/06/solo-fetchupload-16780743642740616569-40oy0kU.png" alt="Clip_2024-06-02_22-28-31" loading="lazy"></p><p><del>If it weren’t for swapping out my earphones, I wouldn’t have spent a whole night on this…</del></p><p>I hope this tutorial helps solve your problem. Even if just one person avoids the detour because of my article, I’d be more than satisfied.</p>]]>
    </content>
    <id>https://shiquda.link/en/solve-annoying-bluetooth-problem-on-windows-11/</id>
    <link href="https://shiquda.link/en/solve-annoying-bluetooth-problem-on-windows-11/"/>
    <published>2024-06-02T14:33:01.000Z</published>
    <summary>After a system update, the Bluetooth panel became unresponsive and crashed. Setting the Device Association Service startup type to 'Automatic' resolves the issue.</summary>
    <title>Fixing Bluetooth Crashes and Device Discovery Issues in Windows 11</title>
    <updated>2024-06-02T14:33:01.000Z</updated>
  </entry>
  <entry>
    <author>
      <name>shiquda</name>
    </author>
    <category term="题解" scheme="https://shiquda.link/categories/%E9%A2%98%E8%A7%A3/"/>
    <category term="题解" scheme="https://shiquda.link/tags/%E9%A2%98%E8%A7%A3/"/>
    <content>
      <![CDATA[<h2 id="Understanding-the-Problem"><a href="#Understanding-the-Problem" class="headerlink" title="Understanding the Problem"></a>Understanding the Problem</h2><p><a href="https://www.luogu.com.cn/problem/P1120">P1120 Small Wooden Sticks - Luogu | New Ecology of Computer Science Education (luogu.com.cn)</a></p><p>Given $n$ small wooden sticks with lengths $a_i$ , satisfying $1 \leq a_{i} \leq 50$ , $n \leq 650$ , they can be arbitrarily joined together. The goal is to make all joined sticks have the same length, and we need to find the minimum possible value of that equal length.</p><p>For example:</p><figure class="highlight txt"><table><tbody><tr><td class="gutter"><pre><span class="line">1</span><br><span class="line">2</span><br></pre></td><td class="code"><pre><span class="line">9</span><br><span class="line">5 2 1 5 2 1 5 2 1</span><br></pre></td></tr></tbody></table></figure><p>The minimum length here is 6, formed by three <code>5 1</code> combinations and one <code>2 2 2</code> combination.</p><p>The problem is labeled as a search problem.</p><h2 id="Approach"><a href="#Approach" class="headerlink" title="Approach"></a>Approach</h2><p>This problem looks simple and easy to understand, but it’s actually quite tricky to implement. I initially <del>refused to believe it</del> and tried a greedy approach, but that didn’t work, so I had to go back and write a proper search.</p><p>First, let’s analyze the hidden mathematical properties: the number of final equal-length sticks is bounded between 1 and n, so the possible stick lengths are actually limited. It’s easy to see that: <strong>the total sum of all stick lengths, sum, must be divisible by the target length</strong>, and this length must be ≥ the maximum value among the stick lengths $a_i$ .</p><p>Therefore, we can first compute all possible candidate answers, then try them in increasing order to see if they can be formed.</p><p>As for how to determine whether a length can be formed, my initial greedy idea was to treat the process as “filling”: a stick is considered complete when it’s exactly filled. Each time, start by picking the largest stick that fits into the remaining space. If everything fills up successfully, the condition is satisfied, and we can stop and return this length as the minimum. If no remaining stick can fit, it means this length doesn’t work, and we move on to the next candidate.</p><p>However, this greedy algorithm has a flaw: a case that seems impossible might actually have a valid solution.</p><p>Counterexample: <code>3 4 7 8 18 20</code></p><p>Greedy gets <em>45</em> points</p><figure class="highlight cpp"><table><tbody><tr><td class="gutter"><pre><span class="line">1</span><br><span class="line">2</span><br><span class="line">3</span><br><span class="line">4</span><br><span class="line">5</span><br><span class="line">6</span><br><span class="line">7</span><br><span class="line">8</span><br><span class="line">9</span><br><span class="line">10</span><br><span class="line">11</span><br><span class="line">12</span><br><span class="line">13</span><br><span class="line">14</span><br><span class="line">15</span><br><span class="line">16</span><br><span class="line">17</span><br><span class="line">18</span><br><span class="line">19</span><br><span class="line">20</span><br><span class="line">21</span><br><span class="line">22</span><br><span class="line">23</span><br><span class="line">24</span><br><span class="line">25</span><br><span class="line">26</span><br><span class="line">27</span><br><span class="line">28</span><br><span class="line">29</span><br><span class="line">30</span><br><span class="line">31</span><br><span class="line">32</span><br><span class="line">33</span><br><span class="line">34</span><br><span class="line">35</span><br><span class="line">36</span><br><span class="line">37</span><br><span class="line">38</span><br><span class="line">39</span><br><span class="line">40</span><br><span class="line">41</span><br><span class="line">42</span><br><span class="line">43</span><br><span class="line">44</span><br><span class="line">45</span><br><span class="line">46</span><br><span class="line">47</span><br><span class="line">48</span><br><span class="line">49</span><br><span class="line">50</span><br><span class="line">51</span><br><span class="line">52</span><br><span class="line">53</span><br><span class="line">54</span><br><span class="line">55</span><br><span class="line">56</span><br><span class="line">57</span><br><span class="line">58</span><br><span class="line">59</span><br><span class="line">60</span><br><span class="line">61</span><br><span class="line">62</span><br><span class="line">63</span><br><span class="line">64</span><br><span class="line">65</span><br><span class="line">66</span><br><span class="line">67</span><br><span class="line">68</span><br><span class="line">69</span><br><span class="line">70</span><br><span class="line">71</span><br><span class="line">72</span><br><span class="line">73</span><br><span class="line">74</span><br><span class="line">75</span><br><span class="line">76</span><br><span class="line">77</span><br><span class="line">78</span><br><span class="line">79</span><br><span class="line">80</span><br><span class="line">81</span><br><span class="line">82</span><br></pre></td><td class="code"><pre><span class="line"><span class="meta">#<span class="keyword">include</span> <span class="string">&lt;bits/stdc++.h&gt;</span></span></span><br><span class="line"></span><br><span class="line"><span class="keyword">using</span> <span class="keyword">namespace</span> std;</span><br><span class="line"></span><br><span class="line"><span class="type">int</span> fac[<span class="number">50</span>]{<span class="number">0</span>};</span><br><span class="line"><span class="type">int</span> fac_cnt = <span class="number">0</span>;</span><br><span class="line"><span class="type">int</span> max_num = <span class="number">0</span>;</span><br><span class="line"><span class="type">int</span> bucket[<span class="number">51</span>]{<span class="number">0</span>};  <span class="comment">// 统计每个长度的个数</span></span><br><span class="line"><span class="type">int</span> n;</span><br><span class="line"><span class="type">int</span> sum = <span class="number">0</span>;</span><br><span class="line"></span><br><span class="line"><span class="function"><span class="type">bool</span> <span class="title">is_valid</span><span class="params">(<span class="type">int</span> p)</span></span></span><br><span class="line"><span class="function"></span>{</span><br><span class="line">    cout &lt;&lt; p &lt;&lt; endl;</span><br><span class="line">    <span class="type">int</span> bucket_copy[<span class="number">51</span>]{<span class="number">0</span>};</span><br><span class="line">    <span class="keyword">for</span> (<span class="type">int</span> i = <span class="number">0</span>; i &lt;= max_num; i++)</span><br><span class="line">    {</span><br><span class="line">        bucket_copy[i] = bucket[i];</span><br><span class="line">    }</span><br><span class="line"></span><br><span class="line">    <span class="keyword">for</span> (<span class="type">int</span> i = <span class="number">0</span>; i &lt; sum / p; i++)</span><br><span class="line">    {</span><br><span class="line">        <span class="type">int</span> max_num_copy = max_num;</span><br><span class="line">        <span class="type">int</span> pp = p;</span><br><span class="line">        <span class="keyword">while</span> (pp &gt; <span class="number">0</span>)</span><br><span class="line">        {</span><br><span class="line">            <span class="keyword">if</span> (bucket_copy[max_num_copy] == <span class="number">0</span> ||</span><br><span class="line">                max_num_copy &gt; pp)  <span class="comment">// 查找最低能被减的值</span></span><br><span class="line">            {</span><br><span class="line">                <span class="keyword">do</span></span><br><span class="line">                {</span><br><span class="line">                    <span class="keyword">if</span> (max_num_copy == <span class="number">0</span>)</span><br><span class="line">                    {</span><br><span class="line">                        cout &lt;&lt; <span class="string">"FAILED\n"</span>;</span><br><span class="line">                        <span class="keyword">return</span> <span class="literal">false</span>;</span><br><span class="line">                    }</span><br><span class="line">                    max_num_copy--;</span><br><span class="line">                } <span class="keyword">while</span> (bucket_copy[max_num_copy] == <span class="number">0</span> || max_num_copy &gt; pp);</span><br><span class="line">            }</span><br><span class="line">            pp -= max_num_copy;</span><br><span class="line">            bucket_copy[max_num_copy]--;</span><br><span class="line">            cout &lt;&lt; max_num_copy &lt;&lt; <span class="string">'\n'</span>;</span><br><span class="line">        }</span><br><span class="line">    }</span><br><span class="line">    <span class="keyword">return</span> <span class="literal">true</span>;</span><br><span class="line">}</span><br><span class="line"></span><br><span class="line"><span class="function"><span class="type">int</span> <span class="title">main</span><span class="params">()</span></span></span><br><span class="line"><span class="function"></span>{</span><br><span class="line">    cin &gt;&gt; n;</span><br><span class="line">    <span class="keyword">for</span> (<span class="type">int</span> i = <span class="number">0</span>; i &lt; n; i++)</span><br><span class="line">    {</span><br><span class="line">        <span class="type">int</span> ai;</span><br><span class="line">        cin &gt;&gt; ai;</span><br><span class="line">        max_num = <span class="built_in">max</span>(ai, max_num);</span><br><span class="line">        sum += ai;</span><br><span class="line">        bucket[ai]++;</span><br><span class="line">    }</span><br><span class="line"></span><br><span class="line">    <span class="comment">// 对sum求因子</span></span><br><span class="line">    <span class="keyword">for</span> (<span class="type">int</span> i = max_num; i &lt;= sum; i++)</span><br><span class="line">    {</span><br><span class="line">        <span class="keyword">if</span> (sum % i == <span class="number">0</span>)  <span class="comment">// 整除</span></span><br><span class="line">        {</span><br><span class="line">            fac[fac_cnt++] = i;</span><br><span class="line">        }</span><br><span class="line">    }</span><br><span class="line"></span><br><span class="line">    <span class="keyword">for</span> (<span class="type">int</span> i = <span class="number">0</span>; i &lt; fac_cnt - <span class="number">1</span>; i++)</span><br><span class="line">    {</span><br><span class="line">        <span class="keyword">if</span> (<span class="built_in">is_valid</span>(fac[i]))</span><br><span class="line">        {</span><br><span class="line">            cout &lt;&lt; fac[i] &lt;&lt; endl;</span><br><span class="line">            <span class="built_in">system</span>(<span class="string">"pause"</span>);</span><br><span class="line">            <span class="built_in">exit</span>(<span class="number">0</span>);</span><br><span class="line">        }</span><br><span class="line">    }</span><br><span class="line">    cout &lt;&lt; sum &lt;&lt; endl;  <span class="comment">// 都不满足则是sum</span></span><br><span class="line"></span><br><span class="line">    <span class="built_in">system</span>(<span class="string">"pause"</span>);</span><br><span class="line">    <span class="keyword">return</span> <span class="number">0</span>;</span><br><span class="line">}</span><br></pre></td></tr></tbody></table></figure><p>So I ended up writing a proper search. The search logic isn’t that hard — I used DFS. Each time we form a stick, we loop from the longest to the shortest stick to pick a suitable one, then move to the next state. If all stick lengths have been tried and none work, return <code>false</code>; if all sticks are fully assembled, return <code>true</code>.</p><p>The real challenge is pruning the search. Pruning means: <strong>when we can already determine the outcome in a certain state, stop recursing and immediately return.</strong></p><p>First, we need to understand a key insight: if we need a certain length, say 5, and we still have 2 and 3 available, choosing 5 can be seen as the “superior” choice over choosing 2 and 3, because 2 and 3 together can fully replace 5, but not the other way around. So we should prioritize choosing 5 first, and only later try 2 and 3. This is why we search from larger to smaller.</p><p>Here are the most critical optimizations, <del>as for the other trivial ones, 😂👉🤡</del>:</p><ol><li>Use a bucket (frequency array) to store stick lengths. The advantage is that it lets us retrieve sticks in descending order while also acting as a <code>vis</code> array, “recording” which lengths have already been visited.</li><li>When searching for an available stick, continue from where the last search left off, rather than starting from the beginning. This is because if a longer stick than the previous one works, it should be preferred — so we shouldn’t go back to smaller sticks.</li><li>If the remaining length equals the current stick’s length, but filling it in returns <code>false</code>, break out of the loop immediately and mark this branch as <code>false</code>. This is because it’s already the optimal choice — if using a smaller stick to fill this length would definitely be worse.</li><li>If nothing has been filled yet and it fails, also return <code>false</code> directly. The reasoning is the same as above: if the optimal filling method can’t succeed, worse ones certainly can’t either.</li></ol><p>Honestly, optimizations 3 and 4 are quite hard to come up with. Without reading the top solutions, I probably wouldn’t have figured them out. At the time, my best attempt only scored around 50 points. I still have a lot to learn from the experts.</p><hr><h2 id="AC-Code"><a href="#AC-Code" class="headerlink" title="AC Code"></a>AC Code</h2><figure class="highlight cpp"><table><tbody><tr><td class="gutter"><pre><span class="line">1</span><br><span class="line">2</span><br><span class="line">3</span><br><span class="line">4</span><br><span class="line">5</span><br><span class="line">6</span><br><span class="line">7</span><br><span class="line">8</span><br><span class="line">9</span><br><span class="line">10</span><br><span class="line">11</span><br><span class="line">12</span><br><span class="line">13</span><br><span class="line">14</span><br><span class="line">15</span><br><span class="line">16</span><br><span class="line">17</span><br><span class="line">18</span><br><span class="line">19</span><br><span class="line">20</span><br><span class="line">21</span><br><span class="line">22</span><br><span class="line">23</span><br><span class="line">24</span><br><span class="line">25</span><br><span class="line">26</span><br><span class="line">27</span><br><span class="line">28</span><br><span class="line">29</span><br><span class="line">30</span><br><span class="line">31</span><br><span class="line">32</span><br><span class="line">33</span><br><span class="line">34</span><br><span class="line">35</span><br><span class="line">36</span><br><span class="line">37</span><br><span class="line">38</span><br><span class="line">39</span><br><span class="line">40</span><br><span class="line">41</span><br><span class="line">42</span><br><span class="line">43</span><br><span class="line">44</span><br><span class="line">45</span><br><span class="line">46</span><br><span class="line">47</span><br><span class="line">48</span><br><span class="line">49</span><br><span class="line">50</span><br><span class="line">51</span><br><span class="line">52</span><br><span class="line">53</span><br><span class="line">54</span><br><span class="line">55</span><br><span class="line">56</span><br><span class="line">57</span><br><span class="line">58</span><br><span class="line">59</span><br><span class="line">60</span><br><span class="line">61</span><br><span class="line">62</span><br><span class="line">63</span><br><span class="line">64</span><br><span class="line">65</span><br><span class="line">66</span><br><span class="line">67</span><br><span class="line">68</span><br><span class="line">69</span><br><span class="line">70</span><br><span class="line">71</span><br><span class="line">72</span><br><span class="line">73</span><br><span class="line">74</span><br><span class="line">75</span><br><span class="line">76</span><br><span class="line">77</span><br><span class="line">78</span><br><span class="line">79</span><br><span class="line">80</span><br><span class="line">81</span><br><span class="line">82</span><br><span class="line">83</span><br><span class="line">84</span><br><span class="line">85</span><br><span class="line">86</span><br><span class="line">87</span><br><span class="line">88</span><br><span class="line">89</span><br><span class="line">90</span><br><span class="line">91</span><br><span class="line">92</span><br><span class="line">93</span><br><span class="line">94</span><br><span class="line">95</span><br><span class="line">96</span><br><span class="line">97</span><br><span class="line">98</span><br><span class="line">99</span><br><span class="line">100</span><br><span class="line">101</span><br><span class="line">102</span><br><span class="line">103</span><br><span class="line">104</span><br></pre></td><td class="code"><pre><span class="line"><span class="meta">#<span class="keyword">include</span> <span class="string">&lt;bits/stdc++.h&gt;</span></span></span><br><span class="line"></span><br><span class="line"><span class="keyword">using</span> <span class="keyword">namespace</span> std;</span><br><span class="line"></span><br><span class="line"><span class="type">int</span> fac[<span class="number">50</span>]{<span class="number">0</span>};</span><br><span class="line"><span class="type">int</span> fac_cnt = <span class="number">0</span>;</span><br><span class="line"><span class="type">int</span> max_num = <span class="number">0</span>;</span><br><span class="line"><span class="type">int</span> min_num = <span class="number">100</span>;</span><br><span class="line"><span class="type">int</span> bucket[<span class="number">51</span>]{<span class="number">0</span>};  <span class="comment">// 统计每个长度的个数</span></span><br><span class="line"><span class="type">int</span> n;</span><br><span class="line"><span class="type">int</span> sum = <span class="number">0</span>;</span><br><span class="line"><span class="type">int</span> current_fac;</span><br><span class="line"><span class="type">int</span> filled_bucket[<span class="number">50</span>]{<span class="number">0</span>};</span><br><span class="line"><span class="type">int</span> filled_bucket_cnt = <span class="number">0</span>;</span><br><span class="line"></span><br><span class="line"><span class="function"><span class="type">bool</span> <span class="title">dfs</span><span class="params">(<span class="type">int</span> l, <span class="type">int</span> x, <span class="type">int</span> idx)</span></span></span><br><span class="line"><span class="function"></span>{</span><br><span class="line">    <span class="comment">// l是当次剩余的长度，x是次数，idx是上次搜到的索引</span></span><br><span class="line">    <span class="keyword">if</span> (l == <span class="number">0</span>)</span><br><span class="line">    {</span><br><span class="line">        <span class="keyword">if</span> (x == <span class="number">2</span>)  <span class="comment">// 剩一个一定可以拼</span></span><br><span class="line">        {</span><br><span class="line">            <span class="keyword">return</span> <span class="literal">true</span>;</span><br><span class="line">        }</span><br><span class="line">        <span class="keyword">else</span></span><br><span class="line">        {</span><br><span class="line">            <span class="keyword">return</span> <span class="built_in">dfs</span>(current_fac, x - <span class="number">1</span>, <span class="number">0</span>);</span><br><span class="line">        }</span><br><span class="line">    }</span><br><span class="line"></span><br><span class="line">    <span class="keyword">if</span> (l &lt; min_num)  <span class="comment">// 剩下的比最小长度还小</span></span><br><span class="line">    {</span><br><span class="line">        <span class="keyword">return</span> <span class="literal">false</span>;</span><br><span class="line">    }</span><br><span class="line"></span><br><span class="line">    <span class="keyword">for</span> (<span class="type">int</span> i = idx; i &lt; filled_bucket_cnt; i++)</span><br><span class="line">    {</span><br><span class="line">        <span class="keyword">if</span> (bucket[filled_bucket[i]] &gt; <span class="number">0</span>)</span><br><span class="line">        {</span><br><span class="line">            bucket[filled_bucket[i]]--;</span><br><span class="line">            <span class="keyword">if</span> (<span class="built_in">dfs</span>(l - filled_bucket[i], x, i))</span><br><span class="line">            {</span><br><span class="line">                <span class="comment">// cout &lt;&lt; i &lt;&lt; '\n';</span></span><br><span class="line">                bucket[filled_bucket[i]]++;</span><br><span class="line">                <span class="keyword">return</span> <span class="literal">true</span>;</span><br><span class="line">            }</span><br><span class="line">            <span class="keyword">else</span> <span class="keyword">if</span> (l == current_fac || l == filled_bucket[i])</span><br><span class="line">            {</span><br><span class="line">                bucket[filled_bucket[i]]++;</span><br><span class="line">                <span class="keyword">return</span> <span class="literal">false</span>;</span><br><span class="line">            }</span><br><span class="line"></span><br><span class="line">            bucket[filled_bucket[i]]++;</span><br><span class="line">        }</span><br><span class="line">    }</span><br><span class="line">    <span class="keyword">return</span> <span class="literal">false</span>;</span><br><span class="line">}</span><br><span class="line"></span><br><span class="line"><span class="function"><span class="type">bool</span> <span class="title">cmp</span><span class="params">(<span class="type">int</span> a, <span class="type">int</span> b)</span></span></span><br><span class="line"><span class="function"></span>{</span><br><span class="line">    <span class="keyword">return</span> a &gt; b;</span><br><span class="line">}</span><br><span class="line"></span><br><span class="line"><span class="function"><span class="type">int</span> <span class="title">main</span><span class="params">()</span></span></span><br><span class="line"><span class="function"></span>{</span><br><span class="line">    cin &gt;&gt; n;</span><br><span class="line">    <span class="keyword">for</span> (<span class="type">int</span> i = <span class="number">0</span>; i &lt; n; i++)</span><br><span class="line">    {</span><br><span class="line">        <span class="type">int</span> ai;</span><br><span class="line">        cin &gt;&gt; ai;</span><br><span class="line">        max_num = <span class="built_in">max</span>(ai, max_num);</span><br><span class="line">        min_num = <span class="built_in">min</span>(ai, min_num);</span><br><span class="line">        sum += ai;</span><br><span class="line">        <span class="keyword">if</span> (bucket[ai] == <span class="number">0</span>)</span><br><span class="line">        {</span><br><span class="line">            filled_bucket[filled_bucket_cnt++] = ai;</span><br><span class="line">        }</span><br><span class="line">        bucket[ai]++;</span><br><span class="line">    }</span><br><span class="line"></span><br><span class="line">    <span class="built_in">sort</span>(filled_bucket, filled_bucket + filled_bucket_cnt, cmp);</span><br><span class="line"></span><br><span class="line">    <span class="comment">// 对sum求因子</span></span><br><span class="line">    <span class="keyword">for</span> (<span class="type">int</span> i = max_num; i &lt;= sum; i++)</span><br><span class="line">    {</span><br><span class="line">        <span class="keyword">if</span> (sum % i == <span class="number">0</span>)  <span class="comment">// 整除</span></span><br><span class="line">        {</span><br><span class="line">            fac[fac_cnt++] = i;</span><br><span class="line">        }</span><br><span class="line">    }</span><br><span class="line"></span><br><span class="line">    <span class="keyword">for</span> (<span class="type">int</span> i = <span class="number">0</span>; i &lt; fac_cnt - <span class="number">1</span>; i++)</span><br><span class="line">    {</span><br><span class="line">        current_fac = fac[i];</span><br><span class="line">        <span class="keyword">if</span> (<span class="built_in">dfs</span>(fac[i], sum / fac[i], <span class="number">0</span>))</span><br><span class="line">        {</span><br><span class="line">            cout &lt;&lt; fac[i] &lt;&lt; endl;</span><br><span class="line">            <span class="built_in">exit</span>(<span class="number">0</span>);</span><br><span class="line">        }</span><br><span class="line">    }</span><br><span class="line">    cout &lt;&lt; sum &lt;&lt; endl;  <span class="comment">// 前几个都不满足则是sum</span></span><br><span class="line"></span><br><span class="line">    <span class="keyword">return</span> <span class="number">0</span>;</span><br><span class="line">}</span><br></pre></td></tr></tbody></table></figure>]]>
    </content>
    <id>https://shiquda.link/en/P1120/</id>
    <link href="https://shiquda.link/en/P1120/"/>
    <published>2024-05-30T12:06:08.000Z</published>
    <summary>A deep dive into solving the classic backtracking problem of reconstructing equal-length sticks from broken pieces, with pruning techniques and optimization strategies.</summary>
    <title>P1120 Small Wooden Sticks</title>
    <updated>2024-05-30T12:06:08.000Z</updated>
  </entry>
  <entry>
    <author>
      <name>shiquda</name>
    </author>
    <category term="题解" scheme="https://shiquda.link/categories/%E9%A2%98%E8%A7%A3/"/>
    <category term="题解" scheme="https://shiquda.link/tags/%E9%A2%98%E8%A7%A3/"/>
    <content>
      <![CDATA[<h2 id="Understanding-the-Problem"><a href="#Understanding-the-Problem" class="headerlink" title="Understanding the Problem"></a>Understanding the Problem</h2><p><a href="https://www.luogu.com.cn/problem/P1434">P1434 [SHOI2002] Skiing - Luogu | Computer Science Education New Ecology (luogu.com.cn)</a></p><p>Given a rectangular grid with elevations, calculate the maximum length of a “ski” path from high to low.</p><p>A “ski” move can only go from one cell to a cell that is <strong>adjacent</strong> to it vertically or horizontally, and whose elevation is <strong>strictly lower</strong> than the current cell’s elevation.</p><p>For example:</p><figure class="highlight plaintext"><table><tbody><tr><td class="gutter"><pre><span class="line">1</span><br><span class="line">2</span><br><span class="line">3</span><br><span class="line">4</span><br><span class="line">5</span><br></pre></td><td class="code"><pre><span class="line">1   2   3   4   5</span><br><span class="line">16  17  18  19  6</span><br><span class="line">15  24  25  20  7</span><br><span class="line">14  23  22  21  8</span><br><span class="line">13  12  11  10  9</span><br></pre></td></tr></tbody></table></figure><p>The maximum path here is:</p><p><img src="https://b3logfile.com/file/2024/05/solo-fetchupload-6378931297264261002-9oul5dR.png" alt="Clip_2024-05-28_21-12-10" loading="lazy"></p><p>It has 25 cells in total.</p><p>Note that “length” is the total number of cells passed through from start to end; for example, a path $1\rightarrow 2$ has length 2.</p><p>The maximum rectangle size given in the problem is 100 by 100; let the length be c(olumns) and the width be r(ows).</p><h2 id="Approach"><a href="#Approach" class="headerlink" title="Approach"></a>Approach</h2><p>The first thing that comes to mind is DFS (depth-first search). <code>dfs(int x, int y)</code> returns the maximum length starting from <code>[x][y]</code>. The search logic is simple: find the maximum length among the neighboring cells in four directions, then add 1 to get the maximum length for the current cell.</p><p>But the maximum dimensions in this problem are 100 by 100, so brute-forcing every cell would definitely time out; the worst-case time complexity could be $O(r^2c^2)$.</p><p>We can add memoization on top of the brute-force search. Create an array <code>rec[x][y]</code> to store the maximum length starting from <code>[x][y]</code>. If a later search reaches a neighboring cell and needs the length for <code>[x][y]</code>, just return the recorded value instead of recursing again.</p><p>After this optimization, both the space complexity and time complexity are only $O(rc)$ (because each cell is computed at most once), so it passes easily.</p><hr><h2 id="AC-Code"><a href="#AC-Code" class="headerlink" title="AC Code"></a>AC Code</h2><figure class="highlight cpp"><table><tbody><tr><td class="gutter"><pre><span class="line">1</span><br><span class="line">2</span><br><span class="line">3</span><br><span class="line">4</span><br><span class="line">5</span><br><span class="line">6</span><br><span class="line">7</span><br><span class="line">8</span><br><span class="line">9</span><br><span class="line">10</span><br><span class="line">11</span><br><span class="line">12</span><br><span class="line">13</span><br><span class="line">14</span><br><span class="line">15</span><br><span class="line">16</span><br><span class="line">17</span><br><span class="line">18</span><br><span class="line">19</span><br><span class="line">20</span><br><span class="line">21</span><br><span class="line">22</span><br><span class="line">23</span><br><span class="line">24</span><br><span class="line">25</span><br><span class="line">26</span><br><span class="line">27</span><br><span class="line">28</span><br><span class="line">29</span><br><span class="line">30</span><br><span class="line">31</span><br><span class="line">32</span><br><span class="line">33</span><br><span class="line">34</span><br><span class="line">35</span><br><span class="line">36</span><br><span class="line">37</span><br><span class="line">38</span><br><span class="line">39</span><br><span class="line">40</span><br><span class="line">41</span><br><span class="line">42</span><br><span class="line">43</span><br><span class="line">44</span><br><span class="line">45</span><br><span class="line">46</span><br><span class="line">47</span><br><span class="line">48</span><br><span class="line">49</span><br><span class="line">50</span><br><span class="line">51</span><br><span class="line">52</span><br><span class="line">53</span><br><span class="line">54</span><br><span class="line">55</span><br><span class="line">56</span><br><span class="line">57</span><br><span class="line">58</span><br><span class="line">59</span><br><span class="line">60</span><br><span class="line">61</span><br><span class="line">62</span><br><span class="line">63</span><br><span class="line">64</span><br><span class="line">65</span><br><span class="line">66</span><br></pre></td><td class="code"><pre><span class="line"><span class="meta">#<span class="keyword">include</span> <span class="string">&lt;bits/stdc++.h&gt;</span></span></span><br><span class="line"></span><br><span class="line"><span class="keyword">using</span> <span class="keyword">namespace</span> std;</span><br><span class="line"></span><br><span class="line"><span class="type">int</span> block[<span class="number">110</span>][<span class="number">110</span>]{<span class="number">0</span>};</span><br><span class="line"><span class="type">int</span> rec[<span class="number">110</span>][<span class="number">110</span>]{<span class="number">0</span>};  <span class="comment">// 记忆</span></span><br><span class="line"><span class="type">int</span> r, c;</span><br><span class="line"></span><br><span class="line"><span class="function"><span class="keyword">inline</span> <span class="type">bool</span> <span class="title">is_valid</span><span class="params">(<span class="type">int</span> x, <span class="type">int</span> y)</span>  <span class="comment">// 在范围内</span></span></span><br><span class="line"><span class="function"></span>{</span><br><span class="line">    <span class="keyword">return</span> x &gt;= <span class="number">0</span> &amp;&amp; x &lt; r &amp;&amp; y &gt;= <span class="number">0</span> &amp;&amp; y &lt; c;</span><br><span class="line">}</span><br><span class="line"></span><br><span class="line"><span class="function"><span class="type">int</span> <span class="title">dfs</span><span class="params">(<span class="type">int</span> x, <span class="type">int</span> y)</span>  <span class="comment">// 返回从x, y出发的最大的值</span></span></span><br><span class="line"><span class="function"></span>{</span><br><span class="line">    <span class="keyword">if</span> (rec[x][y] &gt;= <span class="number">0</span>) <span class="keyword">return</span> rec[x][y];</span><br><span class="line"></span><br><span class="line">    <span class="type">int</span> res = <span class="number">1</span>;</span><br><span class="line">    <span class="type">int</span> max_next = <span class="number">0</span>;</span><br><span class="line"></span><br><span class="line">    <span class="keyword">if</span> (<span class="built_in">is_valid</span>(x - <span class="number">1</span>, y) &amp;&amp; block[x - <span class="number">1</span>][y] &lt; block[x][y])</span><br><span class="line">        max_next = <span class="built_in">max</span>(<span class="built_in">dfs</span>(x - <span class="number">1</span>, y), max_next);</span><br><span class="line">    <span class="keyword">if</span> (<span class="built_in">is_valid</span>(x + <span class="number">1</span>, y) &amp;&amp; block[x + <span class="number">1</span>][y] &lt; block[x][y])</span><br><span class="line">        max_next = <span class="built_in">max</span>(<span class="built_in">dfs</span>(x + <span class="number">1</span>, y), max_next);</span><br><span class="line">    <span class="keyword">if</span> (<span class="built_in">is_valid</span>(x, y - <span class="number">1</span>) &amp;&amp; block[x][y - <span class="number">1</span>] &lt; block[x][y])</span><br><span class="line">        max_next = <span class="built_in">max</span>(<span class="built_in">dfs</span>(x, y - <span class="number">1</span>), max_next);</span><br><span class="line">    <span class="keyword">if</span> (<span class="built_in">is_valid</span>(x, y + <span class="number">1</span>) &amp;&amp; block[x][y + <span class="number">1</span>] &lt; block[x][y])</span><br><span class="line">        max_next = <span class="built_in">max</span>(<span class="built_in">dfs</span>(x, y + <span class="number">1</span>), max_next);</span><br><span class="line">    res += max_next;</span><br><span class="line"></span><br><span class="line">    rec[x][y] = res;</span><br><span class="line">    <span class="keyword">return</span> res;</span><br><span class="line">}</span><br><span class="line"></span><br><span class="line"><span class="function"><span class="type">int</span> <span class="title">main</span><span class="params">()</span></span></span><br><span class="line"><span class="function"></span>{</span><br><span class="line">    <span class="keyword">for</span> (<span class="type">int</span> i = <span class="number">0</span>; i &lt; <span class="number">110</span>; i++)</span><br><span class="line">    {</span><br><span class="line">        <span class="keyword">for</span> (<span class="type">int</span> j = <span class="number">0</span>; j &lt; <span class="number">110</span>; j++)</span><br><span class="line">        {</span><br><span class="line">            rec[i][j] = <span class="number">-1</span>;  <span class="comment">// 初始化，-1为无记录</span></span><br><span class="line">        }</span><br><span class="line">    }</span><br><span class="line"></span><br><span class="line">    cin &gt;&gt; r &gt;&gt; c;</span><br><span class="line">    <span class="keyword">for</span> (<span class="type">int</span> i = <span class="number">0</span>; i &lt; r; i++)</span><br><span class="line">    {</span><br><span class="line">        <span class="keyword">for</span> (<span class="type">int</span> j = <span class="number">0</span>; j &lt; c; j++)</span><br><span class="line">        {</span><br><span class="line">            cin &gt;&gt; block[i][j];</span><br><span class="line">        }</span><br><span class="line">    }</span><br><span class="line"></span><br><span class="line">    <span class="type">int</span> ans = <span class="number">1</span>;  <span class="comment">// 至少为1</span></span><br><span class="line">    <span class="keyword">for</span> (<span class="type">int</span> i = <span class="number">0</span>; i &lt; r; i++)</span><br><span class="line">    {</span><br><span class="line">        <span class="keyword">for</span> (<span class="type">int</span> j = <span class="number">0</span>; j &lt; c; j++)</span><br><span class="line">        {</span><br><span class="line">            ans = <span class="built_in">max</span>(ans, <span class="built_in">dfs</span>(i, j));</span><br><span class="line">        }</span><br><span class="line">    }</span><br><span class="line">    cout &lt;&lt; ans &lt;&lt; endl;</span><br><span class="line"></span><br><span class="line">    <span class="built_in">system</span>(<span class="string">"pause"</span>);</span><br><span class="line">    <span class="keyword">return</span> <span class="number">0</span>;</span><br><span class="line">}</span><br></pre></td></tr></tbody></table></figure>]]>
    </content>
    <id>https://shiquda.link/en/P1434/</id>
    <link href="https://shiquda.link/en/P1434/"/>
    <published>2024-05-28T13:28:37.000Z</published>
    <summary>Michael loves skiing, but to gain speed, he must always ski from a higher point to a lower one. Given a grid of mountain heights, find the length of the longest downhill path he can take by moving up, down, left, or right. This classic problem is a perfect introduction to memoized dynamic programming.</summary>
    <title>P1434 [SHOI2002] Skiing: A Classic Dynamic Programming Challenge</title>
    <updated>2024-05-28T13:28:37.000Z</updated>
  </entry>
  <entry>
    <author>
      <name>shiquda</name>
    </author>
    <category term="题解" scheme="https://shiquda.link/categories/%E9%A2%98%E8%A7%A3/"/>
    <category term="题解" scheme="https://shiquda.link/tags/%E9%A2%98%E8%A7%A3/"/>
    <content>
      <![CDATA[<h2 id="Reading-the-Problem"><a href="#Reading-the-Problem" class="headerlink" title="Reading the Problem"></a>Reading the Problem</h2><p><a href="https://www.luogu.com.cn/problem/P1535">P1535 [USACO08MAR] Cow Travelling S - Luogu | New Ecology of Computer Science Education (luogu.com.cn)</a></p><p>The problem roughly says: a cow moves around inside a rectangle of a given size. The cells are either <strong>grass</strong> or <strong>trees</strong>, and the cow cannot walk on trees.</p><p>In one move, the cow can go up, down, left, or right, but cannot stay in place (though it can go in circles!). Given two points A and B, count the number of paths from A to B that take exactly T steps.</p><p>There’s a slight issue with the original problem statement—maybe it’s a translation problem. The original text says “within T seconds,” but what it actually wants is exactly that T-th second. <del>It took me forever to find the bug; I only noticed it after checking the discussion board.</del></p><h2 id="Approach"><a href="#Approach" class="headerlink" title="Approach"></a>Approach</h2><p>At first I thought of using BFS, searching until the front element’s time reaches t+1. But trying it gave <code>MLE</code>, and I didn’t feel like optimizing with memoization or anything.</p><p>Then it hit me: the number of ways to reach each cell at each moment is like a “slice,” and the recurrence between different times and coordinates is obvious. The number of paths at a given time equals the sum of the path counts from the four neighboring cells at the previous time. Of course, if the cell is a tree, it’s 0. From this, we can write the DP formula:</p><p>$$<br>dp[x][y][t] =<br>\begin{cases}<br>0 &amp; \text{if } \text{block}[x][y] = 1 \<br>dp[x-1][y][t-1] + dp[x+1][y][t-1] + dp[x][y-1][t-1] + dp[x][y+1][t-1] &amp; \text{otherwise}<br>\end{cases}<br>$$</p><hr><h2 id="AC-Code"><a href="#AC-Code" class="headerlink" title="AC Code"></a>AC Code</h2><figure class="highlight cpp"><table><tbody><tr><td class="gutter"><pre><span class="line">1</span><br><span class="line">2</span><br><span class="line">3</span><br><span class="line">4</span><br><span class="line">5</span><br><span class="line">6</span><br><span class="line">7</span><br><span class="line">8</span><br><span class="line">9</span><br><span class="line">10</span><br><span class="line">11</span><br><span class="line">12</span><br><span class="line">13</span><br><span class="line">14</span><br><span class="line">15</span><br><span class="line">16</span><br><span class="line">17</span><br><span class="line">18</span><br><span class="line">19</span><br><span class="line">20</span><br><span class="line">21</span><br><span class="line">22</span><br><span class="line">23</span><br><span class="line">24</span><br><span class="line">25</span><br><span class="line">26</span><br><span class="line">27</span><br><span class="line">28</span><br><span class="line">29</span><br><span class="line">30</span><br><span class="line">31</span><br><span class="line">32</span><br><span class="line">33</span><br><span class="line">34</span><br><span class="line">35</span><br><span class="line">36</span><br><span class="line">37</span><br><span class="line">38</span><br><span class="line">39</span><br><span class="line">40</span><br><span class="line">41</span><br><span class="line">42</span><br><span class="line">43</span><br><span class="line">44</span><br><span class="line">45</span><br><span class="line">46</span><br><span class="line">47</span><br><span class="line">48</span><br><span class="line">49</span><br><span class="line">50</span><br><span class="line">51</span><br><span class="line">52</span><br><span class="line">53</span><br><span class="line">54</span><br><span class="line">55</span><br><span class="line">56</span><br><span class="line">57</span><br><span class="line">58</span><br><span class="line">59</span><br><span class="line">60</span><br></pre></td><td class="code"><pre><span class="line"><span class="meta">#<span class="keyword">include</span> <span class="string">&lt;bits/stdc++.h&gt;</span></span></span><br><span class="line"><span class="keyword">using</span> <span class="keyword">namespace</span> std;</span><br><span class="line"></span><br><span class="line"><span class="type">int</span> n, m, t;</span><br><span class="line"><span class="type">int</span> block[<span class="number">110</span>][<span class="number">110</span>]{<span class="number">0</span>};  <span class="comment">// 0未被阻挡</span></span><br><span class="line"><span class="type">int</span> dp[<span class="number">110</span>][<span class="number">110</span>][<span class="number">16</span>]{<span class="number">0</span>};</span><br><span class="line"></span><br><span class="line"><span class="function"><span class="type">bool</span> <span class="title">is_valid</span><span class="params">(<span class="type">int</span> x, <span class="type">int</span> y)</span></span></span><br><span class="line"><span class="function"></span>{</span><br><span class="line">    <span class="keyword">return</span> x &gt;= <span class="number">1</span> &amp;&amp; x &lt;= n &amp;&amp; y &gt;= <span class="number">1</span> &amp;&amp; y &lt;= m &amp;&amp; !block[x][y];</span><br><span class="line">}</span><br><span class="line"></span><br><span class="line"><span class="function"><span class="type">int</span> <span class="title">main</span><span class="params">()</span></span></span><br><span class="line"><span class="function"></span>{</span><br><span class="line">    cin &gt;&gt; n &gt;&gt; m &gt;&gt; t;</span><br><span class="line">    <span class="keyword">for</span> (<span class="type">int</span> i = <span class="number">1</span>; i &lt;= n; i++)</span><br><span class="line">    {</span><br><span class="line">        <span class="keyword">for</span> (<span class="type">int</span> j = <span class="number">1</span>; j &lt;= m; j++)</span><br><span class="line">        {</span><br><span class="line">            <span class="type">char</span> c;</span><br><span class="line">            cin &gt;&gt; c;</span><br><span class="line">            block[i][j] = (c == <span class="string">'*'</span> ? <span class="number">1</span> : <span class="number">0</span>);</span><br><span class="line">        }</span><br><span class="line">    }</span><br><span class="line">    <span class="type">int</span> x1, y1, x2, y2;</span><br><span class="line">    cin &gt;&gt; x1 &gt;&gt; y1 &gt;&gt; x2 &gt;&gt; y2;</span><br><span class="line"></span><br><span class="line">    dp[x1][y1][<span class="number">0</span>] = <span class="number">1</span>;</span><br><span class="line">    <span class="keyword">for</span> (<span class="type">int</span> k = <span class="number">1</span>; k &lt;= t; k++)</span><br><span class="line">    {</span><br><span class="line">        <span class="keyword">for</span> (<span class="type">int</span> i = <span class="number">1</span>; i &lt;= n; i++)</span><br><span class="line">        {</span><br><span class="line">            <span class="keyword">for</span> (<span class="type">int</span> j = <span class="number">1</span>; j &lt;= m; j++)</span><br><span class="line">            {</span><br><span class="line">                <span class="keyword">if</span> (<span class="built_in">is_valid</span>(i, j))</span><br><span class="line">                {</span><br><span class="line">                    <span class="keyword">if</span> (<span class="built_in">is_valid</span>(i - <span class="number">1</span>, j)) dp[i][j][k] += dp[i - <span class="number">1</span>][j][k - <span class="number">1</span>];</span><br><span class="line">                    <span class="keyword">if</span> (<span class="built_in">is_valid</span>(i + <span class="number">1</span>, j)) dp[i][j][k] += dp[i + <span class="number">1</span>][j][k - <span class="number">1</span>];</span><br><span class="line">                    <span class="keyword">if</span> (<span class="built_in">is_valid</span>(i, j - <span class="number">1</span>)) dp[i][j][k] += dp[i][j - <span class="number">1</span>][k - <span class="number">1</span>];</span><br><span class="line">                    <span class="keyword">if</span> (<span class="built_in">is_valid</span>(i, j + <span class="number">1</span>)) dp[i][j][k] += dp[i][j + <span class="number">1</span>][k - <span class="number">1</span>];</span><br><span class="line">                }</span><br><span class="line">            }</span><br><span class="line">        }</span><br><span class="line">    }</span><br><span class="line"></span><br><span class="line">    <span class="type">int</span> ans = <span class="number">0</span>;</span><br><span class="line"></span><br><span class="line">    <span class="comment">// for (int i = 1; i &lt;= n; i++)</span></span><br><span class="line">    <span class="comment">// {</span></span><br><span class="line">    <span class="comment">//     for (int j = 0; j &lt; m; j++)</span></span><br><span class="line">    <span class="comment">//     {</span></span><br><span class="line">    <span class="comment">//         cout &lt;&lt; dp[i][j][1] &lt;&lt; ' ';</span></span><br><span class="line">    <span class="comment">//     }</span></span><br><span class="line">    <span class="comment">//     cout &lt;&lt; '\n';</span></span><br><span class="line">    <span class="comment">// }</span></span><br><span class="line"></span><br><span class="line">    cout &lt;&lt; dp[x2][y2][t] &lt;&lt; endl;</span><br><span class="line">    <span class="built_in">system</span>(<span class="string">"pause"</span>);</span><br><span class="line">    <span class="keyword">return</span> <span class="number">0</span>;</span><br><span class="line">}</span><br></pre></td></tr></tbody></table></figure>]]>
    </content>
    <id>https://shiquda.link/en/P1535/</id>
    <link href="https://shiquda.link/en/P1535/"/>
    <published>2024-05-26T13:08:39.000Z</published>
    <summary>Explore the classic USACO problem 'Cow Travelling'—a dynamic programming approach to counting paths with exact time constraints on a grid, complete with optimized solutions and edge-case insights.</summary>
    <title>P1535 [USACO08MAR] Cow Travelling S</title>
    <updated>2024-05-26T13:50:03.000Z</updated>
  </entry>
  <entry>
    <author>
      <name>shiquda</name>
    </author>
    <category term="题解" scheme="https://shiquda.link/categories/%E9%A2%98%E8%A7%A3/"/>
    <category term="题解" scheme="https://shiquda.link/tags/%E9%A2%98%E8%A7%A3/"/>
    <content>
      <![CDATA[<h2 id="Well-That’s-It"><a href="#Well-That’s-It" class="headerlink" title="Well, That’s It"></a>Well, That’s It</h2><p>The problem list I plan to work through is <a href="https://www.luogu.com.cn/training/9391">this one</a> on Luogu. I won’t necessarily go through it in order, and I won’t force myself to hit a daily or weekly quota. The idea is simply: <strong>trying to explain a problem clearly to someone else is a great way to learn.</strong></p><p>It also leaves something behind.</p><p>Well, that’s it.</p>]]>
    </content>
    <id>https://shiquda.link/en/solution-project-start/</id>
    <link href="https://shiquda.link/en/solution-project-start/"/>
    <published>2024-05-25T14:32:44.000Z</published>
    <summary>Well, That’s It
The problem list I plan to work through is this one on Luogu. I won’t necessarily go through it in order, and I won’t force myself to hit a daily or weekly quota. The idea is simply: trying to explain a problem clearly to someone else is a great way to learn.

It also leaves somethin</summary>
    <title>I've Seen Others Write Problem Solutions, So I'm Starting Too</title>
    <updated>2024-05-25T14:32:44.000Z</updated>
  </entry>
  <entry>
    <author>
      <name>shiquda</name>
    </author>
    <category term="教程" scheme="https://shiquda.link/categories/%E6%95%99%E7%A8%8B/"/>
    <category term="教程" scheme="https://shiquda.link/tags/%E6%95%99%E7%A8%8B/"/>
    <content>
      <![CDATA[<h2 id="Why-can’t-I-load-images-from-Imgur"><a href="#Why-can’t-I-load-images-from-Imgur" class="headerlink" title="Why can’t I load images from Imgur?"></a>Why can’t I load images from Imgur?</h2><p>In short, the IP is blacklisted. Imgur is inaccessible from mainland China, so we need to use a proxy/VPN to access it. The problem is that your proxy node’s IP might be on Imgur’s <strong>blacklist</strong>, which prevents images from loading. Specifically, visiting <code>i.imgur.com</code> (the direct image link) returns <code>429</code>, while visiting <code>imgur.com</code> returns</p><figure class="highlight json"><table><tbody><tr><td class="gutter"><pre><span class="line">1</span><br><span class="line">2</span><br><span class="line">3</span><br><span class="line">4</span><br><span class="line">5</span><br><span class="line">6</span><br><span class="line">7</span><br></pre></td><td class="code"><pre><span class="line"><span class="punctuation">{</span></span><br><span class="line">    <span class="attr">"data"</span><span class="punctuation">:</span> <span class="punctuation">{</span></span><br><span class="line">        <span class="attr">"error"</span><span class="punctuation">:</span> <span class="string">"Imgur is temporarily over capacity. Please try again later."</span></span><br><span class="line">    <span class="punctuation">}</span><span class="punctuation">,</span></span><br><span class="line">    <span class="attr">"success"</span><span class="punctuation">:</span> <span class="literal"><span class="keyword">false</span></span><span class="punctuation">,</span></span><br><span class="line">    <span class="attr">"status"</span><span class="punctuation">:</span> <span class="number">403</span></span><br><span class="line"><span class="punctuation">}</span></span><br></pre></td></tr></tbody></table></figure><h2 id="So-what-can-we-do"><a href="#So-what-can-we-do" class="headerlink" title="So what can we do?"></a>So what can we do?</h2><p>The simplest solution is actually to <strong>switch to a different node</strong>.</p><p>However, I found that after trying all my existing nodes (including self-hosted ones), none of them could access Imgur properly!</p><p>Some netizens said that <strong>many datacenter IPs have been blacklisted by Imgur</strong>. Coincidentally, I didn’t feel like hunting for more nodes either, so I decided to tinker and come up with a workaround.</p><h3 id="Idea-1"><a href="#Idea-1" class="headerlink" title="Idea 1"></a>Idea 1</h3><p>Many websites are slow or blocked in mainland China, so some people create public mirror sites, like <a href="https://hf-mirror.com/">HF-Mirror</a> for <a href="https://huggingface.co/">Hugging Face</a>.</p><p>So I wondered: is there an Imgur mirror site?</p><p>Answer: I couldn’t find one.</p><p>However, there are sites that provide <strong>image mirror/caching services</strong>. They can cache direct links from image hosts and relay them to users. For details, see <a href="https://www.1itao.com/image-anti-leech.html">this article</a>.</p><p>Take <code>https://img.noobzone.ru/getimg.php?url=</code> as an example: just append the Imgur image URL you want to access to the end of this URL (pass it as a parameter), and you can access it without a proxy/VPN.</p><p>For example: <code>https://img.noobzone.ru/getimg.php?url=https://i.imgur.com/TbWS0cZ.png</code></p><h3 id="Idea-2"><a href="#Idea-2" class="headerlink" title="Idea 2"></a>Idea 2</h3><p>I thought of <a href="https://chromewebstore.google.com/detail/header-editor/eningockdidmgiojffjmkdblpjocbhgh">Header Editor (google.com)</a>, a browser extension that can redirect any request matching certain conditions.</p><p>So I wrote a regex to match URLs whose domain is <code>i.imgur.com</code> and redirect them to <code>https://img.noobzone.ru/getimg.php?url=</code>.</p><p><img src="https://b3logfile.com/file/2024/05/solo-fetchupload-15941643260665077244-hDXeQ03.png" alt="Clip_2024-05-31_18-41-59" loading="lazy"></p><p><strong>Update</strong>: Thanks to a helpful reader’s reminder, I found that this image caching site seems to have enabled hotlink protection. We can create another rule to strip the <code>referer</code> from request headers, and images will load normally again.</p><p><img src="https://b3logfile.com/file/2024/05/solo-fetchupload-16074890948498776779-UdLGQCf.png" alt="Clip_2024-05-31_18-42-19" loading="lazy"></p><p>After installing the extension, you can fill in the rules following my example, or import them directly from</p><figure class="highlight plaintext"><table><tbody><tr><td class="gutter"><pre><span class="line">1</span><br></pre></td><td class="code"><pre><span class="line">https://gist.githubusercontent.com/shiquda/fde8daca5c45a829d063283ba41bcca4/raw/a7b80eeb251c5175b6e4e3d2fb6f497e9df7c0f9/header-editor-imgur-config</span><br></pre></td></tr></tbody></table></figure><p>Once imported, enabling the rules should make it work.</p><h2 id="Limitations"><a href="#Limitations" class="headerlink" title="Limitations"></a>Limitations</h2><p>This only works in the browser. If you need to access Imgur from other software, you’ll likely need some other traffic-routing software, which I won’t discuss here. Interested readers can explore and implement it on their own.</p><h2 id="References"><a href="#References" class="headerlink" title="References"></a>References</h2><ol><li><a href="https://www.1itao.com/image-anti-leech.html">The ultimate solution to image hotlink protection, super simple and practical | iTao Digital Resource Library (1itao.com)</a></li><li><a href="https://hostloc.com/thread-1180833-1-1.html">Imgur blocked all Oracle Cloud IPs from accessing images - US VPS General Discussion - Global Hosting Exchange Forum - Powered by Discuz! (hostloc.com)</a></li></ol><h2 id="Acknowledgments"><a href="#Acknowledgments" class="headerlink" title="Acknowledgments"></a>Acknowledgments</h2><p>Thanks to netizen <a href="https://shiquda.link/load-imgur-images#46cbb4b336094559a6debafd50772276">“Guest”</a> for the supplementary solution.</p>]]>
    </content>
    <id>https://shiquda.link/en/load-imgur-images/</id>
    <link href="https://shiquda.link/en/load-imgur-images/"/>
    <published>2024-04-19T13:19:21.000Z</published>
    <summary>Imgur is blocked in mainland China, and many proxy IPs are blacklisted too. Discover a practical solution using mirror cache services like noobzone.ru and the Header Editor browser extension to redirect requests and load images seamlessly.</summary>
    <title>Fixing Imgur Images Not Loading: A Clever Workaround</title>
    <updated>2024-05-31T10:48:27.000Z</updated>
  </entry>
  <entry>
    <author>
      <name>shiquda</name>
    </author>
    <category term="教程" scheme="https://shiquda.link/categories/%E6%95%99%E7%A8%8B/"/>
    <category term="教程" scheme="https://shiquda.link/tags/%E6%95%99%E7%A8%8B/"/>
    <content>
      <![CDATA[<h2 id="Background"><a href="#Background" class="headerlink" title="Background"></a>Background</h2><p>I’m used to solving algorithm problems in VSCode, but often when I need to allocate large memory locally (specifically in the <code>main</code> function), the IDE reports <code>Segmentation fault</code> at runtime.</p><p>For example, the following code:</p><figure class="highlight cpp"><table><tbody><tr><td class="gutter"><pre><span class="line">1</span><br><span class="line">2</span><br><span class="line">3</span><br><span class="line">4</span><br><span class="line">5</span><br><span class="line">6</span><br><span class="line">7</span><br></pre></td><td class="code"><pre><span class="line"><span class="meta">#<span class="keyword">include</span> <span class="string">&lt;bits/stdc++.h&gt;</span></span></span><br><span class="line"><span class="keyword">using</span> <span class="keyword">namespace</span> std;</span><br><span class="line"><span class="function"><span class="type">int</span> <span class="title">main</span><span class="params">()</span></span></span><br><span class="line"><span class="function"></span>{</span><br><span class="line">    <span class="type">int</span> blocks[<span class="number">1001</span>][<span class="number">1001</span>]{<span class="number">0</span>};</span><br><span class="line"> ...</span><br><span class="line">}</span><br></pre></td></tr></tbody></table></figure><p>At this point, the array actually only takes up 1001 * 1001 * 8B ≈ 7.64MB of memory, yet it throws a <code>Segmentation fault</code>. But on the OJ, it runs fine and gets AC.</p><p>The solution is actually simple: <strong>don’t define it inside <code>main</code>—just make it a global variable</strong>. But <del>in the spirit of getting to the bottom of things</del>, I did some digging into this phenomenon.</p><h2 id="Explanation"><a href="#Explanation" class="headerlink" title="Explanation"></a>Explanation</h2><p>In C++ programs, <strong>global variables</strong> are stored on the <strong>heap</strong>, while <strong>local variables</strong> are stored on the <strong>stack</strong>. If you define a large array inside <code>main</code>, the limited stack space can easily cause a stack overflow, resulting in a <code>Segmentation fault</code>.</p><h2 id="Then-why-does-it-work-on-OJ"><a href="#Then-why-does-it-work-on-OJ" class="headerlink" title="Then why does it work on OJ?"></a>Then why does it work on OJ?</h2><p>Actually, you can customize the upper limit of stack-allocated memory by <strong>passing arguments to the linker</strong>.</p><p>Using my VSCode configuration as an example: in the <code>.vscode</code> folder under your project directory, there should be a <code>tasks.json</code> file. Modify the configuration and add the following command to <code>tasks.args</code>:</p><figure class="highlight plaintext"><table><tbody><tr><td class="gutter"><pre><span class="line">1</span><br></pre></td><td class="code"><pre><span class="line">-Wl,--stack,512000000</span><br></pre></td></tr></tbody></table></figure><p>What this command means:</p><ul><li><code>-Wl</code>: tells the compiler that what follows is passed to the linker</li><li><code>--stack,512000000</code>: sets the stack memory allocation limit to <code>512000000B</code></li></ul><p>After the change, it should look like this:</p><figure class="highlight json"><table><tbody><tr><td class="gutter"><pre><span class="line">1</span><br><span class="line">2</span><br><span class="line">3</span><br><span class="line">4</span><br><span class="line">5</span><br><span class="line">6</span><br><span class="line">7</span><br><span class="line">8</span><br><span class="line">9</span><br><span class="line">10</span><br><span class="line">11</span><br><span class="line">12</span><br><span class="line">13</span><br><span class="line">14</span><br><span class="line">15</span><br><span class="line">16</span><br><span class="line">17</span><br><span class="line">18</span><br><span class="line">19</span><br><span class="line">20</span><br><span class="line">21</span><br><span class="line">22</span><br><span class="line">23</span><br><span class="line">24</span><br><span class="line">25</span><br><span class="line">26</span><br><span class="line">27</span><br><span class="line">28</span><br><span class="line">29</span><br></pre></td><td class="code"><pre><span class="line"><span class="punctuation">{</span></span><br><span class="line">    <span class="attr">"tasks"</span><span class="punctuation">:</span> <span class="punctuation">[</span></span><br><span class="line">        <span class="punctuation">{</span></span><br><span class="line">            <span class="attr">"type"</span><span class="punctuation">:</span> <span class="string">"cppbuild"</span><span class="punctuation">,</span></span><br><span class="line">            <span class="attr">"label"</span><span class="punctuation">:</span> <span class="string">"C/C++: g++.exe 生成活动文件"</span><span class="punctuation">,</span></span><br><span class="line">            <span class="attr">"command"</span><span class="punctuation">:</span> <span class="string">"C:\\MinGW\\bin\\g++.exe"</span><span class="punctuation">,</span></span><br><span class="line">            <span class="attr">"args"</span><span class="punctuation">:</span> <span class="punctuation">[</span></span><br><span class="line">                <span class="string">"-fdiagnostics-color=always"</span><span class="punctuation">,</span></span><br><span class="line">                <span class="string">"-g"</span><span class="punctuation">,</span></span><br><span class="line">                <span class="string">"${file}"</span><span class="punctuation">,</span></span><br><span class="line">                <span class="string">"-o"</span><span class="punctuation">,</span></span><br><span class="line">                <span class="string">"${fileDirname}\\${fileBasenameNoExtension}.exe"</span><span class="punctuation">,</span></span><br><span class="line">                <span class="string">"-Wl,--stack,512000000"</span></span><br><span class="line">            <span class="punctuation">]</span><span class="punctuation">,</span></span><br><span class="line">            <span class="attr">"options"</span><span class="punctuation">:</span> <span class="punctuation">{</span></span><br><span class="line">                <span class="attr">"cwd"</span><span class="punctuation">:</span> <span class="string">"${fileDirname}"</span></span><br><span class="line">            <span class="punctuation">}</span><span class="punctuation">,</span></span><br><span class="line">            <span class="attr">"problemMatcher"</span><span class="punctuation">:</span> <span class="punctuation">[</span></span><br><span class="line">                <span class="string">"$gcc"</span></span><br><span class="line">            <span class="punctuation">]</span><span class="punctuation">,</span></span><br><span class="line">            <span class="attr">"group"</span><span class="punctuation">:</span> <span class="punctuation">{</span></span><br><span class="line">                <span class="attr">"kind"</span><span class="punctuation">:</span> <span class="string">"build"</span><span class="punctuation">,</span></span><br><span class="line">                <span class="attr">"isDefault"</span><span class="punctuation">:</span> <span class="literal"><span class="keyword">true</span></span></span><br><span class="line">            <span class="punctuation">}</span><span class="punctuation">,</span></span><br><span class="line">            <span class="attr">"detail"</span><span class="punctuation">:</span> <span class="string">"调试器生成的任务。"</span></span><br><span class="line">        <span class="punctuation">}</span></span><br><span class="line">    <span class="punctuation">]</span><span class="punctuation">,</span></span><br><span class="line">    <span class="attr">"version"</span><span class="punctuation">:</span> <span class="string">"2.0.0"</span></span><br><span class="line"><span class="punctuation">}</span></span><br></pre></td></tr></tbody></table></figure><p>From then on, even if you allocate <em>large memory</em> inside <code>main</code>, it won’t throw an error.</p>]]>
    </content>
    <id>https://shiquda.link/en/solve-segmentation-fault/</id>
    <link href="https://shiquda.link/en/solve-segmentation-fault/"/>
    <published>2024-04-10T15:41:31.000Z</published>
    <summary>Learn how to identify and fix common segmentation fault errors in C++ programs during Olympiad in Informatics contests, including debugging tips and best practices with g++.</summary>
    <title>Solving Segmentation Fault Errors with g++ in OI</title>
    <updated>2024-04-10T15:41:31.000Z</updated>
  </entry>
  <entry>
    <author>
      <name>shiquda</name>
    </author>
    <category term="教程" scheme="https://shiquda.link/categories/%E6%95%99%E7%A8%8B/"/>
    <category term="资源" scheme="https://shiquda.link/categories/%E6%95%99%E7%A8%8B/%E8%B5%84%E6%BA%90/"/>
    <category term="教程" scheme="https://shiquda.link/tags/%E6%95%99%E7%A8%8B/"/>
    <category term="资源" scheme="https://shiquda.link/tags/%E8%B5%84%E6%BA%90/"/>
    <category term="破解" scheme="https://shiquda.link/tags/%E7%A0%B4%E8%A7%A3/"/>
    <content>
      <![CDATA[<h2 id="Important-Notice"><a href="#Important-Notice" class="headerlink" title="Important Notice"></a>Important Notice</h2><p><strong>This tutorial is for learning purposes only. All software, websites, and other resources mentioned are sourced from the internet and have no affiliation with the author. The author assumes no direct or indirect responsibility for them. If you download any resources through this tutorial, you must delete them from your computer within 24 hours. The author is not responsible for any disputes arising from this.</strong></p><h2 id="How-It-Works"><a href="#How-It-Works" class="headerlink" title="How It Works"></a>How It Works</h2><ol><li>Use a third-party website to download the corresponding Microsoft Store app package.</li><li>Bypass Windows signature verification.</li><li>Enjoy~</li></ol><h2 id="Detailed-Steps"><a href="#Detailed-Steps" class="headerlink" title="Detailed Steps"></a>Detailed Steps</h2><p>Let’s walk through the installation process using Diarium as an example.</p><h3 id="Get-the-Microsoft-Store-Link"><a href="#Get-the-Microsoft-Store-Link" class="headerlink" title="Get the Microsoft Store Link"></a>Get the Microsoft Store Link</h3><p>Search for the app you want on <a href="https://apps.microsoft.com/search?hl=zh-cn&gl=CN">Microsoft Apps</a>.<br><img src="https://b3logfile.com/file/2024/03/image-27kErq5.png" alt="image.png" loading="lazy"></p><p>Find the app, click into it, and copy the URL of <strong>the app</strong>.</p><blockquote><p>For example, Diarium’s link is <a href="https://apps.microsoft.com/detail/9nblggh4vzz1?hl=zh-cn&gl=CN">https://apps.microsoft.com/detail/9nblggh4vzz1?hl=zh-cn&gl=CN</a></p></blockquote><h3 id="Search-and-Download-from-a-Third-Party-Website"><a href="#Search-and-Download-from-a-Third-Party-Website" class="headerlink" title="Search and Download from a Third-Party Website"></a>Search and Download from a Third-Party Website</h3><p>Open the following website:</p><p><a href="https://store.rg-adguard.net/">Microsoft Store - Generation Project (v1.2.3) [by @rgadguard &amp; mkuba50] (rg-adguard.net)</a></p><p>Paste the link you copied earlier into the search box and click Search.</p><p><img src="https://b3logfile.com/file/2024/03/image-bvZkyR6.png" alt="image.png" loading="lazy"></p><p>In the search results, download the file with a <code>.appx</code> or <code>.msixbundle</code> extension among the first few files—usually the larger one.</p><p>During the download, your browser may warn that the file is risky. Click <strong>Keep on this device</strong>.</p><p>Open the file directly. You should see an Install button; click Install.</p><p>Once installed, it may work right away. But <strong>if it says the app is unavailable</strong>, follow the steps below.</p><h3 id="Bypass-Signature-Verification"><a href="#Bypass-Signature-Verification" class="headerlink" title="Bypass Signature Verification"></a>Bypass Signature Verification</h3><p>Download <a href="https://github.com/Wapitiii/WSAppBak/releases/tag/v1.1">Release WSAppBak v1.1 · Wapitiii&#x2F;WSAppBak (github.com)</a></p><p>After downloading, extract it to a suitable directory and run <code>WSAppBak.exe</code>.</p><p>The app was installed earlier but isn’t usable, right? Use a tool like Everything to locate the <code>diarium.exe</code> file.</p><p>Navigate to Diarium’s directory (the folder name may contain a jumble of letters and numbers), and copy the <strong>directory</strong> path—not the <del><code>.exe</code></del> file.</p><p>Paste the directory path and press Enter.</p><p><img src="https://b3logfile.com/file/2024/03/image-okOIupB.png" alt="image.png" loading="lazy"></p><p>For the output directory, you can use anything, e.g., <code>./output</code>.</p><p>When prompted for a password, select <code>None</code>.</p><p><img src="https://b3logfile.com/file/2024/03/image-UhitXF5.png" alt="image.png" loading="lazy"></p><p>Open the <code>output</code> folder in the WSAppBak directory (or your custom folder). Open and install the <code>.pfx</code> and <code>.cer</code> files. When asked for the store location, choose <strong>Local Machine</strong>.</p><p><img src="https://b3logfile.com/file/2024/03/image-uqSmO0y.png" alt="image.png" loading="lazy"></p><p>When asked to set a password, just skip it. Leave all other settings unchanged and click OK.</p><p>After installing both files, click the <code>.appx</code> file <strong>generated in the directory</strong>, then click Install (or Reinstall).</p><p>In my case, the installation failed. If that happens, <strong>uninstall the previously installed app, then install the generated <code>.appx</code> file—it should work normally.</strong></p><hr><h2 id="Reference-Credit"><a href="#Reference-Credit" class="headerlink" title="Reference &amp; Credit"></a>Reference &amp; Credit</h2><ol><li><a href="https://www.youtube.com/watch?v=z883dh0twIo">How to get almost any paid app in the Microsoft Store for FREE? ! (youtube.com)</a></li><li><a href="https://github.com/Wapitiii/WSAppBak">Wapitiii&#x2F;WSAppBak: APPX Backupper and Repacker (github.com)</a></li><li><a href="https://store.rg-adguard.net/">Microsoft Store - Generation Project (v1.2.3) [by @rgadguard &amp; mkuba50] (rg-adguard.net)</a></li></ol>]]>
    </content>
    <id>https://shiquda.link/en/how-to-download-apps-on-ms-store-for-free/</id>
    <link href="https://shiquda.link/en/how-to-download-apps-on-ms-store-for-free/"/>
    <published>2024-03-23T12:34:19.000Z</published>
    <summary>Discover how to download and install paid Microsoft Store apps via third-party websites. Steps: grab the app's store link, fetch the installer from a third-party site, and bypass signature verification.</summary>
    <title>How to Get Paid Microsoft Store Apps for Free</title>
    <updated>2024-03-23T12:34:19.000Z</updated>
  </entry>
  <entry>
    <author>
      <name>shiquda</name>
    </author>
    <category term="教程" scheme="https://shiquda.link/categories/%E6%95%99%E7%A8%8B/"/>
    <category term="资源" scheme="https://shiquda.link/categories/%E6%95%99%E7%A8%8B/%E8%B5%84%E6%BA%90/"/>
    <category term="教程" scheme="https://shiquda.link/tags/%E6%95%99%E7%A8%8B/"/>
    <category term="资源" scheme="https://shiquda.link/tags/%E8%B5%84%E6%BA%90/"/>
    <content>
      <![CDATA[<h2 id="Background"><a href="#Background" class="headerlink" title="Background"></a>Background</h2><p>A university campus network throttles bandwidth to 30 Mbps (about 3.75 MB&#x2F;s), which makes downloading large files like games and models painfully slow. However, I accidentally discovered that in rare cases, certain resources are not throttled — for example, downloading installers from app stores or installing Python packages via Anaconda can reach around 20 MB&#x2F;s, which is more than enough.</p><p>Recently, I came across a post about using the tool <a href="https://www.dogfight360.com/blog/18273/">Download CDN Redirect IPv6 Toolkit (Steam&#x2F;EPIC&#x2F;BattleNet&#x2F;UbiConnect&#x2F;XboxPC) – Dogfight360</a> by the developer of <a href="http://www.dogfight360.com/blog/">Dogfight360 – Yuyicheng Personal Blog</a>, which redirects Steam download requests to IPv6-capable CDNs and achieves full-speed downloads. After testing, it indeed works.</p><p>That gave me an idea: since IPv6 traffic isn’t throttled, is there a way to send all traffic over IPv6 and bypass the limit?</p><blockquote><p>From what I’ve learned, some universities don’t charge for IPv6 traffic, so you can try this approach too. But if your campus network doesn’t support IPv6 or also throttles it, this method won’t help.<br>To test whether IPv6 is supported:</p><ul><li><a href="http://v6t.ipip.net/">IPv6 test (ipip.net)</a></li><li>Or run this in the command line: <code>ping 2001:4860:4860::8888</code> and see if it responds.</li></ul></blockquote><h2 id="Principle"><a href="#Principle" class="headerlink" title="Principle"></a>Principle</h2><p>Use an IPv6 <strong>node</strong> to forward all local traffic over IPv6, thereby bypassing the speed limit. <del>(Yes, it’s the same thing used for circumventing censorship.)</del></p><h2 id="Specific-Methods"><a href="#Specific-Methods" class="headerlink" title="Specific Methods"></a>Specific Methods</h2><h3 id="Find-a-node-that-supports-IPv6-directly"><a href="#Find-a-node-that-supports-IPv6-directly" class="headerlink" title="Find a node that supports IPv6 directly"></a>Find a node that supports IPv6 directly</h3><p>I recall seeing some “airports” (proxy providers) with this kind of node. If you’re interested, you can search for them yourself. <del>Or maybe I misremembered.</del></p><h3 id="Set-up-your-own-node"><a href="#Set-up-your-own-node" class="headerlink" title="Set up your own node"></a>Set up your own node</h3><p>You’d better have a spare VPS. Make sure it supports IPv6.<br>Reference:</p><ul><li><a href="https://www.jixing.one/vps/v2ray-xui-v2rayn/">Achieving Campus Network IPv6 Free-Traffic Internet Access and Circumventing Censorship | V2ray Tutorial: X-ui and v2rayN ~ Polaris Network (jixing.one)</a></li></ul><p>Then export the subscription and use it in V2rayN.</p><p>If you use Clash on a daily basis, you can use the following website to convert vmess nodes to a Clash configuration file.</p><p><a href="https://v1.v2rayse.com/v2ray-clash/">v2ray to Clash node - v2rayse.com</a></p><p><strong>Remember to enable the IPv6 option in Clash settings.</strong></p><hr><h2 id="References"><a href="#References" class="headerlink" title="References"></a>References</h2><ol><li><a href="https://www.jixing.one/vps/v2ray-xui-v2rayn/">Achieving Campus Network IPv6 Free-Traffic Internet Access and Circumventing Censorship | V2ray Tutorial: X-ui and v2rayN ~ Polaris Network (jixing.one)</a></li><li><a href="https://zhuanlan.zhihu.com/p/659452359">An Attempt to Bypass Campus Network Quotas Using IPv6 - Zhihu (zhihu.com)</a></li><li><a href="https://mp.weixin.qq.com/s/oJHQ8cGpmwO4TUTTqgLEJQ">Up to 18 MB&#x2F;s! How to Break the 3.6 MB&#x2F;s TJ-WIFI Speed Limit Curse? (qq.com)</a></li></ol>]]>
    </content>
    <id>https://shiquda.link/en/bypass-college-network-rate-limit/</id>
    <link href="https://shiquda.link/en/bypass-college-network-rate-limit/"/>
    <published>2024-03-20T12:04:23.000Z</published>
    <summary>This article details a method to bypass campus network speed restrictions by leveraging IPv6. By finding or setting up IPv6-capable nodes and tunneling all local traffic through IPv6, you can effectively circumvent throttling and enjoy unmetered access.</summary>
    <title>Bypassing Campus Network Throttling with IPv6: A Practical Exploration</title>
    <updated>2024-03-22T15:40:55.000Z</updated>
  </entry>
  <entry>
    <author>
      <name>shiquda</name>
    </author>
    <category term="笔记" scheme="https://shiquda.link/categories/%E7%AC%94%E8%AE%B0/"/>
    <category term="学习" scheme="https://shiquda.link/tags/%E5%AD%A6%E4%B9%A0/"/>
    <category term="Python" scheme="https://shiquda.link/tags/Python/"/>
    <category term="笔记" scheme="https://shiquda.link/tags/%E7%AC%94%E8%AE%B0/"/>
    <category term="AI" scheme="https://shiquda.link/tags/AI/"/>
    <content>
      <![CDATA[<p>All commands below are demonstrated on <strong>Windows</strong>.</p><h2 id="Entering-a-conda-environment"><a href="#Entering-a-conda-environment" class="headerlink" title="Entering a conda environment"></a>Entering a conda environment</h2><figure class="highlight plaintext"><table><tbody><tr><td class="gutter"><pre><span class="line">1</span><br></pre></td><td class="code"><pre><span class="line">activate</span><br></pre></td></tr></tbody></table></figure><h2 id="Exiting"><a href="#Exiting" class="headerlink" title="Exiting"></a>Exiting</h2><figure class="highlight plaintext"><table><tbody><tr><td class="gutter"><pre><span class="line">1</span><br></pre></td><td class="code"><pre><span class="line">deactivate</span><br></pre></td></tr></tbody></table></figure><h2 id="Creating-an-environment"><a href="#Creating-an-environment" class="headerlink" title="Creating an environment"></a>Creating an environment</h2><figure class="highlight plaintext"><table><tbody><tr><td class="gutter"><pre><span class="line">1</span><br></pre></td><td class="code"><pre><span class="line">conda create -n &lt;env&gt;</span><br></pre></td></tr></tbody></table></figure><p>If you’re using <strong>python</strong>, you’ll need to run</p><figure class="highlight plaintext"><table><tbody><tr><td class="gutter"><pre><span class="line">1</span><br></pre></td><td class="code"><pre><span class="line">conda create -n &lt;env&gt; python</span><br></pre></td></tr></tbody></table></figure><h2 id="Entering-a-specific-environment"><a href="#Entering-a-specific-environment" class="headerlink" title="Entering a specific environment"></a>Entering a specific environment</h2><figure class="highlight plaintext"><table><tbody><tr><td class="gutter"><pre><span class="line">1</span><br></pre></td><td class="code"><pre><span class="line">conda activate &lt;env&gt;</span><br></pre></td></tr></tbody></table></figure><h2 id="Listing-packages-in-the-current-environment"><a href="#Listing-packages-in-the-current-environment" class="headerlink" title="Listing packages in the current environment"></a>Listing packages in the current environment</h2><figure class="highlight plaintext"><table><tbody><tr><td class="gutter"><pre><span class="line">1</span><br></pre></td><td class="code"><pre><span class="line">conda list</span><br></pre></td></tr></tbody></table></figure><h2 id="Installing-a-specific-package"><a href="#Installing-a-specific-package" class="headerlink" title="Installing a specific package"></a>Installing a specific package</h2><figure class="highlight plaintext"><table><tbody><tr><td class="gutter"><pre><span class="line">1</span><br></pre></td><td class="code"><pre><span class="line">conda install &lt;package&gt;</span><br></pre></td></tr></tbody></table></figure><p>You can also specify a version.</p><figure class="highlight plaintext"><table><tbody><tr><td class="gutter"><pre><span class="line">1</span><br></pre></td><td class="code"><pre><span class="line">conda install &lt;package&gt;=&lt;version&gt;</span><br></pre></td></tr></tbody></table></figure><h2 id="Viewing-available-versions"><a href="#Viewing-available-versions" class="headerlink" title="Viewing available versions"></a>Viewing available versions</h2><figure class="highlight plaintext"><table><tbody><tr><td class="gutter"><pre><span class="line">1</span><br></pre></td><td class="code"><pre><span class="line">conda search numpy</span><br></pre></td></tr></tbody></table></figure><h2 id="Uninstalling-a-package"><a href="#Uninstalling-a-package" class="headerlink" title="Uninstalling a package"></a>Uninstalling a package</h2><figure class="highlight plaintext"><table><tbody><tr><td class="gutter"><pre><span class="line">1</span><br></pre></td><td class="code"><pre><span class="line">conda uninstall &lt;package&gt;</span><br></pre></td></tr></tbody></table></figure><h2 id="Deleting-a-virtual-environment"><a href="#Deleting-a-virtual-environment" class="headerlink" title="Deleting a virtual environment"></a>Deleting a virtual environment</h2><p>Note: you need to <strong>exit the virtual environment first</strong> before deleting it.</p><figure class="highlight plaintext"><table><tbody><tr><td class="gutter"><pre><span class="line">1</span><br></pre></td><td class="code"><pre><span class="line">conda remove -n &lt;env&gt; --all</span><br></pre></td></tr></tbody></table></figure>]]>
    </content>
    <id>https://shiquda.link/en/articles/2024/02/26/1708943642988.html</id>
    <link href="https://shiquda.link/en/articles/2024/02/26/1708943642988.html"/>
    <published>2024-02-26T10:34:03.000Z</published>
    <summary>
      <![CDATA[All commands below are demonstrated on Windows.

Entering a conda environment
1


activate


Exiting
1


deactivate


Creating an environment
1


conda create -n <env>


If you’re using python, you’ll need to run

1


conda create -n <env> python


Entering a specific environment
1


conda activate]]>
    </summary>
    <title>Essential conda Commands You Need to Know</title>
    <updated>2024-02-26T13:15:39.000Z</updated>
  </entry>
  <entry>
    <author>
      <name>shiquda</name>
    </author>
    <category term="教程" scheme="https://shiquda.link/categories/%E6%95%99%E7%A8%8B/"/>
    <category term="资源" scheme="https://shiquda.link/categories/%E6%95%99%E7%A8%8B/%E8%B5%84%E6%BA%90/"/>
    <category term="教程" scheme="https://shiquda.link/tags/%E6%95%99%E7%A8%8B/"/>
    <category term="资源" scheme="https://shiquda.link/tags/%E8%B5%84%E6%BA%90/"/>
    <content>
      <![CDATA[<h2 id="The-Easiest-Way…"><a href="#The-Easiest-Way…" class="headerlink" title="The Easiest Way…"></a>The Easiest Way…</h2><p><strong>Search on Taobao:</strong></p><figure class="highlight plaintext"><table><tbody><tr><td class="gutter"><pre><span class="line">1</span><br></pre></td><td class="code"><pre><span class="line">PDF代找</span><br></pre></td></tr></tbody></table></figure><p>For many things, spending time hunting them down isn’t really worth it. Paying someone to find them is <strong>fast and convenient</strong>, and the price isn’t bad either.<br>Generally speaking, the merchant channels here are pretty similar. If one or two of them can’t find a particular book, it’s basically a lost cause—just go buy the physical copy.<br><del>If you’re not ready to give up and don’t mind wasting time, you can also try my methods below.</del><br>If you’d rather not spend money, definitely check out the methods below. As long as the book isn’t too obscure, you can usually find it.</p><h2 id="Search-Criteria"><a href="#Search-Criteria" class="headerlink" title="Search Criteria"></a>Search Criteria</h2><p>There are actually many criteria you can use to find a book, rather than just blindly searching by title.</p><h3 id="Book-Title"><a href="#Book-Title" class="headerlink" title="Book Title"></a>Book Title</h3><p>Generally, this should be the starting point for finding an ebook. <del>If you don’t even know the book’s name, figure that out first.</del></p><p>It’s worth noting that you <strong>don’t need to know the exact title</strong>. Of course, searching with an exact title is always better than a fuzzy search.</p><p>For example, if you want to find <em>C++ Primer Plus</em>, you can first search on <a href="https://www.douban.com/search?cat=1001&amp;q=">Douban</a> to <strong>determine the edition you want</strong> and get its exact title.</p><p><img src="https://b3logfile.com/file/2024/02/image-5bJLgsM.png" alt="image.png" loading="lazy"></p><h3 id="ISBN"><a href="#ISBN" class="headerlink" title="ISBN"></a>ISBN</h3><p>In the previous step, you can also grab the book’s <strong>ISBN</strong> from the book details page.</p><p><img src="https://b3logfile.com/file/2024/02/image-ABzOUcv.png" alt="image.png" loading="lazy"></p><p><strong>ISBN</strong> stands for <strong>International Standard Book Number</strong>. You can think of it as a book’s unique “<strong>ID number</strong>.” With it, you can precisely pinpoint a specific edition of a book. This is very useful in our subsequent searches.</p><h3 id="ssid"><a href="#ssid" class="headerlink" title="ssid"></a>ssid</h3><p>It may also be called the $SS$ code, and it’s an 8-digit ID.<br>This is the ID used to look up certain libraries.<br>How to find the ssid:</p><ol><li><a href="https://findbooks.eu.org/">FindBooks – Book Information Search Platform (findbooks.eu.org)</a></li><li><a href="https://tampermonkey.getpdfnow.com/">Monkey Mutual Aid (getpdfnow.com)</a></li></ol><p>In the second method, the ssid is located in the “Number” field.</p><p><img src="https://b3logfile.com/file/2024/02/image-7utu2Wr.png" alt="image.png" loading="lazy"></p><h2 id="Search-Channels"><a href="#Search-Channels" class="headerlink" title="Search Channels"></a>Search Channels</h2><p>Below are some useful search channels I’ve collected.</p><div class="md-table-scroll"><table><thead><tr><th align="left">Channel</th><th align="left">Title Search</th><th align="left">ISBN Search</th><th>ssid Search</th><th>Notes</th></tr></thead><tbody><tr><td align="left"><a href="https://z-library.se/">Z-Library – the world’s largest e-book library. Your gateway to knowledge and culture.</a></td><td align="left">✔</td><td align="left">✔</td><td>❌</td><td>The famous Z-Library, especially comprehensive for foreign-language ebooks. If it’s down, you can find official links on your own.</td></tr><tr><td align="left"><a href="https://search.zhelper.net/">zhelper Search Page 🔍</a></td><td align="left">✔</td><td align="left">✔</td><td>❌</td><td>Requires an API endpoint to use; refer to <a href="https://tool.ssdown.org/">this</a>. Covers Z-Library resources, and some endpoints include other resources too.</td></tr><tr><td align="left"><a href="https://www.findbooks.info/">My Book House (findbooks.info)</a></td><td align="left">✔</td><td align="left">✔</td><td>❌</td><td>Downloading may require a VPN.</td></tr><tr><td align="left"><a href="https://www.book123.info/">Anonymous Books | A nice ebook website (book123.info)</a></td><td align="left">✔</td><td align="left">✔</td><td>❌</td><td>Simple and easy to use.</td></tr><tr><td align="left"><a href="https://freembook.com/">FreeMbook Search</a></td><td align="left">✔</td><td align="left">✔</td><td>✔</td><td>Works well, but most links are Baidu Netdisk instant transfers, which may fail due to API changes.</td></tr><tr><td align="left"><a href="https://www.jiumodiary.com/">Jiumo Search – Document Search Engine (jiumodiary.com)</a></td><td align="left">✔</td><td align="left">✔</td><td>❌</td><td>Recommended by many, but personally I find the resources limited.</td></tr><tr><td align="left"><a href="https://t.me/+dLqK79lm0G40ZWQ1">https://t.me/+dLqK79lm0G40ZWQ1</a></td><td align="left">❌</td><td align="left">❌</td><td>✔</td><td>Requires VPN.</td></tr><tr><td align="left"><a href="https://t.me/duxiubook">https://t.me/duxiubook</a></td><td align="left">✔</td><td align="left">❌</td><td>✔</td><td>Requires VPN.</td></tr></tbody></table></div><h2 id="Helper-Tools"><a href="#Helper-Tools" class="headerlink" title="Helper Tools"></a>Helper Tools</h2><p>First, let me recommend an all-purpose website. You can download instant transfers and also <strong>find and add bookmarks</strong> based on ssid (some PDF books may not have detailed bookmarks).</p><p><a href="https://pdg2pdf.com/">PDG to PDF All-in-One Tool (pdg2pdf.com)</a></p><p>Also, a <strong>format conversion</strong> website. If the format of the resource you downloaded isn’t what you want, you can convert it with the site below.</p><p><a href="https://convertio.co/zh/">Convertio — File Converter</a></p><hr><h2 id="References"><a href="#References" class="headerlink" title="References"></a>References</h2><ol><li><a href="https://ssdown.org/archives/1700482250661">Chaoxing TG Channel/Bot Collection – YiBook Project (ssdown.org)</a></li><li><a href="https://ssdown.org/archives/1694769328287">[Continuously Updated] Zlibrary/Superlib Access Methods &amp; News Collection – YiBook Project (ssdown.org)</a></li><li><a href="https://www.readfree.net/bbs/thread-5902150-1-1.html">DX Book Instant Link Query Site – Online Reading Garden – Powered by Discuz! (readfree.net)</a></li><li><a href="https://blog.yibook.org/post/zhelper/">Using Zhelper Search to Find and Download Books / Zhelper Search API Collection · YiBook Project</a></li></ol>]]>
    </content>
    <id>https://shiquda.link/en/articles/2024/02/19/1708320689703.html</id>
    <link href="https://shiquda.link/en/articles/2024/02/19/1708320689703.html"/>
    <published>2024-02-19T05:31:29.000Z</published>
    <summary>Beyond paying for e-books on marketplaces like Taobao, you can leverage key identifiers—book title, ISBN, and SSID—to conduct precise searches across alternative sources.</summary>
    <title>How to Find E-books Beyond the Usual Channels?</title>
    <updated>2024-02-19T05:31:29.000Z</updated>
  </entry>
  <entry>
    <author>
      <name>shiquda</name>
    </author>
    <category term="教程" scheme="https://shiquda.link/categories/%E6%95%99%E7%A8%8B/"/>
    <category term="教程" scheme="https://shiquda.link/tags/%E6%95%99%E7%A8%8B/"/>
    <category term="Linux" scheme="https://shiquda.link/tags/Linux/"/>
    <content>
      <![CDATA[<p><img src="https://b3logfile.com/bing/20230201.jpg?imageView2/1/w/960/h/540/interlace/1/q/100" loading="lazy"></p><h2 id="Prerequisites"><a href="#Prerequisites" class="headerlink" title="Prerequisites"></a>Prerequisites</h2><ul><li>A server</li><li>Nginx installed</li><li>A domain name</li></ul><h2 id="Steps"><a href="#Steps" class="headerlink" title="Steps"></a>Steps</h2><h3 id="Domain-Configuration"><a href="#Domain-Configuration" class="headerlink" title="Domain Configuration"></a>Domain Configuration</h3><p>Generally, to set up HTTPS, you need a domain name. I got my current domain for free in 2023 from <a href="http://www.dynadot.com/?s6m836E8ED7l6L7H">dynadot</a> for one year—not sure if that offer is still available. If you need to purchase a domain, you can try <a href="http://www.dynadot.com/?s6m836E8ED7l6L7H">dynadot</a>‘s services, or consider using a free domain (usually a subdomain, though the experience isn’t as smooth).</p><p>In your domain registrar, locate the <strong>DNS settings</strong>.<br>If your primary domain is already in use, you can set up a subdomain instead. Here, I’ll use a <strong>subdomain</strong> as an example—the process is the same for a primary domain.</p><p>In the subdomain settings, add a record, select <strong>A</strong>, and point it to your server’s <strong>public IP</strong>.</p><p><img src="https://b3logfile.com/file/2024/01/Clip_2024-01-31_10-53-05-SuFAiHE.png" alt="Clip20240131105305.png" loading="lazy"></p><p>After saving, it may take a <strong>few minutes</strong> for the changes to propagate.</p><h3 id="Nginx-Configuration"><a href="#Nginx-Configuration" class="headerlink" title="Nginx Configuration"></a>Nginx Configuration</h3><p>If Nginx isn’t installed, here’s how to install it on Ubuntu:</p><figure class="highlight bash"><table><tbody><tr><td class="gutter"><pre><span class="line">1</span><br><span class="line">2</span><br></pre></td><td class="code"><pre><span class="line"><span class="built_in">sudo</span> apt-get update</span><br><span class="line"><span class="built_in">sudo</span> apt-get install nginx</span><br></pre></td></tr></tbody></table></figure><p>You can verify the installation with the following command:</p><figure class="highlight bash"><table><tbody><tr><td class="gutter"><pre><span class="line">1</span><br></pre></td><td class="code"><pre><span class="line">nginx -v</span><br></pre></td></tr></tbody></table></figure><p>You should see version information similar to this:</p><figure class="highlight plaintext"><table><tbody><tr><td class="gutter"><pre><span class="line">1</span><br></pre></td><td class="code"><pre><span class="line">nginx version: nginx/1.22.0 (Ubuntu)</span><br></pre></td></tr></tbody></table></figure><p>In the <code>/etc/nginx/sites-available/</code> directory, create a new file (the name is up to you, but it’s best to keep it related to your website or service):</p><figure class="highlight bash"><table><tbody><tr><td class="gutter"><pre><span class="line">1</span><br></pre></td><td class="code"><pre><span class="line"><span class="built_in">sudo</span> nano /etc/nginx/sites-available/&lt;name&gt;</span><br></pre></td></tr></tbody></table></figure><p>Fill in the following content (replace the values inside <code>&lt;&gt;</code> with your own):</p><figure class="highlight bash"><table><tbody><tr><td class="gutter"><pre><span class="line">1</span><br><span class="line">2</span><br><span class="line">3</span><br><span class="line">4</span><br><span class="line">5</span><br><span class="line">6</span><br><span class="line">7</span><br><span class="line">8</span><br><span class="line">9</span><br><span class="line">10</span><br><span class="line">11</span><br></pre></td><td class="code"><pre><span class="line">server {</span><br><span class="line">    listen 80;</span><br><span class="line">    server_name &lt;your_domain&gt;;</span><br><span class="line"></span><br><span class="line">    location / {</span><br><span class="line">        proxy_pass http://localhost:&lt;service_port&gt;;</span><br><span class="line">        proxy_set_header Host <span class="variable">$host</span>;</span><br><span class="line">        proxy_set_header X-Real-IP <span class="variable">$remote_addr</span>;</span><br><span class="line">        proxy_set_header X-Forwarded-For <span class="variable">$proxy_add_x_forwarded_for</span>;</span><br><span class="line">    }</span><br><span class="line">}</span><br></pre></td></tr></tbody></table></figure><p>After saving, create a symlink with the following command:</p><figure class="highlight bash"><table><tbody><tr><td class="gutter"><pre><span class="line">1</span><br></pre></td><td class="code"><pre><span class="line"><span class="built_in">sudo</span> <span class="built_in">ln</span> -s /etc/nginx/sites-available/&lt;name&gt; /etc/nginx/sites-enabled/</span><br></pre></td></tr></tbody></table></figure><h3 id="Configuring-Certbot"><a href="#Configuring-Certbot" class="headerlink" title="Configuring Certbot"></a>Configuring Certbot</h3><p>Install Certbot:</p><figure class="highlight bash"><table><tbody><tr><td class="gutter"><pre><span class="line">1</span><br><span class="line">2</span><br></pre></td><td class="code"><pre><span class="line"><span class="built_in">sudo</span> apt-get update</span><br><span class="line"><span class="built_in">sudo</span> apt-get install certbot python3-certbot-nginx</span><br></pre></td></tr></tbody></table></figure><p>Request a free certificate:</p><figure class="highlight bash"><table><tbody><tr><td class="gutter"><pre><span class="line">1</span><br></pre></td><td class="code"><pre><span class="line"><span class="built_in">sudo</span> certbot --nginx -d &lt;your_domain&gt;</span><br></pre></td></tr></tbody></table></figure><p>Upon success, you’ll see:</p><figure class="highlight plaintext"><table><tbody><tr><td class="gutter"><pre><span class="line">1</span><br><span class="line">2</span><br><span class="line">3</span><br></pre></td><td class="code"><pre><span class="line">Deploying certificate</span><br><span class="line">Successfully deployed certificate for openai.api.shiquda.link to /etc/nginx/sites-enabled/xxx</span><br><span class="line">Congratulations! You have successfully enabled HTTPS on xxx</span><br></pre></td></tr></tbody></table></figure><p>After the request succeeds, <del>if everything goes well</del>, the certificate will renew automatically when it’s close to expiring.</p><p>To be safe, you can test a dry run of the renewal (it won’t actually renew anything):</p><figure class="highlight bash"><table><tbody><tr><td class="gutter"><pre><span class="line">1</span><br></pre></td><td class="code"><pre><span class="line"><span class="built_in">sudo</span> certbot renew --dry-run</span><br></pre></td></tr></tbody></table></figure><h2 id="Usage"><a href="#Usage" class="headerlink" title="Usage"></a>Usage</h2><p>Now, when you visit your domain, HTTPS should be working.</p>]]>
    </content>
    <id>https://shiquda.link/en/articles/2024/01/31/1706670820508.html</id>
    <link href="https://shiquda.link/en/articles/2024/01/31/1706670820508.html"/>
    <published>2024-01-31T03:13:40.000Z</published>
    <summary>A step-by-step guide to enabling HTTPS for your website or service, covering certificate acquisition, configuration, and best practices.</summary>
    <title>How to Add HTTPS to Your Website or Service</title>
    <updated>2024-01-31T03:19:58.000Z</updated>
  </entry>
  <entry>
    <author>
      <name>shiquda</name>
    </author>
    <category term="教程" scheme="https://shiquda.link/categories/%E6%95%99%E7%A8%8B/"/>
    <category term="资源" scheme="https://shiquda.link/categories/%E6%95%99%E7%A8%8B/%E8%B5%84%E6%BA%90/"/>
    <category term="教程" scheme="https://shiquda.link/tags/%E6%95%99%E7%A8%8B/"/>
    <category term="学习" scheme="https://shiquda.link/tags/%E5%AD%A6%E4%B9%A0/"/>
    <category term="Linux" scheme="https://shiquda.link/tags/Linux/"/>
    <category term="AI" scheme="https://shiquda.link/tags/AI/"/>
    <content>
      <![CDATA[<p><strong>Summary: Use GitHub Copilot to access the GPT-4 model for free</strong></p><div class="tag-plugin colorful note"><div class="body"><p><strong>Note</strong>: Multiple GitHub Copilot accounts have already been banned for using this method, so it’s no longer recommended.</p></div></div><h2 id="Prerequisites"><a href="#Prerequisites" class="headerlink" title="Prerequisites"></a>Prerequisites</h2><p>What you’ll need:</p><h3 id="GitHub-Copilot"><a href="#GitHub-Copilot" class="headerlink" title="GitHub Copilot"></a>GitHub Copilot</h3><p>If you’re a college student, you can take advantage of GitHub’s education benefits — after verification, you’ll get access to GitHub Copilot. If you’re not a student and don’t want to pay the full price, you can search online for ways to get it for free or at a discounted rate.</p><h3 id="Server-Optional"><a href="#Server-Optional" class="headerlink" title="Server (Optional)"></a>Server (Optional)</h3><p><a href="https://github.com/aaamoon/copilot-gpt4-service">aaamoon/copilot-gpt4-service: Convert Github Copilot to ChatGPT, free to use the GPT-4 model</a><br>This project leverages Copilot to call GPT models, enabling free access to GPT-4.</p><p>The repo author has deployed a public service, but since so many people use it, your Copilot could get banned by GitHub due to IP-related issues. Self-hosting the service is a safer option.</p><h2 id="Getting-Your-Copilot-Token"><a href="#Getting-Your-Copilot-Token" class="headerlink" title="Getting Your Copilot Token"></a>Getting Your Copilot Token</h2><p><a href="https://github.com/aaamoon/copilot-gpt4-service">aaamoon/copilot-gpt4-service: Convert Github Copilot to ChatGPT, free to use the GPT-4 model</a></p><p>The project documentation covers several ways to obtain a Copilot token. If you want to skip the hassle, you can grab one directly from the site below — just keep in mind that since it’s not self-hosted, there’s some risk involved.<br><a href="https://cocopilot.org/copilot/token">Get Copilot Token (cocopilot.org)</a></p><p>If you don’t want to self-host <a href="https://github.com/aaamoon/copilot-gpt4-service">copilot-gpt4-service</a> and <a href="https://github.com/ChatGPTNextWeb/ChatGPT-Next-Web">ChatGPT-Next-Web</a>, you can use the repo author’s <a href="https://gpt4copilot.tech/#/chat">NextChat (gpt4copilot.tech)</a> directly. Just fill in the target URL with:</p><figure class="highlight plaintext"><table><tbody><tr><td class="gutter"><pre><span class="line">1</span><br></pre></td><td class="code"><pre><span class="line">https://gpt4copilot.tech/</span><br></pre></td></tr></tbody></table></figure><p>For the API key, <strong>directly use the Copilot Token you obtained earlier</strong>.<br><del>It seems this is no longer working — self-hosting is the only option now.</del></p><h2 id="Setting-Up-copilot-gpt4-service"><a href="#Setting-Up-copilot-gpt4-service" class="headerlink" title="Setting Up copilot-gpt4-service"></a>Setting Up copilot-gpt4-service</h2><p>Build it with Docker:</p><figure class="highlight bash"><table><tbody><tr><td class="gutter"><pre><span class="line">1</span><br><span class="line">2</span><br><span class="line">3</span><br><span class="line">4</span><br><span class="line">5</span><br></pre></td><td class="code"><pre><span class="line">docker run -d \</span><br><span class="line">  --name copilot-gpt4-service \</span><br><span class="line">  --restart always \</span><br><span class="line">  -p 8080:8080 \</span><br><span class="line">  aaamoon/copilot-gpt4-service:latest</span><br></pre></td></tr></tbody></table></figure><p>If you need to specify a port, just change the <code>8080</code> before the colon to whatever you want — no other changes needed.<br>Once this step is done, you can already use HTTP-compatible clients to make calls, like <a href="https://chatboxai.app/zh">Chatbox - Your AI assistant for work and study, free official download (chatboxai.app)</a></p><h2 id="Setting-Up-ChatGPT-Next-Web"><a href="#Setting-Up-ChatGPT-Next-Web" class="headerlink" title="Setting Up ChatGPT-Next-Web"></a>Setting Up ChatGPT-Next-Web</h2><p>Pull the image:</p><figure class="highlight bash"><table><tbody><tr><td class="gutter"><pre><span class="line">1</span><br></pre></td><td class="code"><pre><span class="line">docker pull yidadaa/chatgpt-next-web</span><br></pre></td></tr></tbody></table></figure><p>If copilot-gpt4-service is deployed on the same server, you can set the <code>BASE_URL</code> parameter to <code>http://copilot-gpt4-service:8080/</code></p><figure class="highlight bash"><table><tbody><tr><td class="gutter"><pre><span class="line">1</span><br><span class="line">2</span><br><span class="line">3</span><br><span class="line">4</span><br><span class="line">5</span><br></pre></td><td class="code"><pre><span class="line">docker run -d -p 3000:3000 \</span><br><span class="line">   -e CODE=&lt;your_password&gt; \</span><br><span class="line">   -e BASE_URL=http://copilot-gpt4-service:8080/ \</span><br><span class="line">   -e OPENAI_API_KEY=&lt;your_copilot_token&gt; \</span><br><span class="line">   yidadaa/chatgpt-next-web</span><br></pre></td></tr></tbody></table></figure><p>Check the container info:</p><figure class="highlight bash"><table><tbody><tr><td class="gutter"><pre><span class="line">1</span><br></pre></td><td class="code"><pre><span class="line">docker ps</span><br></pre></td></tr></tbody></table></figure><p>Then add both containers to the same network:</p><figure class="highlight bash"><table><tbody><tr><td class="gutter"><pre><span class="line">1</span><br><span class="line">2</span><br><span class="line">3</span><br><span class="line">4</span><br><span class="line">5</span><br></pre></td><td class="code"><pre><span class="line"><span class="comment"># Create a new network</span></span><br><span class="line">docker network create my_network</span><br><span class="line"><span class="comment"># Add containers to this network</span></span><br><span class="line">docker network connect my_network copilot-gpt4-service  </span><br><span class="line">docker network connect my_network &lt;nextchat_container_id&gt;</span><br></pre></td></tr></tbody></table></figure><h2 id="Usage"><a href="#Usage" class="headerlink" title="Usage"></a>Usage</h2><p>Visit <code>&lt;ip&gt;:3000</code> to start using it. On first login, you’ll need to enter the password to access the configured API key, then switch the model to GPT-4 in the model selector.</p><h2 id="Reference"><a href="#Reference" class="headerlink" title="Reference"></a>Reference</h2><p><a href="https://github.com/ChatGPTNextWeb/ChatGPT-Next-Web">ChatGPTNextWeb/ChatGPT-Next-Web: A cross-platform ChatGPT/Gemini UI (Web / PWA / Linux / Win / MacOS). Have your own cross-platform ChatGPT/Gemini app with one click. (github.com)</a><br><a href="https://github.com/aaamoon/copilot-gpt4-service">aaamoon/copilot-gpt4-service: Convert Github Copilot to ChatGPT, free to use the GPT-4 model</a></p>]]>
    </content>
    <id>https://shiquda.link/en/articles/2024/01/08/1704715752038.html</id>
    <link href="https://shiquda.link/en/articles/2024/01/08/1704715752038.html"/>
    <published>2024-01-08T12:09:12.000Z</published>
    <summary>Leverage GitHub Copilot to access the GPT-4 model at no cost.</summary>
    <title>A Free Way to Use GPT-4</title>
    <updated>2024-01-11T11:18:24.000Z</updated>
  </entry>
  <entry>
    <author>
      <name>shiquda</name>
    </author>
    <category term="教程" scheme="https://shiquda.link/categories/%E6%95%99%E7%A8%8B/"/>
    <category term="教程" scheme="https://shiquda.link/tags/%E6%95%99%E7%A8%8B/"/>
    <category term="学习" scheme="https://shiquda.link/tags/%E5%AD%A6%E4%B9%A0/"/>
    <category term="Linux" scheme="https://shiquda.link/tags/Linux/"/>
    <category term="Python" scheme="https://shiquda.link/tags/Python/"/>
    <content>
      <![CDATA[<p><img src="https://b3logfile.com/bing/20201218.jpg?imageView2/1/w/960/h/540/interlace/1/q/100" loading="lazy"></p><p>Reference:</p><p><a href="https://stable-diffusion-art.com/stable-video-diffusion-img2vid/">How to run Stable Video Diffusion img2vid - Stable Diffusion Art (stable-diffusion-art.com)</a></p><p><a href="https://video-stable-diffusion.com/install-svd-on-linux/">https://video-stable-diffusion.com/install-svd-on-linux/</a></p><p>This tutorial uses the SVD XT model.</p><blockquote><p><a href="https://huggingface.co/stabilityai/stable-video-diffusion-img2vid/blob/main/svd.safetensors">SVD</a> – trained to generate 14 frames at resolution 576×1024.</p><p><a href="https://huggingface.co/stabilityai/stable-video-diffusion-img2vid-xt/blob/main/svd_xt.safetensors">SVD XT</a> – trained to generate <strong>25 frames</strong> at resolution <strong>576×1024</strong>.</p></blockquote><p>This tutorial works on Ubuntu 22.04.3 x86_64.</p><h2 id="Preparation"><a href="#Preparation" class="headerlink" title="Preparation"></a>Preparation</h2><p>Create a folder to isolate your project.</p><figure class="highlight bash"><table><tbody><tr><td class="gutter"><pre><span class="line">1</span><br></pre></td><td class="code"><pre><span class="line"><span class="built_in">mkdir</span> ./xxx</span><br></pre></td></tr></tbody></table></figure><p>Enter the folder you just created.</p><figure class="highlight bash"><table><tbody><tr><td class="gutter"><pre><span class="line">1</span><br></pre></td><td class="code"><pre><span class="line"><span class="built_in">cd</span> xxx</span><br></pre></td></tr></tbody></table></figure><h2 id="Cloning"><a href="#Cloning" class="headerlink" title="Cloning"></a>Cloning</h2><p>Pull the remote repository.</p><figure class="highlight bash"><table><tbody><tr><td class="gutter"><pre><span class="line">1</span><br><span class="line">2</span><br></pre></td><td class="code"><pre><span class="line">git <span class="built_in">clone</span> https://github.com/Stability-AI/generative-models</span><br><span class="line"><span class="built_in">cd</span> generative-models</span><br></pre></td></tr></tbody></table></figure><h2 id="Downloading-the-Model"><a href="#Downloading-the-Model" class="headerlink" title="Downloading the Model"></a>Downloading the Model</h2><p>(Since <a href="http://huggingface.co/">huggingface.co</a> is blocked, we use a mirror here.)</p><p><a href="https://huggingface.co/stabilityai/stable-video-diffusion-img2vid/tree/main">stabilityai/stable-video-diffusion-img2vid at main (huggingface.co)</a></p><p><a href="https://huggingface.co/stabilityai/stable-video-diffusion-img2vid-xt/tree/main">stabilityai/stable-video-diffusion-img2vid-xt at main (huggingface.co)</a></p><p>First, download the <code>svd.safetensors</code> model.</p><figure class="highlight bash"><table><tbody><tr><td class="gutter"><pre><span class="line">1</span><br><span class="line">2</span><br><span class="line">3</span><br></pre></td><td class="code"><pre><span class="line"><span class="built_in">mkdir</span> checkpoints</span><br><span class="line"><span class="built_in">cd</span> checkpoints</span><br><span class="line">wget https://hf-mirror.com/stabilityai/stable-video-diffusion-img2vid/resolve/main/svd.safetensors</span><br></pre></td></tr></tbody></table></figure><p>After downloading, return to the project root directory.</p><figure class="highlight bash"><table><tbody><tr><td class="gutter"><pre><span class="line">1</span><br></pre></td><td class="code"><pre><span class="line"><span class="built_in">cd</span> ..</span><br></pre></td></tr></tbody></table></figure><h2 id="Installing-Dependencies"><a href="#Installing-Dependencies" class="headerlink" title="Installing Dependencies"></a>Installing Dependencies</h2><h3 id="conda-and-Python"><a href="#conda-and-Python" class="headerlink" title="conda and Python"></a>conda and Python</h3><p>First install Anaconda (skip this if you already have it).</p><figure class="highlight bash"><table><tbody><tr><td class="gutter"><pre><span class="line">1</span><br><span class="line">2</span><br></pre></td><td class="code"><pre><span class="line">wget https://repo.anaconda.com/archive/Anaconda3-2023.09-0-Linux-x86_64.sh</span><br><span class="line">bash Anaconda3-2023.09-0-Linux-x86_64.sh</span><br></pre></td></tr></tbody></table></figure><p>Note: during installation, you need to accept the license agreement first, type <code>yes</code>, and then continue.</p><p>After installation, you can delete the installer script.</p><figure class="highlight bash"><table><tbody><tr><td class="gutter"><pre><span class="line">1</span><br></pre></td><td class="code"><pre><span class="line"><span class="built_in">rm</span> Anaconda3-2023.09-0-Linux-x86_64.sh</span><br></pre></td></tr></tbody></table></figure><p>Check whether the installation was successful.</p><figure class="highlight bash"><table><tbody><tr><td class="gutter"><pre><span class="line">1</span><br></pre></td><td class="code"><pre><span class="line">conda --v</span><br></pre></td></tr></tbody></table></figure><p>You should see a version number.</p><p>If it didn’t work, you can manually configure the environment variables.</p><figure class="highlight bash"><table><tbody><tr><td class="gutter"><pre><span class="line">1</span><br><span class="line">2</span><br></pre></td><td class="code"><pre><span class="line"><span class="built_in">echo</span> <span class="string">". ~/anaconda3/etc/profile.d/conda.sh"</span> &gt;&gt; ~/.bashrc</span><br><span class="line"><span class="built_in">source</span> ~/.bashrc</span><br></pre></td></tr></tbody></table></figure><p>Use conda to create a Python environment with Python 3.10.</p><figure class="highlight bash"><table><tbody><tr><td class="gutter"><pre><span class="line">1</span><br></pre></td><td class="code"><pre><span class="line">conda create --name svd python=3.10 -y</span><br></pre></td></tr></tbody></table></figure><h3 id="Project-Dependencies"><a href="#Project-Dependencies" class="headerlink" title="Project Dependencies"></a>Project Dependencies</h3><figure class="highlight bash"><table><tbody><tr><td class="gutter"><pre><span class="line">1</span><br></pre></td><td class="code"><pre><span class="line">conda activate svd</span><br></pre></td></tr></tbody></table></figure><p>At this point, you should be in the virtual environment.</p><p>You can configure a domestic mirror source.</p><figure class="highlight bash"><table><tbody><tr><td class="gutter"><pre><span class="line">1</span><br><span class="line">2</span><br></pre></td><td class="code"><pre><span class="line">pip config <span class="built_in">set</span> global.index-url https://pypi.tuna.tsinghua.edu.cn/simple/</span><br><span class="line">pip config <span class="built_in">set</span> install.trusted-host pypi.tuna.tsinghua.edu.cn</span><br></pre></td></tr></tbody></table></figure><p>Run the following command in the project root directory to install dependencies:</p><figure class="highlight bash"><table><tbody><tr><td class="gutter"><pre><span class="line">1</span><br><span class="line">2</span><br></pre></td><td class="code"><pre><span class="line">pip3 install -r requirements/pt2.txt</span><br><span class="line">pip3 install .</span><br></pre></td></tr></tbody></table></figure><h2 id="Launching"><a href="#Launching" class="headerlink" title="Launching"></a>Launching</h2><p>First set the environment variables, otherwise you’ll get an error.</p><figure class="highlight bash"><table><tbody><tr><td class="gutter"><pre><span class="line">1</span><br><span class="line">2</span><br></pre></td><td class="code"><pre><span class="line"><span class="built_in">echo</span> <span class="string">'export PYTHONPATH=/generative-models:$PYTHONPATH'</span> &gt;&gt; ~/.bashrc</span><br><span class="line"><span class="built_in">source</span> ~/.bashrc</span><br></pre></td></tr></tbody></table></figure><p><del>(If) it’s blocked and you need to manually download files,</del> <strong>you don’t need to run the code below</strong>.</p><figure class="highlight bash"><table><tbody><tr><td class="gutter"><pre><span class="line">1</span><br><span class="line">2</span><br><span class="line">3</span><br></pre></td><td class="code"><pre><span class="line"><span class="comment"># [Deprecated] If manually downloading files:</span></span><br><span class="line"><span class="comment"># git clone https://hf-mirror.com/laion/CLIP-ViT-H-14-laion2B-s32B-b79K ~/.cache/huggingface/hub/CLIP-ViT-H-14-laion2B-s32B-b79K</span></span><br><span class="line"><span class="comment"># wget https://openaipublic.azureedge.net/clip/models/b8cca3fd41ae0c99ba7e8951adf17d267cdb84cd88be6f7c2e0eca1737a03836/ViT-L-14.pt -P ~/.cache/clip/</span></span><br></pre></td></tr></tbody></table></figure><p>Or try the code below to replace the mirror site. Just add the parameter on the first run; you won’t need it afterward.</p><figure class="highlight bash"><table><tbody><tr><td class="gutter"><pre><span class="line">1</span><br></pre></td><td class="code"><pre><span class="line">HF_ENDPOINT=https://hf-mirror.com streamlit run scripts/demo/video_sampling.py  --server.address  0.0.0.0  --server.port 4801</span><br></pre></td></tr></tbody></table></figure><p>You can change the <code>-server.port</code> parameter to set the access port.</p><h2 id="Usage"><a href="#Usage" class="headerlink" title="Usage"></a>Usage</h2><p>Visit <code>http://&lt;ip&gt;:4801</code></p>]]>
    </content>
    <id>https://shiquda.link/en/articles/2023/12/05/1701780603849.html</id>
    <link href="https://shiquda.link/en/articles/2023/12/05/1701780603849.html"/>
    <published>2023-12-05T12:50:03.000Z</published>
    <summary>Learn how to set up Stable Video Diffusion on a China-based server, from environment configuration and model downloads to optimizing performance under local network constraints.</summary>
    <title>Deploying Stable Video Diffusion on a Domestic Server: A Step-by-Step Guide</title>
    <updated>2024-01-11T11:19:29.000Z</updated>
  </entry>
  <entry>
    <author>
      <name>shiquda</name>
    </author>
    <category term="教程" scheme="https://shiquda.link/categories/%E6%95%99%E7%A8%8B/"/>
    <category term="资源" scheme="https://shiquda.link/categories/%E6%95%99%E7%A8%8B/%E8%B5%84%E6%BA%90/"/>
    <category term="教程" scheme="https://shiquda.link/tags/%E6%95%99%E7%A8%8B/"/>
    <category term="学习" scheme="https://shiquda.link/tags/%E5%AD%A6%E4%B9%A0/"/>
    <category term="油猴脚本" scheme="https://shiquda.link/tags/%E6%B2%B9%E7%8C%B4%E8%84%9A%E6%9C%AC/"/>
    <category term="资源" scheme="https://shiquda.link/tags/%E8%B5%84%E6%BA%90/"/>
    <content>
      <![CDATA[<p>First, clarify <strong>why</strong> you’re looking for resources, so you know <strong>what kind</strong> of resources you need, and then figure out how to find them.</p><h2 id="Why-search"><a href="#Why-search" class="headerlink" title="Why search?"></a>Why search?</h2><h3 id="Know"><a href="#Know" class="headerlink" title="Know"></a>Know</h3><blockquote><p>Search: Shaanxi Xinda forfeits game</p><p>NBL   5 fouls 1 throw</p><p>What is NBL? How is it different from and related to CBA? What does “5 fouls 1 throw” mean?</p></blockquote><h3 id="Learn"><a href="#Learn" class="headerlink" title="Learn"></a>Learn</h3><blockquote><p>E.g., tips for using ChatGPT</p></blockquote><h3 id="Create"><a href="#Create" class="headerlink" title="Create"></a>Create</h3><blockquote><p>Build a project</p></blockquote><h3 id="Do"><a href="#Do" class="headerlink" title="Do"></a>Do</h3><blockquote><p>Remove watermarks from PDFs</p></blockquote><h2 id="What-categories-of-resources-are-there"><a href="#What-categories-of-resources-are-there" class="headerlink" title="What categories of resources are there?"></a>What categories of resources are there?</h2><ul><li>News and information</li><li>Knowledge and skills</li><li>Assets and files</li><li>Tools and software</li></ul><h3 id="How-they-relate-to-your-purpose"><a href="#How-they-relate-to-your-purpose" class="headerlink" title="How they relate to your purpose"></a>How they relate to your purpose</h3><h4 id="A-way-to-think-about-it"><a href="#A-way-to-think-about-it" class="headerlink" title="A way to think about it"></a>A way to think about it</h4><p>Think from the perspective of the type of resource you’re looking for:</p><ul><li><p>Which <strong>type of medium</strong> is the knowledge most likely attached to?</p><ul><li>Web pages -&gt; <strong>Google</strong> &#x2F; <strong>Zhihu</strong> &#x2F; <strong>Sogou WeChat article search</strong> &#x2F; niche communities (e.g., <a href="https://pkmer.cn/">PKMer</a>) &#x2F; curated link directories (e.g., <a href="https://hao.shejidaren.com/">Design Navigation - The Best Design Websites</a>)<ul><li>How to find communities or link directories: search <code>xxx必逛的网站</code> &#x2F; <code>websites xxx should visit</code></li></ul></li><li>PDF documents<ul><li>-&gt; Google <code>xxx filetype:pdf</code> &#x2F; <code>inurl:baogao/xxx</code>, and you can further use <a href="https://www.similarsites.com/">Similarsites.com - Easily Explore alternative websites</a></li></ul></li><li>Academic papers<ul><li>Domestic<ul><li>CNKI</li><li>Wanfang &#x2F; VIP</li></ul></li><li>International<ul><li>Google Scholar <a href="https://scholar.google.com/">https://scholar.google.com/</a></li><li>Sci-Hub <a href="https://sci-hub.se/">Sci-Hub: 将知识带给每个人</a></li><li>Web of Science <a href="https://webofscience.clarivate.cn/wos/woscc/basic-search">Web of Science</a></li></ul></li></ul></li><li>E-books<ul><li>Chinese<ul><li><a href="https://www.jiumodiary.com/">Jiumodiary</a></li><li><a href="https://zlibrary-africa.se/">zlib</a></li><li><a href="https://www.book123.info/">Wuming Books | A nice e-book website (book123.info)</a> — personally recommended, you can download directly from here</li><li>WeRead<ul><li>Direct search</li><li>Full-text search</li></ul></li></ul></li><li>English<ul><li><a href="https://zlibrary-africa.se/">zlib</a></li><li>manybooks</li><li>pdfbooksword</li></ul></li></ul></li><li>Video tutorials<ul><li>Bilibili</li><li>YouTube</li><li>NetEase Cloud Classroom</li><li><a href="https://zh.khanacademy.org/">Khan Academy</a></li><li>……</li></ul></li><li>……</li></ul></li></ul><h3 id="Assets-and-files"><a href="#Assets-and-files" class="headerlink" title="Assets and files"></a>Assets and files</h3><h4 id="Video-assets"><a href="#Video-assets" class="headerlink" title="Video assets"></a>Video assets</h4><ul><li><a href="https://www.pexels.com/zh-cn/">Free stock photos</a></li><li><a href="https://pixabay.com/">4.2 million+ Stunning Free Images to Use Anywhere - Pixabay - Pixabay</a></li><li><a href="https://www.videvo.net/">Free Stock Video Footage HD 4K Download Royalty-Free Clips</a></li><li><a href="https://mixkit.co/">Mixkit - Awesome free assets for your next video project</a> — a handy way to download from YouTube: add <code>9x</code> before <code>youtube</code></li></ul><div class="tag-plugin colorful note" color="green"><div class="title"><strong><p>title:Example</p></strong></div><div class="body"><p><a href="https://www.9xyoutube.com/watch?v=HfACrKJ_Y2w">https://www.9xyoutube.com/watch?v=HfACrKJ_Y2w</a></p></div></div><ul><li><a href="https://save.tube/">SaveTube - Best Online Video Downloader ( 4K, 8K, FHD, 1080p, HDR )</a></li></ul><p>Searching for HD assets: search YouTube for “4K” + topic, then filter by resolution, or find some 4K channels</p><h4 id="Audio-assets"><a href="#Audio-assets" class="headerlink" title="Audio assets"></a>Audio assets</h4><ul><li><a href="https://pixabay.com/">4.2 million+ Stunning Free Images to Use Anywhere - Pixabay - Pixabay</a></li></ul><h4 id="Image-assets"><a href="#Image-assets" class="headerlink" title="Image assets"></a>Image assets</h4><ul><li>Google search <code>imagesize:</code></li><li><a href="https://www.pexels.com/zh-cn/">Free stock photos</a></li></ul><h4 id="Icon-assets"><a href="#Icon-assets" class="headerlink" title="Icon assets"></a>Icon assets</h4><ul><li><a href="https://www.iconfont.cn/">iconfont - Alibaba Vector Icon Library</a></li></ul><h3 id="Tools-and-software"><a href="#Tools-and-software" class="headerlink" title="Tools and software"></a>Tools and software</h3><ul><li><a href="https://www.ghxi.com/">Guohe Boke - A clean corner of the internet (ghxi.com)</a></li><li><a href="https://www.appinn.com/">Appinn - Sharing free, compact, practical, fun, green software (appinn.com)</a></li><li>Some Telegram channels (please <a href="https://www.virustotal.com/gui/home/upload">judge the risks for yourself</a>)</li></ul><h3 id="General-approaches"><a href="#General-approaches" class="headerlink" title="General approaches"></a>General approaches</h3><ul><li>Cloud drive search engines</li><li>Google search <code>Best site xxx</code></li><li>Zhihu &#x2F; Bilibili</li></ul><h3 id="General-tools"><a href="#General-tools" class="headerlink" title="General tools"></a>General tools</h3><ul><li><a href="http://shiquda.link/articles/2023/11/29/1701226195433.html">Google Advanced Search</a><ul><li>Can use helper scripts (hand-rolled)</li></ul></li><li><a href="https://greasyfork.org/zh-CN/scripts/27752-searchenginejump-%E6%90%9C%E7%B4%A2%E5%BC%95%E6%93%8E%E5%BF%AB%E6%8D%B7%E8%B7%B3%E8%BD%AC">Search Engine Jump</a> script</li></ul>]]>
    </content>
    <id>https://shiquda.link/en/articles/2023/11/29/1701227248383.html</id>
    <link href="https://shiquda.link/en/articles/2023/11/29/1701227248383.html"/>
    <published>2023-11-29T03:07:28.000Z</published>
    <summary>First, clarify why you’re looking for resources, so you know what kind of resources you need, and then figure out how to find them.

Why search?
Know
Search: Shaanxi Xinda forfeits game

NBL 5 fouls 1 throw

What is NBL? How is it different from and related to CBA? What does “5 fouls 1 throw” mean?</summary>
    <title>Finding Resources</title>
    <updated>2023-11-29T11:57:21.000Z</updated>
  </entry>
  <entry>
    <author>
      <name>shiquda</name>
    </author>
    <category term="教程" scheme="https://shiquda.link/categories/%E6%95%99%E7%A8%8B/"/>
    <category term="教程" scheme="https://shiquda.link/tags/%E6%95%99%E7%A8%8B/"/>
    <category term="油猴脚本" scheme="https://shiquda.link/tags/%E6%B2%B9%E7%8C%B4%E8%84%9A%E6%9C%AC/"/>
    <category term="笔记" scheme="https://shiquda.link/tags/%E7%AC%94%E8%AE%B0/"/>
    <content>
      <![CDATA[<p>Jump straight to a beginner-friendly UI:<br><a href="https://www.google.com/advanced_search">Google Advanced Search</a></p><p><a href="https://evanli.github.io/blog/2019/01/26/advanced-google-search-engine-command/">Google Search Advanced Commands: A Complete Table Summary (with Examples) - EvanLi’s Blog</a></p><h2 id="Search-Strategy"><a href="#Search-Strategy" class="headerlink" title="Search Strategy"></a>Search Strategy</h2><h3 id="Problem-Solving-Approach"><a href="#Problem-Solving-Approach" class="headerlink" title="Problem-Solving Approach"></a>Problem-Solving Approach</h3><ul><li>Extract keywords</li><li>Refine</li><li>Reverse-engineer</li><li>Convert &amp; transform</li></ul><h2 id="Syntax"><a href="#Syntax" class="headerlink" title="Syntax"></a>Syntax</h2><p>Commonly used syntax:</p><div class="md-table-scroll"><table><thead><tr><th>Search Operator</th><th>Function</th><th>Example</th></tr></thead><tbody><tr><td><code>" "</code></td><td>Search for results containing a specific word or phrase.</td><td><a href="https://www.google.com/search?q=%22steve+jobs%22">“steve jobs”</a></td></tr><tr><td><code>OR</code></td><td>Search for results related to X or Y.</td><td><a href="https://www.google.com/search?&amp;q=jobs+OR+gates">jobs OR gates</a></td></tr><tr><td><code>|</code></td><td>Same as <code>OR</code>.</td><td><a href="https://www.google.com/search?q=jobs%7Cgates">jobs | gates</a></td></tr><tr><td><code>AND</code></td><td>Search for results related to both X and Y.</td><td><a href="https://www.google.com/search?&amp;q=jobs+AND+gates">jobs AND gates</a></td></tr><tr><td><code>-</code></td><td>Exclude results containing a specific word or phrase.</td><td><a href="https://www.google.com/search?q=jobs+-apple">jobs -apple</a></td></tr><tr><td><code>*</code></td><td>Wildcard that matches any word or phrase.</td><td><a href="https://www.google.com/search?q=%22steve+*+apple%22">steve * apple</a></td></tr><tr><td><code>( )</code></td><td>Group multiple search conditions.</td><td><a href="https://www.google.com/search?q=(ipad+OR+iphone)+apple">(ipad OR iphone) apple</a></td></tr><tr><td><code>define:</code></td><td>Search for the definition of a word or phrase.</td><td><a href="https://www.google.com/search?q=define:entrepreneur">define:entrepreneur</a></td></tr><tr><td><code>cache:</code></td><td>Find the latest cached version of a webpage.</td><td><a href="https://webcache.googleusercontent.com/search?q=cache:apple.com">cache:apple.com</a></td></tr><tr><td><code>filetype:</code></td><td>Search for a specific file type (e.g., PDF).</td><td><a href="https://www.google.com/search?q=apple+filetype:pdf">apple filetype:pdf</a></td></tr><tr><td><code>ext:</code></td><td>Same as <code>filetype:</code>.</td><td><a href="https://www.google.com/search?q=apple+ext:pdf">apple ext:pdf</a></td></tr><tr><td><code>site:</code></td><td>Search for results from a specific website.</td><td><a href="https://www.google.com/search?q=site:apple.com">site:apple.com</a></td></tr><tr><td><code>related:</code></td><td>Search for websites related to a given domain.</td><td><a href="https://www.google.com/search?q=related:apple.com">related:apple.com</a></td></tr><tr><td><code>intitle:</code></td><td>Search for pages with a specific word in the title tag.</td><td><a href="https://www.google.com/search?q=intitle:apple">intitle:apple</a></td></tr><tr><td><code>allintitle:</code></td><td>Search for pages with multiple words in the title tag.</td><td><a href="https://www.google.com/search?q=allintitle:apple+iphone">allintitle:apple iphone</a></td></tr><tr><td><code>inurl:</code></td><td>Search for pages with a specific word in the URL.</td><td><a href="https://www.google.com/search?q=inurl:apple">inurl:apple</a></td></tr><tr><td><code>allinurl:</code></td><td>Search for pages with multiple words in the URL.</td><td><a href="https://www.google.com/search?q=allinurl:apple+iphone">allinurl:apple iphone</a></td></tr><tr><td><code>intext:</code></td><td>Search for pages with a specific word in the content.</td><td><a href="https://www.google.com/search?q=intext:apple">intext:apple iphone</a></td></tr><tr><td><code>allintext:</code></td><td>Search for pages with multiple words in the content.</td><td><a href="https://www.google.com/search?q=allintext:apple+iphone">allintext:apple iphone</a></td></tr><tr><td><code>weather:</code></td><td>Search for the weather in a specific location.</td><td><a href="https://www.google.com/search?q=weather:san+francisco">weather:san francisco</a></td></tr><tr><td><code>stocks:</code></td><td>Search for stock information.</td><td><a href="https://www.google.com/search?q=stocks:aapl">stocks:aapl</a></td></tr><tr><td><code>map:</code></td><td>Force Google to show map results.</td><td><a href="https://www.google.com/search?q=map:silicon+valley">map:silicon valley</a></td></tr><tr><td><code>movie:</code></td><td>Search for information about a movie.</td><td><a href="https://www.google.com/search?q=movie:steve+jobs">movie:steve jobs</a></td></tr><tr><td><code>in</code></td><td>Convert one unit to another.</td><td><a href="https://www.google.com/search?q=$329+in+GBP">$329 in GBP</a></td></tr><tr><td><code>source:</code></td><td>Search for results from a specific source on Google News.</td><td><a href="https://www.google.com/search?q=apple+source:the_verge&amp;tbm=nws">apple source:the_verge</a></td></tr><tr><td><code>before:</code></td><td>Search for results published before a specific date.</td><td><a href="https://www.google.com/search?q=apple+before:2007-06-29">apple before:2007-06-29</a></td></tr><tr><td><code>after:</code></td><td>Search for results published after a specific date.</td><td><a href="https://www.google.com/search?q=apple+after:2007-06-29">apple after:2007-06-29</a></td></tr></tbody></table></div><p><strong>Notes:</strong></p><ul><li>Use English colons.</li><li>No space before the colon.</li><li>Separate commands with a space, e.g., <code>C++ filetype:pdf</code> — there’s a space before <code>filetype</code>.</li></ul><h2 id="Userscript"><a href="#Userscript" class="headerlink" title="Userscript"></a>Userscript</h2><p>For convenience, I also put together a simple script:<br><a href="https://greasyfork.org/zh-CN/scripts/474178-advanced-search-assistant-for-google">Advanced Search Assistant for Google</a></p><h1 id="Raw-Data-Below"><a href="#Raw-Data-Below" class="headerlink" title="Raw Data Below"></a>Raw Data Below</h1><div class="md-table-scroll"><table><thead><tr><th>#</th><th>Syntax</th><th>Description</th><th>Example</th><th>Example Description</th></tr></thead><tbody><tr><td>1</td><td><strong><code>+</code></strong></td><td>Same as AND; searches for results containing multiple keywords.</td><td>Search <code>+</code> engine</td><td>Finds pages containing both “search” and “engine”.</td></tr><tr><td>2</td><td><strong><code>OR</code></strong></td><td>Or.</td><td>Search <code>OR</code> engine</td><td>Finds pages containing either “search” or “engine”.</td></tr><tr><td>3</td><td><strong><code>-</code></strong></td><td>Minus sign; excludes pages containing the word after the minus.</td><td>Search engine <code>-</code> Baidu</td><td>Finds pages about “search engine” that exclude “Baidu”.</td></tr><tr><td>4</td><td><strong><code>" "</code></strong></td><td>Double quotes; exact match.</td><td>“search engine”</td><td>Finds pages that exactly match the phrase “search engine”.</td></tr><tr><td>5</td><td><strong><code>*</code></strong></td><td>Asterisk; wildcard, fuzzy search; the asterisk stands in for a word.</td><td>Search <code>*</code> engine</td><td>The asterisk can stand for any word.</td></tr><tr><td>6</td><td><strong><code>@</code></strong></td><td>Put <code>@</code> before a word to search social media.</td><td>trump<code>@</code>twitter</td><td>Searches Trump’s Twitter.</td></tr><tr><td>7</td><td><strong><code>$</code></strong></td><td>Put <code>$</code> before a number to search for a specific price.</td><td>camera <code>$</code>400</td><td>Searches for cameras priced at $400.</td></tr><tr><td>8</td><td><strong><code>#</code></strong></td><td>Search for a <code>#</code> hashtag.</td><td><code>#</code>throwbackthursday</td><td>Searches the hashtag throwbackthursday.</td></tr><tr><td>9</td><td><strong><code>..</code></strong></td><td>Two dots; put <code>..</code> between two numbers to run a number range search.</td><td>camera 500<code>..</code>1000</td><td>Searches for cameras priced between 500 and 1000.</td></tr><tr><td>10</td><td><strong><code>filetype</code></strong></td><td>Search for resources of a specific file type.</td><td>C++<code>filetype</code>:<code>pdf</code></td><td>Searches for C++ web resources in PDF format.</td></tr><tr><td>11</td><td><strong><code>site</code></strong></td><td>Search within a specified site.</td><td>C++<code>site</code>:<code>https://www.zhihu.com</code></td><td>Searches Zhihu for pages related to C++.</td></tr><tr><td>12</td><td><strong><code>cache</code></strong></td><td>View Google’s cached version of a website; shows the cached page.</td><td><code>cache</code>:weibo.com</td><td>Views Weibo’s Google cache.</td></tr><tr><td>13</td><td><strong><code>info</code></strong></td><td>Put <code>info:</code> before a URL to get website details.</td><td><code>info:</code>github.com</td><td>Searches for details about the GitHub website.</td></tr><tr><td>14</td><td><strong><code>related</code></strong></td><td>Search for pages related to a certain website.</td><td><code>related:</code>sina.com</td><td>Searches for other sites similar to Sina.</td></tr><tr><td>15</td><td><strong><code>link</code></strong></td><td>Returns all web pages that link to a specific URL.</td><td><code>link:</code><a href="http://www.csdn.net/">www.csdn.net</a></td><td>Searches for all pages containing a link to <a href="http://www.csdn.net/">www.csdn.net</a>.</td></tr><tr><td>16</td><td><strong><code>inurl</code></strong></td><td>Search for pages where the query appears in the URL.</td><td><code>inurl:</code>search engine</td><td>Finds pages with “search engine” in the URL.</td></tr><tr><td>17</td><td><strong><code>intitle</code></strong></td><td>Search for pages where the query appears in the page title; supports Chinese and English.</td><td><code>intitle:</code>search engine</td><td>Finds pages with “search engine” in the title.</td></tr><tr><td>18</td><td><strong><code>intext</code></strong></td><td>Search for pages where the query appears in the body text; supports Chinese and English.</td><td><code>intext:</code>SEO <code>intext:</code>search engine</td><td>Searches for “SEO” within pages whose body contains “search engine”.</td></tr><tr><td>19</td><td><strong><code>inanchor</code></strong></td><td>Search for pages where the link anchor text contains the search term.</td><td><code>inanchor:</code>front-end</td><td>Finds pages whose link anchor text contains “front-end”.</td></tr><tr><td>20</td><td><strong><code>allinurl</code></strong></td><td>Pages with multiple keywords in the URL.</td><td><code>allinurl:</code>SEO search engine optimization</td><td>Equivalent to: <code>inurl:</code>SEO <code>inurl:</code>search engine optimization</td></tr><tr><td>21</td><td><strong><code>allintitle</code></strong></td><td>Pages with multiple keywords in the title.</td><td><code>allintitle:</code>SEO search engine optimization</td><td>Equivalent to: <code>intitle:</code>SEO <code>intitle:</code>search engine optimization</td></tr><tr><td>22</td><td><strong><code>allintext</code></strong></td><td>Pages with multiple keywords in the body text.</td><td><code>allintext:</code>SEO search engine optimization</td><td>Equivalent to: <code>intext:</code>SEO <code>intext:</code>search engine optimization</td></tr><tr><td>23</td><td><strong><code>allinanchor</code></strong></td><td>Pages whose link anchor text contains multiple keywords.</td><td><code>allinanchor:</code>SEO search engine optimization</td><td>Equivalent to: <code>inanchor:</code>SEO <code>inanchor:</code>search engine optimization</td></tr><tr><td>24</td><td><strong><code>weather</code></strong></td><td><code>weather/time/sunrise/sundown</code> + city name; returns the city’s weather/time/sunrise/sunset.</td><td><code>weather:</code>beijing</td><td>Shows Beijing’s weather.</td></tr><tr><td>25</td><td><strong><code>music</code></strong></td><td>Or use <code>songs</code>; artist name + <code>music/songs</code>.</td><td>Jay Chou<code>music</code></td><td>Returns Jay Chou’s songs.</td></tr><tr><td>26</td><td><code>imagesize</code></td><td>Limit image size (search on Google Images).</td><td><code>imagesize:2560x1440</code></td><td></td></tr></tbody></table></div><h3 id="Valid-Search-Operators"><a href="#Valid-Search-Operators" class="headerlink" title="Valid Search Operators"></a>Valid Search Operators</h3><div class="md-table-scroll"><table><thead><tr><th>Search Operator</th><th>Function</th><th>Example</th></tr></thead><tbody><tr><td><code>" "</code></td><td>Search for results containing a specific word or phrase.</td><td><a href="https://www.google.com/search?q=%22steve+jobs%22">“steve jobs”</a></td></tr><tr><td><code>OR</code></td><td>Search for results related to X or Y.</td><td><a href="https://www.google.com/search?&amp;q=jobs+OR+gates">jobs OR gates</a></td></tr><tr><td><code>|</code></td><td>Same as <code>OR</code>.</td><td><a href="https://www.google.com/search?q=jobs%7Cgates">jobs | gates</a></td></tr><tr><td><code>AND</code></td><td>Search for results related to both X and Y.</td><td><a href="https://www.google.com/search?&amp;q=jobs+AND+gates">jobs AND gates</a></td></tr><tr><td><code>-</code></td><td>Exclude results containing a specific word or phrase.</td><td><a href="https://www.google.com/search?q=jobs+-apple">jobs -apple</a></td></tr><tr><td><code>*</code></td><td>Wildcard that matches any word or phrase.</td><td><a href="https://www.google.com/search?q=%22steve+*+apple%22">steve * apple</a></td></tr><tr><td><code>( )</code></td><td>Group multiple search conditions.</td><td><a href="https://www.google.com/search?q=(ipad+OR+iphone)+apple">(ipad OR iphone) apple</a></td></tr><tr><td><code>define:</code></td><td>Search for the definition of a word or phrase.</td><td><a href="https://www.google.com/search?q=define:entrepreneur">define:entrepreneur</a></td></tr><tr><td><code>cache:</code></td><td>Find the latest cached version of a webpage.</td><td><a href="https://webcache.googleusercontent.com/search?q=cache:apple.com">cache:apple.com</a></td></tr><tr><td><code>filetype:</code></td><td>Search for a specific file type (e.g., PDF).</td><td><a href="https://www.google.com/search?q=apple+filetype:pdf">apple filetype:pdf</a></td></tr><tr><td><code>ext:</code></td><td>Same as <code>filetype:</code>.</td><td><a href="https://www.google.com/search?q=apple+ext:pdf">apple ext:pdf</a></td></tr><tr><td><code>site:</code></td><td>Search for results from a specific website.</td><td><a href="https://www.google.com/search?q=site:apple.com">site:apple.com</a></td></tr><tr><td><code>related:</code></td><td>Search for websites related to a given domain.</td><td><a href="https://www.google.com/search?q=related:apple.com">related:apple.com</a></td></tr><tr><td><code>intitle:</code></td><td>Search for pages with a specific word in the title tag.</td><td><a href="https://www.google.com/search?q=intitle:apple">intitle:apple</a></td></tr><tr><td><code>allintitle:</code></td><td>Search for pages with multiple words in the title tag.</td><td><a href="https://www.google.com/search?q=allintitle:apple+iphone">allintitle:apple iphone</a></td></tr><tr><td><code>inurl:</code></td><td>Search for pages with a specific word in the URL.</td><td><a href="https://www.google.com/search?q=inurl:apple">inurl:apple</a></td></tr><tr><td><code>allinurl:</code></td><td>Search for pages with multiple words in the URL.</td><td><a href="https://www.google.com/search?q=allinurl:apple+iphone">allinurl:apple iphone</a></td></tr><tr><td><code>intext:</code></td><td>Search for pages with a specific word in the content.</td><td><a href="https://www.google.com/search?q=intext:apple">intext:apple iphone</a></td></tr><tr><td><code>allintext:</code></td><td>Search for pages with multiple words in the content.</td><td><a href="https://www.google.com/search?q=allintext:apple+iphone">allintext:apple iphone</a></td></tr><tr><td><code>weather:</code></td><td>Search for the weather in a specific location.</td><td><a href="https://www.google.com/search?q=weather:san+francisco">weather:san francisco</a></td></tr><tr><td><code>stocks:</code></td><td>Search for stock information.</td><td><a href="https://www.google.com/search?q=stocks:aapl">stocks:aapl</a></td></tr><tr><td><code>map:</code></td><td>Force Google to show map results.</td><td><a href="https://www.google.com/search?q=map:silicon+valley">map:silicon valley</a></td></tr><tr><td><code>movie:</code></td><td>Search for information about a movie.</td><td><a href="https://www.google.com/search?q=movie:steve+jobs">movie:steve jobs</a></td></tr><tr><td><code>in</code></td><td>Convert one unit to another.</td><td><a href="https://www.google.com/search?q=$329+in+GBP">$329 in GBP</a></td></tr><tr><td><code>source:</code></td><td>Search for results from a specific source on Google News.</td><td><a href="https://www.google.com/search?q=apple+source:the_verge&amp;tbm=nws">apple source:the_verge</a></td></tr><tr><td><code>before:</code></td><td>Search for results published before a specific date.</td><td><a href="https://www.google.com/search?q=apple+before:2007-06-29">apple before:2007-06-29</a></td></tr><tr><td><code>after:</code></td><td>Search for results published after a specific date.</td><td><a href="https://www.google.com/search?q=apple+after:2007-06-29">apple after:2007-06-29</a></td></tr></tbody></table></div><h3 id="Unstable-Search-Operators"><a href="#Unstable-Search-Operators" class="headerlink" title="Unstable Search Operators"></a>Unstable Search Operators</h3><div class="md-table-scroll"><table><thead><tr><th>Search Operator</th><th>Function</th><th>Example</th></tr></thead><tbody><tr><td><code>#..#</code></td><td>Search within a range of numbers.</td><td><a href="https://www.google.com/search?q=iphone+case+$50..$60">iphone case $50..$60</a></td></tr><tr><td><code>inanchor:</code></td><td>Search for pages with backlinks containing specific anchor text.</td><td><a href="https://www.google.com/search?q=inanchor:apple">inanchor:apple</a></td></tr><tr><td><code>allinanchor:</code></td><td>Search for pages with backlinks containing multiple words in anchor text.</td><td><a href="https://www.google.com/search?q=allinanchor:apple+iphone">allinanchor:apple iphone</a></td></tr><tr><td><code>AROUND(X)</code></td><td>Search for pages where two words or phrases appear within X words of each other.</td><td><a href="https://www.google.com/search?q=apple+AROUND(4)">apple AROUND(4) iphone</a></td></tr><tr><td><code>loc:</code></td><td>Find results from a specific location.</td><td>loc:”san francisco” apple</td></tr><tr><td><code>location:</code></td><td>Find news from a specific location on Google News.</td><td><a href="https://www.google.com/search?q=loc:%22san+francisco%22+apple">location:”san francisco” apple</a></td></tr><tr><td><code>daterange:</code></td><td>Search for results within a specific date range.</td><td><a href="https://www.google.com/search?q=steve+jobs+daterange:11278-13278">daterange:11278-13278</a></td></tr></tbody></table></div><h3 id="Deprecated-Search-Operators-No-Longer-Effective"><a href="#Deprecated-Search-Operators-No-Longer-Effective" class="headerlink" title="Deprecated Search Operators (No Longer Effective)"></a>Deprecated Search Operators (No Longer Effective)</h3><p>The following search operators are no longer effective and have been dropped by Google:</p><div class="md-table-scroll"><table><thead><tr><th>Search Operator</th><th>Function</th><th>Example</th></tr></thead><tbody><tr><td><code>#..#</code></td><td>Search within a range of numbers.</td><td><a href="https://www.google.com/search?q=iphone+case+$50..$60">iphone case $50..$60</a></td></tr><tr><td><code>inanchor:</code></td><td>Search for pages with backlinks containing specific anchor text.</td><td><a href="https://www.google.com/search?q=inanchor:apple">inanchor:apple</a></td></tr><tr><td><code>allinanchor:</code></td><td>Search for pages with backlinks containing multiple words in anchor text.</td><td><a href="https://www.google.com/search?q=allinanchor:apple+iphone">allinanchor:apple iphone</a></td></tr><tr><td><code>AROUND(X)</code></td><td>Search for pages where two words or phrases appear within X words of each other.</td><td><a href="https://www.google.com/search?q=apple+AROUND(4)">apple AROUND(4) iphone</a></td></tr><tr><td><code>loc:</code></td><td>Find results from a specific location.</td><td>loc:”san francisco” apple</td></tr><tr><td><code>location:</code></td><td>Find news from a specific location on Google News.</td><td><a href="https://www.google.com/search?q=loc:%22san+francisco%22+apple">location:”san francisco” apple</a></td></tr><tr><td><code>daterange:</code></td><td>Search for results within a specific date range.</td><td><a href="https://www.google.com/search?q=steve+jobs+daterange:11278-13278">daterange:11278-13278</a></td></tr></tbody></table></div>]]>
    </content>
    <id>https://shiquda.link/en/articles/2023/11/29/1701226195433.html</id>
    <link href="https://shiquda.link/en/articles/2023/11/29/1701226195433.html"/>
    <published>2023-11-29T02:49:55.000Z</published>
    <summary>
      <![CDATA[Jump straight to a beginner-friendly UI:
Google Advanced Search

Google Search Advanced Commands: A Complete Table Summary (with Examples) - EvanLi’s Blog

Search Strategy
Problem-Solving Approach
 * Extract keywords
 * Refine
 * Reverse-engineer
 * Convert & transform

Syntax
Commonly used syntax:]]>
    </summary>
    <title>Google Advanced Search Tips + Simple Tampermonkey Script</title>
    <updated>2023-11-29T02:49:55.000Z</updated>
  </entry>
  <entry>
    <author>
      <name>shiquda</name>
    </author>
    <category term="笔记" scheme="https://shiquda.link/categories/%E7%AC%94%E8%AE%B0/"/>
    <category term="Linux" scheme="https://shiquda.link/tags/Linux/"/>
    <category term="笔记" scheme="https://shiquda.link/tags/%E7%AC%94%E8%AE%B0/"/>
    <category term="转载" scheme="https://shiquda.link/tags/%E8%BD%AC%E8%BD%BD/"/>
    <content>
      <![CDATA[<p><a href="https://matt-rickard.com/de-facto-ports">Source</a><br>Some of the mentioned ports include:</p><ul><li>1080: SOCK Proxy</li><li>2049: Network File System (NFS)</li><li>2181: Apache ZooKeeper</li><li>2375: Docker REST API (HTTP)</li><li>2376: Docker REST API (HTTPS)</li><li>3000: Development Framework Port (used by Ruby on Rails, Node frameworks, etc.)</li><li>3306: MySQL</li><li>3478: STUN, TURN (NAT Traversal)</li><li>4000: Phoenix, Jekyll</li><li>4001: etcd</li><li>4200: AngularJS</li><li>4567: Sinatra</li><li>5000: Other Development Framework Port (used by Flask, ASP.NET Core, etc.)</li><li>5222: XMPP (Extensible Messaging and Presence Protocol)</li><li>5349: STUN, TURN over TLS</li><li>5353: Multicast DNS</li><li>5432: PostgreSQL</li><li>5900: VNC (using a remote frame buffer, RFB)</li><li>6000: X11 (over the network)</li><li>6379: Redis</li><li>6660: IRC (Internet Relay Chat)</li><li>6881: BitTorrent</li><li>8000: Python Development Framework Port (used by Django, Python 3’s http.server, etc.)</li><li>8080: HTTP web server port</li><li>8333: Bitcoin</li><li>8888: Jupyter Notebook</li><li>8983: Apache Solr</li><li>9000: Used by various applications</li><li>25565: Minecraft</li><li>27017: MongoDB</li><li>51820: WireGuard</li></ul>]]>
    </content>
    <id>https://shiquda.link/en/articles/2023/11/29/1701225706548.html</id>
    <link href="https://shiquda.link/en/articles/2023/11/29/1701225706548.html"/>
    <published>2023-11-29T02:41:46.000Z</published>
    <summary>Source
Some of the mentioned ports include:

 * 1080: SOCK Proxy
 * 2049: Network File System (NFS)
 * 2181: Apache ZooKeeper
 * 2375: Docker REST API (HTTP)
 * 2376: Docker REST API (HTTPS)
 * 3000: Development Framework Port (used by Ruby on Rails, Node frameworks, etc.)
 * 3306: MySQL
 * 3478: ST</summary>
    <title>Common Linux Ports</title>
    <updated>2023-11-29T02:41:46.000Z</updated>
  </entry>
  <entry>
    <author>
      <name>shiquda</name>
    </author>
    <category term="教程" scheme="https://shiquda.link/categories/%E6%95%99%E7%A8%8B/"/>
    <category term="教程" scheme="https://shiquda.link/tags/%E6%95%99%E7%A8%8B/"/>
    <category term="Python" scheme="https://shiquda.link/tags/Python/"/>
    <category term="Steam" scheme="https://shiquda.link/tags/Steam/"/>
    <category term="adb" scheme="https://shiquda.link/tags/adb/"/>
    <content>
      <![CDATA[<h2 id="Background"><a href="#Background" class="headerlink" title="Background"></a>Background</h2><p>Exporting Steam token data is a real hassle these days.<br><a href="https://keylol.com/t900854-1-1">https://keylol.com/t900854-1-1</a><br>(Source: Keylol)</p><p>Some veterans on the forum have already posted tutorials covering various methods, such as:</p><p>[ROOT ANDROID] How to export Steam 3.0 tokens<br><a href="https://keylol.com/t854675-1-1">https://keylol.com/t854675-1-1</a><br>(Source: Keylol)</p><p>[Android] Tips for extracting token files from Steam app versions 3.0 and above<br><a href="https://keylol.com/t901003-1-1">https://keylol.com/t901003-1-1</a><br>(Source: Keylol)</p><p>This article provides a fairly detailed tutorial on exporting tokens using an Android emulator + Frida Python debugging.</p><p>Pros: You don’t need a rooted phone; a computer alone is enough to export, and it’s relatively safer than some other methods.<br>Cons: It’s tedious, and the token has to be transferred to the emulator, which <strong>incurs a 2-day cooldown</strong>.</p><h2 id="Prerequisites"><a href="#Prerequisites" class="headerlink" title="Prerequisites"></a>Prerequisites</h2><p>This tutorial uses an <strong>Android emulator</strong> + <strong>ADB Frida debugging</strong> + <strong>Python scripts</strong> to export token data.</p><p><strong>Before you begin:</strong></p><ol><li>After the transfer, the token will live on the emulator, and <strong>the token on your original phone will stop working</strong> — you won’t be able to use the official client to scan-login, confirm trades, etc.</li><li>After the transfer, there is a <strong>market cooldown of about two days</strong>.</li></ol><p><strong>Tools you’ll need:</strong></p><ol><li>Python and the Frida library</li><li>ADB debugging tools</li><li>Android emulator (this tutorial uses LDPlayer)</li><li>frida-server</li></ol><h2 id="Installing-the-Tools"><a href="#Installing-the-Tools" class="headerlink" title="Installing the Tools"></a>Installing the Tools</h2><h3 id="Android-Emulator"><a href="#Android-Emulator" class="headerlink" title="Android Emulator"></a>Android Emulator</h3><p>After installing the emulator, download and install the Steam client on it for later use.</p><p>To install the Steam client, simply drag the downloaded APK file into the emulator.</p><h3 id="Installing-and-Configuring-Python"><a href="#Installing-and-Configuring-Python" class="headerlink" title="Installing and Configuring Python"></a>Installing and Configuring Python</h3><p><strong>If you’ve already installed Python and configured the environment variables, skip ahead to the Frida dependency installation section.</strong></p><p>Install the Frida dependency:</p><figure class="highlight bash"><table><tbody><tr><td class="gutter"><pre><span class="line">1</span><br></pre></td><td class="code"><pre><span class="line">pip install frida frida-tools</span><br></pre></td></tr></tbody></table></figure><h2 id="Installing-ADB-Debugging-Tools"><a href="#Installing-ADB-Debugging-Tools" class="headerlink" title="Installing ADB Debugging Tools"></a>Installing ADB Debugging Tools</h2><p>This tutorial uses a one-click installer script from <a href="https://github.com/fawazahmed0/Latest-adb-fastboot-installer-for-windows/releases/tag/v1.7">GitHub</a>.</p><p>If it prompts you to install .NET, just click Install.</p><p>Wait for the installation to finish, then open Command Prompt and enter the following:</p><figure class="highlight bash"><table><tbody><tr><td class="gutter"><pre><span class="line">1</span><br></pre></td><td class="code"><pre><span class="line">adb --version</span><br></pre></td></tr></tbody></table></figure><p>If you see output similar to the following, the installation is complete.</p><figure class="highlight text"><table><tbody><tr><td class="gutter"><pre><span class="line">1</span><br><span class="line">2</span><br><span class="line">3</span><br><span class="line">4</span><br></pre></td><td class="code"><pre><span class="line">Android Debug Bridge version 1.0.41</span><br><span class="line">Version 34.0.4-10411341</span><br><span class="line">Installed as C:\Program Files\platform-tools\adb.exe</span><br><span class="line">Running on Windows 10.0.19045</span><br></pre></td></tr></tbody></table></figure><h2 id="Starting-the-Debugging-Process"><a href="#Starting-the-Debugging-Process" class="headerlink" title="Starting the Debugging Process"></a>Starting the Debugging Process</h2><p>Open Settings in the Android emulator and enable root access.</p><p>After enabling it, remember to restart the emulator as prompted.</p><p>After restarting, open the built-in Settings app in the emulator, go to About Tablet &gt; Build Number, and tap it 7 times to enable Developer Mode.</p><p>Go back, enter System, expand Advanced, open Developer Options, find USB Debugging, and enable it.</p><p>Once enabled, enter the following in Command Prompt:</p><figure class="highlight bash"><table><tbody><tr><td class="gutter"><pre><span class="line">1</span><br></pre></td><td class="code"><pre><span class="line">adb devices</span><br></pre></td></tr></tbody></table></figure><p>If you see output similar to the following, the emulator is being detected properly.</p><p>Using LDPlayer as an example, enter the following in Command Prompt:</p><figure class="highlight bash"><table><tbody><tr><td class="gutter"><pre><span class="line">1</span><br></pre></td><td class="code"><pre><span class="line">adb connect 127.0.0.1:5555</span><br></pre></td></tr></tbody></table></figure><div class="tag-plugin colorful note" color="blue"><div class="title"><strong><p>title:Connection Ports for Other Emulators:</p></strong></div><div class="body"><ul><li>NoxPlayer: <code>adb connect 127.0.0.1:62001</code></li><li>MEmu: <code>adb connect 127.0.0.1:21503</code></li><li>TTVM: <code>adb connect 127.0.0.1:6555</code></li><li>Droid4X: <code>adb connect 127.0.0.1:53001</code></li><li>NetEase MuMu: <code>adb connect 127.0.0.1:7555</code></li></ul></div></div><p>In Command Prompt, enter:</p><figure class="highlight bash"><table><tbody><tr><td class="gutter"><pre><span class="line">1</span><br></pre></td><td class="code"><pre><span class="line">adb root</span><br></pre></td></tr></tbody></table></figure><p>Now navigate to the directory where you downloaded and extracted frida-server-16.1.3-android-x86_64 (if you downloaded a compressed archive from <a href="https://github.com/frida/frida/releases">GitHub</a>).</p><div class="tag-plugin colorful note" color="yellow"><div class="title"><strong><p>title:Architecture Note</p></strong></div><div class="body"><p>LDPlayer uses the x86_64 architecture; other emulators may not, so choose the frida-server that matches your emulator’s architecture. You can download it from GitHub.</p></div></div><p>Type cmd in the address bar and press Enter to open Command Prompt in that directory, then enter the following three lines one by one:</p><figure class="highlight bash"><table><tbody><tr><td class="gutter"><pre><span class="line">1</span><br></pre></td><td class="code"><pre><span class="line">adb push frida-server-16.1.3-android-x86_64 /data/local/tmp/</span><br></pre></td></tr></tbody></table></figure><figure class="highlight bash"><table><tbody><tr><td class="gutter"><pre><span class="line">1</span><br></pre></td><td class="code"><pre><span class="line">adb shell <span class="string">"chmod 755 /data/local/tmp/frida-server-16.1.3-android-x86_64"</span></span><br></pre></td></tr></tbody></table></figure><figure class="highlight bash"><table><tbody><tr><td class="gutter"><pre><span class="line">1</span><br></pre></td><td class="code"><pre><span class="line">adb shell <span class="string">"/data/local/tmp/frida-server-16.1.3-android-x86_64 &amp;"</span></span><br></pre></td></tr></tbody></table></figure><p>After that, open a new Command Prompt window and enter:</p><figure class="highlight plaintext"><table><tbody><tr><td class="gutter"><pre><span class="line">1</span><br></pre></td><td class="code"><pre><span class="line">frida-ps -U</span><br></pre></td></tr></tbody></table></figure><p>If you see output similar to the following, the connection was successful.<br><img src="https://b3logfile.com/file/2023/11/image-LtRnNCx.png" alt="Screenshot" loading="lazy"></p><p>Open the Steam mobile app, sign in to the account whose token you want to extract, then tap Add Authenticator in the middle of the bottom navigation bar, and tap Restore Authenticator (if you already have a token).</p><p>Accept the SMS verification code. If it asks you to write down a recovery code, that means the token has been transferred to the emulator.</p><p>Next, run the steamguard.py script.</p><figure class="highlight plaintext"><table><tbody><tr><td class="gutter"><pre><span class="line">1</span><br><span class="line">2</span><br><span class="line">3</span><br><span class="line">4</span><br><span class="line">5</span><br><span class="line">6</span><br><span class="line">7</span><br><span class="line">8</span><br><span class="line">9</span><br><span class="line">10</span><br><span class="line">11</span><br><span class="line">12</span><br><span class="line">13</span><br><span class="line">14</span><br><span class="line">15</span><br><span class="line">16</span><br><span class="line">17</span><br><span class="line">18</span><br><span class="line">19</span><br><span class="line">20</span><br><span class="line">21</span><br><span class="line">22</span><br><span class="line">23</span><br><span class="line">24</span><br><span class="line">25</span><br><span class="line">26</span><br><span class="line">27</span><br><span class="line">28</span><br><span class="line">29</span><br><span class="line">30</span><br><span class="line">31</span><br><span class="line">32</span><br><span class="line">33</span><br><span class="line">34</span><br><span class="line">35</span><br><span class="line">36</span><br><span class="line">37</span><br><span class="line">38</span><br><span class="line">39</span><br><span class="line">40</span><br><span class="line">41</span><br><span class="line">42</span><br><span class="line">43</span><br><span class="line">44</span><br><span class="line">45</span><br><span class="line">46</span><br><span class="line">47</span><br><span class="line">48</span><br><span class="line">49</span><br><span class="line">50</span><br><span class="line">51</span><br><span class="line">52</span><br><span class="line">53</span><br><span class="line">54</span><br><span class="line">55</span><br><span class="line">56</span><br></pre></td><td class="code"><pre><span class="line">import json</span><br><span class="line">import frida</span><br><span class="line">import sys</span><br><span class="line"></span><br><span class="line">package = "com.valvesoftware.android.steam.community"</span><br><span class="line">cmd = """</span><br><span class="line">'use strict;'</span><br><span class="line"></span><br><span class="line">if (Java.available) {</span><br><span class="line">  Java.perform(function() {</span><br><span class="line"></span><br><span class="line">    //Cipher stuff</span><br><span class="line">    const Cipher = Java.use('javax.crypto.Cipher');</span><br><span class="line"></span><br><span class="line">    Cipher.doFinal.overload('[B').implementation = function (input) {</span><br><span class="line">        var result = this.doFinal.overload('[B').call(this, input);</span><br><span class="line">        send(result);</span><br><span class="line">    }</span><br><span class="line"></span><br><span class="line">  }</span><br><span class="line">)}</span><br><span class="line">"""</span><br><span class="line"></span><br><span class="line"></span><br><span class="line">def parse_hook(cmd_):</span><br><span class="line">    print('[*] Parsing hook...')</span><br><span class="line">    script = session.create_script(cmd_)</span><br><span class="line">    script.on('message', on_message)</span><br><span class="line">    script.load()</span><br><span class="line"></span><br><span class="line"></span><br><span class="line">def on_message(message, _):</span><br><span class="line">    try:</span><br><span class="line">        if message:</span><br><span class="line">            if message['type'] == 'send':</span><br><span class="line">                result = "".join(chr(i) for i in message['payload'])</span><br><span class="line">                print(json.dumps(json.loads(result), indent=2, ensure_ascii=False))</span><br><span class="line">    except Exception as e:</span><br><span class="line">        print(e)</span><br><span class="line"></span><br><span class="line"></span><br><span class="line">if __name__ == '__main__':</span><br><span class="line">    try:</span><br><span class="line">        print('[*] Spawning ' + package)</span><br><span class="line">        pid = frida.get_usb_device().spawn(package)</span><br><span class="line">        session = frida.get_usb_device().attach(pid)</span><br><span class="line">        parse_hook(cmd)</span><br><span class="line">        frida.get_usb_device().resume(pid)</span><br><span class="line">        print('')</span><br><span class="line">        sys.stdin.read()</span><br><span class="line"></span><br><span class="line">    except KeyboardInterrupt:</span><br><span class="line">        sys.exit(0)</span><br><span class="line">    except Exception as e:</span><br><span class="line">        print(e)</span><br><span class="line"></span><br></pre></td></tr></tbody></table></figure><p>Now, in the directory where you saved steamguard.py, open Command Prompt by typing cmd in the address bar as before, and enter the following:</p><figure class="highlight plaintext"><table><tbody><tr><td class="gutter"><pre><span class="line">1</span><br></pre></td><td class="code"><pre><span class="line">python steamguard.py</span><br></pre></td></tr></tbody></table></figure><p>If you successfully get output similar to this:<br><img src="https://b3logfile.com/file/2023/11/image-Vv5rEmG.png" alt="Screenshot" loading="lazy"><br>the extraction was successful.</p><p>Copy the part between the curly braces highlighted in yellow, create a new .txt file, paste it in, save it, and change the .txt extension to .mafile. You’ll then have a token file that can be imported into other third-party software.</p><p>If you want to use a one-click confirmation script for the Steam web, just import the copied content directly.</p><p>This article was originally published on the Keylol forum: <a href="https://keylol.com/t900859-1-1">Steam Android emulator + Frida Python debugging token export tutorial - Platform Tools - Keylol</a></p>]]>
    </content>
    <id>https://shiquda.link/en/articles/2023/11/29/1701219538802.html</id>
    <link href="https://shiquda.link/en/articles/2023/11/29/1701219538802.html"/>
    <published>2023-11-29T00:58:59.000Z</published>
    <summary>Background
Exporting Steam token data is a real hassle these days.
https://keylol.com/t900854-1-1
(Source: Keylol)

Some veterans on the forum have already posted tutorials covering various methods, such as:

[ROOT ANDROID] How to export Steam 3.0 tokens
https://keylol.com/t854675-1-1
(Source: Keylo</summary>
    <title>How to Export Steam Tokens After the Redesign</title>
    <updated>2023-11-29T00:58:59.000Z</updated>
  </entry>
</feed>