Background
Exporting Steam token data is a real hassle these days.
https://keylol.com/t900854-1-1
(Source: Keylol)
Some veterans on the forum have already posted tutorials covering various methods, such as:
[ROOT ANDROID] How to export Steam 3.0 tokens
https://keylol.com/t854675-1-1
(Source: Keylol)
[Android] Tips for extracting token files from Steam app versions 3.0 and above
https://keylol.com/t901003-1-1
(Source: Keylol)
This article provides a fairly detailed tutorial on exporting tokens using an Android emulator + Frida Python debugging.
Pros: You don’t need a rooted phone; a computer alone is enough to export, and it’s relatively safer than some other methods.
Cons: It’s tedious, and the token has to be transferred to the emulator, which incurs a 2-day cooldown.
Prerequisites
This tutorial uses an Android emulator + ADB Frida debugging + Python scripts to export token data.
Before you begin:
- After the transfer, the token will live on the emulator, and the token on your original phone will stop working — you won’t be able to use the official client to scan-login, confirm trades, etc.
- After the transfer, there is a market cooldown of about two days.
Tools you’ll need:
- Python and the Frida library
- ADB debugging tools
- Android emulator (this tutorial uses LDPlayer)
- frida-server
Installing the Tools
Android Emulator
After installing the emulator, download and install the Steam client on it for later use.
To install the Steam client, simply drag the downloaded APK file into the emulator.
Installing and Configuring Python
If you’ve already installed Python and configured the environment variables, skip ahead to the Frida dependency installation section.
Install the Frida dependency:
1 | pip install frida frida-tools |
Installing ADB Debugging Tools
This tutorial uses a one-click installer script from GitHub.
If it prompts you to install .NET, just click Install.
Wait for the installation to finish, then open Command Prompt and enter the following:
1 | adb --version |
If you see output similar to the following, the installation is complete.
1 | Android Debug Bridge version 1.0.41 |
Starting the Debugging Process
Open Settings in the Android emulator and enable root access.
After enabling it, remember to restart the emulator as prompted.
After restarting, open the built-in Settings app in the emulator, go to About Tablet > Build Number, and tap it 7 times to enable Developer Mode.
Go back, enter System, expand Advanced, open Developer Options, find USB Debugging, and enable it.
Once enabled, enter the following in Command Prompt:
1 | adb devices |
If you see output similar to the following, the emulator is being detected properly.
Using LDPlayer as an example, enter the following in Command Prompt:
1 | adb connect 127.0.0.1:5555 |
title:Connection Ports for Other Emulators:
- NoxPlayer:
adb connect 127.0.0.1:62001 - MEmu:
adb connect 127.0.0.1:21503 - TTVM:
adb connect 127.0.0.1:6555 - Droid4X:
adb connect 127.0.0.1:53001 - NetEase MuMu:
adb connect 127.0.0.1:7555
In Command Prompt, enter:
1 | adb root |
Now navigate to the directory where you downloaded and extracted frida-server-16.1.3-android-x86_64 (if you downloaded a compressed archive from GitHub).
title:Architecture Note
LDPlayer uses the x86_64 architecture; other emulators may not, so choose the frida-server that matches your emulator’s architecture. You can download it from GitHub.
Type cmd in the address bar and press Enter to open Command Prompt in that directory, then enter the following three lines one by one:
1 | adb push frida-server-16.1.3-android-x86_64 /data/local/tmp/ |
1 | adb shell "chmod 755 /data/local/tmp/frida-server-16.1.3-android-x86_64" |
1 | adb shell "/data/local/tmp/frida-server-16.1.3-android-x86_64 &" |
After that, open a new Command Prompt window and enter:
1 | frida-ps -U |
If you see output similar to the following, the connection was successful.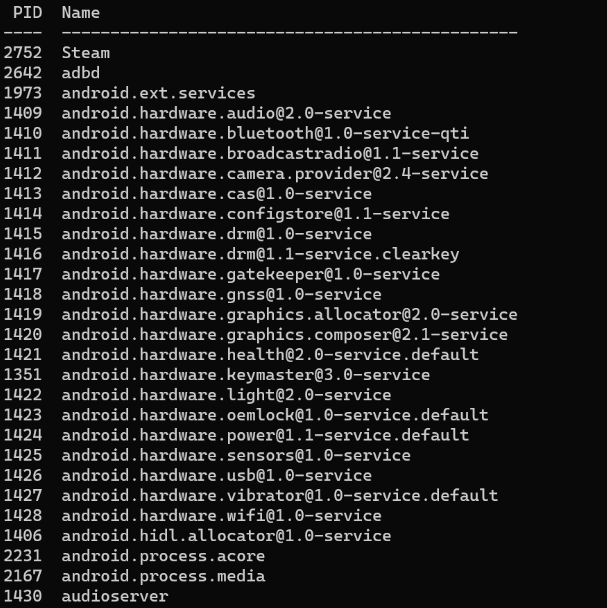
Open the Steam mobile app, sign in to the account whose token you want to extract, then tap Add Authenticator in the middle of the bottom navigation bar, and tap Restore Authenticator (if you already have a token).
Accept the SMS verification code. If it asks you to write down a recovery code, that means the token has been transferred to the emulator.
Next, run the steamguard.py script.
1 | import json |
Now, in the directory where you saved steamguard.py, open Command Prompt by typing cmd in the address bar as before, and enter the following:
1 | python steamguard.py |
If you successfully get output similar to this: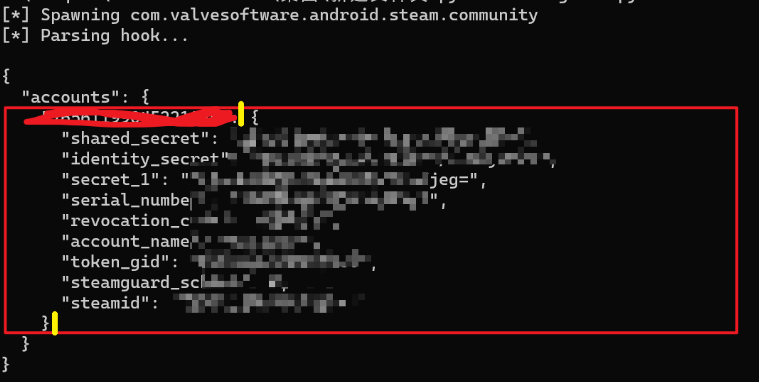
the extraction was successful.
Copy the part between the curly braces highlighted in yellow, create a new .txt file, paste it in, save it, and change the .txt extension to .mafile. You’ll then have a token file that can be imported into other third-party software.
If you want to use a one-click confirmation script for the Steam web, just import the copied content directly.
This article was originally published on the Keylol forum: Steam Android emulator + Frida Python debugging token export tutorial - Platform Tools - Keylol